RxSwift and RxCocoa
Bài đăng này đã không được cập nhật trong 4 năm

Today we're gonna explore another library for working with FRP. RxSwift's companion RxCocoa.
RxCocoa makes common properties of UI more magical REACTIVE.

When you work with RxCocoa your code become significantly shorter, and it improves application performance. The best way to learn somethings is learning by practice, and today we'll make the list of employees.
What will we do?
App will displays a list of existing employees. When "+" button will have clicked the ViewController with new employee parametrs become active. This ViewController will contain many different types of UI elements for better understand how to work with RxCocoa. Ok, stop talking and let's do it!
Non-reactive part
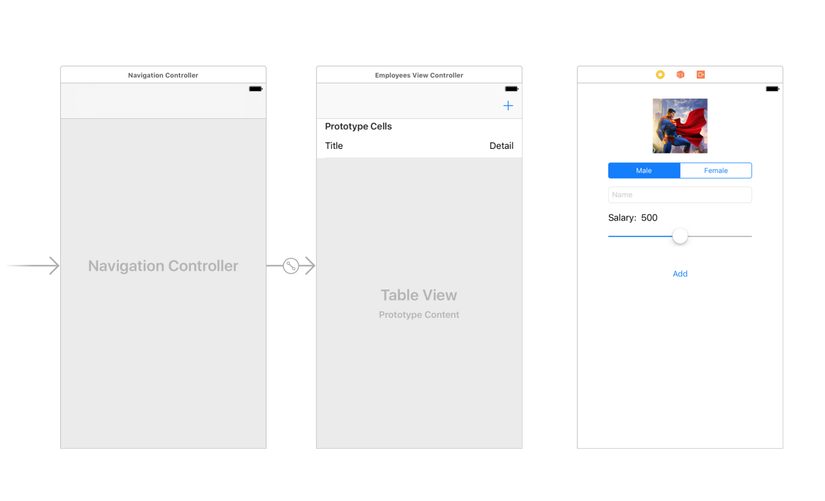
At first we need to create two ViewControllers. First ViewController contains TableView and "+" button
// EmployeesViewController.swift
@IBOutlet private weak var tableView: UITableView!
@IBOutlet private weak var button: UIBarButtonItem!
Second ViewController contains this UI elements:
// AddEmployeeViewController.swift
@IBOutlet private weak var imageView: UIImageView!
@IBOutlet private weak var segmentedControl: UISegmentedControl!
@IBOutlet private weak var textField: UITextField!
@IBOutlet private weak var label: UILabel!
@IBOutlet private weak var slider: UISlider!
@IBOutlet private weak var button: UIButton!
Storyboard looks like this:
.rx
Let's start from part of adding an employee. Our first step is to transform UI elements to Observables:
// AddEmployeeViewController.swift
private var nameObservable: Observable<String> {
    return self.textField
        .rx // 1
        .text // 2.1
        .map { text in
            return text ?? "" // 3
    }
}

private var salaryObservable: Observable<String> {
    return self.slider
        .rx // 1
        .value // 2.2
        .map{ value -> String in
            "\(Int(value * 2000)) $" // 3
        }
        .shareReplay(1) // 4
}

private var genderObservable: Observable<Int> {
    return self.segmentedControl
        .rx // 1
        .selectedSegmentIndex // 2.3
        .asObservable() // 5
}
- Function
.rxprovides access to reactive properties - Get UI property and type of this property is
ControlProperty<type>. It used for binding, but It also can be used like Observable 2.1.ControlProperty<String>2.2.ControlProperty<Float>2.3.ControlProperty<Int> .mapfunction conducts operations on the result of Observable and gives changed results. Result can be changed to a different type or just slightly modified to parametr of the same type.- About
shareReplay(n)you can read here asObservable()function makesObservable<type>fromControlProperty<type>
.bindTo
So move on to the most interesting and magical part of RxCocoa.
 That's
 .bindTo function. Observable have this function for send result directly to ControlProperty. And it's makes our coding much essayer and faster, and program becomes more productive!
Let's do it.
// AddEmployeeViewController.swift
private let images = [UIImage(named: "superman"), UIImage(named: "supergirl")]
private let disposeBag = DisposeBag()
...
private func setupGenderBinding() {
     self.genderObservable
    .map{ index -> UIImage in
        self.images[index]!  // 1
    }
    .bindTo( self.imageView.rx.image) // 2
    .addDisposableTo(self.disposeBag) // 3
}

private func setupSalaryBinding() {
    self.salaryObservable
    .bindTo( self.label.rx.text) // 2
    .addDisposableTo(self.disposeBag) // 3
}
- Result of
self.genderObservableisInttype, but we needUIImagefor set avatar toUIImageView. In this case Observable events must sendUIImage. For make it we use.mapfunction. - Here is magic start! We set parametr to
UIImageViewdirectly from Observable - About
Disposableyou can read here
Let's back to implementation of first controller with a list of employees.
// EmployeesViewController.swift
private var employees: Variable<[Employee]>?
private let disposeBag = DisposeBag()
...
private func setupButtonBinding() {
    self.button
        .rx
        .tap // 1
        .asObservable()
        .subscribe(onNext: {
            let controllerName = String(describing: AddEmployeeViewController.self)
            let storyboard = UIStoryboard(name: "Main", bundle: nil)
            let viewController = storyboard.instantiateViewController(withIdentifier: controllerName) as! AddEmployeeViewController
            viewController.employees = self.employees // 2
            self.navigationController?.pushViewController(viewController, animated: true)
        }).addDisposableTo(self.disposeBag)
}
- With
.rxfunction it's possible to track not only parameters of UI, but also UI events. For example buttons tap - Send the Variable to the next controller to exchange data about employees
// AddEmployeeViewController.swift
private func setupButtonObserver() {
    let params = Observable.combineLatest(self.nameObservable, self.genderObservable, self.salaryObservable) {($0, $1, $2)} // 1
    self.button
        .rx
        .tap
        .asObservable()
        .withLatestFrom(params) // 2
        .subscribe(onNext: { name, gender, salary in
            let employee = Employee(name, gender, salary)
            self.employees?.value.append(employee) // 3
            _ = self.navigationController?.popViewController(animated: true)
        })
        .addDisposableTo(self.disposeBag)
}
Observable.combineLatesthelps to make one Observable from few(max: 8) Observables.withLatestFromwhen Observable emit, to his result add result parametrs from other Observable.tapevents sendsVoidresult to subscriber, and there are only result fromparams- Add new employee to the array and close current controller
The final touch for the end of the project:
// EmployeesViewController.swift
private func setupTableViewBinding() {
    self.employees?
        .asObservable()
        .bindTo(self.tableView.rx.items(cellIdentifier: "cell")) // 1
        { row, element, cell in // 2
            cell.textLabel?.text = element.name
            cell.detailTextLabel?.text = element.salary
            let menColor = UIColor.blue.withAlphaComponent(0.1)
            let womenColor = UIColor.blue.withAlphaComponent(0.1)
            cell.backgroundColor = element.gender == 0 ? menColor : womenColor
        }.addDisposableTo(self.disposeBag)
}
1..bindTo function can be called from array to UI array property. Call .bindTo function from self.employees array and set it to self.tableView.rx.items property.
2. Implementation of binding. Get row, element, cell and make some operation with them to init TableViewCells
RxSwift and RxCocoa greatly facilitate the code writing process. In common programming this project will take many lines of code and need initialization of delgate functions and a lot of things that avoided with ReactiveX.
 You can download this project here.
Good luck! Be reactive!
You can download this project here.
Good luck! Be reactive!
All rights reserved
