Ruby_Connect Database
Bài đăng này đã không được cập nhật trong 4 năm
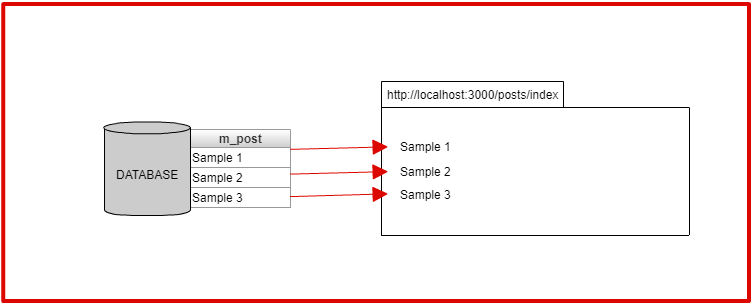
Database là nơi để lưu dữ liệu. Trong ví dụ lần này mình sẽ lưu bài viết (post) vào trong database. Trang post list lấy nội dung bài viết từ trong database ra rồi hiển thị từng cái lên.
Tạo trang post list.
Mục đích cuối cùng là chúng ta sẽ hiển thị nội dung lưu tữ trong database lên, nhưng trước tiên chúng ta sẽ tạo trạng post list dạng ghi nội dung cố định trực tiếp trong HTML.
Tạo posts controller
Lần này chúng ta sẽ tạo page liên quan đến 「Post」nên cần tạo posts controller mới. Thực ra thì cũng có thể tạo bằng home controller đã tạo ở bài trước nhưng mà vì liên quan đến post nên tạo riêng controller cho post thì tốt hơn.
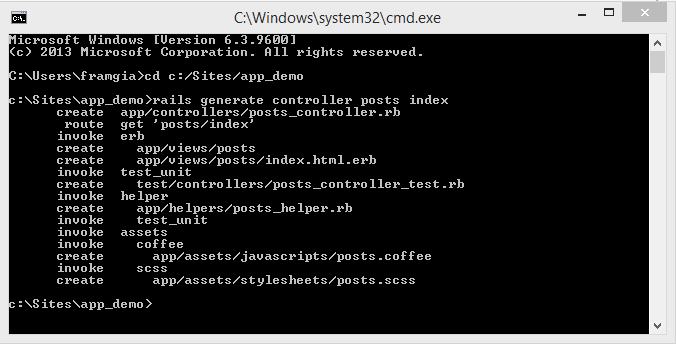
Bước 1: Sử dụng command rails generate controller để tạo. Có thể viết tắt 「rails generate controller」là「rails g controller」
rails generate controller posts index
 Bước 2: Confirm file
 config/routes.rb
Rails.application.routes.draw do
  get "posts/index" => "posts#index"

  get "/" => "home#top"
  get "about" => "home#about"
end
Bước 3: Confirm action được tạo ra trong controller app/controllers/posts_controller.rb
class PostsController < ApplicationController
  def index
  end
end
Bước 4: Confirm view được tạo ra, mở file app/views/posts/index.html.erb và sửa nội dung thành như dưới
<header>
  <div class="header-logo">
    <a href="/">App_Demo</a>
  </div>
  <ul class="header-menus">
    <li>
      <a href="/about">About</a>
    </li>
  </ul>
</header>

<div class="main posts-index">
  <div class="container">
    <div class="posts-index-item">
      Sample 1
    </div>
    <div class="posts-index-item">
      Sample 2
    </div>
        <div class="posts-index-item">
      Sample 3
    </div>
  </div>
</div>
Bước 5: Apply CSS Mở file app/assets/stylesheets/posts.scss và thay bằng nội dung như bên dưới
/* posts/index ================================ */
.posts-index-item {
  padding: 20px 30px;
  background-color: white;
  overflow: hidden;
  box-shadow: 0 2px 6px #c1ced7;
}

.post-left img {
  width: 50px;
  height: 50px;
  border-radius: 40%;
  box-shadow: 0 2px 6px #c1ced7;
  object-fit: cover;
}

.post-user-name a {
  font-weight: 600;
}

.post-user-name a:hover {
  color: #3ecdc6;
}

.post-left {
  float: left;
  width: 10%;
}

.post-right {
  float: left;
  width: 90%;
  padding-left: 25px;
  text-align: left;
}

/* posts/show ================================ */
.posts-show form {
  display: inline;
}

.posts-show-item {
  padding: 30px;
  background-color: white;
  box-shadow: 0 2px 6px #c1ced7;
  overflow: hidden;
}

.posts-show-item img {
  width: 60px;
  height: 60px;
  border-radius: 40%;
  box-shadow: 0 2px 6px #c1ced7;
  vertical-align: middle;
  object-fit: cover;
}

.posts-show-item .post-user-name a {
  vertical-align: middle;
  font-size: 24px;
  margin-left: 15px;
}

.posts-show-item p {
  font-size: 24px;
  margin: 20px 0;
}

.post-time {
  color: #8899a6;
  margin-bottom: 10px;
}

.post-menus {
  float: right;
}

.post-menus a, .post-menus input {
  color: #8899a6;
  text-decoration: underline;
  font-size: 14px;
}

/* posts/new ================================ */
.posts-new textarea {
  font-size: 20px;
  padding: 10px;
  min-height: 140px;
  border: 1px solid rgb(216, 218, 223);
  resize: none;
}

.posts-new textarea::-webkit-input-placeholder {
  font-size: 24px;
  opacity: 0.5;
}
Đến đây chúng ta đã tạo được page posts list rồi. Nhưng mục tiêu của chúng ta ko phải là viết nội dung HTML trực tiếp mà là xử lý data. Tiếp theo chúng ta sẽ tìm hiểu về phương pháp hiển thị sử dụng database.
Sử dụng biến
Bằng HTML ban đầu thì không thể connect với database được. Trước tiên ta cần truyền nội dung post vào biến như hình bên dưới.
 So sánh <% %>và<%= %>
Ở trong cả 2 thì đều có thể viết code Ruby.
Trường hợp <% %> thì không hiển thị gì cả nên chỉ dùng để định nghĩa tham số. Ngược lại, <%= %> thì hiển thị nội dung trong code Ruby nên dùng trong trường hợp muốn hiển thị giá trị của tham số trong page thực tế.
Ví dụ:
So sánh <% %>và<%= %>
Ở trong cả 2 thì đều có thể viết code Ruby.
Trường hợp <% %> thì không hiển thị gì cả nên chỉ dùng để định nghĩa tham số. Ngược lại, <%= %> thì hiển thị nội dung trong code Ruby nên dùng trong trường hợp muốn hiển thị giá trị của tham số trong page thực tế.
Ví dụ:
<% language = "English" %>
Study <%= language %> # Hiển thị StudyEnglish
Study <% language %> # Hiển thị Study
Áp dụng vào posts/index.html.erb
<% post1 = "Sample 1" %>
<%= post1 %>
<% post2 = "Sample 2" %>
<%= post2 %>
<% post3 = "Sample 3" %>
<%= post3 %>
Dùng each để hiển thị
Để hiển thị 1 danh sách dài nếu cứ định nghĩa từng cái rồi hiển thị lên thì rất vất vả, để giải quyết thì ta sẽ: 1/ Định nghĩa 1 mảng array là tâp hợp các giá trị của danh sách muốn hiển thị lên posts/index.html.erb
<%
    posts = [
        "Sample 1",
        "Sample 2"
    ]
%>
<div class="main posts-index">
...
※ Vì là array nên chú ý đừng quên phân cách giữa các phần tử bằng dấu phẩy 「,」 2/ Sử dụng each để lấy ra lần lượt từng phần tử của mảng posts/index.html.erb
<%
    posts = [
        "Sample 1",
        "Sample 2"
        ...
    ]
%>
...

<% posts.each do |post| %>
	<div class="main posts-index">
    	<%= post %>
    </div>

<% end %>
Định nghĩa biến bằng action
Biến sử dụng trong view thì chúng ta hãy định nghĩa ở trong action.
Bên dưới, trong file posts_controller.rb mình định nghĩa biến @posts ở trong「def index」và「end」 Thì có thể sử dụng biến này trong index.html.erb.
def index
    @posts = [
        "Sample 1",
        "Sample 2"
        ...
    ]
 end
Bình thường thì biến được định nghĩa trong action thì không thể sử dụng được ở trong view. Nhưng bằng việc đặt tên biến bắt đầu bằng @ thì sẽ hiểu đây là biến đặc biệt và có thể sử dụng được trong view. Vì thế, đừng quên gắn 「@」ở trước tên biến.
Chuẩn bị database
Chuẩn bị migration file
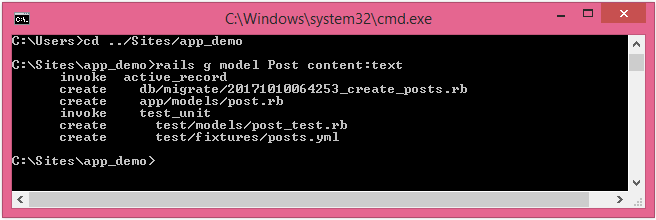
Trước tiên, chúng ta hãy tạo file dùng để chỉ thị cập nhật database (còn được gọi là migration file) bằng lệnh rails g model Post content:text .
「text」có nghĩa là kiểu string, định nghĩa có thể đưa data dạng gì vào column content.
Khi chạy lệnh trên sẽ tạo được file migration trong folder db/migrate.
Phản ánh update database
Sử dụng file migration đã tạo để phản ánh cập nhật trong database bằng lệnh bên dưới
rails db:migrate
Khi tạo table thì tự động sinh ra 3 columns: id, created_at, updated_at
※Khi chưa tạo table thì sẽ hiển thị lỗi migration ActiveRecord::PendingMigrationError.
Confirm model
Post model
Bằng lệnhrails g model ở trên thì đã tạo ra file định nghĩa Post model「post.rb」trong folder app/models. Post class kế thừa ApplicationRecord class.
class Post < ApplicationRecord
end
Tóm tắt về lệnh rails g model
Một lần nữa, chúng ta xem lại lệnh 「rails g model」. Phần 「Post」trong 「rails g model Post ...」thực tế là chỉ định tên model. Bằng lệnh này thì sẽ tạo ra 2 file bên dưới:
・File định nghĩa model trong folder app/models
・File migration trong folder db/migrate
Sử dụng rails console
Sau khi đã tạo được table thì chúng ta sẽ sử dụng rails console để tạo data. Trên terminal, chạy lệnh「rails console」thì sẽ khởi động được console. Để tắt thì chạy lệnh「quit」. Trong console cũng có thể định nghĩa biến. Biến đã định nghĩa thì có thể tiếp tục sử dụng cho đến khi kết thúc console bằng lệnh quit.
New method
Sử dụng rails console, từ Posts model (Post class) chúng ta hãy tạo Post instance bằng cách sử dụng new method. Ví dụ: Tạo Post instance content là 「Sample 1」
$ rails console
>post = Post.new(content: "Sample 1")
Save method
Lưu Post instance đã tạo vào posts table thì chúng ta sử dụng save method. Vì Post model kế thừa ApplicationRecord nên ta có thể sử dụng được save method.
$ rails console
> post1 = Post.new(content: "Sample 1")
>post1.save
> post2 = Post.new(content: "Sample 2")
>post2.save
| id | content | created_at | updated_at |
|---|---|---|---|
| 1 | Sample 1 | 2017/10/10 19:30:36 | 2017/10/10 19:30:36 |
| 2 | Sample 2 | 2017/10/10 19:33:13 | 2017/10/10 19:33:13 |
Update method
Data sau khi đã save thì chúng ta cũng có thể updale lại bằng update method.
$ rails console
> post1 = Post.find(1)
>post1.update(content: "Sample update")
Khi thực hiện lệnh trên thì content của id =1 sẽ được update từ "Sample 1" thành "Sample Update)
Get data từ trong table
Get một data
Lấy data đầu tiên bằng 「Post.first」
$ rails console
> post = Post.first
>post.content # Hiển thị "Sample 1"
Get toàn bộ data
Có thể lấy toàn bộ data bằng「Post.all」, lấy từng phần tử của mảng bằng「Post.all[i]」
$ rails console
> posts=Post.all
>posts[0].content # Hiển thị  "Sample 1"
>posts[1].content # Hiển thị  "Sample 2"
>Post.all[0] # Hiển thị  "Sample 1"
Demo
Controller
.../controllers/posts_controller.rb
class PostsController < ApplicationController
  def index
   @posts = Post.all
  end
end
View
views/posts/index.html.erb
<header>
  <div class="header-logo">
    <a href="/">App Demo</a>
  </div>
  <ul class="header-menus">
    <li>
      <a href="/about">About</a>
    </li>
  </ul>
</header>

<div class="main posts-index">
  <div class="container">
    <% @posts.each do |post| %>
      <div class="posts-index-item">
        <%= post.content %>
      </div>
    <% end %>
  </div>
</div>
Confirm trên trình duyệt
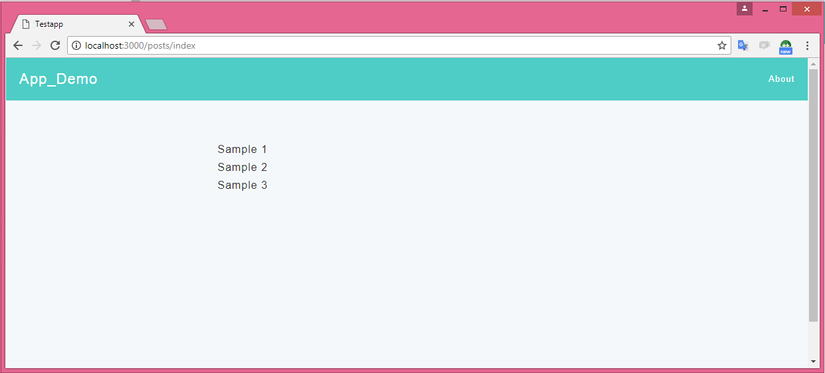
Access vào「localhost:3000/posts/index」và confirm kết quả nội dung content đã lưu trong database được lấy ra và hiển thị trên trang Posts list.
Thêm post mới
Bạn có thể sử dụng console để add thêm post mới vào database. Rồi load lại「localhost:3000/posts/index」để check nội dung hiển thị trên trình duyệt.
Refer bài trước https://viblo.asia/p/ruby-cai-dat-ruby-on-railstao-du-an-dau-tien-Eb85oEdmZ2G
All rights reserved
