Route nâng cao dành cho developer
Bài đăng này đã không được cập nhật trong 7 năm
0. Mở đầu:
Chắc hẳn mọi người tìm hiểu về Rails đều biết đến một thuật ngữ là Route. Rails route giúp nhận ra được URLs và dispatch chúng đến các controller action. Có thể coi như Route như một dạng đường dẫn bên trong project, để có thể dẫn lối giữa các model, controller, view.
1. Cơ bản
Một chút thông tin cơ bản, Routes được defined trong config/routes.rb. Họ thường define thành các group liên quan, và sử dụng resources methods
Ví dụ:
resources :users tạo ra 7 routes, để mapping các action của UsersController:
get '/users', to: 'users#index'
post '/users', to: 'users#creat
get '/users/new', to: 'users#new'
get '/users/:id/edit', to: 'users#edit'
get '/users/:id', to: 'users#show'
patch/put '/users/:id', to: 'users#update'
delete '/users/:id', to: 'users#destroy'
Trong file app/controllers/users_controller.rb sẽ được gen ra như sau:
class UsersController < ApplicationController
 def index
 end

 def create
 end

 end
Ngoài ra, chúng ta có thể limit các action tùy thuộc vào nhu cầu, vừa để dễ quản lý và giảm bớt những action thừa với only or except:
resources :users, only: [:show]
resources :users, except: [:show, :index]
Để có thể show được toàn bộ routes thì chúng ta có thể sử dụng câu lệnh sau
Version < 5.0
$ rake routes
Version ≥ 5.0
$ rake routes
# OR
$ rails routes
users GET /users(.:format) users#index

POST /users(.:format) users#create

new_user GET /users/new(.:format) users#new

edit_user GET /users/:id/edit(.:format) users#edit

user GET /users/:id(.:format) users#show

PATCH /users/:id(.:format) users#update

PUT /users/:id(.:format) users#update

DELETE /users/:id(.:format) users#destroy
Để tìm theo controller
Version < 5.0
$ rake routes -c static_pages
static_pages_home GET /static_pages/home(.:format) static_pages#home
static_pages_help GET /static_pages/help(.:format) static_pages#help
Version ≥ 5.0
$ rake routes -c static_pages
static_pages_home GET /static_pages/home(.:format) static_pages#home
static_pages_help GET /static_pages/help(.:format) static_pages#help
# OR
$ rails routes -c static_pages
static_pages_home GET /static_pages/home(.:format) static_pages#home
static_pages_help GET /static_pages/help(.:format) static_pages#help
Chúng ta có thể search theo -g option.
Version < 5.0
$ rake routes -g new_user # Matches helper method
$ rake routes -g POST # Matches HTTP Verb POST
Version ≥ 5.0
$ rake routes -g new_user # Matches helper method
$ rake routes -g POST # Matches HTTP Verb POST
# OR
$ rails routes -g new_user # Matches helper method
$ rails routes -g POST # Matches HTTP Verb POST
2. Nâng cao
Section 2.1: Constraints
Bạn có filter những routes đang tồn tại bằng cách sử dụng constraints Có một vài loại constrants sau:
Ví dụ như 1 requested based constraint cho phép một địa chỉ IP nhất định có thể access vào route:
constraints(ip: /127\.0\.0\.1$/) do
 get 'route', to: "controller#action"
end
Nếu bạn muốn sử dụng advanced constraints và tạo ra một class riêng để wrap toàn bộ logic
# lib/api_version_constraint.rb
class ApiVersionConstraint
 def initialize(version:, default:)
 @version = version
 @default = default
 end
 def version_header
 "application/vnd.my-app.v#{@version}"
 end
 def matches?(request)
 @default || request.headers["Accept"].include?(version_header)
 end
end

# config/routes.rb
require "api_version_constraint"
Rails.application.routes.draw do
 namespace :v1, constraints: ApiVersionConstraint.new(version: 1, default: true) do
 resources :users # Will route to app/controllers/v1/users_controller.rb
 end
 namespace :v2, constraints: ApiVersionConstraint.new(version: 2) do
 resources :users # Will route to app/controllers/v2/users_controller.rb
 end
end
Một form nhiều button submit
Bạn có sử dụng value của submit_tags của form như là một constraint để route đến một action khác. Ví dụ như bạn có một form với nhiều nút submit (preview và submit), bạn có thể capture constraint này trực tiếp trong routes.rb thay vì viết javascript để thay đổi form destionation URL.
You can also use the value of the submit tags of a form as a constraint to route to a different action. If you have a
form with multiple submit buttons (eg "preview" and "submit"), you could capture this constraint directly in your
routes.rb, instead of writing javascript to change the form destination URL. Sử dụng commit_param_routing gem, bạn có thể tạo ra nhiều điều với submit_tag
# app/views/orders/mass_order.html.erb
<%= form_for(@orders, url: mass_create_order_path do |f| %>

<!-- Big form here -->
 <%= submit_tag "Preview" %>
 <%= submit_tag "Submit" %>
 # => <input name="commit" type="submit" value="Preview" />
 # => <input name="commit" type="submit" value="Submit" />
 ...
<% end %>
# config/routes.rb
resources :orders do
  post 'mass_order', on: :collection, as: 'mass_order',
   constraints: CommitParamRouting.new('Submit'), action: 'mass_create' # when the user presses
"submit"
   post 'mass_order', on: :collection,
     constraints: CommitParamRouting.new('Preview'), action: 'mass_create_preview' # when the user
presses "preview"
end
Section 2.2: Scoping routes
Rails cung cấp một số cách để có thể cấu trúc được các route của chúng ta một cách gọn gàng nhất
Scope by URL:
scope 'admin' do
 get 'dashboard', to: 'administration#dashboard'
 resources 'employees'
end
get '/admin/dashboard', to: 'administration#dashboard'
post '/admin/employees', to: 'employees#create'
get '/admin/employees/new', to: 'employees#new'
get '/admin/employees/:id/edit', to: 'employees#edit'
get '/admin/employees/:id', to: 'employees#show'
patch/put '/admin/employees/:id', to: 'employees#update'
delete '/admin/employees/:id', to: 'employees#destroy'
Như trên, ở bên server team, sẽ tạo ra một subfolder để lưu trữ các views riêng của admin để phân biệt với user views
Scope by module
scope module: :admin do
 get 'dashboard', to: 'administration#dashboard'
end
module sẽ tìm controller files dưới subfolder với tên tương ứng
get '/dashboard', to: 'admin/administration#dashboard'
Bạn có thể thay đổi path helpers prefix bằng cách thêm as paremeter
scope 'admin', as: :administration do
  get 'dashboard'
end
# => administration_dashboard_path
Rails cung cấp một cách khác rất thuận tiện để làm mọi thứ trên cùng một lúc, đó là sử dung namespace method.
namespace :admin do
end
scope 'admin', module: :admin, as: :admin
Scope by controller
scope controller: :management do
 get 'dashboard'
 get 'performance'
end
get '/dashboard', to: 'management#dashboard'
get '/performance', to: 'management#performance'
Shallow Nesting
Resource routes chấp nhận một :shallow option, để shorten URLs. Resources không thể nested hơn 1 level. Do đó, một cách để trách việc này đó là tạo ra các shallow routes. Mục đích là để bỏ qua parent collection URL không cần thiết. Có vẻ hơi khó hiểu, và hơi khó giải thích, mọi người có thể xem ví dụ để hiểu rõ hơn. Có 2 otions cho scope được custom nhờ shallow routes:
:shallow_path: Prefixes member paths with a specified parameter (mình search định nghĩa trên mạng và cảm thấy dịch thì nó không sát nghĩa)
scope shallow_path: "sekret" do
 resources :articles do
 resources :comments, shallow: true
 end
end
:shallow_prefix: Add specified parameters to named helpers (mình search định nghĩa trên mạng và cảm thấy dịch thì nó không sát nghĩa)
scope shallow_prefix: "sekret" do
 resources :articles do
 resources :comments, shallow: true
 end
end
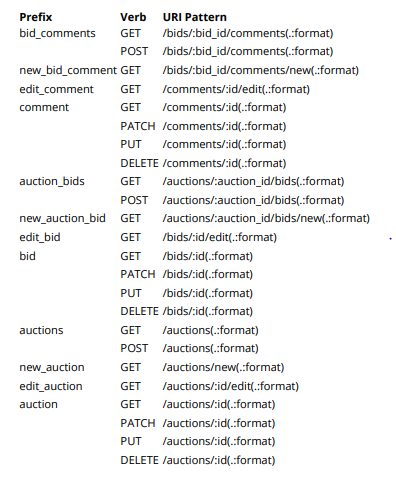
resources :auctions, shallow: true do
 resources :bids do
 resources :comments
 end
end
thay thế bằng block
resources :auctions do
 shallow do
 resources :bids do
 resources :comments
 end
end
end
Và kết quả là:
Section 2.3: Concerns
Để tránh lặp những nested routes, concerns cung cấp một cách tuyệt vời để có thể sharing common resources một cách hữu dụng, và nói chính xác là có thể tái sử dụng (reuseable)
Để tạo một concern trong file routes.rb thì method sẽ được thể hiện như sau
concern :commentable do
 resources :comments
end
cách sử dụng như sau:
resource :page, concerns: :commentable
tương đương với nested routes thì như sau
resource :page do
 resource :comments
end
Kết quả của chúng ta sẽ như sau
/pages/#{page_id}/comments
/pages/#{page_id}/comments/#{comment_id}
Để làm cho concern trở nên có ý nghĩa, thì nó cần được sử dung ở nhiều nơi, và có rất nhiều cách gọi nó.
resource :post, concerns: %i(commentable)
resource :blog do
 concerns :commentable
end
Section 2.4: Root route
Cái này thì chắc hẳn ai cũng biết, root routes dùng để chỉ đường dẫn của homepage
# config/routes.rb
Rails.application.routes.draw do
 root "application#index"
 # equivalent to:
 # get "/", "application#index"
end
# app/controllers/application_controller.rb
class ApplicationController < ActionController::Base
 def index
 render "homepage"
 end
end
Và trong terminal, rake routes (rails routes trong Rails 5) ta có:
root GET / application#index
Bởi vì homepage cực kì quan trọng do đó routes được ưu tiên theo thứ tự chúng xuất hiện và
root routes được xuất hiện đầu tiên trong file.
Section 2.5: Split routes into multiple files
Nếu một file routes quá lớn, đặc biệt là trong các dự án to, thì việc cần chia nhỏ file ra và include chúng vào 1 file to là rất quan trọng, Vừa đảm bảo được việc quản lý, dễ kiểm tra, fix bug, thì nó còn là một cách để chúng ta có thể phân loại routes theo file với require_relative method:
config/routes.rb:
YourAppName::Application.routes.draw do
 require_relative 'routes/admin_routes'
 require_relative 'routes/sidekiq_routes'
 require_relative 'routes/api_routes'
 require_relative 'routes/your_app_routes'
end
config/routes/api_routes.rb:
YourAppName::Application.routes.draw do
 namespace :api do
 # ...
 end
end
Section 2.6: Additional RESTful actions
resources :photos do member do get 'preview' end collection do get 'dashboard' end end
get '/photos/:id/preview', to: 'photos#preview'
get '/photos/dashboards', to: 'photos#dashboard'
Nếu viết trong một dòng thì bạn có thể sử dụng như sau
resources :photos do get 'preview', on: :member get 'dashboard', on: :collection end
Bạn có thể thêm một action vào /newpath: You can also add an action to the /new path:
resources :photos do get 'preview', on: :new end
get '/photos/new/preview', to: 'photos#preview'
Luôn luôn nhớ rằng khi add thêm những RESTful routes của riêng bạn thì đừng quên những resource khác nhé
Section 2.7: Nested Routes
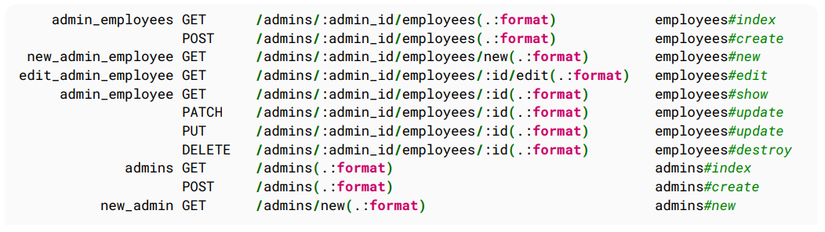
Nếu bạn một tạo một nested routes trong routes.rb file thì cú pháp như sau
resources :admins do
 resources :employees
end
Kết quả như sau:
Section 2.8: Redirection
Bạn có thể thực redirection trong Rails routes như sau:
Version ≥ 4.0
get '/stories', to: redirect('/posts')
Version < 4.0
match "/abc" => redirect("http://example.com/abc")
You can also redirect all unknown routes to a given path:
Version ≥ 4.0
match '*path' => redirect('/'), via: :get
#or
get '*path' => redirect('/')
Version < 4.0
match '*path' => redirect('/')
Section 2.9: Scope available locales
Nếu app của bạn sử dụng đa ngôn ngữ thì bạn thường xuyên phải show current locale trên URL
scope '/(:locale)', locale: /#{I18n.available_locales.join('|')}/ do
 root 'example#root'
 # other routes
end
Root của bạn sẽ được access dựa theo locales đã được define trong I18n.available_locales.
4. Kết thúc
Trong bài viết này mình phần lớn sử dụng ví dụ, để thể hiện hơn là giải thích cặn kẽ, một phần vì bài viết này nhắm đến những bạn dev đã từng có thời gian làm việc nhất định với Rails, và đây như một dạng note thêm những thông tin để các bạn có thể có được keyword để tìm tòi sâu hơn nếu với các đề mục này của mình chưa đủ để giải đáp thắc mắc của các bạn. Hy vọng bài viết này sẽ có đem đến cho các bạn một cái nhìn đầy đủ vầ sâu sắc về Route. Không chỉ với 9 sessions trên mà còn rất nhiều thứ khác nữa, nhưng vì thời lượng bài cũng tương đối dài, nên mình xin phép dừng lại ở đây, với những tips quan trọng nhất, và để các bạn tránh bị lan man với một lượng kiến thức khá lớn. Mình sẽ trở lại với một baifa viết về database, các bạn nhớ đón chờ nhé. Thanks
All rights reserved
