RESPONSIVE filemanager - Chọn file upload từ thư mục trên server
Bài đăng này đã không được cập nhật trong 7 năm
Mở đầu
Chào các bạn, hôm nay mình sẽ trở lại với series giới thiệu những thư viện hay và hữu ích mà mình dùng trong quá trình làm việc. Và ứng viên hôm nay là RESPONSIVE filemanager. Đây là một thư viện hỗ trợ chúng ta chọn file trực tiếp từ thư mục trên server hoặc upload thêm file vào thư mục đó. Ví dụ dễ thấy nhất là trình chèn ảnh của Viblo, ta có thể chọn insert lại các ảnh mà ta từng upload lên. Hoặc đơn giản bây giờ mình đặt ra một ví dụ như sau: chức năng upload avatar - bình thường mình sẽ chọn file từ máy local và upload lên server nhưng bây giờ với thư viện này sẽ hỗ trợ bạn chỉ định 1 thư mục trên server (ví dụ thư mục chứa ảnh của người dùng) và chọn ảnh từ thư mục đó. Khi chọn thì ảnh đã có link sẵn rồi ko cần thực hiện quá trình upload nữa... đại khái là vậy 
Cài đặt
Để cài đặt thư viện này trước hết ta tải về source code thư viện ở đây.
Tải về và giải nén ra thư mục filemanager. Các bước cài đặt như sau:
-
Upload thư mục filemanager lên public folder của project (bạn dùng framework gì thì upload nó vào folder tương ứng, ví dụ với laravel là
publiclàm sao truy cập các file trong thư mục filemanager được bằng url -
Tạo thư mục mà bạn muốn chứa các file tải lên của bạn và cấp quyền thư mục đó là 766.
-
Chỉnh sửa file config ở đường dẫn
filemanager/config/config.php. Trong file config này sẽ cho phép bạn chỉ định thư mục gốc chứa các file và folder trên server. Ví dụ cơ bản như sau:$config = [ // ... /* |-------------------------------------------------------------------------- | path from base_url to base of upload folder |-------------------------------------------------------------------------- | | with start and final / | */ 'upload_dir' => '/storage/uploads/', /* |-------------------------------------------------------------------------- | relative path from filemanager folder to upload folder |-------------------------------------------------------------------------- | | with final / | */ 'current_path' => '../storage/uploads/', /* |-------------------------------------------------------------------------- | relative path from filemanager folder to thumbs folder |-------------------------------------------------------------------------- | | with final / | DO NOT put inside upload folder | */ 'thumbs_base_path' => '../storage/thumbs/', // ... ];Ngoài ra còn nhiều tùy chỉnh khác bạn có thể xem trong file config.
-
Như vậy là bạn đã hoàn thành cài đặt filemanager lên server. Chú ý: Nếu bạn không thấy ảnh xem trước thì bạn cần cấp quyền cho thư mục thumbs đã cài đặt trong file config
Cách sử dụng
Để sử dụng filemanager trên server ta có thể sử dụng bằng nhiều kiểu khác nhau ví dụ như: Dùng trong các thư viện editor Như TinyMCE hay CKEditor hoặc dùng trong ASP.NET MVC, Joomla... hoặc dùng thay input file bình thường.
Sử dụng với TinyMCE
Để sử dụng với Tiny MCE ta config như sau:
tinymce.init({
    selector: "textarea",theme: "modern",width: 680,height: 300,
    plugins: [
         "advlist autolink link image lists charmap print preview hr anchor pagebreak",
         "searchreplace wordcount visualblocks visualchars insertdatetime media nonbreaking",
         "table contextmenu directionality emoticons paste textcolor responsivefilemanager code"
   ],
   toolbar1: "undo redo | bold italic underline | alignleft aligncenter alignright alignjustify | bullist numlist outdent indent | styleselect",
   toolbar2: "| responsivefilemanager | link unlink anchor | image media | forecolor backcolor  | print preview code ",
   image_advtab: true ,

   external_filemanager_path:"/filemanager/",
   filemanager_title:"Responsive Filemanager" ,
   external_plugins: { "filemanager" : "/filemanager/plugin.min.js"}
 });
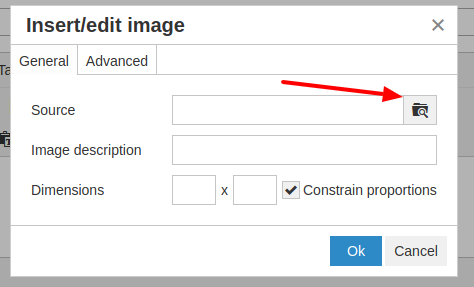
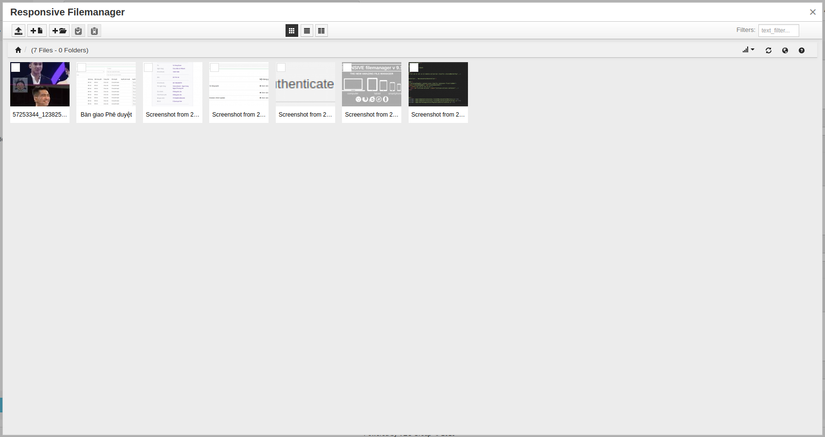
Sau khi config như trên thì ta sẽ có được kết quả

Sử dụng với CKEditor
Với CKEditor ta sử dụng như sau
<textarea name="editor-ckeditor" id="editor-ckeditor" rows="10" cols="80"></textarea>
<script type="text/javascript" src="js/ckeditor/ckeditor.js"></script>
<script>
CKEDITOR.replace( 'editor-ckeditor' ,{
	filebrowserBrowseUrl : 'filemanager/dialog.php?type=2&editor=ckeditor&fldr=',
	filebrowserUploadUrl : 'filemanager/dialog.php?type=2&editor=ckeditor&fldr=',
	filebrowserImageBrowseUrl : 'filemanager/dialog.php?type=1&editor=ckeditor&fldr='
});
</script>
Sử dụng thay thế input file bình thường
Bạn có thể dùng một popup để mở Filemanager (Ví dụ Bootstrap modal, iframe, FancyBox...) Flow của nó là
Với file manager thì đường dẫn để mở dialog là /filemanager/dialog.php?type=0&fldr=
Chọn ảnh: /filemanager/dialog.php?type=1&field_id=fieldID
Chọn video /filemanager/dialog.php?type=3&field_id=fieldID
Chọn File /filemanager/dialog.php?type=2&field_id=fieldID
Danh sách các biến tùy chọn:
- type: kiểu của filemanager: 1. Ảnh; 2: Tất cả các loại files; 3: Video
- fldr: thư mục khi mở filemanager
- sort_by: giá trị order ví dụ name, size, extension...
- descending: chiều hướng order 1 hoặc 0
- lang: mã code ngôn ngữ (en_EN, vi...)
Ví dụ với Fancy box: Ta có một button để mở filemanager kiểu như:
<a href="js/tinymce/plugins/filemanager/dialog.php?type=0" class="btn iframe-btn" type="button">Open Filemanager</a>
Config Fancy box để mở link trên dưới dạng iframe
 $('.iframe-btn').fancybox({
	'width'		: 900,
	'height'	: 600,
	'type'		: 'iframe',
        'autoScale'    	: false
    });
Và đừng quên chèn css và script của fancy box vào nhé
<link rel="stylesheet" type="text/css" href="fancybox/jquery.fancybox-1.3.4.css" media="screen" />
<script type="text/javascript" src="fancybox/jquery.fancybox-1.3.4.pack.js"></script>
Ngoài ra bạn cũng có thể thêm Callback function để làm gì đó sau khi chọn file từ filemanager
function responsive_filemanager_callback(field_id){
	console.log(field_id);
	var url=jQuery('#'+field_id).val();
	alert('update '+field_id+" with "+url);
	//your code
}
Mở rộng
Như vậy mình vừa giới thiệu những gì cơ bản nhất để sử dụng được thư viện này. Ngoài ra mở rộng thêm thì mình có 1 bài toán như sau: Với mỗi user sẽ có một thư mục riêng và tùy theo permisssion đã được cài đặt xem có quyền truy cập toàn bộ server hay chỉ truy cập thư mục của chính user đó. Sau khi xem code của filemanager thì để làm được bài toàn đặt ra ở trên ta cần linh động thay đổi được file config phụ thuộc vào người dùng đang đăng nhập. Ví dụ với người dùng đang đăng nhập thì sẽ config thư mục root là thư mục của user đó...vvv
Mình đang sử dụng trong project Laravel nên code cho phần đó mình viết luôn vào file config như sau:
require __DIR__.'/../../../vendor/autoload.php';
$app = require_once __DIR__. '/../../../bootstrap/app.php';

$kernel = $app->make(Illuminate\Contracts\Http\Kernel::class);

$response = $kernel->handle(
    $request = Illuminate\Http\Request::capture()
);
$user = $app->make('auth')->user();
if (!is_dir($config['current_path'])) {
	$file = $app->make('File');
	$file::makeDirectory($config['current_path']);
	$file::makeDirectory($config['thumbs_base_path']);
}

$userId = '';
if ($user && !$user->hasDefinePrivilege('image_full_upload')) {
	$userId = $user->id;
	if (!is_dir($config['current_path'] . $userId)) {
        $file = $app->make('File');
		$file::makeDirectory($config['current_path'] . $userId);
		$file::makeDirectory($config['thumbs_base_path'] . $userId);
	}
	$config['upload_dir'] .= $userId . '/';
	$config['current_path'] .= $userId . '/';
	$config['thumbs_base_path'] .= $userId . '/';
}

return array_merge(
	$config,
	array(
		'ext'=> array_merge(
			$config['ext_img'],
			$config['ext_file'],
			$config['ext_misc'],
			$config['ext_video'],
			$config['ext_music']
		),
		// For a list of options see: https://developers.aviary.com/docs/web/setup-guide#constructor-config
		'aviary_defaults_config' => array(
			'apiKey'     => $config['aviary_apiKey'],
			'language'   => $config['aviary_language'],
			'theme'      => $config['aviary_theme'],
			'tools'      => $config['aviary_tools'],
			'maxSize'    => $config['aviary_maxSize']
		),
	)
);
Tham khảo
- RESPONSIVE Filemanager
- TinyMCE
All rights reserved
