Redux Form Validation Tutorial Example
Bài đăng này đã không được cập nhật trong 7 năm
Hướng dẫn xác nhận mẫu Redux
Đầu tiên, chúng ta cần thiết lập Redux Store và sau đó chuyển đến thành phần chính. Ngoài ra, chúng ta cần cài đặt một số thư viện liên quan đến redux để chạy và chạy với dự án này.
Bước 1 : Thiết Lập Dự Án
Nhấn lần lượt các lệnh sau để thiết lập bảng mẫu.
npm install -g create-react-app

create-react-app reduxformvalidation

npm i -D redux react-redux redux-form
Bây giờ, gõ lệnh sau.
npm start
Nếu có lỗi xảy ra, vui lòng nhấn lệnh sau.
npm install
Sau đó, thử lại lệnh sau, nó sẽ mở URL http: // localhost: 3000 trong trình duyệt.
Chúng ta cần định kiểu các thành phần của biểu mẫu, vì vậy ở đây tôi đã sử dụng Bootstrap 4 Forms .
<!-- index.html -->

<!DOCTYPE html>
<html lang="en">
  <head>
    <meta charset="utf-8">
    <meta name="viewport" content="width=device-width, initial-scale=1, shrink-to-fit=no">
    <link rel="stylesheet" href="https://maxcdn.bootstrapcdn.com/bootstrap/4.0.0-beta.2/css/bootstrap.min.css" integrity="sha384-PsH8R72JQ3SOdhVi3uxftmaW6Vc51MKb0q5P2rRUpPvrszuE4W1povHYgTpBfshb" crossorigin="anonymous">
    <title>Redux Form Validation</title>
  </head>
  <body>
    <div id="root"></div>
  </body>
</html>
Bước 2: Tạo một cửa hàng redux.
Tạo một cửa hàng và vượt qua bọc với thành phần Nhà cung cấp.
// index.js

import React from 'react';
import ReactDOM from 'react-dom';
import { createStore, combineReducers } from 'redux';
import { Provider } from 'react-redux';
import { reducer as formReducer } from 'redux-form';
import App from './App';
import registerServiceWorker from './registerServiceWorker';

const rootReducer = combineReducers({
    form: formReducer
});

const store = createStore(rootReducer);

ReactDOM.render(
<Provider store={store}>
 <App />
</Provider>
,document.getElementById('root'));
registerServiceWorker();
Bước 3: Chỉ tạo tệp FormCode.js.
Trong thư mục src , tạo một tệp có tên là tệp FormCode.js .
Để làm cho thành phần biểu mẫu của bạn giao tiếp với cửa hàng, chúng ta cần bọc nó bằng reduxForm () .
Nó sẽ cung cấp các đạo cụ về trạng thái biểu mẫu và chức năng để xử lý quá trình đệ trình.
// FormCode.js

import React from 'react';
import { Field, reduxForm } from 'redux-form';

const renderField = ({ input, label, type, meta: { touched, error, warning } }) => (
    <div>
      <label className="control-label">{label}</label>
      <div>
        <input {...input} placeholder={label} type={type} className="form-control" />
        {touched && ((error && <span className="text-danger">{error}</span>) || (warning && <span>{warning}</span>))}
      </div>
    </div>
  )

let FormCode = props => {
  const { handleSubmit, pristine, submitting } = props;
  return (
    <form onSubmit={ handleSubmit }>
      <div className="form-group">
        <Field name="firstName" component={renderField} label="First Name" />
      </div>
      <div className="form-group">
        <Field name="lastName" component={renderField} label="Last Name" />
      </div>
      <div className="form-group">
        <Field name="email" component={renderField} label="Email" />
      </div>
      <div className="form-group">
        <button type="submit" className="btn btn-primary">Submit</button>
      </div>
    </form>
  )
}
FormCode = reduxForm({
  form: 'contact'
})(FormCode);

export default FormCode;
FormCode.js chỉ là một thành phần biểu mẫu web với trường biểu mẫu của nó.
Chúng ta đã thiết kế biểu mẫu và lỗi của nó, nhưng chúng ta vẫn chưa viết bất kỳ logic xác thực nào trong đó. Chỉ cần mẫu Bootstrap đơn giản.
Bước 4: Thêm mẫu này vào thành phần React.
// App.js

import React from 'react';
import FormCode from './FormCode';

class App extends React.Component {
  submit = (values) => {
    alert("submitted");
    console.log(values);
  }
  render() {
    return (
      <div className="container">
        <h3 className="jumbotron">Redux Form Validation</h3>
        <FormCode onSubmit={this.submit} />
      </div>

    )
  }
}

export default App;
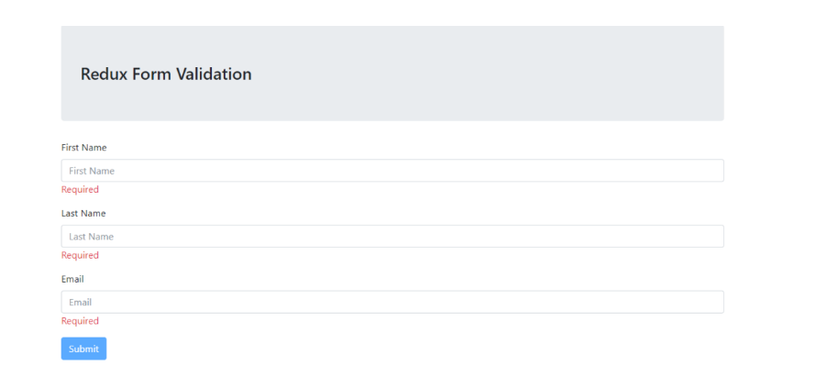
Bây giờ, chuyển sang trình duyệt, bạn có thể thấy biểu mẫu bootstrap đã sẵn sàng. Nếu bạn cố gắng gửi biểu mẫu sau đó, nó sẽ không xác thực bất kỳ trường nào vì chúng ta chưa viết bất kỳ logic xác thực nào và bạn có thể thấy cảnh báo cho biết: đã gửi.
Bước 5: Viết và thêm logic xác thực.
Trong tệp FormCode.js ,hãy viết đoạn mã sau.
// App.js

const validate = values => {
    const errors = {}
    if (!values.firstName) {
      errors.firstName = 'Required'
    } else if (values.firstName.length < 2) {
      errors.firstName = 'Minimum be 2 characters or more'
    }
    if (!values.email) {
      errors.email = 'Required'
    } else if (!/^[A-Z0-9._%+-]+@[A-Z0-9.-]+\.[A-Z]{2,4}$/i.test(values.email)) {
      errors.email = 'Invalid email address'
    }
    if (!values.lastName) {
        errors.lastName = 'Required'
      } else if (values.lastName.length < 2) {
        errors.lastName = 'Minimum be 2 characters or more'
      }
    return errors
  }
Bây giờ, chúng ta cần truyền hàm này vào thành phần FormCode.js . Vì nó là thành phần HOC, thật đơn giản để làm như vậy.
// App.js

FormCode = reduxForm({
  form: 'contact',
  validate,
})(FormCode);

export default FormCode;
Vì vậy, tệp FormCode.js hoàn chỉnh của chúng ta trông như thế này.
// FormCode.js

import React from 'react';
import { Field, reduxForm } from 'redux-form';

const validate = values => {
    const errors = {}
    if (!values.firstName) {
      errors.firstName = 'Required'
    } else if (values.firstName.length < 2) {
      errors.firstName = 'Minimum be 2 characters or more'
    }
    if (!values.email) {
      errors.email = 'Required'
    } else if (!/^[A-Z0-9._%+-]+@[A-Z0-9.-]+\.[A-Z]{2,4}$/i.test(values.email)) {
      errors.email = 'Invalid email address'
    }
    if (!values.lastName) {
        errors.lastName = 'Required'
      } else if (values.lastName.length < 2) {
        errors.lastName = 'Minimum be 2 characters or more'
      }
    return errors
  }

const renderField = ({ input, label, type, meta: { touched, error, warning } }) => (
    <div>
      <label className="control-label">{label}</label>
      <div>
        <input {...input} placeholder={label} type={type} className="form-control" />
        {touched && ((error && <span className="text-danger">{error}</span>) || (warning && <span>{warning}</span>))}
      </div>
    </div>
  )

let FormCode = props => {
  const { handleSubmit, pristine, submitting } = props;
  return (
    <form onSubmit={ handleSubmit }>
      <div className="form-group">
        <Field name="firstName" component={renderField} label="First Name" />
      </div>
      <div className="form-group">
        <Field name="lastName" component={renderField} label="Last Name" />
      </div>
      <div className="form-group">
        <Field name="email" component={renderField} label="Email" />
      </div>
      <div className="form-group">
        <button type="submit" disabled={pristine || submitting} className="btn btn-primary">Submit</button>
      </div>
    </form>
  )
}
FormCode = reduxForm({
  form: 'contact',
  validate,
})(FormCode);

export default FormCode;
Cuối cùng, ví dụ Hướng dẫn xác thực mẫu Redux của chúng ta Từ đầu đã kết thúc.

All rights reserved
