Redis (Nosql)
Bài đăng này đã không được cập nhật trong 4 năm
1. What is Redis?
- Redis là một data structure server.
- Open source .
- Redis viết ngắn của REmote DIctionary Server vì thế Redis là một loại DB key-value rất phổ biến.
2. Supported languages.
- ActionScript
- C, C++, C#, Clojure, Common
- Lisp
- Dart
- Erlang, Elixir, emacs
- Go, GNU
- Haskell, Haxe
- Io
- Java, JavaScript (Node.js), Julia
- Lua
- Objective-C, OCaml
- Perl, PHP, Pure Data, Python, Prolog
- R, Racket, Ruby, Rebol,Rust
- Scala, Smalltalk, Scheme
- Tcl.
- Fancy
- Matlab
- Nim
- VCL
3. Data types
- Strings: kiểu dữ liệu cơ bản nhất.
- Một giá trị String có thể max là 512 Megabytes.
Điểm khác biệt quan trọng nhất giữa Redis và các structured storage system khác đó là Redis hỗ trợ cả những kiểu dữ liệu trừu tượng như List, Sets, Hash tables
-
Lists: Lưu lại mảng gồm nhiều String theo thứ tự.
- Một phần tử khi pust vào mảng có thể được pust ở vị trí bất kì (đầu, cuối) của mảng.
- Một List có thể chứ tối đa 2^32 - 1 phần tử (4294967295, hơn 4 triệu phần tử trong 1 list).
- Đặc điểm nổi bật trong Lít của Redis đó là vấn đề thời gian, khi add hay delete một phần tử trong list gồm hàng triệu phần tử thì thời gian luôn là một hằng số.
-
Sets: Lưu lại mảng gồm nhiều String
Khôngtheo thứ tự, và chỉ save được các phần tử khác nhau.- Một Set có thể chứ tối đa 2^32 - 1 phần tử (4294967295, hơn 4 triệu phần tử trong 1 set).
-
Hashes: hoạt động tương tự Map (key-value)
- Một Hashe có thể chứ tối đa 2^32 - 1 phần tử (4294967295, hơn 4 triệu phần tử trong 1 Hashe).
4.Install Redis
$ sudo apt-get install -y python-software-properties
$ sudo add-apt-repository -y ppa:rwky/redis
$ sudo apt-get update
$ sudo apt-get install -y redis-server
Khởi động Redis server
$ redis-server
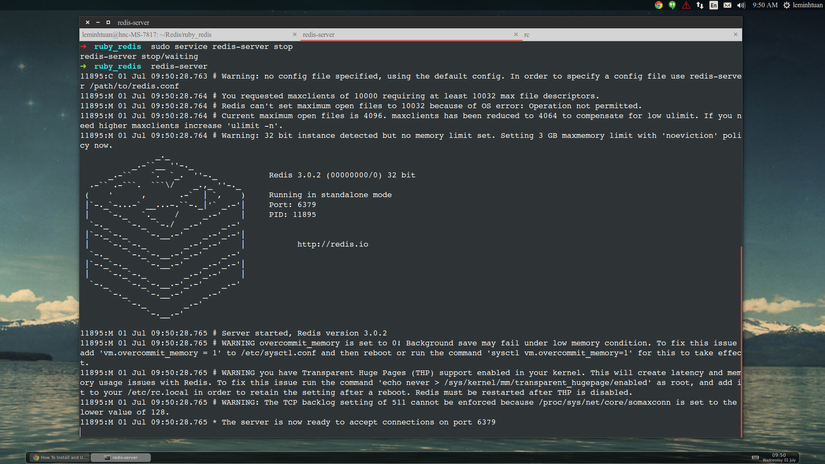
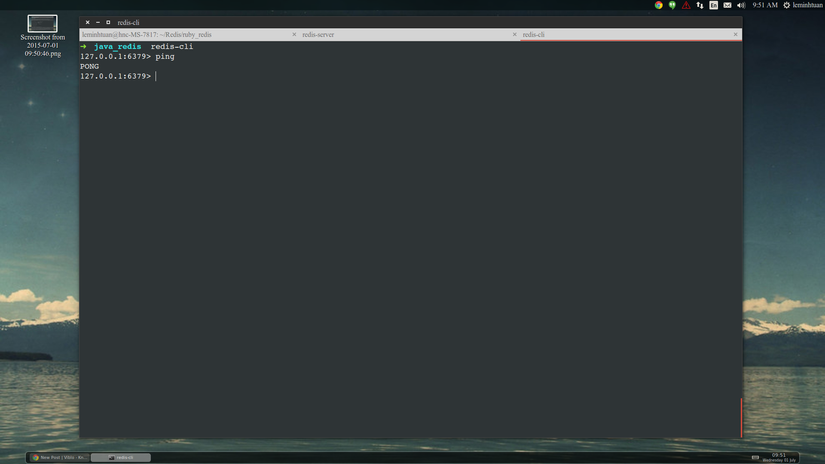
Terminal Redis client
$ redis-cli
5.Ruby connect to Redis.
- Vì Redis hỗ trợ rất nhiều ngôn ngữ và bây giờ em xin đề mô với ngôn ngữ Ruby.
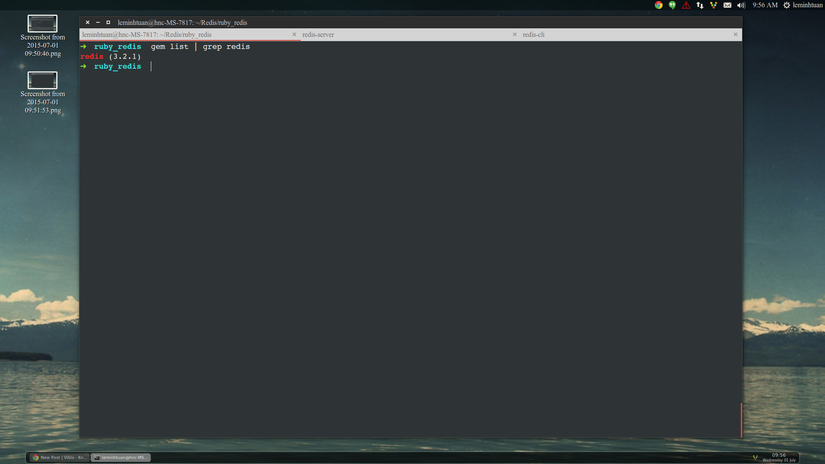
step 1: Install gem redis cho ruby
gem install redis
Kiểm tra xem gem đã được setup chưa.
gem list | grep redis, nếu đã cài gem thành công ta sẽ nhận được kết quả như bên dưới
step 2: Tạo file main.ruby để connect tới server
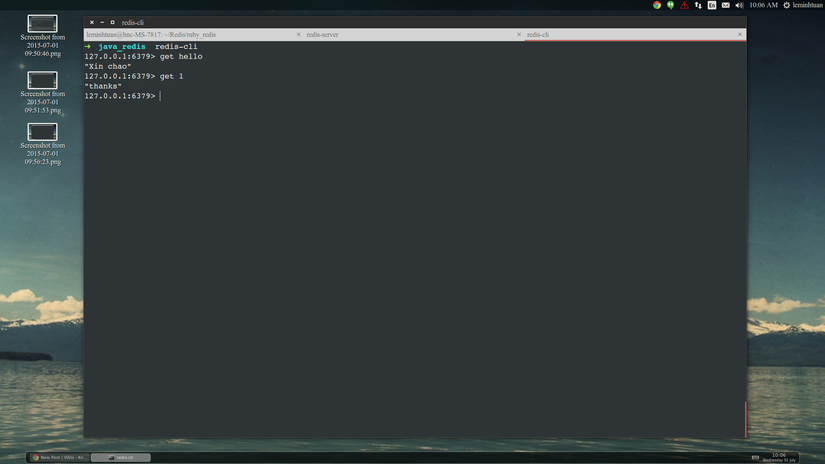
require "redis"

redis = Redis.new

redis.set "hello", "Xin chao"

redis.set 1, "thanks"

p redis.get "hello"

p redis.get 1
step 3: Run file main.rb
$ ruby main.rb
$ "Xin chao"
$ "thanks"
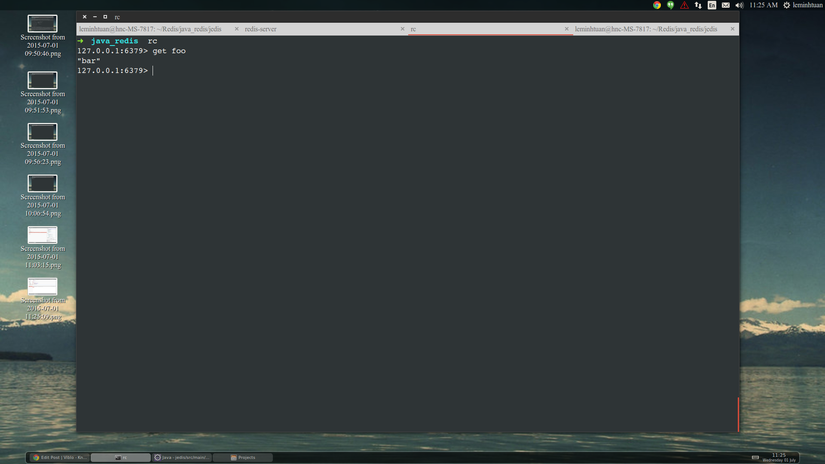
Hay khi sử dụng redis-cli để lấy dữ liệu ta cũng thu được kết qủa tương tự
6. Java with Redis (Mặc định anh chị đã biết về Maven trong Java Maven Apache)
Step 1:
- Khởi tạo java project bằng Maven
mvn archetype:generate -DgroupId=com.tuan.le -DartifactId=jedis -DarchetypeArtifactId=maven-archetype-quickstart -DinteractiveMode=false
Step 2:
- Add Thư viện redis cho Java thông qua Maven
 <project xmlns="http://maven.apache.org/POM/4.0.0" xmlns:xsi="http://www.w3.org/2001/XMLSchema-instance"
  xsi:schemaLocation="http://maven.apache.org/POM/4.0.0 http://maven.apache.org/maven-v4_0_0.xsd">
  <modelVersion>4.0.0</modelVersion>
  <groupId>com.tuan.le</groupId>
  <artifactId>jedis</artifactId>
  <packaging>jar</packaging>
  <version>1.0-SNAPSHOT</version>
  <name>jedis</name>
  <url>http://maven.apache.org</url>
  <dependencies>
    <dependency>
      <groupId>junit</groupId>
      <artifactId>junit</artifactId>
      <version>3.8.1</version>
      <scope>test</scope>
    </dependency>

    <dependency>
      <groupId>redis.clients</groupId>
      <artifactId>jedis</artifactId>
      <version>2.7.2</version>
    </dependency>
  </dependencies>

<build>
  <plugins>
    <plugin>
      <!-- Build an executable JAR -->
      <groupId>org.apache.maven.plugins</groupId>
      <artifactId>maven-jar-plugin</artifactId>
      <version>2.4</version>
      <configuration>
        <archive>
          <manifest>
            <addClasspath>true</addClasspath>
            <classpathPrefix>lib/</classpathPrefix>
            <mainClass>com.tuan.le.App</mainClass>
          </manifest>
        </archive>
      </configuration>
    </plugin>
  </plugins>
</build>
</project>
Chú ý ta đã sửa file pom.xml và thêm thẻ như bên dưới:
    <dependency>
      <groupId>redis.clients</groupId>
      <artifactId>jedis</artifactId>
      <version>2.7.2</version>
    </dependency>
Step 3:
- Convert project để sử dụng Eclipse
mvn eclipse:eclipse
Step 4:
- Import project vào eclipse
Step 5:
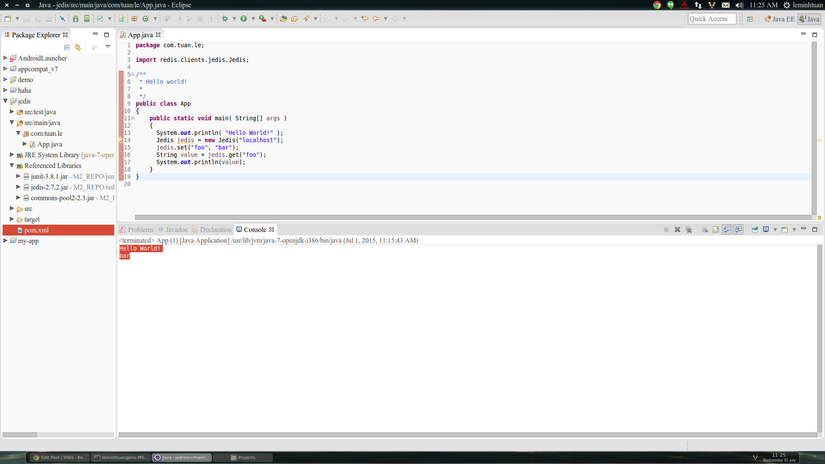
- Sửa file App.java
package com.tuan.le;

import redis.clients.jedis.Jedis;
public class App
{
    public static void main( String[] args )
    {
      System.out.println( "Hello World!" );
      Jedis jedis = new Jedis("localhost");
      jedis.set("foo", "bar");
      String value = jedis.get("foo");
      System.out.println(value);
    }
}
Step 6:
- Test kết quả : Trong eclipse chạy project
7. Thanks
Thanks you guy so much, pls give me some feedbacks of leave a comment so that i can better day by day.!!! (thankyou) !
All rights reserved
