Realtime chat application với Rails và Pusher
Bài đăng này đã không được cập nhật trong 7 năm
Ứng dụng chat đã trở thành một phần rất quan trọng trong cuộc sống hiện đại. Có lẽ bạn đã từng sử dụng Facebook, Whatsapp, Zalo, Viper,... Một trong những tính năng quan trọng của ứng dụng chat là Instant Messaging (gửi tin nhắn thời gian thực). Với Rails, chúng ta đã quá quen thuộc với việc sử dụng ActionCable dựa trên WebSocket để duy trì kết nối liên tục giữa server và client. Ngoài ra, chúng ta có thể sử dụng các API từ bên thứ 3. Trong bài viết này, mình sẽ xây dựng một ứng dụng chat đơn giản sử dụng API từ Pusher.
Giới thiệu về Pusher
Pusher là một dịch vụ cloud cung cấp các giải pháp giao tiếp thời gian thực giữa servers, apps và devices. Dữ liệu được gửi tới pusher, và pusher lại gửi nó đi tới các client đã subscribe (đăng ký) và các channel.
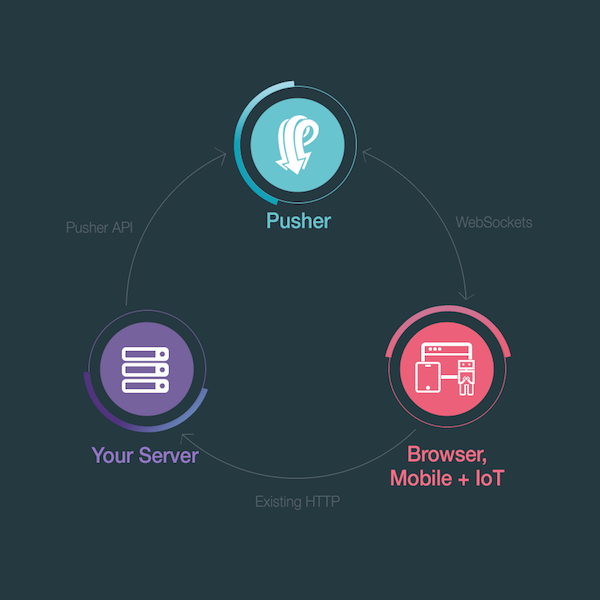
Pusher hỗ trợ rất nhiều ngôn ngữ lập trình khác nhau, trong đó có Ruby. Tham khảo gem của nó tại đây: https://github.com/pusher/pusher-http-ruby.
1. Cài đặt ứng dụng Rails
Mở terminal và chạy lệnh sau để cài đặt ứng dụng Rails
$ rails new pusher-chat -T --database=sqlite3
$ cd pusher-chat
Để xây dựng ứng dụng nhanh hơn nên ở đây mình sẽ sử dụng database SQLite. Option -T để Rails bỏ qua việc generate file test.
Trong thư mục gốc, chèn thêm các dòng sau vào Gemfile để khai báo việc sử dụng thêm một số gem
gem 'bootstrap'
gem 'jquery-rails'
gem 'pusher'
gem 'figaro'
Sau đó chạy
$ bundle install
Tiếp theo chúng ta sẽ cài đặt database. Chạy lệnh sau để cài đặt database trên SQLite
$ rails db:setup
Chạy server
$ rails s
Xem kết quả tại http://localhost:3000
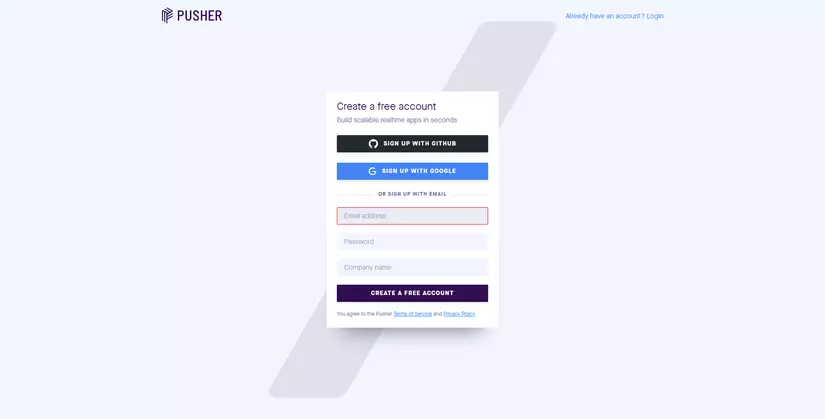
2. Tạo tài khoản Pusher
Bạn có thể tạo tài khoản Pusher ở đây.
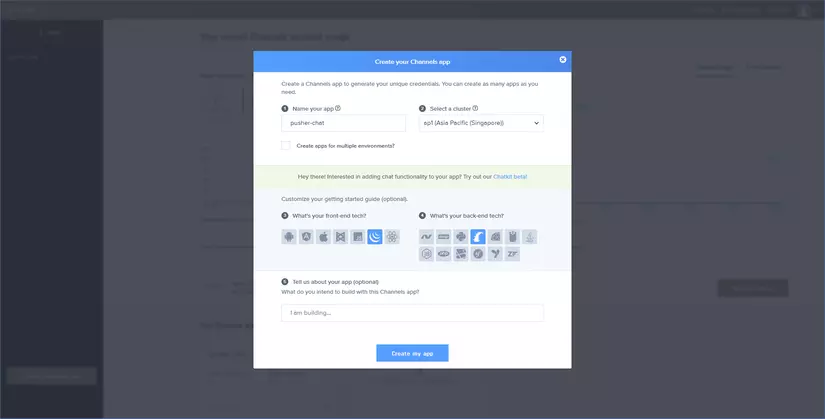
Sau khi tạo tài khoản xong, nó sẽ redirect về trang dashboard. Nó sẽ gợi ý bạn tạo Channel App. Nếu không bạn có thể tạo bằng cách nhấn phím Create Channel App ở tab Channel App. Mặc định gói free được cung cấp 100 kết nối và 200k tin nhắn mỗi ngày. Nếu có nhu cầu sử dụng cao hơn thì phải trả phí.
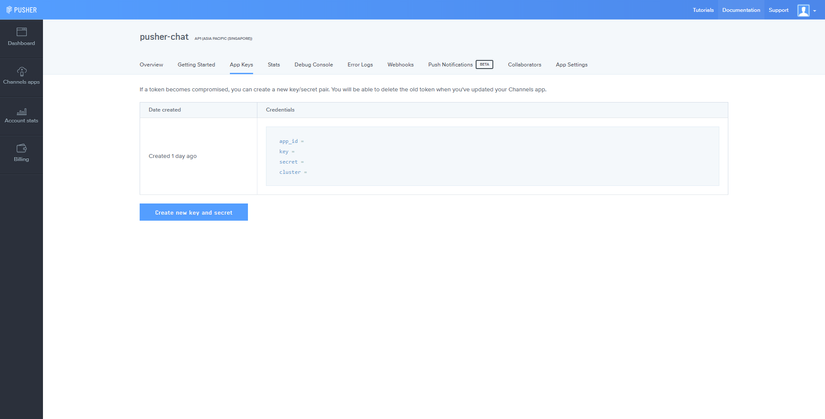
Sau khi tạo App, lấy các key truy cập ở tab App Keys
Chạy lệnh sau để cài đặt figaro lưu trữ các biến môi trường
$ bundle exec figaro install
Lưu trữ các key của Pusher vào biến môi trường
# config/application.yml

PUSHER_APP_ID: 'xxxxxx'
PUSHER_KEY: 'xxxxxxxxxxxxxxxxx'
PUSHER_SECRET: 'xxxxxxxxxxxxxx'
PUSHER_CLUSTER: 'xx'
3. Bắt đầu code!
Giờ chúng ta đã các key xác thực để kết nối đến Pusher. Trước khi sử dụng chúng, cần phải cài đặt thêm model, view, controller...
# generate a chat model
$ rails g model chat message:text username:string

# generate a chats controller with actions
$ rails g controller Chats index create new show

# run database migration
$ rails db:migrate
Đã có controller, ta khai báo routes và khai báo trang root. Sửa đổi routes của bạn như sau
# config/routes.rb

Rails.application.routes.draw do
  resources :chats
  root 'chats#index'
end
Cài đặt controller
# app/controllers/chats_controller.rb

class ChatsController < ApplicationController
  def index
    @chats = Chat.all
    @chat = Chat.new
  end

  def new
    @chat = Chat.new
  end

  def create
    @chat = Chat.new(chat_params)
    respond_to do |format|
      # binding.pry
      if @chat.save
        format.html { redirect_to @chat, notice: 'Message was successfully posted.' }
        format.json { render :show, status: :created, location: @chat }
      else
        format.html { render :new }
        format.json { render json: @chat.errors, status: :unprocessable_entity }
      end
    end
  end

  def show
  end

  private

  def chat_params
    params.require(:chat).permit(:username, :message)
  end
end
Cài đặt view
<%# app/views/chats/index.html.erb %>

<div class="container-fluid">
  <div class="row">
    <div class="col-3 col-md-2 bg-dark full-height sidebar">
      <div class="sidebar-content">
        <input type="text" class="form-control sidebar-form" placeholder="Enter a username" required />
        <h4 class="text-white mt-5 text-center username d-none">Hello </h4>
      </div>
    </div>
    <div class="col-9 col-md-10 bg-light full-height">
      <div class="container-fluid">
        <div class="chat-box py-2">
          <% @chats.each do |chat| %>
            <div class="col-12">
              <div class="chat bg-secondary d-inline-block text-left text-white mb-2">
                <div class="chat-bubble">
                  <small class="chat-username"><%= chat.username %></small>
                  <p class="m-0 chat-message"><%= chat.message %></p>
                </div>
              </div>
            </div>
          <% end %>
        </div>
        <div class="chat-text-input">
          <%= form_with(model: @chat, remote: true, format: :json, id: 'chat-form') do |form| %>
            <% if @chat.errors.any? %>
              <div id="error_explanation">
                <h2><%= pluralize(@chat.errors.count, "error") %> prohibited this chat from being saved:</h2>
                <ul>
                  <% @chat.errors.full_messages.each do |message| %>
                    <li><%= message %></li>
                  <% end %>
                </ul>
              </div>
            <% end %>
            <div class="field position-relative">
              <%= form.text_field :message, id: :message, class: "form-control", required: true, disabled: true %>
              <%= form.hidden_field :username, id: :username %>
            </div>
          <% end %>
        </div>
      </div>
    </div>
  </div>
</div>
Thêm chút css cho giao diện thêm xịn
// app/assets/stylesheets/chats.scss

@import "bootstrap";
@import url('https://fonts.googleapis.com/css?family=Josefin+Sans');

body {
  font-family: 'Josefin Sans', sans-serif;
}

.full-height {
  height: 100vh;
  overflow: hidden;
}

input.form-control.sidebar-form {
  position: absolute;
  bottom: 0;
  left: 0;
  border: 0;
  border-radius: 0;
}

.chat-box {
  height: 94vh;
  overflow: auto;
}

.chat {
  border-radius: 3px;
  padding: 0rem 2rem 0 1rem;
}

.chat-username {
  font-size: 0.7rem;
}

.chat-message {
  font-size: 0.85rem;
}
Ngoài ra các bạn nhớ đổi tên file app/assets/stylesheets/application.css => app/assets/stylesheets/application.scss để Rails biên dịch nhé!
Require jquery và bootstrap
// app/assets/javascripts/application.js

//= require rails-ujs
//= require turbolinks
//= require jquery3
//= require popper
//= require bootstrap
//= require_tree .
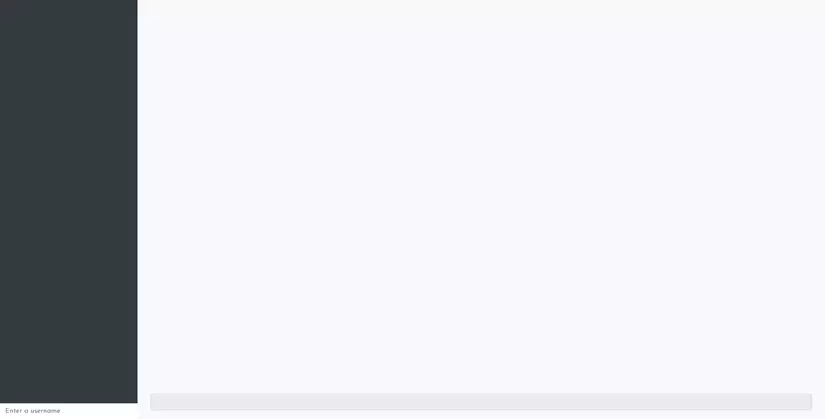
Reload trang chủ, chúng ta sẽ có 1 trang có bố cục đại loại như sau
4. Gửi tin nhắn
Trong thư mục app/views/chats, tạo mới file show.json.jbuilder có nội dung như bên dưới. Chú ý rằng tạo ứng dụng mới thì gem jbuilder đã được kích hoạt sẵn.
// app/views/chats/show.json.jbuilder

json.extract! @chat, :id, :username, :message
json.url chat_url(@chat, format: :json)
Tạo mới file javascript để thực hiện công việc ở phía client
// app/assets/javascripts/chat.js

$(document).ready(function() {
  let username = '';

  let updateChat = (data) => {
    $('.chat-box').append(`
      <div class="col-12">
        <div class="chat bg-secondary d-inline-block text-left text-white mb-2">
          <div class="chat-bubble">
            <small class="chat-username">${data.username}</small>
            <p class="m-0 chat-message">${data.message}</p>
          </div>
        </div>
      </div>
    `);
  };

  $('.sidebar-form').keyup(event => {
    if (event.keyCode == 13) {
      username = event.target.value;
      $('.username').append(username);
      $('#username').val(username);
      $('.username').removeClass('d-none');
      $('.sidebar-form').addClass('d-none');
      $('#message').removeAttr("disabled");
      $('#message').focus();
    }
  });

  $('#chat-form').on('ajax:success', data => {
    $('#chat-form')[0].reset();
  });
});
Trong đoạn code trên, chúng ta gắn ajax:success event listener từ jquery-ujs. Khi chúng ta thêm một tin nhắn, event sẽ kích hoạt nhận response từ server và append nó ra view.
5. Realtime chat với Pusher
Thêm thư viện js của Pusher vào client
<%# app/views/layouts/application.html.erb %>

<head>
  ....
  <script src="https://js.pusher.com/4.1/pusher.min.js"></script>
  <%= javascript_include_tag 'application', 'data-turbolinks-track': 'reload' %>
</head>
Để ứng dụng chát có thể hoạt động realtime, chúng ta sẽ tạo một after_create callback ở model Chat, nó sẽ chạy khi chúng ta tạo thành công một tin nhắn.
# app/models/employee.rb

class Chat < ApplicationRecord
  after_create :notify_pusher, on: :create

  def notify_pusher
    Pusher.trigger 'chat', 'new', self.as_json
  end
end
Sau đó, update UI realtime ở phía client. Đổi tên file từ .js => .js.erb để có thể lấy biến môi trường.
// app/assets/javascripts/chat.js

$(document).ready(function() {
  ...
  Pusher.logToConsole = true;
  let pusher = new Pusher(
    '<%= ENV["PUSHER_KEY"] %>',
    {
      cluster: '<%= ENV["PUSHER_CLUSTER"] %>',
      encrypted: true
    }
  );
  let channel = pusher.subscribe('chat');
  channel.bind('new', data => {
    updateChat(data);
  });
});
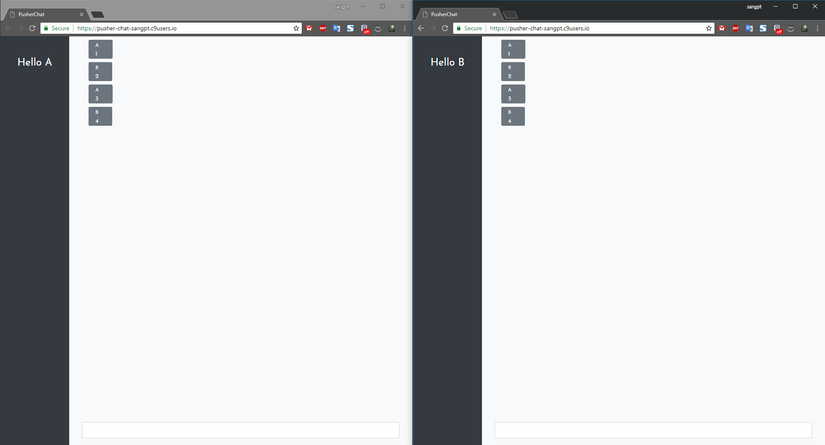
Sau đó restart server, chúng ta đã có ứng dụng chat realtime đơn giản. Bạn có thể mở 2 tab để test.
Toàn bộ source code các bạn có thể tham khảo tại https://github.com/sangpt/pusher-chat
Tham khảo
All rights reserved
