[ReactJS] Tạo Chức Năng Dark Mode Đơn Giản.
Bài đăng này đã không được cập nhật trong 2 năm
Mình có tìm hiểu thêm về tạo Dark Mode trong ReactJS kết hợp cùng Redux và TailWindCSS nên hôm nay cũng muốn được chia sẻ với mọi người một chút.
Các bạn có thể tham khảo dự án mình đã triển khai tại đây: https://rtk-dual-theme.vercel.app/
Source code: https://github.com/atomatiz/rtk-dual-theme
Let's go!
1. Triển khai ứng dụng và cài đặt một số thư viện hỗ trợ:
// Lệnh triển khai dự án react theo template redux và typescript mẫu có sẵn:
npx create-react-app dark-mode-app --template redux-typescript

// Mình dùng yarn thay cho npm nhé:
npm install --global yarn

// Thêm serve để start production sau khi built ứng dụng:
yarn add serve -g

// Thêm 2 thư viện để hỗ trợ ghi đè cài đặt của react app, hỗ trợ khởi động/kiểm tra ứng dựng:
yarn add -D @craco/craco @craco/types

// Tạo file craco.config.js đồng cấp với package.json để tuỳ chỉnh ghi đè cấu hình cài đặt của react:
module.exports = {
   ...
  typescript: {
    enableTypeChecking: true /* (default value) */,
  },
};
*Chú thích: đây là cấu hình mẫu, các bạn có thể tham khảo tại đây https://craco.js.org/docs/category/configuration/

// Tắt StrictMode cho cho môi trường Development tại file main của toàn dự án:
index.tsx

// Thêm một số thư viện còn lại như sau đây:
yarn add -D @babel/plugin-proposal-private-property-in-object autoprefixer eslint eslint-config-prettier postcss styled-components tailwindcss redux-persist
2. Khởi tạo cấu hình cho eslint, prettier:
// Khởi tạo file config eslintrc.js
yarn run eslint --init
Chọn "To check syntax and find problems" -> "JavaScript modules (import/export)" -> "React" -> "Yes" -> "Browser" -> "JSON" -> "npm".

Tổ hợp các lựa chọn trên sẽ tự động cài đặt cho các bạn một số thư viện đi kèm của eslint:
eslint-plugin-react@latest, @typescript-eslint/eslint-plugin@latest, @typescript-eslint/parser@latest

// Cài đặt thêm thư viện của prettier và eslint
yarn add -D prettier eslint-plugin-react-hooks

// Tạo file .prettierrc.json ngang hàng với file package.json và thêm đoạn mã ví dụ dưới đây để tinh chỉnh format code theo ý muốn.
{
  "trailingComma": "es5",
  "tabWidth": 4,
  "semi": false,
  "singleQuote": true
}

// Tạo file .prettierignore và thêm đoạn mã dưới đây để loại trừ một số thư mục cho quá trình artifacts (nếu có).
node_modules
# Ignore artifacts:
build
Coverage

// Cài đặt thêm 2 thư viện sau để cấu hình cho eslint và prettier làm việc với nhau
yarn add -D eslint-config-prettier eslint-plugin-prettier

// Quay lại file eslintrc.js, do mình làm đơn giản nên thêm 2 rules này vào eslintrc.js để ignore một số lỗi:
"react/react-in-jsx-scope": "off",
"react/jsx-uses-react": "off",

// Đi đến file package.json, chúng ta thêm vào phần scripts các cấu hình lệnh để lint, format codes và một số lệnh khác như sau:
"start:dev": "craco start",
"start:prod": "craco build && serve -s build",
"build": "craco build",
"test": "craco test",
"lint": "eslint \"src/**/*.{js,jsx,ts,tsx}\"",
"lint:fix": "eslint --fix \"src/**/*.{js,jsx,ts,tsx}\"",
"format": "prettier --write \"src/**/*.{js,jsx,ts,tsx,css,md}\" --config ./.prettierrc.json"

// Cùng file package.json các bạn có thể thêm cấu hình sau để đặt phạm vi sử dụng phiên bản của node và npm, đây là cấu hình ví dụ, bạn có thể tìm hiểu thêm tại đây: https://docs.npmjs.com/cli/v10/configuring-npm/package-json
  "engines": {
    "node": ">=0.10.3 <15"
    "npm": "~1.0.20"
  }
3. Khởi tạo cấu hình cho tailwindcss:
// Trước đó chúng ta đã cài đặt các thư viện cần thiết của tailwindcss, bây giờ chúng ta sẽ triển khai cấu hình theo lệnh sau:
npx tailwindcss init

// Sau khi chạy lệnh trên, hệ thống sẽ tạo cho chúng ta một file cấu hình tailwind.config.js của tailwindcss, chúng ta mở file lên và cấu hình cơ bản như sau:
/** @type {import('tailwindcss').Config} */
module.exports = {
  content: ['./src/**/*.{js,jsx,ts,tsx}'],
  darkMode: 'class',
  theme: {
    extend: {},
  },
  variants: {},
  plugins: [],
}

// Bây giờ chúng ta mở file index.css và thay thế toàn bộ nội dung hiện tại bằng các layers và import mặc định của tailwindcss.
@tailwind base;
@tailwind components;
@tailwind utilities;
@import "tailwindcss/base";
@import "tailwindcss/components";
@import "tailwindcss/utilities";

// Tiếp theo ta mở file App.tsx lên và import file index.css vào, như vậy chúng ta có thể sử dụng tailwindcss được rồi.
import "./index.css"
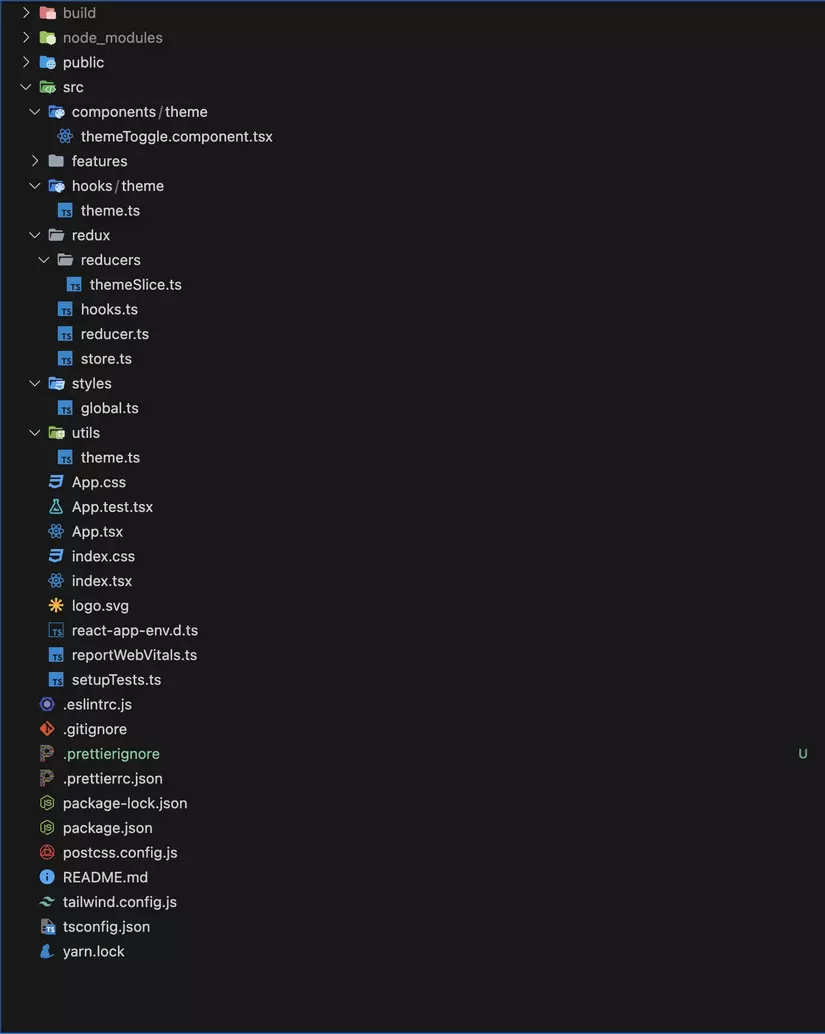
4. Triển khai cơ bản cấu trúc thư mục dự án như sau:
5. Triển khai chi tiết:
// Trước tiên chúng ta truy cập vào thư mục src/ tạo một thư mục utils/ và file theme.ts có nội dung như bên dưới,do làm đơn giản nên mình gộp chung các constants trong 1 file:
export const lightTheme = {
    body: 'white',
};

export const darkTheme = {
    body: 'black',
};

export const themeStatus = {
    DARK: 'dark',
    LIGHT: 'light',
};

export const LOCALSTORAGE_KEY = {
    THEME: 'theme',
};

export const REDUX_STORE_KEY = {
    PERSIST: 'rtk-dual-theme',
    THEME: 'theme',
};

// Trong thư mục src/ chúng ta tạo một thư mục styles/ và file global.ts để làm style chung có tính chuyển đổi khi chúng ta chuyển sang dark mode với nội dung sau:
import { createGlobalStyle } from 'styled-components';

export const GlobalStyleProvider = createGlobalStyle`
  *,
  *::after,
  *::before {
    box-sizing: border-box;
  }
  body {
    align-items: center;
    background: ${({ theme }) => theme.body};
    display: flex;
    flex-direction: column;
    justify-content: center;
    margin: 0;
    padding: 0;
    font-family: BlinkMacSystemFont, -apple-system, 'Segoe UI', Roboto, Helvetica, Arial, sans-serif;
    transition: all 0.25s linear;
  }
`;

// Chúng ta vào thư mục redux/ hoặc store/ tạo một thư mục reducers và file themeSlice.ts để xử lý redux state logic khi thay đổi mode của theme với nội dung sau:
import { PayloadAction, createSlice } from '@reduxjs/toolkit';
import {
    LOCALSTORAGE_KEY,
    REDUX_STORE_KEY,
    themeStatus,
} from '../../utils/theme';

export interface ThemeState {
    mode: boolean | null | undefined;
}

const initialState: Pick<ThemeState, 'mode'> = {
    mode: false,
};

export const themeSlice = createSlice({
    name: REDUX_STORE_KEY.THEME,
    initialState: initialState,
    reducers: {
        toggleTheme: (
            state,
            { payload: { mode } }: PayloadAction<ThemeState>
        ) => {
            setTheme(mode);

            function setTheme(mode?: boolean | null | undefined) {
                if (mode === null || mode === undefined) mode = true;
                state.mode = !mode;
                window.localStorage.setItem(
                    LOCALSTORAGE_KEY.THEME,
                    mode ? themeStatus.LIGHT : themeStatus.DARK
                );
                mode
                    ? document.documentElement.classList.remove(
                          themeStatus.DARK
                      )
                    : document.documentElement.classList.add(themeStatus.DARK);
            }
        },
    },
});

export const { toggleTheme } = themeSlice.actions;
export default themeSlice.reducer;
*Chú thích: Giá trị khởi tại ban đầu sẽ là Light Mode, khi chúng ta bật Dark Mode thì state sẽ được cập nhật lại giá trị cũng như ở phía localstorage và đồng thời sẽ tạo một css custom class "dark" để chúng ta thay đổi giá trị style trong css global và các giá trị khác bên ngoài khi thay đổi mode.

// Tiếp đến chúng tạo một file có tên reducer.ts, file này sẽ là file chính chứa tập hợp các reducers/slices con khác và gửi chúng đến store:
import { combineReducers } from '@reduxjs/toolkit';
import counterReducer from '../features/counter/counterSlice';
import themeReducer from './reducers/themeSlice';

const rootReducer = combineReducers({
    counter: counterReducer,
    theme: themeReducer,
});

export default rootReducer;

// Sau khi đã có rootReducer vừa được xuất ra, chúng ta sẽ mở file store.ts và thêm rootReducer và như sau:
import { configureStore, ThunkAction, Action } from '@reduxjs/toolkit';
import storage from 'redux-persist/lib/storage';
import rootReducer from './reducer';
import {
    FLUSH,
    PAUSE,
    PERSIST,
    PURGE,
    REGISTER,
    REHYDRATE,
    persistReducer,
    persistStore,
} from 'redux-persist';
import { REDUX_STORE_KEY } from '../utils/theme';

const persistConfig = {
    key: REDUX_STORE_KEY.PERSIST,
    storage: storage,
};

const persistedReducer = persistReducer(persistConfig, rootReducer);

export const store = configureStore({
    reducer: persistedReducer,
    devTools: process.env.NODE_ENV !== 'production',
    middleware: (getDefaultMiddleware) =>
        getDefaultMiddleware({
            serializableCheck: {
                ignoredActions: [
                    FLUSH,
                    REHYDRATE,
                    PAUSE,
                    PERSIST,
                    PURGE,
                    REGISTER,
                ],
            },
        }),
});

export const persistor = persistStore(store);

export type AppDispatch = typeof store.dispatch;
export type RootState = ReturnType<typeof store.getState>;
export type AppThunk<ReturnType = void> = ThunkAction<
    ReturnType,
    RootState,
    unknown,
    Action<string>
>;
*Chú thích: store đã được tích hợp Redux Persist để lưu lại các state object mặc định đã được khởi tạo và lưu vào state khi chạy ứng dụng hoặc khi tải lại trang hoặc đóng/mở lại trình duyệt, thường được dùng khi có state object của người dùng, sản phẩm...

// Tiếp theo chúng ta mở file gốc index.tsx của toàn dự án thêm Redux Persist Store như sau:
import { createRoot } from 'react-dom/client';
import { Provider } from 'react-redux';
import { persistor, store } from './redux/store';
import App from './App';
import reportWebVitals from './reportWebVitals';
import './index.css';
import { PersistGate } from 'redux-persist/integration/react';

const container = document.getElementById('root')!;
const root = createRoot(container);

root.render(
    <Provider store={store}>
        <PersistGate loading={null} persistor={persistor}>
            <App />
        </PersistGate>
    </Provider>
);

reportWebVitals();

// Như vậy về phần xử lý state logic chúng ta tạm xong, tiếp theo cũng tại src/ chúng ta sẽ tạo thư mục components/theme và file themeToggle.component.tsx trong theme/ với nội dung như sau:
import { MdOutlineDarkMode } from 'react-icons/md';
import { MdOutlineLightMode } from 'react-icons/md';
import { ThemeState, toggleTheme } from '../../redux/reducers/themeSlice';
import { useAppDispatch } from '../../redux/hooks';

export default function ToggleThemeComponent({mode}: ThemeState) {
    const dispatch = useAppDispatch();

    return mode ? (
        <MdOutlineLightMode
            className="
            dark:cursor-pointer
            dark:text-sky-500
            dark:text-4xl
            dark:bg-transparent
            dark:border
            dark:rounded-lg
            dark:border-gray-800
            dark:hover:bg-stone-900
            dark:hover:animate-bounce w-10 h-10
          "
            onClick={() => dispatch(toggleTheme({ mode: mode }))}
        />
    ) : (
        <MdOutlineDarkMode
            className="
            cursor-pointer
            text-sky-500
            text-4xl
            bg-transparent
            border
            rounded-lg
            border-gray
            hover:bg-gray-100
            hover:animate-bounce w-10 h-10
          "
            onClick={() => dispatch(toggleTheme({ mode: mode }))}
        />
    );
}
*Chú thích: 2 nút trên sẽ được thay đổi theo trạng thái của state khi chúng ta click chúng.

// Bây giờ chúng ta sẽ mở file App.tsx và triển khai component chúng ta vừa tạo cũng như các component nhỏ cơ bản khác với nội dung sau:
import './index.css';
import ToggleTheme from './components/theme/themeToggle.component';
import { darkTheme, lightTheme } from './utils/theme';
import { GlobalStyleProvider } from './styles/global';
import { ThemeProvider } from 'styled-components';
import { useAppSelector } from './redux/hooks';

export default function App() {
    const theme: boolean | null | undefined = useAppSelector((state) => state.theme.mode);

    return (
        <ThemeProvider theme={theme ? darkTheme : lightTheme}>
            <GlobalStyleProvider />
            <h1 className="flex justify-center mt-80 mb-5 text-6xl text-orange-500 dark:text-green-500 dark:text-6x">
                {theme ? 'DARK' : 'BRIGHT'}
            </h1>
            <span className="flex justify-center">
                <ToggleTheme mode={theme}/>
            </span>
        </ThemeProvider>
    );
}
*Chú thích: Tại đây ThemeProvider sẽ tiếp nhận style của darkTheme hoặc lightTheme mà chúng ta đã tạo ban đầu theo trạng thái của state và truyền đến component con GlobalStyleProvider để nhận các giá trị style và cập nhật lại giao diện cho chúng ta.
6. Thêm Hook ghi nhận và bảo toàn trạng thái phía client khi tải lại trang hoặc đóng/mở lại trình duyệt:
// Bây giờ tại thư mục src/ chúng ta tạo 2 thư mục có tên hooks/theme và file theme.ts bên trong theme/ có nội dung như sau:
import { themeStatus } from './../../utils/theme';
import { useEffect } from 'react';
import { toggleTheme } from '../../redux/reducers/themeSlice';
import { useAppDispatch } from '../../redux/hooks';
import { LOCALSTORAGE_KEY } from '../../utils/theme';

export const useThemeHook = () => {
    const prevTheme: string | null | undefined = window.localStorage.getItem(
        LOCALSTORAGE_KEY.THEME
    );
    const dispatch = useAppDispatch();

    const setTheme = () => {
        if (prevTheme === null || prevTheme === undefined)
            prevTheme === themeStatus.LIGHT;
        window.localStorage.setItem(
            LOCALSTORAGE_KEY.THEME,
            prevTheme === themeStatus.LIGHT
                ? themeStatus.LIGHT
                : themeStatus.DARK
        );
        prevTheme === themeStatus.LIGHT
            ? document.documentElement.classList.remove(themeStatus.DARK)
            : document.documentElement.classList.add(themeStatus.DARK);
        prevTheme === themeStatus.LIGHT
            ? dispatch(toggleTheme({ mode: true }))
            : dispatch(toggleTheme({ mode: false }));
    };

    useEffect(() => {
        setTheme();
    }, []);
};

// Cuối cùng chúng ta vào lại file themeToggle.component.tsx trong thư mục components/theme và thêm hook và như sau:
export default function ToggleThemeComponent({mode}: ThemeState) {
    const dispatch = useAppDispatch();

    useThemeHook();
  ...
Vậy là chúng ta đã hoàn thành chức năng Dark Mode theo cách đơn giản rồi, mình không pro nên có chỗ nào thiếu sót mong các bạn bỏ qua và hướng dẫn mình thêm nhé, xin đa tạ các bạn rất nhiều vì đã theo dỗi bài viết của mình !!!
All rights reserved
