[React-native] Dựng layout hoàn chỉnh Stack, Tab, Drawner Navigations với React Navigation 5
Bài đăng này đã không được cập nhật trong 5 năm
Hi Eri Huỳnh chào mọi người, hôm nay mình sẽ giới thiệu mọi người cách để thực hiện một layout hoàn chỉnh cho một ứng dụng, bao gồm Stack, Tab, thanh Drawner với React Navigation 5. Mình bắt đầu nhé ^.^
Nếu các bạn lần đầu tiếp cận với
React-native, mình có viết một bài viết giới thiệu cách init và run project. Mọi người có thể xem ở Giới thiệu cách run project React Native. Trong phạm vi bài viết này, để tóm gọn nội dung mình sẽ bỏ qua bước cài đặt và init project.
1. Cài đặt React Navigtion
Để thực hiện layout bao gồm: Stack, Tab, Drawner Navigations. Mình sẽ cài đặt các package sau.
npm install @react-navigation/native @react-navigation/stack @react-navigation/bottom-tabs @react-navigation/drawer
Tìm kiếm file root của project, thông thường sẽ là file App.js để tiến hành cài đặt react-navation.
// ./App.js

import React from "react";
import { NavigationContainer } from "@react-navigation/native";

const App = () => {
return <NavigationContainer>{/* Navigation here */}</NavigationContainer>;
}
export default App;
2. Tạo các Sceen View
Ở bước tiếp theo, mình sẽ tạo các Screen cơ bản để thực hiện Navigation giữa các screen. Tạo một thư mục screens để quản lý các screen view hiện có. Demo sẽ có 3 view chính: Home, About, Contact.
- Home Screen
// ./screens/Home.js

import React from "react";
import { View, Button, Text, StyleSheet } from "react-native";

const Home = () => {
return (
    <View style={styles.center}>
      <Text>This is the home screen</Text>
      <Button title="Go to About Screen" />
    </View>
    );
};

const styles = StyleSheet.create({
    center: {
    flex: 1,
    justifyContent: "center",
    alignItems: "center",
    textAlign: "center",
    },
});

export default Home;
- About Screen
// ./screens/About.js

import React from "react";
import { View Text, StyleSheet } from "react-native";

const About = () => {
    return (
        <View style={styles.center}>
          <Text>This is the about screen</Text>
        </View>
    );
};

const styles = StyleSheet.create({
    center: {
    flex: 1,
    justifyContent: "center",
    alignItems: "center",
    textAlign: "center",
    },
});

export default  About;
- Contact Screen
// ./screens/Contact.js

import React from "react";
import { View Text, StyleSheet } from "react-native";

const Contact = () => {
    return (
        <View style={styles.center}>
          <Text>This is the contact screen</Text>
        </View>
    );
};

const styles = StyleSheet.create({
    center: {
    flex: 1,
    justifyContent: "center",
    alignItems: "center",
    textAlign: "center",
    },
});

export default  Contact;
3. Tạo Stack Navigation
Stack Navigation là một cách để chúng ta có thể di chuyển qua lại giữa các screen trong react-native. Một Stack có thể là tập hợp của một hoặc nhiều screen. Trường hợp Stack có nhiều screen ta có thể hình dung như là nested page. Một ví dụ cụ thể: khi vào một ứng dụng có yêu cầu đăng nhập, screen đầu tiên bạn có thể thấy là Login Screen, tuy nhiên do là lần đầu đăng nhập ứng dụng, bàn chưa có tài khoản bạn sẽ chọn đăng ký tài khoản và chuyển sang Register Screen và bạn có thể back lại Login Screen sau khi đã đăng ký tài khoản.
Mình sẽ tạo thêm một thư mục navigation để quản lý các navigation. Trong thư mục này, mình tạo file StackNavigator.js để quản lý các Stack.
// ./navigation/StackNavigator.js

import React from "react";
import { createStackNavigator } from "@react-navigation/stack";

import Home from "../screens/Home";
import About from "../screens/About";

const Stack = createStackNavigator();

const MainStackNavigator = () => {
  return (
    <Stack.Navigator>
      <Stack.Screen name="Home" component={Home} />
      <Stack.Screen name="About" component={About} />
    </Stack.Navigator>
  );
}

export { MainStackNavigator };
Đồng thời ở file App.js mình sẽ truyền MainStackNavigator vừa tạo vào phần content để sử dụng.
// ./App.js

import React from "react";
import { NavigationContainer } from "@react-navigation/native";

import { MainStackNavigator } from "./navigation/StackNavigator";

 const App = () => {
  return (
    <NavigationContainer>
      <MainStackNavigator />
    </NavigationContainer>
  );
}
export default App
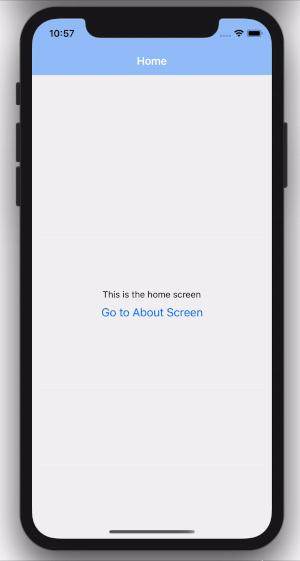
Ngoài ra bạn có thể tùy chỉnh thanh header của các Stack bằng thuộc tính screenOptions như sau
// ./navigation/StackNavigator.js

const MainStackNavigator = () => {
  return (
    <Stack.Navigator
      screenOptions={{
        headerStyle: {
          backgroundColor: "#9AC4F8",
        },
        headerTintColor: "white",
        headerBackTitle: "Back",
      }}
    >
      <Stack.Screen name="Home" component={Home} />
      <Stack.Screen name="About" component={About} />
    </Stack.Navigator>
  );
}
Và đây là kết quả, sau bước cài đặt Stack Navigation
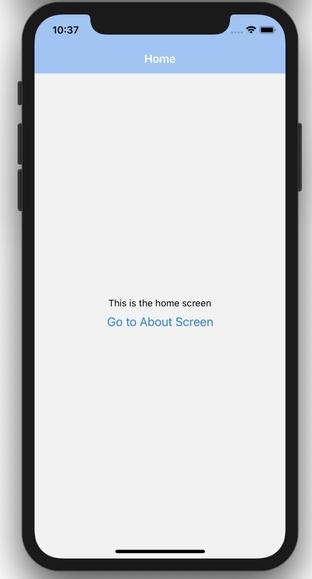
Tiếp theo mình sẽ thêm chức năng navigate tới trang About cho button ở Home Screen. Khi các Screen được render bởi Stack các component sẽ có thể access navigation prop dùng để navigate giữa các Screen.
// ./screens/Home.js

import React from "react";
import { View, Button, Text, StyleSheet } from "react-native";

const Home = ({ navigation }) => {
  return (
    <View style={styles.center}>
      <Text>This is the home screen</Text>
      <Button
        title="Go to About Screen"
        onPress={() => navigation.navigate("About")}
      />
    </View>
  );
};

const styles = StyleSheet.create({
  center: {
    flex: 1,
    justifyContent: "center",
    alignItems: "center",
    textAlign: "center",
  },
});

export default Home;
4. Tạo Tab Navigation
Tab Navigation có thể là một thanh Botom Tab hoặc Top Tab, mình sẽ dựng một thành Bottom Tab để switch giữa các screen. Mỗi tab tương ứng với một component có thể là Stack hoặc Screen.
Ở StackNavigator.js file tạo thêm ContactStackNavigator.
// ./navigation/StackNavigator.js

import React from "react";
import { createStackNavigator } from "@react-navigation/stack";

import Home from "../screens/Home";
import About from "../screens/About";
import Contact from "../screens/Contact";

const Stack = createStackNavigator();

const screenOptionStyle = {
  headerStyle: {
    backgroundColor: "#9AC4F8",
  },
  headerTintColor: "white",
  headerBackTitle: "Back",
};

const MainStackNavigator = () => {
  return (
    <Stack.Navigator screenOptions={screenOptionStyle}>
      <Stack.Screen name="Home" component={Home} />
      <Stack.Screen name="About" component={About} />
    </Stack.Navigator>
  );
}

const ContactStackNavigator = () => {
  return (
    <Stack.Navigator screenOptions={screenOptionStyle}>
      <Stack.Screen name="Contact" component={Contact} />
    </Stack.Navigator>
  );
}

export { MainStackNavigator, ContactStackNavigator };
Tạo TabNavigator.js file để thực hiện Bottom Tab
// ./navigation/TabNavigator.js

import React from "react";
import { createBottomTabNavigator } from "@react-navigation/bottom-tabs";

import { MainStackNavigator, ContactStackNavigator } from "./StackNavigator";

const Tab = createBottomTabNavigator();

const BottomTabNavigator = () => {
  return (
    <Tab.Navigator>
      <Tab.Screen name="Home" component={MainStackNavigator} />
      <Tab.Screen name="Contact" component={ContactStackNavigator} />
    </Tab.Navigator>
  );
};

export default BottomTabNavigator;
Và cuối cùng là cập nhật App.js file để apply TabNavigator.js
//  ./App.js

import React from "react";
import { NavigationContainer } from "@react-navigation/native";

import BottomTabNavigator from "./navigation/TabNavigator";

 const App = () => {
  return (
    <NavigationContainer>
      <BottomTabNavigator />
    </NavigationContainer>
  );
}
export default App
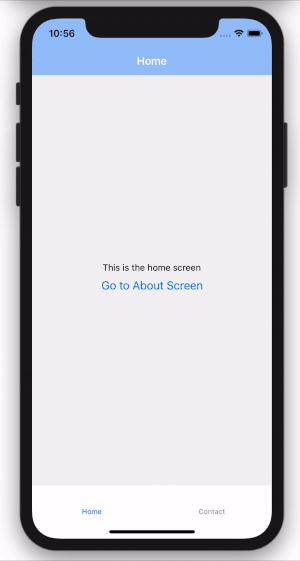
Sau khi hoàn tất step này sẽ có kết quả như trong hình
5. Tạo Drawner Navigation
Cuối cùng, mình sẽ thực hiện thanh Drawner cho ứng dụng. Tạo file DrawerNavigator.js trong thư mục navigation. Drawner Screen có thể render component là một Stack,Tab, Screen.
// ./navigation/DrawerNavigator.js

import React from "react";

import { createDrawerNavigator } from "@react-navigation/drawer";

import { ContactStackNavigator } from "./StackNavigator";
import TabNavigator from "./TabNavigator";

const Drawer = createDrawerNavigator();

const DrawerNavigator = () => {
  return (
    <Drawer.Navigator>
      <Drawer.Screen name="Home" component={TabNavigator} />
      <Drawer.Screen name="Contact" component={ContactStackNavigator} />
    </Drawer.Navigator>
  );
}

export default DrawerNavigator;
Cập nhật App.js file
// ./App.js

import React from "react";
import { NavigationContainer } from "@react-navigation/native";

import DrawerNavigator from "./navigation/DrawerNavigator";

 const App = () => {
  return (
    <NavigationContainer>
      <DrawerNavigator />
    </NavigationContainer>
  );
}
export default App;
Tạm kết
Yup 🎆🎆 hãy tận hưởng thành quả nào 😄 Vậy là mình đã hoàn thành các bước thực hiện layout cho ứng dụng di động với React Native, React Navigation 5. Nếu gặp khó khăn gì trong quá trình thực hiện hãy comment ở phần bình luận nhé. Mình và mọi người sẽ hỗ trợ các bạn, chúc các bạn thành công.
Hãy ủng hộ, follow và cho mình những nhận xét để mình dần cải thiện nhé. Mọi người có thể xem thêm nhiều bài viết của mình ở erihuynh.tech Eri Huỳnh Cám ơn mọi người 💗
All rights reserved
