[React Native] Dựng base App React Native - Mobx - Áp dụng thực tế
Bài đăng này đã không được cập nhật trong 5 năm
Chào mọi người.
Ở bài hôm trước chúng ta đã tìm hiểu về Mobx là gì rồi. Mọi người có thể đọc lại ở đây.
Và hôm nay chúng ta sẽ đi vào bài toán thực tế mà chúng ta có thể sử dụng với Mobx.
Phân quyền
Với các bài toán về phân quyền thì chúng ta sẽ gặp rất là nhiều. Chúng ta có thể sử dụng nhiều cách, nhiều phương pháp để giải quyết bài toán đó. Và hôm nay mình sẽ giới thiệu thêm một cách nữa đó chính là sử dụng Mobx.
Vậy chúng ta sẽ giải quyết nó như thế nào?
Giả sử chúng ta sẽ đặt ra bài toán như sau:
- Nếu user chưa đăng nhập thì user được di chuyển qua lại giữa các màn hình như: Login, register, forgot password, ... và không thể truy cập các màn hình get data.
- Và ở hướng ngược lại thì user sẽ có thể di chuyển giữa các màn hình có thể get detail data và không thể di chuyển tới các màn hình ở case phía trên.
Bài toán thực tế
Bài toán đã có thì bây giờ chúng ta cần chuẩn bị những gì.
- 2 navigation bao gồm Authen Navigation và Home Navigation
- 1 biến Mobx để tracking việc user Login.
Ok xong rồi đó, giờ là chúng ta triển khai code thôi.
Navigation
const Stack = createStackNavigator();

const AuthNavigationStack = () => {
 return (
   <Stack.Navigator initialRouteName={StackRoute.LoginScreen}>
     <Stack.Screen
       name={StackRoute.LoginScreen}
       component={LoginScreen}
       options={{
         title: 'Login Page',
       }}
     />
     <Stack.Screen
       name={StackRoute.RegisterScreen}
       component={RegisterScreen}
       options={{
         title: 'Register Page',
       }}
     />
   </Stack.Navigator>
 );
};

export default AuthNavigationStack;
const Tab = createStackNavigator();
const HomeNavigationStack = () => {
  return (
    <Tab.Navigator initialRouteName={StackRoute.HomePageScreen}>
      <Tab.Screen name={StackRoute.HomePageScreen} component={HomeScreen} />
      <Tab.Screen
        name={StackRoute.SettingScreen}
        options={{ headerShown: false }}
        component={SettingScreen}
      />
      <Tab.Screen
        name={StackRoute.AnimationNavigation1Screen}
        options={{ headerShown: false }}
        component={AnimationSampleStack}
      />
      <Tab.Screen
        name={StackRoute.BottomNavigation1ScreenScreen}
        component={BottomNavigationStack}
        options={{
          title: 'Bottom Navigation Example',
        }}
      />
      <Tab.Screen
        name={StackRoute.ModalNavigation1Screen}
        component={ModalNavigationStack}
        options={{ headerShown: false }}
      />
      <Tab.Screen
        name={StackRoute.SwipeSampleScreen}
        component={SwipeSampleStack}
        options={{ headerShown: false }}
      />
    </Tab.Navigator>
  );
};

export default HomeNavigationStack;
Chúng ta sẽ sử dụng react-navigation để tạo ra 2 Stack Navigation với 2 mục đích rõ ràng:
AuthNavigationStackđể chứa các màn hình dành cho user chưa đăng nhậpHomeNavigationStackđể chứa các màn hình dành cho user đã đăng nhập.
Ok vậy là chúng ta đã tạo xong Navigation, bây giờ chúng ta đi qua bước tiếp theo để tạo ra 1 object Mobx
Mobx Class
Như đã giới thiệu ở phần trước thì một object Mobx chính là 1 class có chứa các observer property, nó có nhiệm vụ quan sát và thông báo cho view khi có data thay đổi.
import { action, computed, observable } from 'mobx';

class UserStore {
  @observable _hasLogin: boolean = false;

  @action setHasLogin = (hasLogin: boolean) => {
    this._hasLogin = hasLogin;
  };

  @computed get IsUserLoggedIn(): boolean {
    return this._hasLogin;
  }
}

const userStore = new UserStore();
export default userStore;
Phân quyền
Chúng ta đã dọn mâm rồi, giờ thì xúc thôi, chúng ta sẽ update View để có thể update UserStore và qua đó điều hướng Navigation luôn.
const App = () => {
  const selectStack = () => {
    if (!UserStore.IsUserLoggedIn) {
      return <AuthNavigationStack />;
    } else {
      return <HomeNavigationStack />;
    }
  };

  return (
    <>
      <StatusBar barStyle="dark-content" backgroundColor={Colors.lighter} />
      <NavigationContainer>{selectStack()}</NavigationContainer>
    </>
  );
};

export default observer(App);
Giải thích đoạn code trên như sau:
- Function
selectStacksẽ có nhiệm vụ trả về Navigation dựa theo biếnUserStore.IsUserLoggedIn - Component
Appsẽ được bọc trong HOC Component của Mobxobserver(App)và nhiệm vụ của nó là báo choAppComponent biết khi có sự thay đổi củaUserStore.IsUserLoggedInvà tiến hành rerender lại.
Ok đến bước cuối cùng sẽ là nơi thực hiện update UserStore.IsUserLoggedIn
/**
 * Sample React Native App
 * https://github.com/facebook/react-native
 *
 * Generated with the TypeScript template
 * https://github.com/react-native-community/react-native-template-typescript
 *
 * @format
 */

import { observer } from 'mobx-react';
import React from 'react';
import { Button, SafeAreaView, StyleSheet, View } from 'react-native';
import { Colors } from 'react-native/Libraries/NewAppScreen';

import { UserStore } from 'stores';
import { StackRoute } from 'constants/Routes';

type Props = {
  navigation: any;
};

const LoginScreen = (props: Props) => {
  const { navigation } = props;
  return (
    <SafeAreaView>
      <View style={styles.body}>
        <Button
          title="Login"
          onPress={() => {
            UserStore.setHasLogin(true);
          }}
        />
        <Button
          title="Register"
          onPress={() => {
            navigation.navigate(StackRoute.RegisterScreen);
          }}
        />
      </View>
    </SafeAreaView>
  );
};

const styles = StyleSheet.create({
  body: {
    backgroundColor: Colors.white,
  },
});

export default observer(LoginScreen);
Ở màn hình login thì mình đang demo việc user login thành công bằng cách click button để thực hiện update UserStore. Và ở chiều ngược lại mình sẽ thực hiện Logout cũng bằng cách tương tự, update UserStore.IsLoggedIn = false
const HomeScreen = (props: Props) => {
  const { navigation } = props;

  return (
    <>
      <SafeAreaView style={styles.body}>
        <View style={styles.body}>
          <Button
            title="Logout"
            onPress={() => {
              UserStore.setHasLogin(false);
            }}
          />
        </View>
      </SafeAreaView>
    </>
  );
};
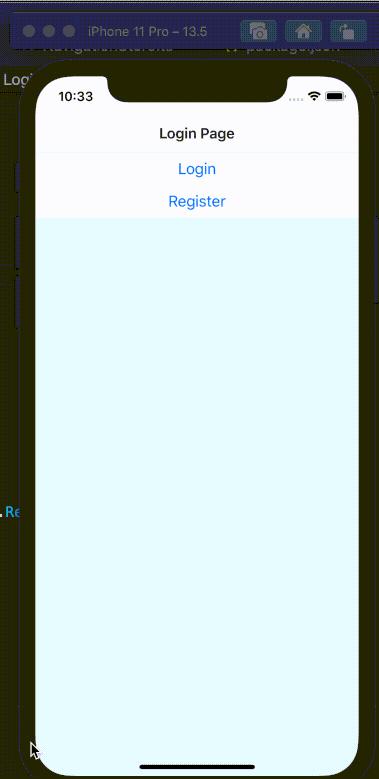
Kết quả
Mọi người cùng xem chúng ta được kết quả như thế nào nhé. (Click vào ảnh gif)
All rights reserved
