React Context API và react-query trong NextJS
Bài đăng này đã không được cập nhật trong 3 năm
1.1. React Context là gì ?
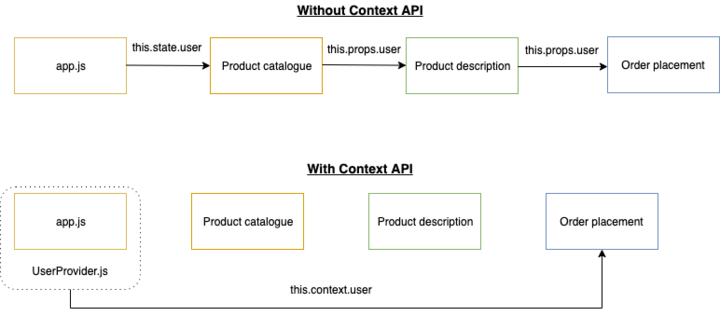
React Context là một tính năng trong thư viện React, cho phép chia sẻ dữ liệu giữa các thành phần con trong cây thành phần mà không cần truyền dữ liệu qua các thành phần cha. Nó cung cấp một cơ chế truyền dữ liệu theo chiều từ trên xuống (top-down) mà không cần thông qua các props.
Nếu không có React Context, chúng ta sẽ sử dụng kỹ thuật là “prop drilling” trong đó chúng ta sẽ phải truyền data xuống các components mặc dù một số components không cần dữ liệu đó.
1.2. So sánh React Context với Redux
| React Context | Redux |
|---|---|
| - Là built-in tool đến từ React | - Là một thư viện ngoài, cần phải cài vô project nếu muốn sử dụng, nên sẽ tăng bundle size cho ứng dụng. |
| - Dễ dàng để setup và sử dụng: Tạo Context, Provider, sử dụng dữ liệu từ Consumer (hoặc useContext hook). | - Tốn thời gian và công sức để cài đặt và sử dụng: Tạo Reducer, thiết lập state ban đầu, tạo các actions, khi dùng cần phải dispatch một action, cũng như xử lý action trong reducer tương ứng action đó |
| - Khó debug. | - Có thể sử dụng Redux devtool để debug một cách dễ dàng và tiện lợi. |
| - Khi state thay đổi, thì sẽ re-render tất cả các Components sử dụng Context đó. Tuy nhiên, ta có thể hạn chế bằng cách sử dụng React memo hoặc hook useMemo. Tham khảo tại đây | - Chỉ re-render các Component sử dụng data bị thay đổi. |
1.3. Setup React Context với useState hook
Đầu tiên, ta tạo Context và Provider. Provider của 1 Context là thành phần cha, có các state của Context bao bọc bên ngoài các Components con sử dụng state của Context.
import React, { useState } from 'react';

export interface ICounterContext {
    counter: number;
    setCounter: React.Dispatch<React.SetStateAction<number>>;
}

const DEFAULT_COUNTER: ICounterContext = {
    counter: 0,
    setCounter: () => {},
};

const CounterContext = React.createContext<ICounterContext>(DEFAULT_COUNTER);

export const CounterContextProvider: React.FC<{ children: any }> = ({ children }) => {
    const [counter, setCounter] = useState<number>(0);

    const values: ICounterContext = React.useMemo(
        () => ({
            counter,
            setCounter,
        }),
        [counter, setCounter],
    );

    return <CounterContext.Provider value={values}>{children}</CounterContext.Provider>;
};

export default CounterContext;
Tiếp theo ta bọc các components con bên trong Provider (thông thường ta sẽ bọc ở _app luôn).
import CounterContextProvider from '@/src/contexts';
import type { AppProps } from 'next/app';

export default function App({ Component, pageProps }: AppProps) {
    return (
            <CounterContextProvider>
                <Component {...pageProps} />
            </CounterContextProvider>
    );
}
Tại components muốn sử dụng, ta sử dụng hook useContext với tham số truyền vào Context cần sử dụng.
import { useContext } from 'react';

const { counter, setCounter } = useContext(CounterContext);
Tuy nhiên, nếu state có nhiều thành phần, thì việc tạo ra useState chưa chắc là một lựa chọn tối ưu. Sau đây, ta sẽ sử dụng useReducer để xử lý nhiều hành động hơn cho state của Context.
1.4. Setup React Context với useReducer hook
Về cơ bản cũng giống useState, tuy nhiên với useReducer, ta tạo thêm một function reducer để xử lý các actions. useReducer nhận vào 2 tham số. Đầu tiên là function reducer nhận 2 tham số là state hiện tại và action, tham số thứ 2 là initState.
Tạo types và enum trong typescript:
export enum PRODUCT_ACTIONS {
    Create = 'CREATE_PRODUCT',
    Delete = 'DELETE_PRODUCT',
    Update = 'UPDATE_PRODUCT',
    Init = 'INIT_PRODUCT',
    DeleteAll = 'DELETE_ALL_PRODUCT',
}

export type TProductType = {
    id: string;
    name: string;
    price: number;
};

export type TInitialProductStateType = {
    products: TProductType[];
};

export type TProductPayload = {
    [PRODUCT_ACTIONS.Create]: {
        id: string;
        name: string;
        price: number;
    };
    [PRODUCT_ACTIONS.Delete]: {
        id: string;
    };
    [PRODUCT_ACTIONS.Update]: {
        id: string;
        name: string;
        price: number;
    };
    [PRODUCT_ACTIONS.Init]: {
        data: TProductType[];
    };
    [PRODUCT_ACTIONS.DeleteAll]: {};
};

export type TActionMap<M extends { [index: string]: any }> = {
    [Key in keyof M]: M[Key] extends undefined
        ? {
              type: Key;
          }
        : {
              type: Key;
              payload: M[Key];
          };
};

export type TProductActions = TActionMap<TProductPayload>[keyof TActionMap<TProductPayload>];
Tạo Context và Provider. Ở đây ta có sử dụng function mainReducer để chuyển type any về type mà ta đã khởi tạo.
// Tạo Context và Provider
import React, { createContext, useReducer, Dispatch } from 'react';
import { productReducers } from './reducers/productReducers';
import { TInitialProductStateType, TProductActions } from '../lib/types/productTypes';

const initialState = {
    products: [],
};

const ProductContext = createContext<{
    state: TInitialProductStateType;
    dispatch: Dispatch<TProductActions>;
}>({
    state: initialState,
    dispatch: () => null,
});

const mainReducer = ({ products }: TInitialProductStateType, action: TProductActions) => ({
    products: productReducers(products, action),
});

export const ProductContextProvider: React.FC<{ children: any }> = ({ children }) => {
    const [state, dispatch] = useReducer(mainReducer, initialState);

    return <ProductContext.Provider value={{ state, dispatch }}>{children}</ProductContext.Provider>;
};

export default ProductContext;
Tạo reducer
// Tạo reducer
import { PRODUCT_ACTIONS } from '@/src/shared/constants/productConstants';
import { TProductActions, TProductType } from '@lib/types/productTypes';
import _, { isArray } from 'lodash';

export const productReducers = (state: TProductType[], action: TProductActions) => {
    switch (action.type) {
        case PRODUCT_ACTIONS.Create:
            return [
                ...state,
                {
                    id: action.payload.id,
                    name: action.payload.name,
                    price: action.payload.price,
                },
            ];
        case PRODUCT_ACTIONS.Init:
            return isArray(action.payload) ? action.payload : [];
        case PRODUCT_ACTIONS.Update:
            return [
                ...state.map((product) =>
                    product.id === action.payload.id
                        ? {
                              id: action.payload.id,
                              name: action.payload.name || product.name,
                              price: action.payload.price || product.price,
                          }
                        : product,
                ),
            ];
        case PRODUCT_ACTIONS.Delete:
            return [...state.filter((product) => product.id !== action.payload.id)];
        case PRODUCT_ACTIONS.DeleteAll:
            return [];
        default:
            throw new Error(Invalid action`);
    }
};
2.1. react-query là gì ?
React Query is often described as the missing data-fetching library for React, but in more technical terms, it makes fetching, caching, synchronizing and updating server state in your React applications a breeze.
React Query là một thư viện quản lý trạng thái và truy xuất dữ liệu cho ứng dụng React. Nó cung cấp một cách tiếp cận đơn giản và mạnh mẽ để thực hiện các yêu cầu mạng, quản lý bộ nhớ cache, và đồng bộ dữ liệu với giao diện người dùng.
2.2. Tại sao nên sử dụng react-query ?
Trước đây, người ta thường hay sử dụng useStatekết hợp useEffect hoặc Redux thunk, Redux toolkit để tương tác với API.
const Product = () => {
	const [data, setData] = useState();

    useEffect(() => {
        (async () => {
            const response = await axios({
                method: 'GET',
                baseURL: API,
                url: '/products',
            }).then((res) => {
                setData(res.data);
            });
        })();
    }, []);

    return (
		// ...
	)
}
Cách này hoạt động tốt, tuy nhiên khá dài dòng, phải viết một đống code chỉ để lấy dữ liệu về, trong trường hợp muốn có thêm loading, error, ta lại phải thêm nhiều useState nữa. Thêm nữa, nếu chuyển qua lại giữa các page, cách trên cũng sẽ reset state lại từ đầu, nếu dữ liệu trên API không có thay đổi, vẫn phải chờ thêm để setData hiện lên UI, điều này làm giảm trải nghiệm của người dùng. react-query sẽ giúp ta giải quyết vấn đề này.
2.3. Setup react-query
Trước tiến, để sử dụng các hooks của react-query, ta cần phải bọc các components sử dụng chúng ở trong Provide của react-query (thông thường ta sẽ bọc ở _app như Provide của Context luôn).
import AppContextProvider from '@/src/contexts';
import '@/styles/globals.css';
import { QueryClient, QueryClientProvider } from 'react-query';
import type { AppProps } from 'next/app';
const queryClient = new QueryClient();

export default function App({ Component, pageProps }: AppProps) {
    return (
        <QueryClientProvider client={queryClient}>
            <AppContextProvider>
                <Component {...pageProps} />
            </AppContextProvider>
        </QueryClientProvider>
    );
}
2.4. Sử dụng useQuery trong react-query
Đúng như tên gọi, useQuery là hook dùng để thực hiện truy vấn dữ liệu.
Để sử dụng hook useQuery, ta phải truyền ít nhất 2 tham số:
- Tham số đầu tiên là queryKey
- Tham số thứ 2 là hàm trả về 1 promise: Resolve data, hoặc Throw error
- Tham số thứ 3 là các options.
Dưới đây là cách sử dụng useQuery kết hợp với Context API
import { useEffect } from 'react';
import { PRODUCT_ACTIONS } from '@/src/shared/constants/productConstants';
import { QueryFunctionContext, useQuery } from 'react-query';

export default function Home() {
    const { state, dispatch } = useContext(ProductContext);

    const queryFunction = useCallback(
        () => (paramsQuery: QueryFunctionContext) => {
            return axios({
                method: 'GET',
                baseURL: API,
                url: 'products',
            });
        },
        [],
    );
    const { isLoading, isError, data, error, isSuccess } = useQuery(
        'products',
        queryFunction,
        { refetchOnWindowFocus: false }
    );

    useEffect(() => {
        if (isSuccess && data && data.data) {
            dispatch({
                type: PRODUCT_ACTIONS.Init,
                payload: data.data,
            });
        }
    }, [isSuccess, data]);

    return (
        // ....
    );
}
Trong đoạn code trên, mình có sử dụng option refetchOnWindowFocus: false để tắt tính năng (mặc định là true) re-fetching mỗi khi màn hình hiện tại được focus. Ví dụ, bạn đang mở 2 tab và đang ở tab khác của browser, khi chuyển qua tab mà page đang sử dụng useQuery, nó sẽ tự động re-fetching để cập nhật dữ liệu.
Hoặc có thể sử dụng option enable để bật tính năng chỉ lấy dữ liệu từ cache (nếu có), nếu cache không có dữ liệu mới thực hiện queryFunction.
Thêm nữa, ta có thể config các tính năng mặc định này ở Provide luôn.
const queryClient = new QueryClient({
    defaultOptions: {
        queries: {
            refetchOnWindowFocus: false,
        },
    },
});
Đọc thêm các options tại docs của react-query
2.5. Sử dụng useMutation trong react-query
useMutation là hook được dùng để thực hiện thêm/sửa/xóa dữ liệu. Nó cũng có thể dùng để query dữ liệu nếu sử dụng method GET và payload rỗng. Nhưng như vậy lại phải sử dụng useState và useEffect, và như vậy chỉ tăng sự rườm rà không cần thiết mà không tận dụng được ưu điểm khi sử dụng useQuery, nên ta ít khi sử dụng để query dữ liệu.
Để sử dụng hook useMutation , ta phải truyền ít nhất 1 tham số:
- Tham số thứ nhất là hàm trả về 1 promise: Resolve data, hoặc Throw error
- Tham số thứ hai là các options.
Dưới đây là cách sử dụng useMutation kết hợp với Context API
import { useContext } from 'react';
import { PRODUCT_ACTIONS } from '@/src/shared/constants/productConstants';
import { useMutation } from 'react-query';
import axios from 'axios';
import { API } from '@/src/shared/constants';
import ProductContext from '@/src/contexts/ProductContext';

export default function Home() {
    const { state, dispatch } = useContext(ProductContext);

    const mutationFunction = (payload: any) => {
        return axios({
            method: 'POST',
            baseURL: API,
            url: 'products',
            data: payload,
        });
    };
    const { mutate, isError, error, isSuccess } = useMutation(mutationFunction, {
        onMutate: () => {
            console.log('Loading....');
        },
        onSuccess: (response) => {
            console.log('Success');
        },
        onError: (error) => {
            console.log('Error');
        },
    });

    const handleAdd = () => {
        const dataPayload = { price: 150, name: 'Product 1' };
        mutate(
            { payload: dataPayload },
            {
                onSuccess: async (data: any) => {

                    dispatch({
                        type: PRODUCT_ACTIONS.Create,
                        payload: data.data,
                    });
                },
            },
        );
    };

    return (
        <>
            <button
                onClick={handleAdd}
                className='bg-blue-500 hover:bg-blue-700 text-white font-bold py-2 px-4 rounded-lg ml-4'
            >
                Add
            </button>
        </>
    );
}
Khác với useQuery trả về data, useMutation trả về hàm mutate. Khi gọi hàm mutate, thì function ở tham số thứ nhất của useMutation sẽ được gọi. Các options được khai báo ở default sẽ được thực thi trước các option hàm mutate. Ví dụ onSuccess, onSuccess khai báo ở useMutation sẽ thực thi trước rồi mới đến onSuccess ở mutate. Dĩ nhiên, nếu sử dụng setTimeout ở options useMutation, thì options ở hàm mutate sẽ thực thi trước do cơ chế bất đồng bộ trong JavaScript.
3. Kết
Trên đây là một vài tổng quan về Context API và react-query. Mọi người có thể tham khảo app hoàn chỉnh ở đây:
Github: useContext + useState | useReducer + react-query.
Cảm ơn mọi người đã đọc.
Bài viết có tham khảo từ:
react-query là gì? Tại sao nên sử dụng react-query?
All rights reserved
