QUERY BUILDER TRONG LARAVEL
Bài đăng này đã không được cập nhật trong 7 năm
1. Cấu hình Database.
-
-Trước tiên để sử dụng được Query builder các bạn cần phải cấu hình database kết nối đến cơ sở dữ liệu.
-
-Để cấu hình Database các bạn cần mở file .env lên và cấu hình như sau.
APP_ENV=local
APP_KEY=base64:w6dZccXCvdehAax2NYUt6f/igtsyw7QTQCx2eGEQBgI=
APP_DEBUG=true
APP_LOG_LEVEL=debug
APP_URL=http://localhost

DB_CONNECTION=mysql
DB_HOST=127.0.0.1
DB_PORT=3306
DB_USERNAME=root
DB_PASSWORD=

BROADCAST_DRIVER=log
CACHE_DRIVER=file
SESSION_DRIVER=file
QUEUE_DRIVER=sync

REDIS_HOST=127.0.0.1
REDIS_PASSWORD=null
REDIS_PORT=6379

MAIL_DRIVER=smtp
MAIL_HOST=mailtrap.io
MAIL_PORT=2525
MAIL_USERNAME=null
MAIL_PASSWORD=null
MAIL_ENCRYPTION=null

PUSHER_APP_ID=
PUSHER_KEY=
PUSHER_SECRET=
Chú thích:
- DB_HOST : Là server chứa mysql của bạn.
- DB_PORT: Là cổng post của server Mysql của bạn (thường để mặc định là 3306).
- DB_DATABASE: Là tên database của bạn.
- DB_USERNAME: Là username để truy cập vào database của bạn.
- DB_PASSWORD: Là password để truy cập vào database của bạn.
2. Sử dụng Query Builder trong Laravel.
a, Lấy tất cả dữ liệu trong bảng.
- cú pháp.
DB::table('tablename')->get()
-ví dụ: lấy tất cả dữ liệu từ bảng tbl_product.
Route::get('/', function () {
    $data=DB::table('tb_product')->get();
    	print_r($data);
});
b, select cột trong bảng.
- cú pháp.
DB::table('tablename')->select('columnfirst','columnsecond')->get();
c, truy vấn có điều kiện.
- điều kiện bằng.
DB::table('tablename')->where('column','filter')->get();
- điều kiện lớn hơn
DB::table('tablename')->where('column','>','filter')->get();
- điều kiện nhỏ hơn
DB::table('tablename')->where('column','<','filter')->get();
- điều kiện khác.
DB::table('tablename')->where('column','<>','filter')->get();
- điều kiện lồng.
$users = DB::table('users')->where('votes', '>', 100)->orWhere('name', 'John')->get();
- truy vấn tìm kiếm chuỗi.
DB::table('tablename')->where('column','like','filter')->get();
- các loại where khác. 1.Phương whereBetween : kiểm tra giá trị của một cột nằm giữa hai giá trị.
$users = DB::table('users')
                    ->whereBetween('votes', [1, 100])->get();
- Phương thức whereNotBetween : Kiểm tra giá trị của một cột không nằm trong khoảng 2 giá trị.
$users = DB::table('users')
                    ->whereNotBetween('votes', [1, 100])
                    ->get();
- phương thức whereIn/whereNotIn : kiểm tra giá trị của một cột có nằm trong một mảng các giá trị hay không.
$users = DB::table('users')
                    ->whereIn('id', [1, 2, 3])
                    ->get();
$users = DB::table('users')
                    ->whereIn('id', [1, 2, 3])
                    ->get();
- whereNull/whereNotNull : Kiểm tra giá trị của một cột có thể mang giá trị null hay không.
$users = DB::table('users')
                    ->whereNull('updated_at')
                    ->get();
$users = DB::table('users')
                    ->whereNotNull('updated_at')
                    ->get();
- phương thức whereDate / whereMonth / whereDay / whereYear. +, Phương thức whereDate kiểm tra giá trị cột giống như một date.
$users = DB::table('users')
                ->whereDate('created_at', '2016-10-10')
                ->get();
+, Phương thức whereMonth sử dụng để kiểm tra giá trị cột giống ngày date đặc biệt của tháng trong năm.
$users = DB::table('users')
                ->whereMonth('created_at', '10')
                ->get();
+, Phương thức whereDay sử dụng để kiểm tra giá trị cột giống ngày của tháng được truyền vào.
$users = DB::table('users')
                ->whereDay('created_at', '10')
                ->get();
+, Phương thức whereYear sử dụng để kiểm tra giá trị cột giống năm được truyền vào.
$users = DB::table('users')
                ->whereYear('created_at', '2016')
                ->get();
+, Phương thức whereColumn kiểm tra giá trị hai cột bằng nhau.
$users = DB::table('users')
                ->whereColumn('first_name', 'last_name')
                ->get();
- Bạn cũng có thể truyền một toán tử so sánh vào phương thức.
$users = DB::table('users')
                ->whereColumn('updated_at', '>', 'created_at')
                ->get();
- Phương thức whereColumn có thể được truyền vào một mảng các điều kiện. Những điều kiện này sẽ được nối với nhau sử dụng toán tử and operator.
$users = DB::table('users')
                ->whereColumn([
                    ['first_name', '=', 'last_name'],
                    ['updated_at', '>', 'created_at']
                ])->get();
- Mệnh đề where exists.
- Phương thức whereExists cho phép bạn viết các mệnh đề where exists. Phương thức whereExists chấp nhận tham số là một Closure cái mà sẽ nhận một query builder instance cho phép bạn định nghĩa truy vấn mà sẽ được đặt trong mệnh đề.
DB::table('users')
            ->whereExists(function ($query) {
                $query->select(DB::raw(1))
                      ->from('orders')
                      ->whereRaw('orders.user_id = users.id');
            })
            ->get();
-Truy vấn trên sẽ sinh ra đoạn SQL sau.
select * from users
where exists (
    select 1 from orders where orders.user_id = users.id
)
c, Kết nối các bảng (join).
- inner join.
$users = DB::table('users')->join('contacts', 'users.id', '=', 'contacts.user_id')->get();
- left join.
$users = DB::table('users')->leftjoin('contacts', 'users.id', '=', 'contacts.user_id')->get();
d. OrderBy, GroupBy,limit
- orderBy. Phương thức orderBy cho phép bạn sắp xếp kết quả của truy vấn bởi một cột cho trước. Tham số đầu tiên của phương thức orderBy nên là cột bạn muốn sắp xếp, trong khi tham số thứ 2 là chiểu của sắp xếp và có thể là asc hoặc desc.
$users = DB::table('users')
                ->orderBy('name', 'desc')
                ->get();
- groupBy / having / havingRaw. Phương thức groupBy và having có thể được sử dụng để nhóm kết quả truy vấn. Phương thức having có cách sử dụng tương tự phương thức where.
$users = DB::table('users')
                ->groupBy('account_id')
                ->having('account_id', '>', 100)
                ->get();
Phương thức havingRaw có thể được sử dụng thiết lập các chuỗi vào mệnh đề having. Ví dụ chúng ta có thể tìm toàn bộ các department mà có sale lớn hơn $2,500.
$users = DB::table('orders')
                ->select('department', DB::raw('SUM(price) as total_sales'))
                ->groupBy('department')
                ->havingRaw('SUM(price) > 2500')
                ->get();
insert,delete,update.
- Insert. Query builder cũng cung cấp phương thức insert cho việc chèn các bản ghi vào trong bảng. Phương thức insert chấp nhận một mảng tên các cột và giá trị để thêm vào.
DB::table('users')->insert(
    ['email' => 'john@example.com', 'votes' => 0]
);
Bạn có thể chèn các bản ghi riêng biệt vào bảng với một lần gọi insert bằng cách truyền vào một mảng các mảng. Mỗi mảng con đại diện cho một dòng sẽ được chèn vào bảng.
DB::table('users')->insert([
    ['email' => 'taylor@example.com', 'votes' => 0],
    ['email' => 'dayle@example.com', 'votes' => 0]
]);
- Update.
- Tất nhiên, ngoài việc chèn thêm bản ghi vào database, query builder cũng có thể cập nhật bản ghi có sẵn bằng cách sử dụng phương thức update. Phương thức update giống như insert, chấp nhận một mảng các cặp cột và giá trị có trong cột để cập nhật. Bạn có thể ràng buộc truy vấn update sử dụng mệnh đề where.
DB::table('users')
            ->where('id', 1)
            ->update(['votes' => 1]);
- delete.
- Tất nhiên, query builder cũng có thể được sử dụng để xóa các bản ghi từ bảng thông qua phương thức delete. Bạn có thể ràng buộc cú pháp delete bằng cách thêm mệnh đề where trước khi gọi phương thức delete.
DB::table('users')->delete();

DB::table('users')->where('votes', '>', 100)->delete();
3. Xây dựng Ứng dụng với Query Builder.
Xây dựng một số trang phục vụ các việc sau nhập thông tin sản phẩm, quản lý danh sách sản phẩm: xóa sản phẩm, sửa sản phẩm… Chúng ta cùng bắt đầu thực hiện nào.
- Bước 1: Tạo bảng products trong database laravel-test.
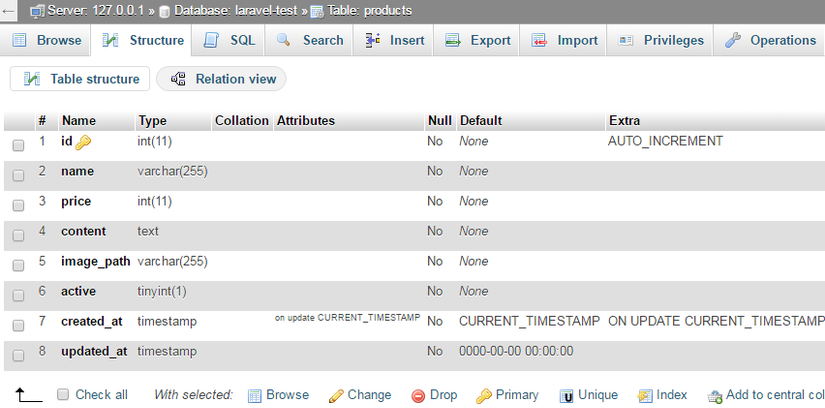 .
. - Bước 2: Tạo một controller tên là ProductController.
c:\xampp\htdocs\laravel-test>php artisan make:controller ProductController --res
ource
Controller created successfully.
- Bước 3: Thêm resource route vào routes/web.php.
Route::resource('product', 'ProductController', ['only' => [
    'create', 'store', 'edit'
]]);
- Bước 4. Tạo view create.blade.php trong resources/views/fontend/product.
@extends('layouts.default')

@section('title', 'Tạo sản phẩm')

@section('content')
    @if(isset($success))
		<div class="alert alert-success" role="alert">{{ $success }}</div>
    @endif
    @if(isset($fail))
		<div class="alert alert-danger" role="alert">{{ $fail }}</div>
    @endif

    {!! Form::open(array('url' => '/product', 'class' => 'form-horizontal')) !!}
      <div class="form-group">
         {!! Form::label('name', 'Tên sản phẩm', array('class' => 'col-sm-3 control-label')) !!}
         <div class="col-sm-9">
            {!! Form::text('name', '', array('class' => 'form-control')) !!}
         </div>
      </div>

      <div class="form-group">
         {!! Form::label('price', 'Giá sản phẩm', array('class' => 'col-sm-3 control-label')) !!}
         <div class="col-sm-3">
            {!! Form::text('price', '', array('class' => 'form-control')) !!}
         </div>
      </div>

      <div class="form-group">
         {!! Form::label('content', 'Nội dung sản phẩm', array('class' => 'col-sm-3 control-label')) !!}
         <div class="col-sm-9">
            {!! Form::textarea('content', '', array('class' => 'form-control', 'rows' => 3)) !!}
         </div>
      </div>

      <div class="form-group">
         {!! Form::label('image_path', 'Ảnh sản phẩm', array('class' => 'col-sm-3 control-label')) !!}
         <div class="col-sm-9">
            {!! Form::text('content', '', array('class' => 'form-control')) !!}
         </div>
      </div>

      <div class="form-group">
         {!! Form::label('active', 'Active', array('class' => 'col-sm-3 control-label')) !!}
         <div class="col-sm-3">
            {!! Form::checkbox('active', '', true) !!}
         </div>
      </div>

      <div class="form-group">
         <div class="col-sm-offset-2 col-sm-10">
            {!! Form::submit('Tạo sản phẩm', array('class' => 'btn btn-success')) !!}
         </div>
      </div>
   {!! Form::close() !!}
@endsection
- Bước 5 : Thêm nội dung phương thức create trong ProductController.
   /**
     * Show the form for creating a new resource.
     *
     * @return \Illuminate\Http\Response
     */
    public function create()
    {
        return view('fontend.product.create');
    }
- Bước 6 : Tiếp đến chúng ta xử lý insert sản phẩm vào CSDL, nó sẽ nằm trong phương thức store của ProductController.
/**
     * Store a newly created resource in storage.
     *
     * @param  \Illuminate\Http\Request  $request
     * @return \Illuminate\Http\Response
     */
    public function store(Request $request)
    {
        $validator = Validator::make($request->all(), [
            'name'       => 'required|max:255',
            'price'      => 'required|number',
            'content'    => 'required',
            'image_path' => 'required'
        ]);

        if ($validator->fails()) {
            return redirect('product/create')
                    ->withErrors($validator)
                    ->withInput();
        } else {
            // Lưu thông tin vào database, phần này sẽ giới thiệu ở bài về database
            $active = $request->has('active')? 1 : 0;
            $product_id = DB::table('product')->insertGetId(
                'name'       => $request->input('name'),
                'price'      => $request->input('price'),
                'content'    => $request->input('content'),
                'image_path' => $request->input('image_path'),
                'active'     => $active
                );
            return redirect('product/create')
                    ->with('message', 'Sản phẩm được tạo thành công với ID: ' . $product_id);
        }
    }
- Bước 7 : Để nhập sản phẩm ta vào đường dẫn http://laravel.dev/product/create.
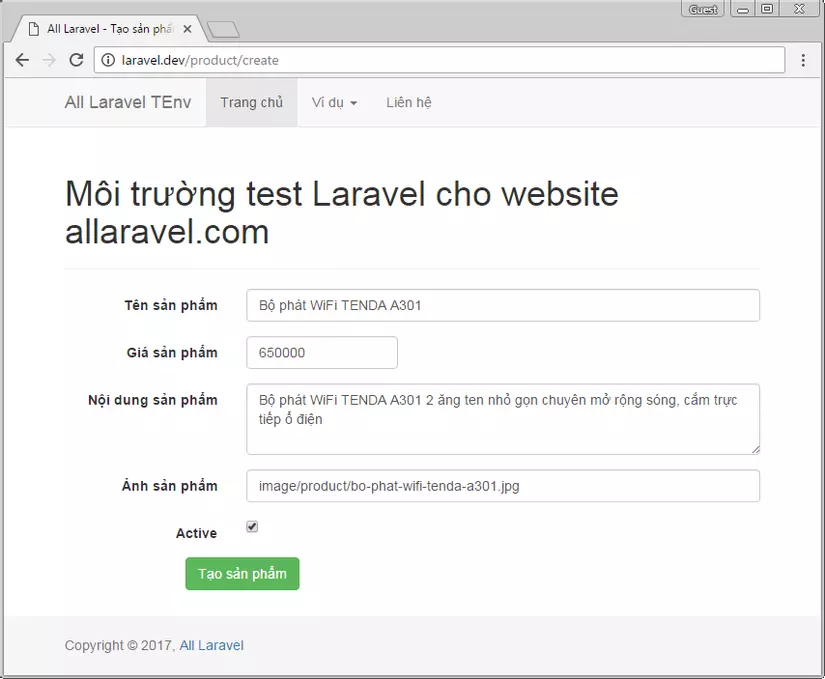 .
. - Bước 8 : anh sách sản phẩm sẽ được xử lý trong phương thức index của ProductController.
 /**
     * Display a listing of the resource.
     *
     * @return \Illuminate\Http\Response
     */
    public function index()
    {
        $products = DB::table('products')->get();
        return view('fontend.product.list')->with($products);
    }
- Bước 9 : Tiếp đến chúng ta tạo một view để hiển thị danh sách sản phẩm tên là list.blade.php nằm trong thư mục resources/views/fontend/product.
@extends('layouts.default')

@section('title', 'Danh sách sản phẩm')

@section('content')
    <table class="table table-bordered">
        <tr class="success">
            <th>ID</th>
            <th>Tên sản phẩm</th>
            <th>Giá sản phẩm</th>
            <th>Nội dung</th>
            <th>Ảnh sản phẩm</th>
            <th>Đăng bán</th>
            <th>Action</th>
        </tr>
        @foreach($products as $p)
        <tr>
            <td>{{ $p->id }}</td>
            <td>{{ $p->name }}</td>
            <td class="text-right">{{ number_format($p->price) }}</td>
            <td>{{ $p->content }}</td>
            <td>
                <img src="{{ Asset($p->image_path) }}" alt="{{ $p->name }}" width="120" height="120">
            </td>
            <td>
                @if($p->active)
                    <span class="text-success glyphicon glyphicon-ok"></span>
                @else
                    <span class="text-danger glyphicon glyphicon-remove"></span>
                @endif
            </td>
            <td>
                <a href="{{ '/product/' . $p->id . '/edit'}}"><span class="glyphicon glyphicon-pencil">Edit</span></a>
                <a href="{{ '/product/' . $p->id }}"><span class="glyphicon glyphicon-trash">Delete</span></a>
            </td>
        </tr>
        @endforeach
    </table>
@endsection
- Kết quả khi chạy http://laravel.dev/product ta có danh sách các sản phẩm.
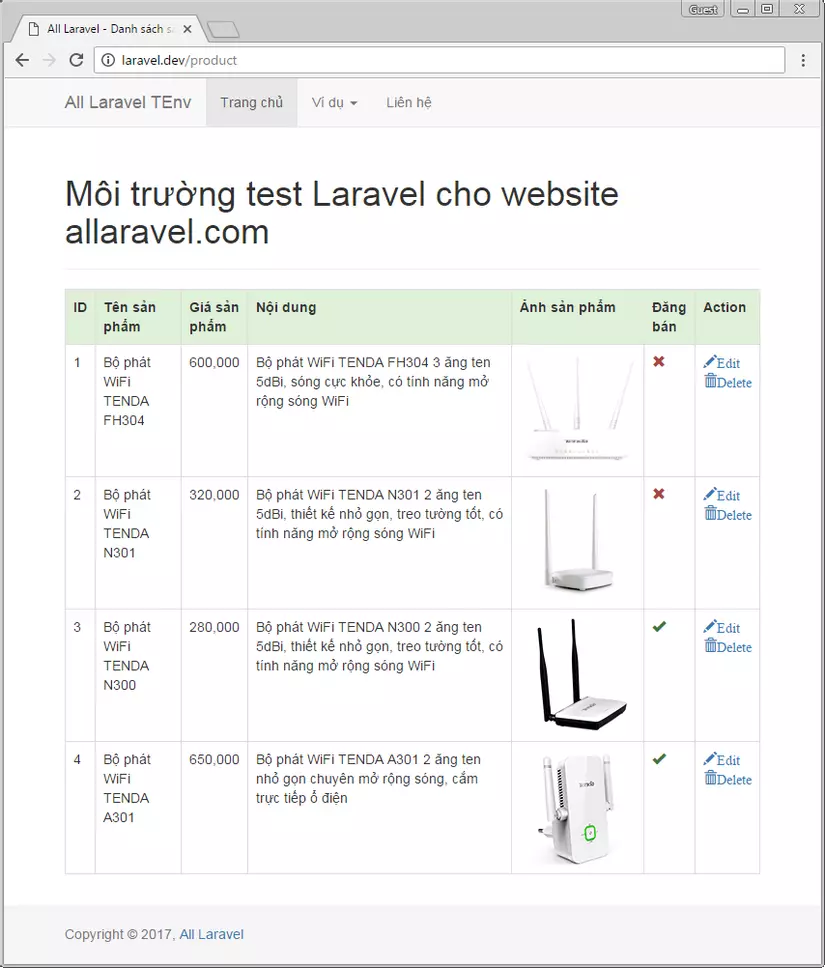 .
.
- Bước 10 : Chúng ta sử dụng phương thức edit() trong ProductController để chỉnh sửa sản phẩm.
/**
     * Show the form for editing the specified resource.
     *
     * @param  int  $id
     * @return \Illuminate\Http\Response
     */
    public function edit($id)
    {
        $product = DB::table('products')->find($id);
        return view('fontend.product.edit')->with(compact('product'));
    }
- Bước 11 : Tạo một view để chỉnh sửa sản phẩm resources/views/fontend/product/edit.blade.php.
@extends('layouts.default')

@section('title', 'Chỉnh sửa sản phẩm')

@section('content')
    @if(isset($success))
		<div class="alert alert-success" role="alert">{{ $success }}</div>
    @endif
    @if (count($errors) > 0)
        <div class="alert alert-danger">
            <ul>
                @foreach ($errors->all() as $error)
                    <li>{{ $error }}</li>
                @endforeach
            </ul>
        </div>
    @endif

    {!! Form::open(array('url' => '/product/' . $product->id, 'class' => 'form-horizontal', 'method' => 'put')) !!}
      <div class="form-group">
         {!! Form::label('name', 'Tên sản phẩm', array('class' => 'col-sm-3 control-label')) !!}
         <div class="col-sm-9">
            {!! Form::text('name', $product->name, array('class' => 'form-control')) !!}
         </div>
      </div>

      <div class="form-group">
         {!! Form::label('price', 'Giá sản phẩm', array('class' => 'col-sm-3 control-label')) !!}
         <div class="col-sm-3">
            {!! Form::text('price', $product->price, array('class' => 'form-control')) !!}
         </div>
      </div>

      <div class="form-group">
         {!! Form::label('content', 'Nội dung sản phẩm', array('class' => 'col-sm-3 control-label')) !!}
         <div class="col-sm-9">
            {!! Form::textarea('content', $product->content, array('class' => 'form-control', 'rows' => 3)) !!}
         </div>
      </div>

      <div class="form-group">
         {!! Form::label('image_path', 'Ảnh sản phẩm', array('class' => 'col-sm-3 control-label')) !!}
         <div class="col-sm-9">
            {!! Form::text('image_path', $product->image_path, array('class' => 'form-control')) !!}
         </div>
      </div>

      <div class="form-group">
         {!! Form::label('active', 'Active', array('class' => 'col-sm-3 control-label')) !!}
         <div class="col-sm-3">
            {!! Form::checkbox('active', $product->active, true) !!}
         </div>
      </div>

      <div class="form-group">
         <div class="col-sm-offset-2 col-sm-10">
            {!! Form::submit('Chỉnh sửa sản phẩm', array('class' => 'btn btn-success')) !!}
         </div>
      </div>
   {!! Form::close() !!}
@endsection
- Bước 12 : Phương thức update() của ProductController đảm nhận phần cập nhật nội dung sản phẩm.
/**
     * Update the specified resource in storage.
     *
     * @param  \Illuminate\Http\Request  $request
     * @param  int  $id
     * @return \Illuminate\Http\Response
     */
    public function update(Request $request, $id)
    {
        $active = $request->has('active')? 1 : 0;
        $updated = DB::table('products')
            ->where('id', '=', $id)
            ->update([
                'name'       => $request->input('name'),
                'price'      => $request->input('price'),
                'content'    => $request->input('content'),
                'image_path' => $request->input('image_path'),
                'active'     => $active,
                'updated_at' => \Carbon\Carbon::now()
                ]);
        return Redirect::back()
            ->with('message', 'Cập nhật sản phẩm thành công')
            ->withInput();
    }
- giờ chúng ta click vào Edit sản phẩm bất kỳ trong danh sách sản phẩm nó sẽ xuất hiện cửa sổ chỉnh sửa sản phẩm.
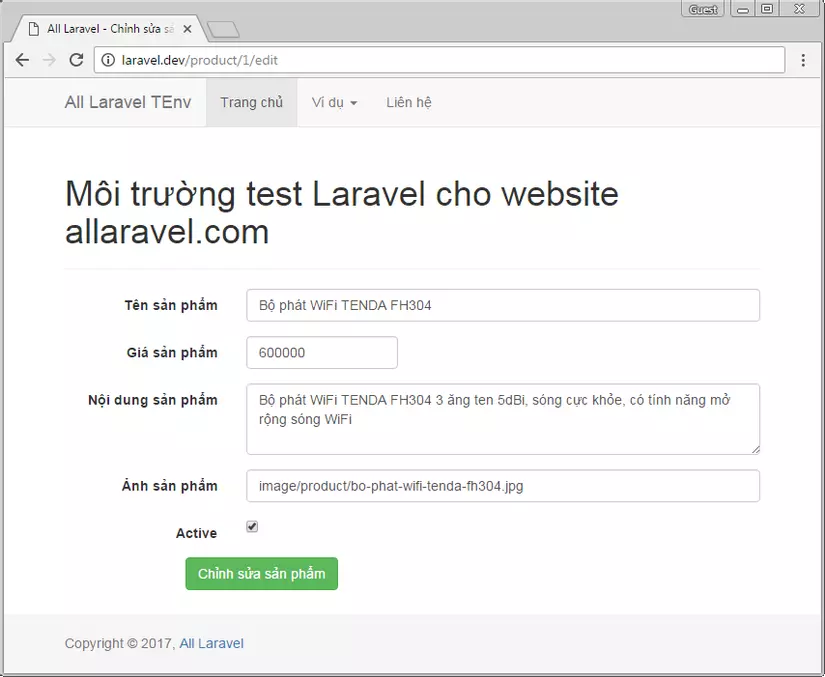 .
.
4. Tổng kết.
Qua bài này mình đã giới thiệu cho các bạn các phương thức quan trọng trong Query Builder.Các bạn thấy nó khá ngắn gọn và dễ sử dụng phải không nào,từ những câu lệnh truy vấn đến phức tạp.Ngoài ra Query Builder còn nhiều phương thức khác,bài viết được tham khảo tại trang chủ của Laravel các bạn có thể vào đây để tìm hiểu thêm các phương thức khác nhé.Sang bài tiếp theo mình sẽ giới thiệu cho các bạn về Eloquent ORM trong Laravel.
All rights reserved
