Push notification to web browser
Bài đăng này đã không được cập nhật trong 4 năm
Push notification là gì ?
Push notification là những tin nhắn do server đẩy xuống client thông qua một cổng cloud message nào đó rồi từ cổng này sẽ thông báo xuống máy chúng ta là có thông báo mới và hiển thị chúng. Chính vì vậy nên phải có internet thì mới push notification được.
Browser push notification
Tương tự như push notification, browser push notification sẽ gửi request xuống browser thông qua một cổng cloud message nào đó (gọi là endpoint) để hiển thị thông báo. Trong bài viết này chúng ta sẽ tìm hiểu cách gửi push notification thông qua Google Cloud Message xuống trình duyệt Chrome nhé.
1. Đăng ký Firebase Project
Đầu tiên chúng ta cần đăng ký một project tại https://console.firebase.google.com/
Sau khi đăng ký thành công chúng ta vào Project settings >> Cloud Messaging.
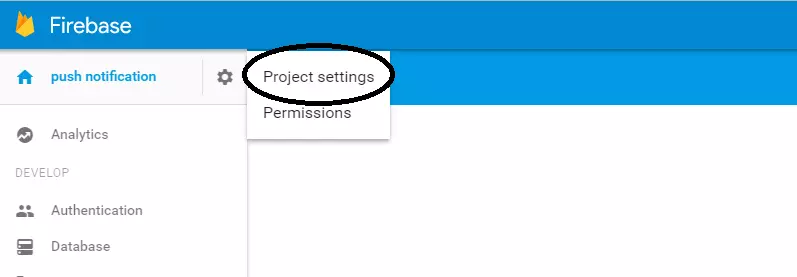
Hoặc có thể truy cập trực tiếp vào liên kết sau https://console.firebase.google.com/project/<Your-Project-ID>/settings/cloudmessaging
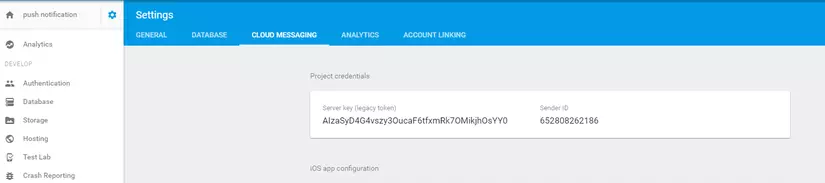
Trang này chứa Server key để push message mà chúng ta sẽ sử dụng sau này và và sender ID mà chúng ta cần phải đặt trong file manifest.json phần tiếp theo.
2. Tạo file Web App Manifest (manifest.json)
Chúng ta tạo một file manifest.json có chưa sender ID mà bạn vừa tạo ở bước trên với nội dung như sau:
{
  "name": "Push notification",
  "gcm_sender_id": "<Your Sender ID>"
}
Trên thực tế bạn có thể cho thêm nhiều thông tin khác như short_name, icon, start_url, display… nhưng mình chỉ để như vậy thôi là đủ rồi =))
Tiếp theo chúng ta phải include file này vào website:
<link rel="manifest" href="manifest.json">
3. Đăng ký service worker
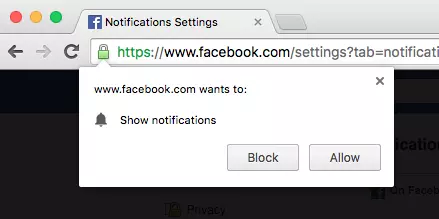
Push notification có thể được gửi đến browser bất kỳ lúc nào kể cả khi bạn không mở website đó. Ví dụ khi bạn đăng ký nhận notification trên Facebook thì kể cả bạn không mở Facebook ra nhưng bạn vẫn có thể nhận notification của facebook khi có tin nhắn hay thông báo mới trên facebook. Để làm được như vậy là do service worker nó sẽ chạy ngầm trong background và được gọi ra bất cứ khi nào cần.
Đoạn code sau đây dùng để đăng ký 1 service worker vào browser:
var isPushEnabled = false;
window.addEventListener('load', function() {
    var pushButton = document.querySelector('.js-push-button');
    pushButton.addEventListener('click', function() {
        if (isPushEnabled) {
            unsubscribe();
        } else {
            subscribe();
        }
    });

    // Check that service workers are supported, if so, progressively
    // enhance and add push messaging support, otherwise continue without it.
    if ('serviceWorker' in navigator) {
        navigator.serviceWorker.register('/service-worker.js')
        .then(initialiseState);
    } else {
        console.warn('Service workers aren\'t supported in this browser.');
    }
});
Ở đây chúng ta sẽ để 1 button cho phép người dùng bật/tắt push notification nếu muốn.
<button class="js-push-button" disabled>
  Enable Push Messages
</button>
Chúng ta sẽ kiểm tra trạng thái hiện tại cho button này là bật hay tắt trong hàm initialiseState sau đây.
// Once the service worker is registered set the initial state
function initialiseState() {
  // Are Notifications supported in the service worker?
  if (!('showNotification' in ServiceWorkerRegistration.prototype)) {
    console.warn('Notifications aren\'t supported.');

    return;
  }

  // Check the current Notification permission.
  // If its denied, it's a permanent block until the
  // user changes the permission
  if (Notification.permission === 'denied') {
    console.warn('The user has blocked notifications.');

    return;
  }

  // Check if push messaging is supported
  if (!('PushManager' in window)) {
    console.warn('Push messaging isn\'t supported.');

    return;
  }

  // We need the service worker registration to check for a subscription
  navigator.serviceWorker.ready.then(function(serviceWorkerRegistration) {
    // Do we already have a push message subscription?
    serviceWorkerRegistration.pushManager.getSubscription()
      .then(function(subscription) {
        // Enable any UI which subscribes / unsubscribes from
        // push messages.
        var pushButton = document.querySelector('.js-push-button');
        pushButton.disabled = false;

        if (!subscription) {
          // We aren't subscribed to push, so set UI
          // to allow the user to enable push
          return;
        }

        // Keep your server in sync with the latest subscriptionId
        sendSubscriptionToServer(subscription);

        // Set your UI to show they have subscribed for
        // push messages
        pushButton.textContent = 'Disable Push Messages';
        isPushEnabled = true;
      })
      .catch(function(err) {
        console.warn('Error during getSubscription()', err);
      });
  });
}
Sau khi đăng ký service worker thành công chúng ta sẽ có 1 đối tượng serviceWorkerRegistration cho phép ta subscribe push message. Điều này sẽ yêu cầu người dùng cho phép browser quyền gửi thông báo, nếu thành công sẽ trả lại một đối tượng PushSubscription sẽ chứa một thiết bị đầu cuối (endpoint). Endpoint này chúng ta cần phải lưu lưu lại trên server cho mỗi người dùng để sau này có thể xác định được endpoint này là của user nào để notification sao cho hợp lý.
function subscribe() {
  // Disable the button so it can't be changed while
  // we process the permission request
  var pushButton = document.querySelector('.js-push-button');
  pushButton.disabled = true;

  navigator.serviceWorker.ready.then(function(serviceWorkerRegistration) {
    serviceWorkerRegistration.pushManager.subscribe()
      .then(function(subscription) {
        // The subscription was successful
        isPushEnabled = true;
        pushButton.textContent = 'Disable Push Messages';
        pushButton.disabled = false;
        // TODO: Send the subscription.endpoint to your server
        // and save it to send a push message at a later date
        return sendSubscriptionToServer(subscription);
      })
      .catch(function(e) {
        if (Notification.permission === 'denied') {
          // The user denied the notification permission which
          // means we failed to subscribe and the user will need
          // to manually change the notification permission to
          // subscribe to push messages
          console.warn('Permission for Notifications was denied');
          pushButton.disabled = true;
        } else {
          // A problem occurred with the subscription; common reasons
          // include network errors, and lacking gcm_sender_id and/or
          // gcm_user_visible_only in the manifest.
          console.error('Unable to subscribe to push.', e);
          pushButton.disabled = false;
          pushButton.textContent = 'Enable Push Messages';
        }
      });
  });
}

function sendSubscriptionToServer(subscription) {
    //save enpoint
}
Kết quả là bạn sẽ có một endpoint kiểu như sau gửi lên server:
Sau khi đã có endpoint thì bạn sẽ tạo một POST request đến endpoint đó để gửi push notification. Ở đây chúng ta sẽ sử dụng curl cho nó đơn giản nhé.
curl --header "Authorization: key=<YOUR_API_KEY>" --header
"Content-Type: application/json" https://android.googleapis.com/gcm/send -d
"{\"registration_ids\":[\"<YOUR_REGISTRATION_ID>\"]}"
Với <YOUR_API_KEY> là Server key của firebase project chúng ta đã tạo ở phần đầu tiên và <YOUR_REGISTRATION_ID> là phần cuối của URL endpoint, ví dụ như endpoint ở trên thì <YOUR_REGISTRATION_ID> sẽ là:
7vsNIgzF28KGspVmLUpMgYLAPA91bHPffi8zclbIBDcToXN_LEpT6iA87pgR-OfwWiyVdKh__rEt15W9n2o6cZ8nxrPoiiydjAJW6Fa9mE3Ts-ukL1KV8exGOnuJ-MuuVVycM0SmptG-rXdCPKTM5pvKiHk2rOAKdbvH9jcvg8h2gSi-zZJyT_Bd1rxaVh-L4NDzD7HyTkhF
4. Xử lý sự kiện khi nhận được push notification
Nếu để ý thì chúng ta sẽ thấy là mình không gửi bất kỳ một thông tin gì xuống client ví dụ như title, nội dung notification. Thay vì thế bạn sẽ phải dùng 1 request nữa để lấy ra message cần hiển thị. Và dĩ nhiên chúng ta sẽ phải gửi kèm endpoint lên để phân biệt là message đó của user nào. Request trả về json bao gồm có message, title, icon, url để khi bấm vào thông báo sẽ mở ra trang web nào đó. Dưới đây chúng ta sẽ xử lý sự kiện và dùng dùng request browser_push_notification?endpoint=xxx trả về json gần các thông tin cần thiết cho nofification.
self.addEventListener('push', function(event) {
  var apiPath = 'browser_push_notification?endpoint=';

  event.waitUntil(
    registration.pushManager.getSubscription()
    .then(function(subscription) {
      if (!subscription || !subscription.endpoint) {
        throw new Error();
      }

      apiPath = apiPath + encodeURI(subscription.endpoint);

      return fetch(apiPath)
      .then(function(response) {
        if (response.status !== 200){
          console.log("Problem Occurred:"+response.status);
          throw new Error();
        }

        return response.json();
      })
      .then(function(data) {
        if (data.status == 0) {
          console.error('The API returned an error.', data.error.message);
          throw new Error();
        }
        var data = data.data;
        var title = data.notification.title;
        var message = data.notification.message;
        var icon = data.notification.icon;
        var data = {
          url: data.notification.url
        };

        return self.registration.showNotification(title, {
          body: message,
          icon: icon,
          data: data
        });
      })
      .catch(function(err) {
        return self.registration.showNotification('Notification', {
          body: 'Có một sự kiện sắp diễn ra',
          icon: 'image/pn_logo.png',
          data: {
            url: "/"
          }
        });
      });
    })
  );
});
5. Xử lý sự kiện khi user click vào thông báo
self.addEventListener('notificationclick', function(event) {
    event.notification.close();
    var url = event.notification.data.url;
    event.waitUntil(
        clients.matchAll({
                type: 'window'
            })
            .then(function(windowClients) {
                for (var i = 0; i < windowClients.length; i++) {
                    var client = windowClients[i];
                    if (client.url === url && 'focus' in client) {
                        return client.focus();
                    }
                }
                if (clients.openWindow) {
                    return clients.openWindow(url);
                }
            })
    );
});
Đoạn code trên giúp cho việc click vào thông báo sẽ mở ra trang web tương ứng. Nếu như nó đã được mở rồi thì focus vào tab đó nếu chưa thì mở tab mới.
6. Unsubscribe push notification
Khi người dùng không muốn nhận thông báo nữa thì có thể unsubscribe, đoạn code dưới đây để xử lý việc này.
function unsubscribe() {
  var pushButton = document.querySelector('.js-push-button');
  pushButton.disabled = true;

  navigator.serviceWorker.ready.then(function(serviceWorkerRegistration) {
    // To unsubscribe from push messaging, you need get the
    // subscription object, which you can call unsubscribe() on.
    serviceWorkerRegistration.pushManager.getSubscription().then(
      function(pushSubscription) {
        // Check we have a subscription to unsubscribe
        if (!pushSubscription) {
          // No subscription object, so set the state
          // to allow the user to subscribe to push
          isPushEnabled = false;
          pushButton.disabled = false;
          pushButton.textContent = 'Enable Push Messages';

          return;
        }

        var subscriptionId = pushSubscription.subscriptionId;
        // TODO: Make a request to your server to remove
        // the subscriptionId from your data store so you
        // don\'t attempt to send them push messages anymore

        // We have a subscription, so call unsubscribe on it
        pushSubscription.unsubscribe().then(function(successful) {
          pushButton.disabled = false;
          pushButton.textContent = 'Enable Push Messages';
          isPushEnabled = false;
        }).catch(function(e) {
          // We failed to unsubscribe, this can lead to
          // an unusual state, so may be best to remove
          // the users data from your data store and
          // inform the user that you have done so

          console.log('Unsubscription error: ', e);
          pushButton.disabled = false;
          pushButton.textContent = 'Enable Push Messages';
        });
      }).catch(function(e) {
        console.error('Error thrown while unsubscribing from push messaging.', e);
      });
  });
}
Ok vậy là chúng ta hoàn thành xong việc push notification trên trình duyệt Chrome/Cốc Cốc. Sau đây là demo ứng dụng dùng push notification.
Bài viết hoàn toàn dựa trên việc tìm hiểu cá nhân nên có thể sai sót có gì mọi người cứ comment nhiệt tình ak =)).
Tham khảo:
All rights reserved
