Push notification lên Browser bằng Reactjs + Nodejs
Bài đăng này đã không được cập nhật trong 6 năm
Gần đây mình có nghe một người bạn kể về một task trong công việc đó là làm sao để bắn thông báo cho ng dùng thông qua browser . Lúc đấy vs mình thì khái niệm này khá mơ hồ và mình cho rằng nếu đã tắt tab ứng dụng rồi thì làm sao bắn đc Notification chứ. Rồi mình thử tìm hiểu xem có thực sự làm đc chuyện đấy không . Bài viết này mình sẽ chia sẻ các thức hoạt động cũng như một ví dụ minh họa nhỏ mà mình tìm hiểu và làm được về Push notification .
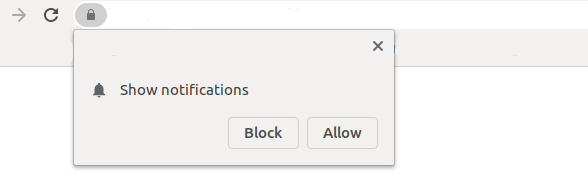
À hóa ra là nó đây thứ mà bấy lâu nay mình nghĩ nó là quảng cáo và nhấn vào Block mà chẳng mảy may suy nghĩ nó thực sự là gì. Không dài dòng thêm nữa chúng ta cùng bắt đầu tìm hiểu về nó nào
Service Worker
Ủa ủa đang tìm hiểu về Push notification lên browser cơ mà. Vâng mình ko nhầm bài viết đâu ạ. Đầu tiên phải tìm hiểu Service Worker trước đã, Service Worker là một script hoạt động ngầm trên browser ( browser underground ) mà không có sự tương tác của người dùng . Ngoài ra, nó giống như một proxy hoạt động ở phía người dùng.
Chúng ta có thể làm gì với Service Worker?
- Kiểm soát Network Traffic!
- Cache lại dữ liệu req/res từ đó có thể chạy web offline
- Thực hiện một số tính năng chạy background như: Push notification và background synchronization.
- Service Worker chỉ có thể làm việc trên giao thức HTTPS. Bạn cũng có thể làm việc trên localhost trong quá trình phát triển.
- ...
Trong bài này thì mình chỉ tập trung vào phần Push notification thôi nhé . Đầu tiên chúng ta cần nắm rõ hoạt động Push này có 2 phần:
- Push : việc gửi thông báo từ máy chủ đến ứng dụng. vì thế bạn sẽ cần một server
- Notification : thông báo được hiển thị trên thanh trạng thái của điện thoại hoặc trên browser.
Web push notifications flow
Chúng ta sẽ có 4 tác nhân chính trong quá trình này :
- User : Ng dùng muốn nhận thông báo
- Application : Ứng dụng chạy ở phía ng dùng
- Service worker : Chạy trên browser
- Push Server : Server bắn tin nhắn đến service workers
![]()
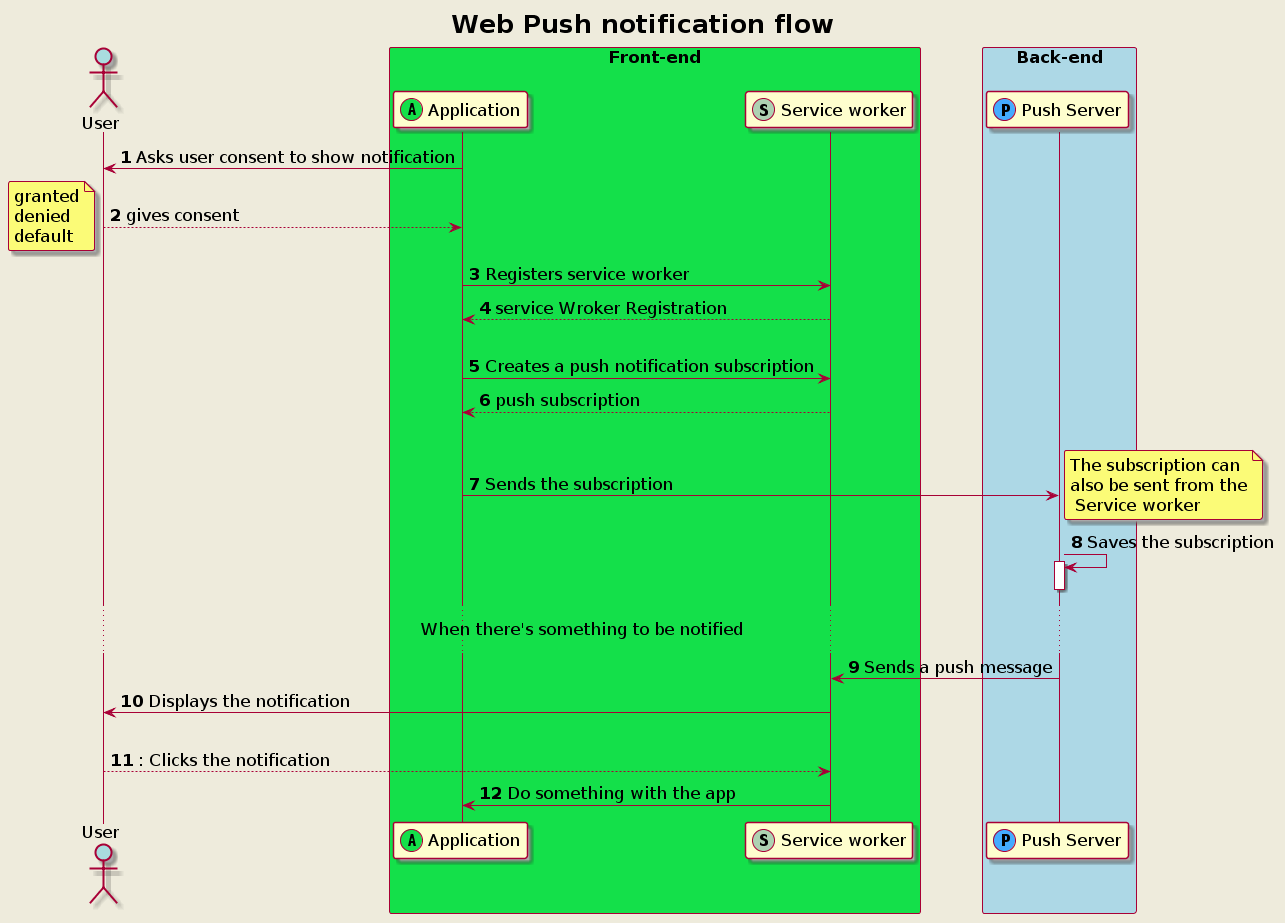
Giải thích flow :
1, Luồng bắt đầu khi ứng dụng yêu cầu người dùng đồng ý hiển thị notifications ( giống như ảnh ban đầu ý ). User sẽ có một vài kịch bản có thể xảy ra :
- Do nothing :
defaultvà như vậy thì notification sẽ ko hiện ra - Grant :
grandednotification sẽ có thể hiển thị - Deny :
deniednotification sẽ ko hiện ra
2, 3, Sau khi người dùng đồng ý nhận notifications ứng dụng sẽ register một service worker
4, 5, 6, Sau khi đăng kí thành công sẽ tiến hành tạo push notification subscription
7, Sau đó ứng dụng sẽ gửi đến server . Tất nhiên là server cần phải có 1 endpoint subscription để gửi noti
8, Sau đó server sẽ lưu subcription đó
9, Sau đó Serer có thể gửi notification đến service worker .
10, 11, 12, Service sẽ hiển thị cho ng dùng . Sau đó nếu ng dùng nhấn vào notification đấy server worker sẽ nhận được hành động đó thông quá notification click event. Sau đó nó có thể kích hoạt một số kịch bản như hiển thị trang web , gọi API , v..v....
Code tí vận động ngón tay nào
Ví dụ này mình sẽ làm bằng Nodejs và Reactjs vì thế mặc định là mọi người có một số kiến thức cũng như môi trường cài đặt nhé .
Tạo server
Vẫn những câu lệnh quen thuộc tạo một server nodejs + express và lần này có thêm một thư viện web-push
npm init -y
yarn add body-parser cors crypto express morgan web-push
tạo file index.js
const express = require('express');
const bodyParser = require('body-parser');
const logger = require('morgan');
const cors = require('cors');
const subscriptionHandler = require('./subscriptionHandler');

var port = process.env.PORT || 4000;

const app = express();

app.use(
  cors({
    origin: '*', // allow to server to accept request from different origin
    methods: 'GET,HEAD,PUT,PATCH,POST,DELETE',
    credentials: true // allow session cookie from browser to pass through
  })
);

app.use(logger('dev'));
app.use(bodyParser.urlencoded({ extended: true }));
app.use(bodyParser.json());

app.post('/subscription', subscriptionHandler.handlePushNotificationSubscription);
app.get('/subscription/:id', subscriptionHandler.sendPushNotification);

app.listen(port);
console.log('The magic happens on port ' + port);
tạo file subscriptionHandler.js để handle việc push notification phía server
const subscriptions = {};
var crypto = require('crypto');
const webpush = require('web-push');

const vapidKeys = {
  privateKey: 'bdSiNzUhUP6piAxLH-tW88zfBlWWveIx0dAsDO66aVU',
  publicKey:
    'BIN2Jc5Vmkmy-S3AUrcMlpKxJpLeVRAfu9WBqUbJ70SJOCWGCGXKY-Xzyh7HDr6KbRDGYHjqZ06OcS3BjD7uAm8'
};

webpush.setVapidDetails('mailto:example@yourdomain.org', vapidKeys.publicKey, vapidKeys.privateKey);

function createHash(input) {
  const md5sum = crypto.createHash('md5');
  md5sum.update(Buffer.from(input));
  return md5sum.digest('hex');
}

function handlePushNotificationSubscription(req, res) {
  const subscriptionRequest = req.body.data;
  const susbscriptionId = createHash(JSON.stringify(subscriptionRequest));
  subscriptions[susbscriptionId] = subscriptionRequest;
  res.status(201).json({ id: susbscriptionId });
}

function sendPushNotification(req, res) {
  const subscriptionId = req.params.id;
  const pushSubscription = subscriptions[subscriptionId];
  webpush
    .sendNotification(
      pushSubscription,
      JSON.stringify({
        title: 'New Product Available ',
        text: 'HEY! Take a look at this brand new t-shirt!',
        image: '/images/jason-leung-HM6TMmevbZQ-unsplash.jpg',
        tag: 'new-product',
        url: '/new-product-jason-leung-HM6TMmevbZQ-unsplash.html'
      })
    )
    .catch((err) => {
      console.log(err);
    });

  res.status(202).json({});
}

module.exports = { handlePushNotificationSubscription, sendPushNotification };
Kịch bản
Server này chúng ta tạo 2 api POST /subscription và GET /subscription/:id để đăng kí và kích hoạt push notification từ phía server tất nhiên là phần GET có thể đc kích hoạt bằng những xử lý logic trong project thực sự như khi có thêm sản phẩm mới ở web bán hàng chứ ko phải client gọi api để bắn notification về mình.
Hơn nữa mình cũng ko dùng database nào nên dữ liệu sẽ đc fix cứng trong function sendPushNotification . Danh sách các client đăng kí cũng đc lưu trong obj subscriptions và phân biệt vs nhau bằng id đc generate từ function createHash
Như vậy là đã xong phần server rồi .
Tạo React app
Cách nhanh nhất để tạo khởi tạo React là chạy lệnh create-react-app:
npx create-react-app frontend
cd frontend
yarn add axios serve
Mình install luôn thư viện axios để tiện request đến server thay vì fetch serve để chạy web trên file build
Chú ý
Mặc dù có thể chạy service worker ở local nhưng react yêu cầu phải chạy từ file build. Vì thế chạy service worker trên React thì phải chạy build rồi start bằng lệnh . Hơn nữa vì service worker có cache lại nên để test chuẩn nhất thì nên thỉnh thoảng xóa cache của browser .
yarn serve -s build
Tạo file usePushNotifications.js ( một custom Hook )
import { useState, useEffect } from 'react';
import axios from 'axios';
import * as serviceWorker from './serviceWorker';

const pushNotificationSupported = serviceWorker.isPushNotificationSupported();
// check push notifications are supported by the browser

export default function usePushNotifications() {
  const [userConsent, setSuserConsent] = useState(Notification.permission);
  //to manage the user consent: Notification.permission is a JavaScript native function that return the current state of the permission
  //We initialize the userConsent with that value
  const [userSubscription, setUserSubscription] = useState(null);
  //to manage the use push notification subscription
  const [pushServerSubscriptionId, setPushServerSubscriptionId] = useState();
  //to manage the push server subscription
  const [error, setError] = useState(null);
  //to manage errors
  const [loading, setLoading] = useState(true);
  //to manage async actions

  useEffect(() => {
    if (pushNotificationSupported) {
      setLoading(true);
      setError(false);
      serviceWorker.register();
    }
  }, []);
  //if the push notifications are supported, registers the service worker
  //this effect runs only the first render

  useEffect(() => {
    setLoading(true);
    setError(false);
    const getExixtingSubscription = async () => {
      const existingSubscription = await serviceWorker.getUserSubscription();
      setUserSubscription(existingSubscription);
      setLoading(false);
    };
    getExixtingSubscription();
  }, []);
  //Retrieve if there is any push notification subscription for the registered service worker
  // this use effect runs only in the first render

  /**
   * define a click handler that asks the user permission,
   * it uses the setSuserConsent state, to set the consent of the user
   * If the user denies the consent, an error is created with the setError hook
   */
  const onClickAskUserPermission = () => {
    setLoading(true);
    setError(false);
    serviceWorker.askUserPermission().then((consent) => {
      setSuserConsent(consent);
      if (consent !== 'granted') {
        setError({
          name: 'Consent denied',
          message: 'You denied the consent to receive notifications',
          code: 0
        });
      }
      setLoading(false);
    });
  };
  //

  /**
   * define a click handler that creates a push notification subscription.
   * Once the subscription is created, it uses the setUserSubscription hook
   */
  const onClickSusbribeToPushNotification = () => {
    setLoading(true);
    setError(false);
    serviceWorker
      .createNotificationSubscription()
      .then(function(subscrition) {
        setUserSubscription(subscrition);
        setLoading(false);
      })
      .catch((err) => {
        console.error(
          "Couldn't create the notification subscription",
          err,
          'name:',
          err.name,
          'message:',
          err.message,
          'code:',
          err.code
        );
        setError(err);
        setLoading(false);
      });
  };

  /**
   * define a click handler that sends the push susbcribtion to the push server.
   * Once the subscription ics created on the server, it saves the id using the hook setPushServerSubscriptionId
   */
  const onClickSendSubscriptionToPushServer = () => {
    setLoading(true);
    setError(false);
    axios
      .post('http://localhost:4000/subscription', { data: userSubscription })
      .then(function(response) {
        setPushServerSubscriptionId(response.data.id);
        setLoading(false);
      })
      .catch((err) => {
        setLoading(false);
        setError(err);
      });
  };

  /**
   * define a click handler that requests the push server to send a notification, passing the id of the saved subscription
   */
  const onClickSendNotification = async () => {
    setLoading(true);
    setError(false);
    axios.get(`http://localhost:4000/subscription/${pushServerSubscriptionId}`).catch((error) => {
      setLoading(false);
      setError(error);
    });
    setLoading(false);
  };

  return {
    onClickAskUserPermission,
    onClickSusbribeToPushNotification,
    onClickSendSubscriptionToPushServer,
    pushServerSubscriptionId,
    onClickSendNotification,
    userConsent,
    pushNotificationSupported,
    userSubscription,
    error,
    loading
  };
}
Nhiều code thế @@
- Đầu tiên là check browser có support push notification không
- Nếu push notifications đã được support tiến hành registers service worker
- Handler click bằng
onClickAskUserPermissionđể yêu cầu ng dùng cung cấp quyền - Handler click bằng
onClickSubscribeToPushNotificationđể tạo push notification subscription - Handler click bằng
onClickSendSubscriptionToPushServerđể gửipush subscriptionđến server - Handler click bằng
onclickSendNotificationđể mô phỏng việc server gửi notification cho mình
Tiếp theo thêm một vài function vào serviceWorker.js file này đã đc tạo sẵn rồi
const pushServerPublicKey =
  'BIN2Jc5Vmkmy-S3AUrcMlpKxJpLeVRAfu9WBqUbJ70SJOCWGCGXKY-Xzyh7HDr6KbRDGYHjqZ06OcS3BjD7uAm8';

export async function askUserPermission() {
  return await Notification.requestPermission();
}

export async function createNotificationSubscription() {
  //wait for service worker installation to be ready

  const serviceWorker = await navigator.serviceWorker.ready;

  // subscribe and return the subscription
  return await serviceWorker.pushManager.subscribe({
    userVisibleOnly: true,
    applicationServerKey: pushServerPublicKey
  });
}

export function getUserSubscription() {
  //wait for service worker installation to be ready, and then
  return navigator.serviceWorker.ready
    .then(function(serviceWorker) {
      return serviceWorker.pushManager.getSubscription();
    })
    .then(function(pushSubscription) {
      return pushSubscription;
    });
}

export function isPushNotificationSupported() {
  return 'serviceWorker' in navigator && 'PushManager' in window;
}
Chú thích : chúng ta thêm các hàm
- askUserPermission để xin quyền của user
- isPushNotificationSupported để check browser có hỗ trợ ko ( cái này sẽ check đc ví dụ mở ẩn danh sẽ ko hỗ trợ )
- pushServerPublicKey của server
- createNotificationSubscription để tạo Notification Subscription mà chúng ta đã tạo sự kiện
onClickSusbribeToPushNotificationởusePushNotifications.jsbên trên
Mấu chốt để bắn noti về browser
return await serviceWorker.pushManager.subscribe({
    userVisibleOnly: true,
    applicationServerKey: pushServerPublicKey
  });
Để tạo chúng ta cần 2 tham số
- userVisibleOnly : giá trị kiểu Boolean chỉ ra push subscription được server lại sẽ chỉ được sử dụng để hiển thị cho người dùng .
- applicationServerKey : là một Base64-encoded DOMString hoặc ArrayBuffer chứa ECDSA P-256 public key mà server push notification sau sẽ dùng để xác thực .
endpoint: '.....',
  keys: {
    auth: '.....',
    p256dh: '.....'
  }
Đây chính là những gì mà hàm createNotificationSubscription tạo ra và chúng ta dùng để register trên server.
- endpoint : là endpoint mang tính chất duy nhất và được sử dụng để định tuyến tin nhắn mà server gửi đến đúng thiết bị .
- keys: dùng để xác thực và giải mã tin nhắn
Vậy còn khi server push thì phía browser sẽ nghe ở đâu ? . Đó chính là chúng ta phải ghi đè vào file service-worker.js . Thực ra file serviceWorker.js mà create-react-app tạo sẵn ko phải là service-worker.js mà browser chạy ngầm mà sau khi build xong file đấy mới thực sự xuất hiện .
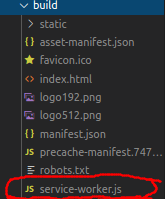
Vì thế chúng ta phải code thêm file sw.js cùng cấp vs file serviceWorker.js
function receivePushNotification(event) {
  console.log('[Service Worker] Push Received.');

  const { image, tag, url, title, text } = event.data.json();

  const options = {
    data: url,
    body: text,
    icon: image,
    vibrate: [200, 100, 200],
    tag: tag,
    image: image,
    badge: 'https://spyna.it/icons/favicon.ico',
    actions: [{ action: 'Detail', title: 'View', icon: 'https://via.placeholder.com/128/ff0000' }]
  };
  event.waitUntil(self.registration.showNotification(title, options));
}

function openPushNotification(event) {
  console.log('[Service Worker] Notification click Received.', event.notification.data);

  event.notification.close();
  event.waitUntil(clients.openWindow(event.notification.data));
}

self.addEventListener('push', receivePushNotification);
self.addEventListener('notificationclick', openPushNotification);
Mục đích là để lắng nghe event và handle việc ng dùng click vào notification đấy. Sau đó sửa lại một chút phần file package.js phần build và thêm lệnh sw ở dưới để nối file sw vào file service-worker.js .
    "build": "rm -rf build/ && react-scripts build && npm run-script sw",
    "sw": "cat src/sw.js >> build/service-worker.js",
Cuối cùng là phần giao diện .Mình sẽ tận dụng luôn file App.js làm demo
import React from 'react';
import logo from './logo.svg';
import usePushNotifications from './usePushNotifications';
import './App.css';

function App() {
  const {
    userConsent,
    pushNotificationSupported,
    userSubscription,
    onClickAskUserPermission,
    onClickSusbribeToPushNotification,
    onClickSendSubscriptionToPushServer,
    pushServerSubscriptionId,
    onClickSendNotification,
    error,
    loading
  } = usePushNotifications();

  const Loading = ({ loading }) =>
    loading ? <div className='app-loader'>Please wait, we are loading something...</div> : null;
  const Error = ({ error }) =>
    error ? (
      <section className='app-error'>
        <h2>{error.name}</h2>
        <p>Error message : {error.message}</p>
        <p>Error code : {error.code}</p>
      </section>
    ) : null;

  const isConsentGranted = userConsent === 'granted';

  return (
    <div className='App'>
      <header className='App-header'>
        <img src={logo} className='App-logo' alt='logo' />
        <Loading loading={loading} />

        <p>Push notification are {!pushNotificationSupported && 'NOT'} supported by your device.</p>

        <p>
          User consent to recevie push notificaitons is <strong>{userConsent}</strong>.
        </p>

        <Error error={error} />

        <button
          disabled={!pushNotificationSupported || isConsentGranted}
          onClick={onClickAskUserPermission}>
          {isConsentGranted ? 'Consent granted' : ' Ask user permission'}
        </button>

        <button
          disabled={!pushNotificationSupported || !isConsentGranted || userSubscription}
          onClick={onClickSusbribeToPushNotification}>
          {userSubscription ? 'Push subscription created' : 'Create Notification subscription'}
        </button>

        <button
          disabled={!userSubscription || pushServerSubscriptionId}
          onClick={onClickSendSubscriptionToPushServer}>
          {pushServerSubscriptionId
            ? 'Subscrption sent to the server'
            : 'Send subscription to push server'}
        </button>

        {pushServerSubscriptionId && (
          <div>
            <p>The server accepted the push subscrption!</p>
            <button onClick={onClickSendNotification}>Send a notification</button>
          </div>
        )}
      </header>
    </div>
  );
}

export default App;
nhớ cuối cùng là chạy lệnh :
yarn build
yarn serve -s build
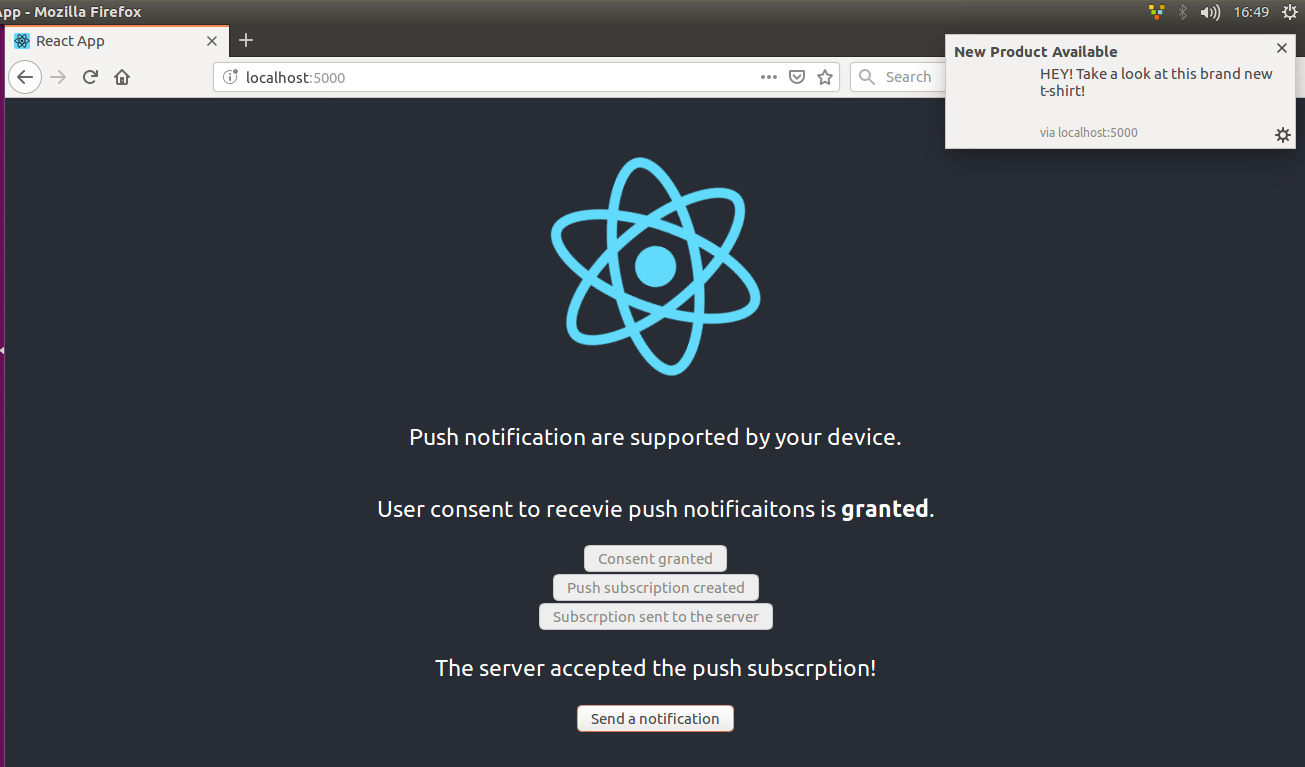
Demo : sau khi nhấn 3 nút từ trên xuống dưới và nhấn nút cuối cùng để kích hoạt bắn notification về browser
Link github : https://github.com/vinhyenvodoi98/Push_Notification_Nodejs_Reactjs
Reference :
- https://developers.google.com/web/ilt/pwa/introduction-to-push-notifications
- https://itnext.io/react-push-notifications-with-hooks-d293d36f4836
- https://itnext.io/an-introduction-to-web-push-notifications-a701783917ce
- https://stackoverflow.com/questions/57185722/how-to-add-event-listeners-to-create-react-app-default-sw-js-file/57185956
All rights reserved
