Push notification cho React App sử dụng Firebase kết hợp backend Laravel
Bài đăng này đã không được cập nhật trong 4 năm
1. Giới thiệu
Firebase là công ty mà Google mua lại vào năm 2014. Kể từ đó, Google đã thực hiện một số cải tiến đối với nền tảng này, đến mức hiện tại họ quảng cáo Firebase như một giải pháp phụ trợ một cửa như một dịch vụ cho các ứng dụng di động.
Bao gồm các giải pháp như Centralized Authentication, Realtime Databases, Cloud Functions, trong đó có một phần được xây dựng lên để tối ưu và gửi thông báo cho các ứng dụng. Đó chính là Firebase Cloud Messaging.
Trong bài viết này chúng mình cùng thử tìm hiểu làm sao để push notification từ một web Server Laravel đến browser chạy bằng 1 React app nhé .
Bắt đầu thôi 
2. Setting Firebase
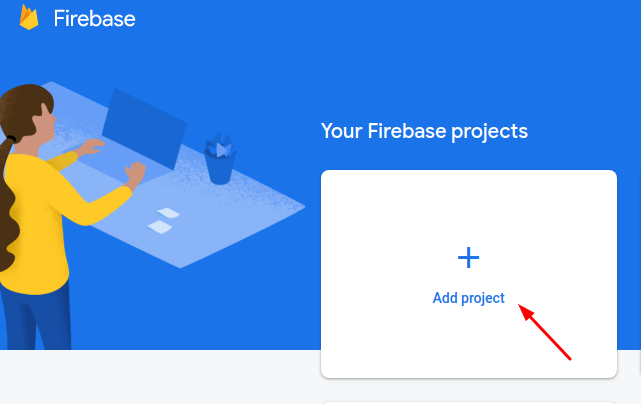
- Đầu tiên chúng ta cần tạo mới 1 project
- Sau đó ta cần tạo mới web application
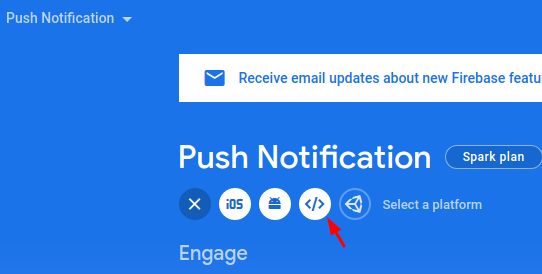
- Thực hiện điền các thông tin cơ bản và chúng ta sẽ thu được 1 đoạn script sau
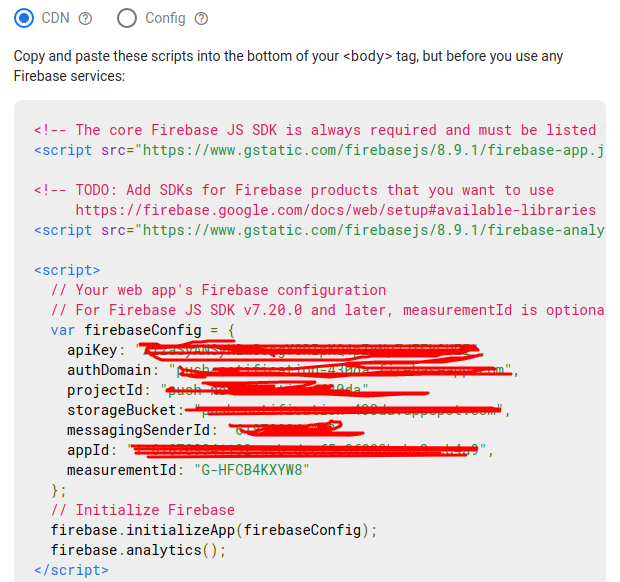
-
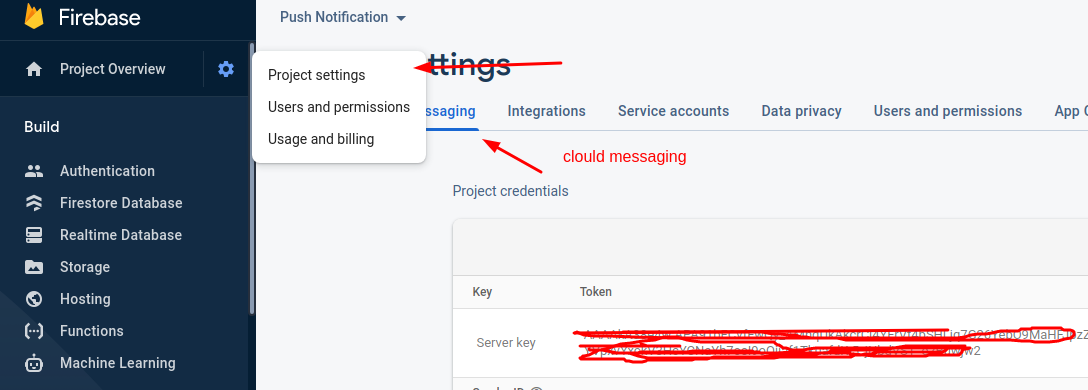
Sau các bước trên các bạn truy cập vào Project setting > Cloud Messaging
Thực hiện Coppy cho mình server key; nó sẽ được sử dụng là FiRE_BASE_FCM_KEY ở dưới logic server
![image.png]()
3. Server Side (Laravel)
- Tạo mới migration để add column device_token vào bảng users
> php artisan make:migration add_column_device_token_to_users_table --table=users
    /**
        * Run the migrations.
        *
        * @return void
        */
       public function up()
       {
           Schema::table('users', function (Blueprint $table) {
               $table->string('device_key')->nullable();
           });
       }

       /**
        * Reverse the migrations.
        *
        * @return void
        */
       public function down()
       {
           Schema::table('users', function (Blueprint $table) {
               $table->dropColumn('device_key');
           });
       }
-
sau đó là chạy migrate
-
tiếp theo là xử lý trong phần UserController
- Đây là phần receive và add token vào trong database
/** * Add device token for user * * @param Request $request * @return \Illuminate\Http\JsonResponse */ public function addDeviceToken(Request $request) { $user = getUser($request->bearerToken()); //getUser($request->bearerToken()) là mình đang sử dụng JWT nên mình chỉ lấy ra user với user_id truyển nên mà thôi return response()->json([ $user->update(['device_key' => $request->device_token]) ], 200); }- Đây sẽ là function send notification
/** * handle push notification * * @param Request $request * @return \Illuminate\Http\JsonResponse */ public function sendNotification(Request $request) { $deviceToken = User::whereNotNull('device_key')->pluck('device_key')->all(); $dataEndCode = json_encode([ "registration_ids" => $deviceToken, "notification" => [ "title" => $request->title, "body" => $request->body, ] ]); $headerRequest = [ 'Authorization: key=' . env('FIRE_BASE_FCM_KEY'), 'Content-Type: application/json' ]; // FIRE_BASE_FCM_KEY mình có note ở phần 2.setting firebase nhé // CURL $ch = curl_init(); curl_setopt($ch, CURLOPT_URL, env('FIRE_BASE_URL')); //FIRE_BASE_URL = https://fcm.googleapis.com/fcm/send curl_setopt($ch, CURLOPT_POST, true); curl_setopt($ch, CURLOPT_HTTPHEADER, $headerRequest); curl_setopt($ch, CURLOPT_RETURNTRANSFER, true); curl_setopt($ch, CURLOPT_SSL_VERIFYHOST, 0); curl_setopt($ch, CURLOPT_HTTP_VERSION, CURL_HTTP_VERSION_1_1); curl_setopt($ch, CURLOPT_SSL_VERIFYPEER, false); curl_setopt($ch, CURLOPT_POSTFIELDS, $dataEndCode); // Mục đích mình đưa các tham số kia vào env để tùy biến nhé $output = curl_exec($ch); if ($output === FALSE) { log('Curl error: ' . curl_error($ch)); } curl_close($ch); return response()->json($output); } -
Trong file routers/api.php mình sẽ có 2 router sau
 Route::post('update-device-token', [UserController::class, 'addDeviceToken']);
 Route::post('send-notifications', [UserController::class, 'sendNotification']);
Xong rồi tiếp đến phần client side nhé
4. Client Side (React App)
Ở phần Client side mình có sử dụng material-ui và react typescrip
-
Tiến hành tạo mới react app, firebase và install material-ui nhé
> npx create-react-app my-app --template typescript > npm install @material-ui/core > npm i firebase > @firebase/messaging > npm i axios -
Tạo mới file src/firebase.ts là file config firebase nhé :
import firebase from "firebase/app"; import '@firebase/messaging' const firebaseConfig = { apiKey: "apiKey", authDomain: "authDomain", projectId: "projectId", storageBucket: "storageBucket", messagingSenderId: "messagingSenderId", appId: "appId", measurementId: "measurementId" }; // các tham số này là phần config lấy ra được từ phần 2. setting firebase nhé firebase.initializeApp(firebaseConfig) export const message = firebase.messaging() export default firebase -
Tiếp theo các bạn tạo giúp mình public/firebase-messaging-sw.js với nội dung sau
    // Scripts for firebase and firebase messaging
   importScripts('https://www.gstatic.com/firebasejs/8.9.0/firebase-app.js');
   importScripts('https://www.gstatic.com/firebasejs/8.9.0/firebase-analytics.js');
   importScripts('https://www.gstatic.com/firebasejs/8.9.0/firebase-messaging.js')


   if ('serviceWorker' in navigator) {
     navigator.serviceWorker.register('../firebase-messaging-sw.js')
     .then(function(registration) {
       console.log('Registration successful, scope is:', registration.scope);
     }).catch(function(err) {
       console.log('Service worker registration failed, error:', err);
     });
   }

   // Initialize the Firebase app in the service worker by passing the generated config
   var firebaseConfig = {
     messagingSenderId: "messagingSenderId",
     appId: "appId",
   };

   // phần firebaseConfig tương tự như ở trên nhé

   firebase.initializeApp(firebaseConfig);

   const message = firebase.messaging()
- Ở file src/App.tsx xử lý push token và receive notification server trả về nhé
   import React, {useState, useEffect, useCallback} from 'react';
   import  Snackbar, {SnackbarOrigin} from '@material-ui/core/Snackbar';
   import  MuiAlert, { AlertProps } from '@material-ui/lab/Alert';
   import firebase, {message} from './firebase'
   import PushNotification from 'api/push-notification';
   import { getAccessToken } from './hooks';

   export interface State extends SnackbarOrigin {
     open: boolean;
     severity: "error" | "success" | "info" | "warning" | undefined
   }

   export interface Notification {
     title: any,
     body: any
   }

   function Alert(props: AlertProps) {
     return <MuiAlert elevation={6} variant="filled" {...props} />;
   }

   const App: React.FC = () => {

     const [dataNotify, setDataNotify] = useState<Notification>({title: '', body: ''});
     const [stateData, setStateData] = useState<State>({
       open: false,
       vertical: 'bottom',
       horizontal: 'left',
       severity: 'success'
     });

   // receive notification server trả về
     message.onMessage((payload) => {
       if(!payload?.notification) {
         setStateData({...stateData, open: true, severity: 'error'})
         return;
       }

       const {notification} = payload

       setStateData({...stateData, open: true, severity: 'success'})
       setDataNotify({title: notification.title, body: notification.body})
     });

    // getToken và push tokenID lên server
     useEffect(() => {
       const messaging = firebase.messaging()
       messaging.requestPermission()
       .then(() => {
         return messaging.getToken()
       })
       .then(token => {
          return axios.post('http://localhost/api/update-device-token ', {device_token: token})
       })
       .then(response => {
         console.log(response)
       })
     }, [])


     const handleClose = useCallback((event?: React.SyntheticEvent, reason?: string) => {
       setStateData({ ...stateData, open: false });
     }, [stateData]);

     const { vertical, horizontal, open } = stateData;

     // push data notification lên server
     const handlePushDataNotify = () => {
       axios.post('http://localhost/api/send-notifications ', {title: 'Đây là title', body: 'đây là body'})
    }
     return (
       <div>
          <button onClick={handlePushDataNotify}> Click to me </button>
         <Snackbar
           anchorOrigin={{ vertical, horizontal }}
           open={open}
           onClose={handleClose}
           key={vertical + horizontal}
         >
           <Alert onClose={handleClose} severity={stateData.severity}>
             {dataNotify.title}
           </Alert>
         </Snackbar>
       </div>
     );
   }

   export default App;
- ở đây mục đích sử dụng material để design và show notification
5. Kết quả
Sau khi thực hiện bấm vào button "Click to me" sẽ thực hiện call API lên Web server và server sẽ đẩy đến các device token đã lưu trước đó Kết quả
-
Trong trường hợp mình đứng tại page đó thì sẽ có hiển thị thông báo của trang web
![image.png]()
-
Trong trường hợp mình đã chuyển sang tab khác thì thông báo sẽ như sau:
![image.png]()


Còn đây là repository React App của mình, mọi người có thể tham khảo thêm : https://github.com/duong120798/redux-saga-typescript/
6. Tham khảo
https://blog.logrocket.com/push-notifications-with-react-and-firebase/ https://www.remotestack.io/how-to-send-web-push-notification-in-laravel-with-firebase/
All rights reserved
