Push Nofication firebase kết hợp ReactJS và NodeJs
Bài đăng này đã không được cập nhật trong 3 năm
1. Mở đầu:
Chào mọi người hôm nay mình sẽ hướng dẫn mọi người cách push nofication firebase với ReactJS và NodeJs. Không vòng vo nữa chúng ta cùng làm nào
2. Tạo project ReactJS và NodeJs
Chú ý: Máy tính của bạn phải cài đặt sẵn nodejs trước khi tạo project reactjs và nodejs, nếu ai chưa cài đặt truy cập vào link: https://nodejs.org/en
1. Tạo project ReactJS
Để tạo dự án ReactJS bạn chạy câu lệnh sau:
npx create-react-app reactjs-firebase
Sau đó bạn chạy lệnh sau để cài đặt các package cần thiết cho project:
npm install firebase --save
2. Tạo project NodeJs
Để tạo dự án NodeJs bạn chạy câu lệnh sau:
npm init
Sau đó bạn chạy lệnh sau để cài đặt các package cần thiết cho project:
npm install fcm-notification fcm-node express --save
3. Cấu hình firebase
1. Đăng nhập firebase
Chúng ta sẽ truy cập vào link này https://firebase.google.com/ để đăng kí hoặc đăng nhập
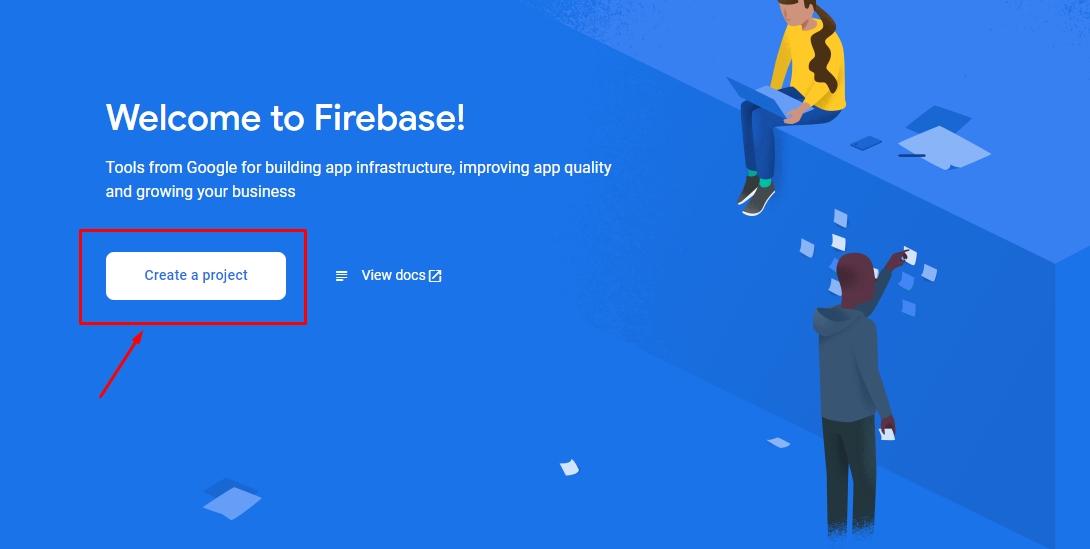
Các bạn click vào nút create a project như ảnh trên:
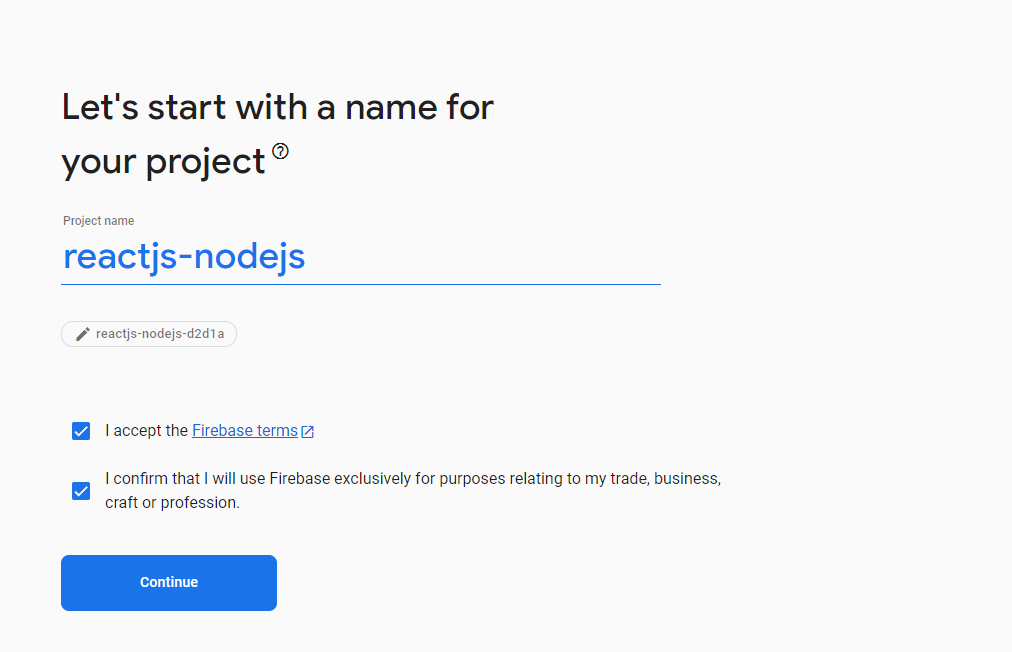
Tiếp theo chúng ta nhập tên tùy ý và click continue
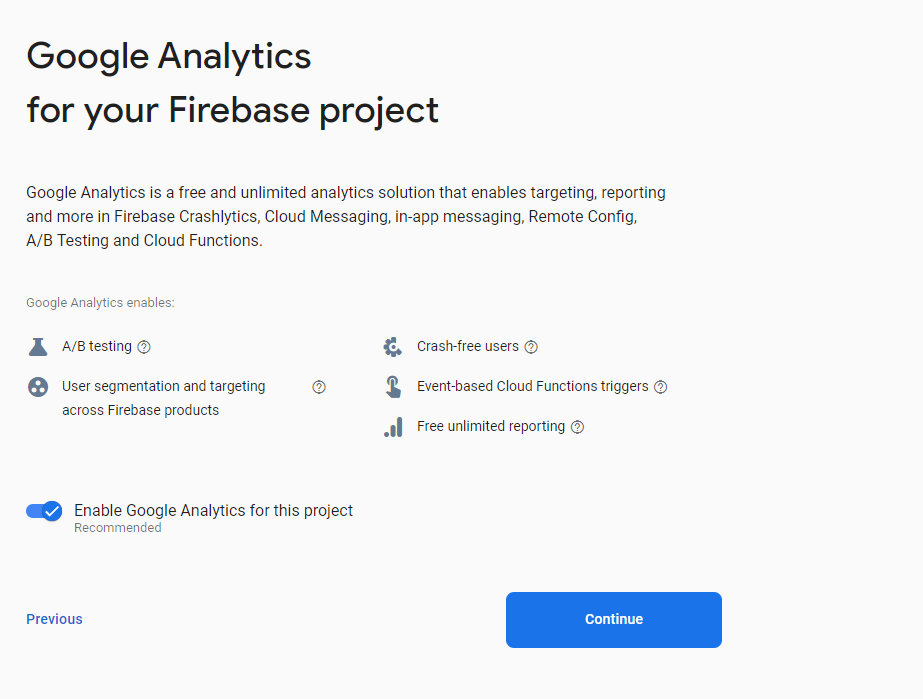
Tiếp tục click continue
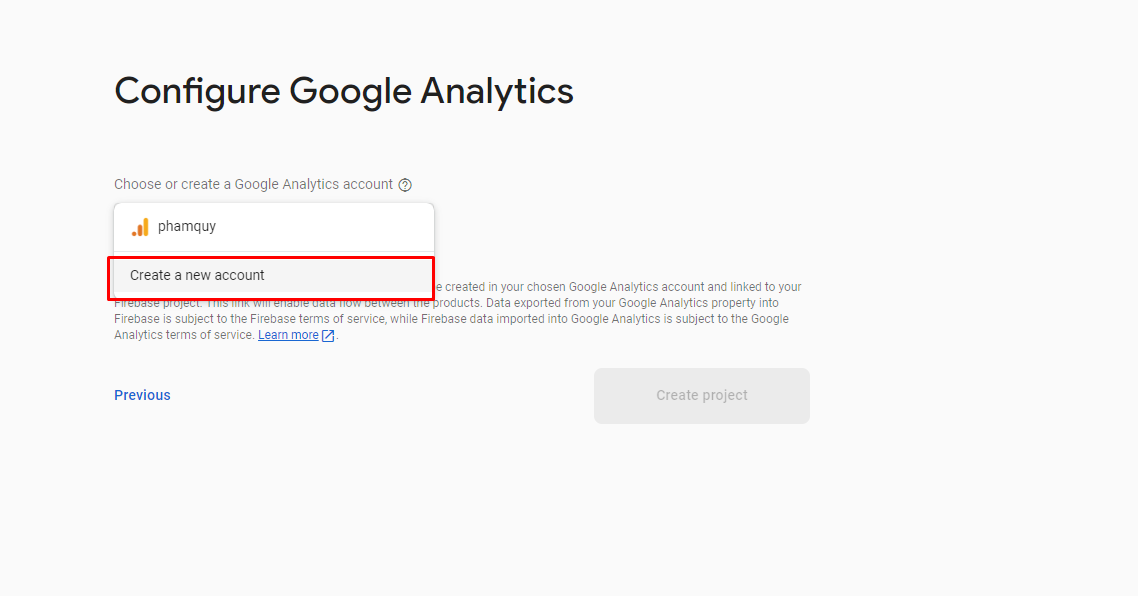
Chúng ta click vào create a new account và nhập tên tùy ý như ảnh ở dưới
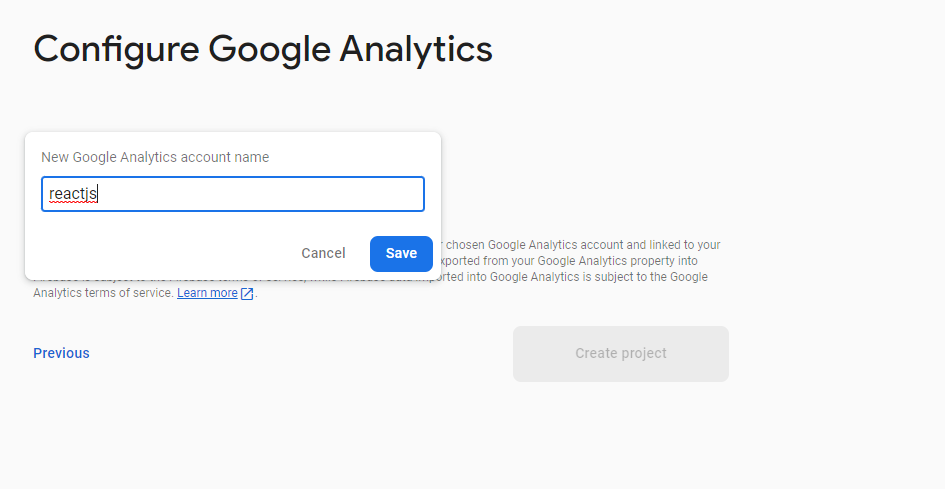
Chúng ta sẽ chọn giống ảnh bên dưới và nhấn Create project

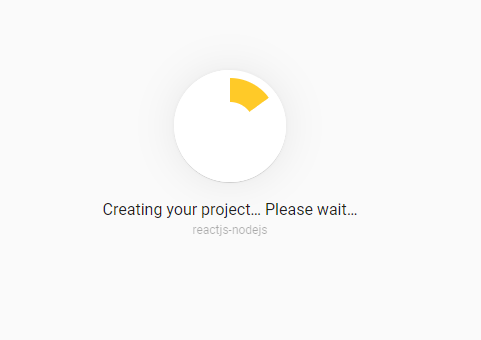
Tạo project chúng ta sẽ phải đợi 1 lúc
2. Tạo project firebase cho web
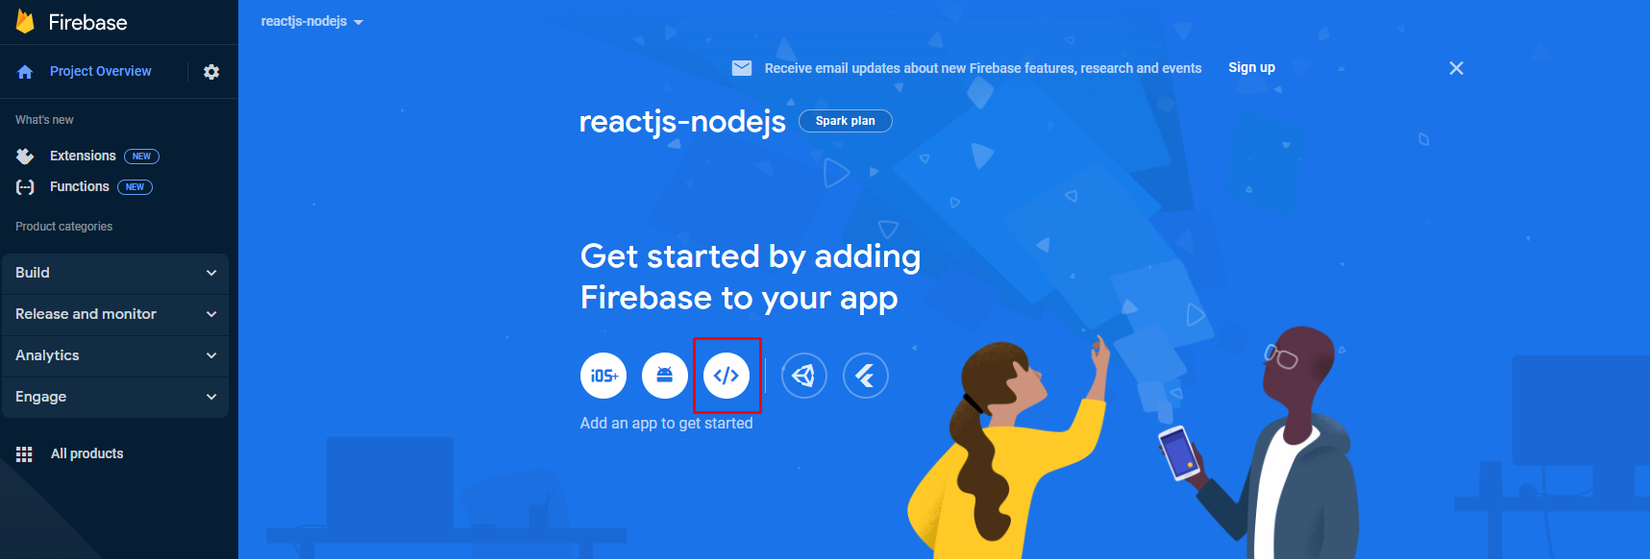
Sau khi project thông báo được tạo xong các bạn click vào button continue sau đó sẽ chuyển đến trang quản lý và bây giờ chúng ta sẽ click vào button như trong hình dưới đây để đăng ký project cho web
Các bạn sẽ nhập tên project của các bạn:

Sau đó click vào button Register app, bạn sẽ thấy 1 trang hướng dẫn mở ra:
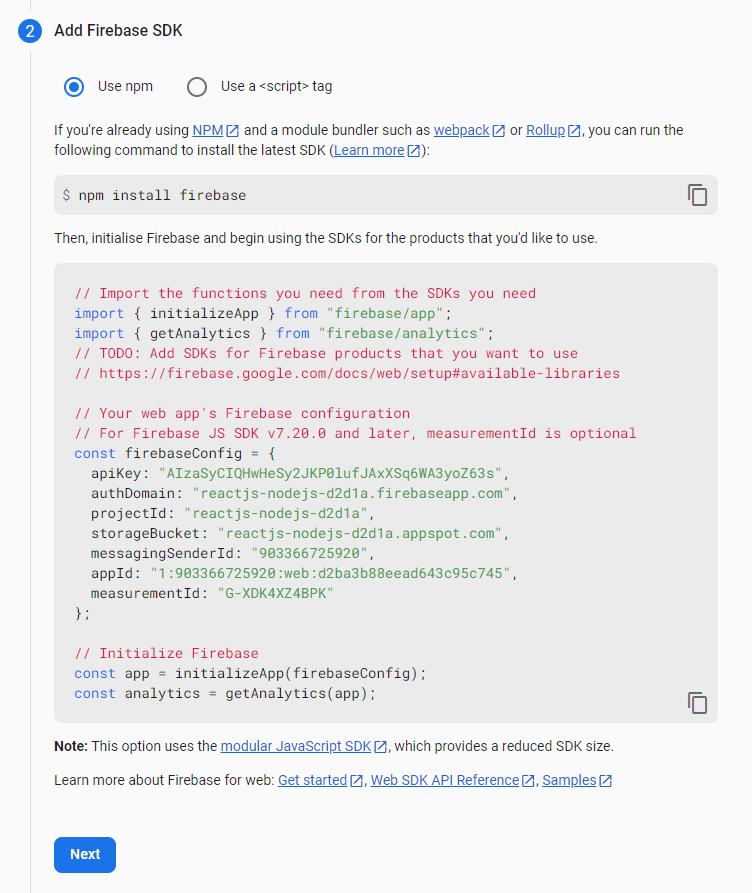
Bạn copy đoạn code ở trên lưu vào 1 nơi nào đó để tý chúng ta sử dụng nhé
4. Cấu hình
1. Cấu hình firebase cho ReactJS
Chúng ta vào project reactjs vừa tạo ở trên và tạo 1 file có tên là firebase-messaging-sw.js nằm trong thư mục public
// Scripts for firebase and firebase messaging
// eslint-disable-next-line no-undef
importScripts('https://www.gstatic.com/firebasejs/9.0.0/firebase-app-compat.js');
// eslint-disable-next-line no-undef
importScripts('https://www.gstatic.com/firebasejs/9.0.0/firebase-messaging-compat.js');

// Initialize the Firebase app in the service worker by passing the generated config
const firebaseConfig = {
  apiKey: "your-code",
  authDomain: "your-code",
  databaseURL: "your-code",
  projectId: "your-code",
  storageBucket: "your-code",
  messagingSenderId: "your-code",
  appId: "your-code"
};

// eslint-disable-next-line no-undef
firebase.initializeApp(firebaseConfig);

// Retrieve firebase messaging
// eslint-disable-next-line no-undef
const messaging = firebase.messaging();

messaging.onBackgroundMessage(function(payload) {
  console.log('Received background message ', payload);

  const notificationTitle = payload.notification.title;
  const notificationOptions = {
    body: payload.notification.body,
  };

  // eslint-disable-next-line no-restricted-globals
  self.registration.showNotification(notificationTitle,
    notificationOptions);
});
và cấu chỉnh sửa firebaseConfig mà bạn vừa tạo ở bước trước
Tiếp theo trong thư mục src các bạn tạo file firebase.js và copy code dưới đây
import { initializeApp } from "firebase/app";
import { getMessaging, getToken, onMessage } from "firebase/messaging";

const firebaseConfig = {
  apiKey: "your-code",
  authDomain: "your-code",
  databaseURL: "your-code",
  projectId: "your-code",
  storageBucket: "your-code",
  messagingSenderId: "your-code",
  appId: "your-code"
};

const firebaseApp = initializeApp(firebaseConfig);
const messaging = getMessaging(firebaseApp);

export const fetchToken = (setTokenFound) => {
    return getToken(messaging, {
        vapidKey:
            "",
    })
        .then((currentToken) => {
            if (currentToken) {
                console.log("current token for client: ", currentToken);
                setTokenFound(true);
            } else {
                console.log(
                    "No registration token available. Request permission to generate one."
                );
                setTokenFound(false);
            }
        })
        .catch((err) => {
            console.log("An error occurred while retrieving token. ", err);
        });
};

export const onMessageListener = () =>
    new Promise((resolve) => {
        onMessage(messaging, (payload) => {
            resolve(payload);
        });
    });
Sau đó cũng chỉnh sửa firebaseConfig
return getToken(messaging, {
        vapidKey:
            "",
    })
Bây giờ chúng ta sẽ lấy vapidKey
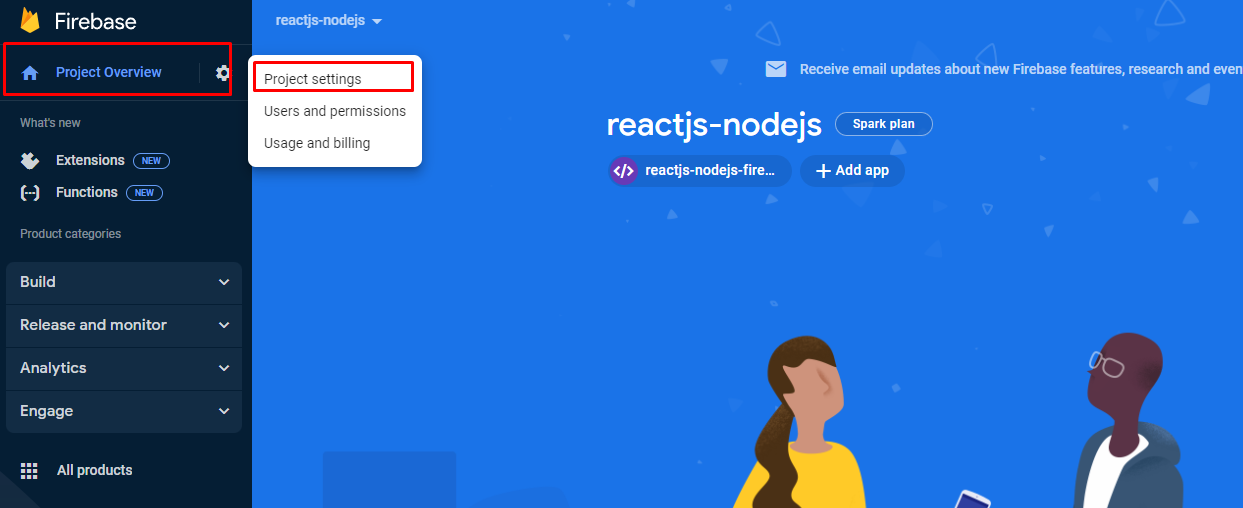
Các bạn quay lại trang quản lý firebase click vào tab như trong ảnh dưới đây
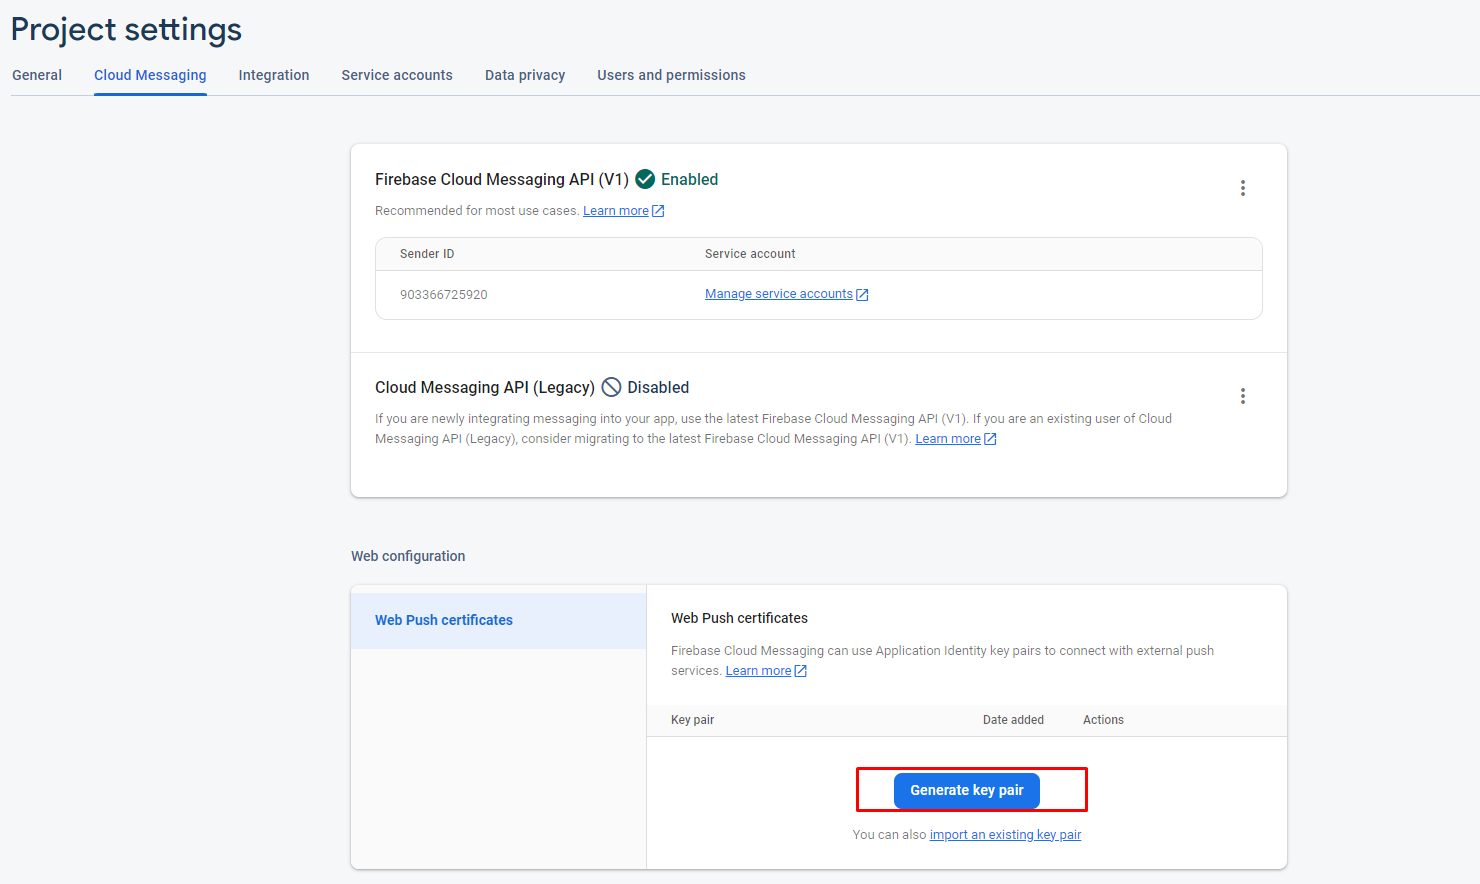
Sau đó chọn tab cloud messaging và kéo xuống dưới cùng click vào nút Generate key pairđể tạo key sau đó các bạn copy key vừa tạo và thay thế giá trị cho vapidKey
Tiếp theo các bạn copy đoạn code dưới đây vào thư mục src/App.js
import logo from './logo.svg';
import './App.css';
import {useEffect, useState} from 'react';
import { fetchToken, onMessageListener } from './firebase';
import 'bootstrap/dist/css/bootstrap.min.css';

function App() {
  const [show, setShow] = useState(false);
  const [notification, setNotification] = useState({title: '', body: ''});
  const [isTokenFound, setTokenFound] = useState(false);

  useEffect(() => {
    fetchToken(setTokenFound);
  },[])

  onMessageListener().then(payload => {
    setNotification({title: payload.notification.title, body: payload.notification.body})
    setShow(true);
    console.log(payload);
  }).catch(err => console.log('failed: ', err));

  const onShowNotificationClicked = () => {
    setNotification({title: "Notification", body: "This is a test notification"})
    setShow(true);
  }

  return (
    <div className="App">
      <header className="App-header">
        {isTokenFound && <h1> Notification permission enabled 👍🏻 </h1>}
        {!isTokenFound && <h1> Need notification permission ❗️ </h1>}
        <img src={logo} className="App-logo" alt="logo" />
      </header>

    </div>
  );
}

export default App;
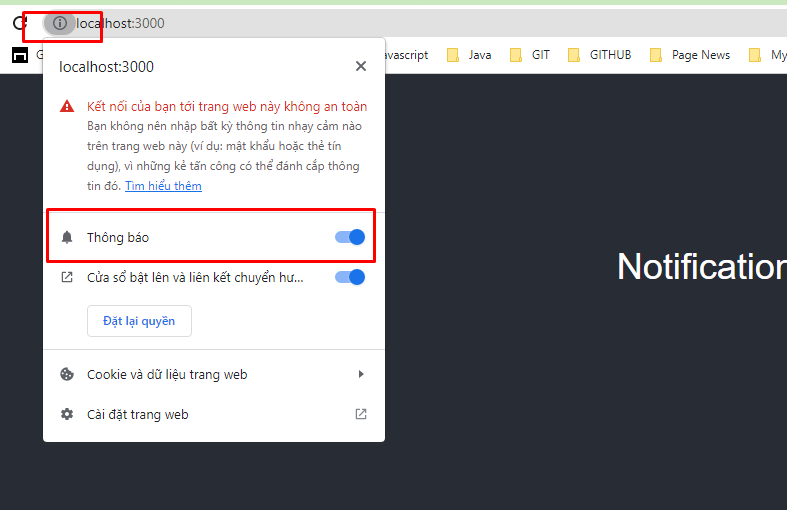
Chúng ta khởi động project bằng command npm start và truy cập http://localhost:3000/. Và cho phép trình duyệt đẩy thông báo như hình ảnh bên dưới:
Bây giờ các bạn bật cửa sổ console của trình duyệt lên và xem sẽ xuất hiện 1 chuỗi token cho client:

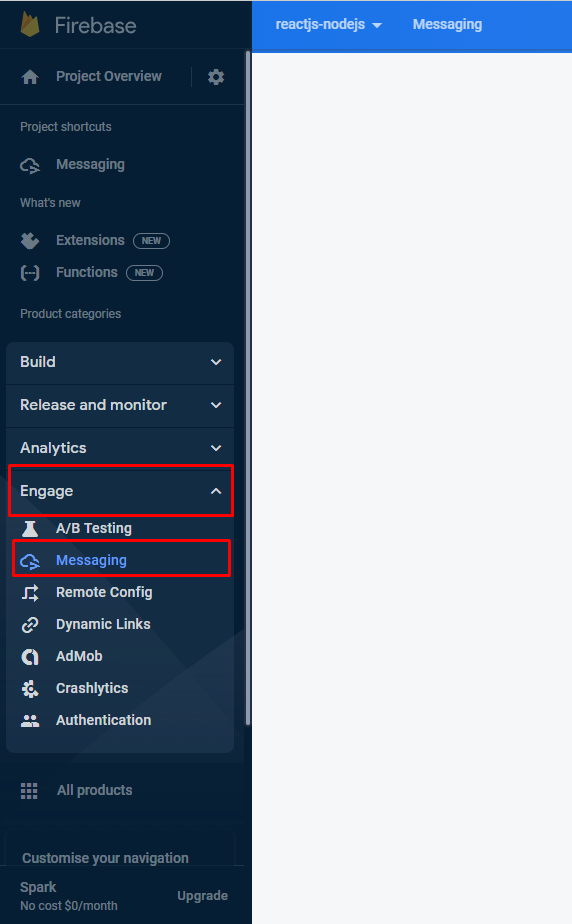
Copy đoạn chuỗi giống như ảnh mình khoanh đỏ và vào lại trang quản lý firebase chọn tab như dưới ảnh
Các bạn click vào button Create your first campaign để tạo 1 message test
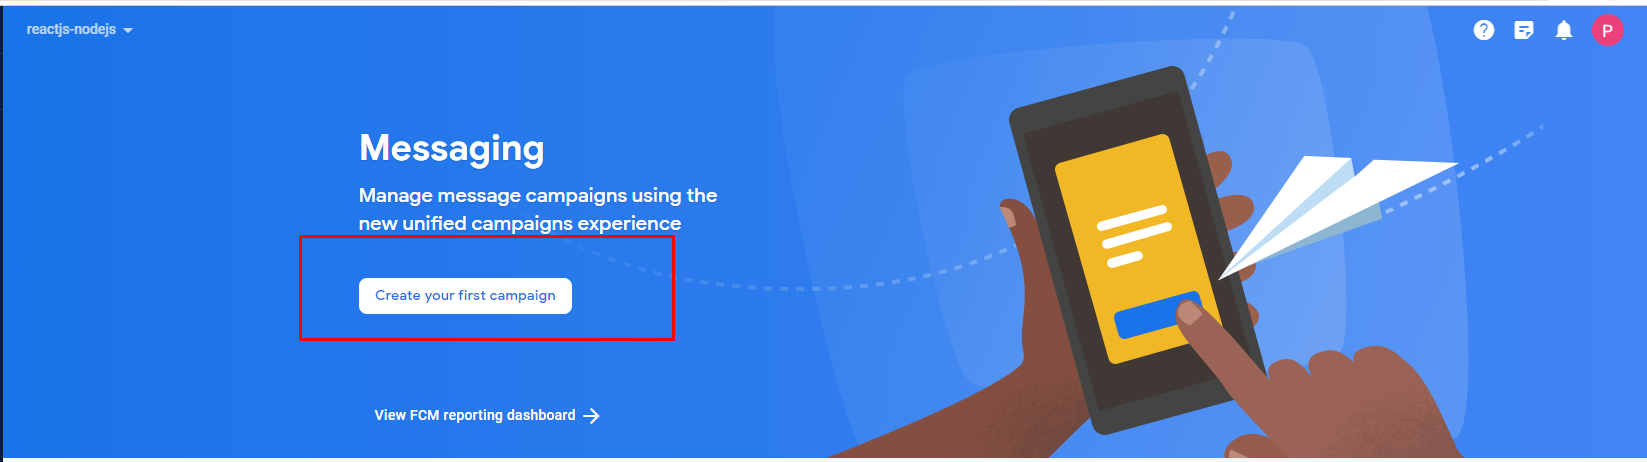
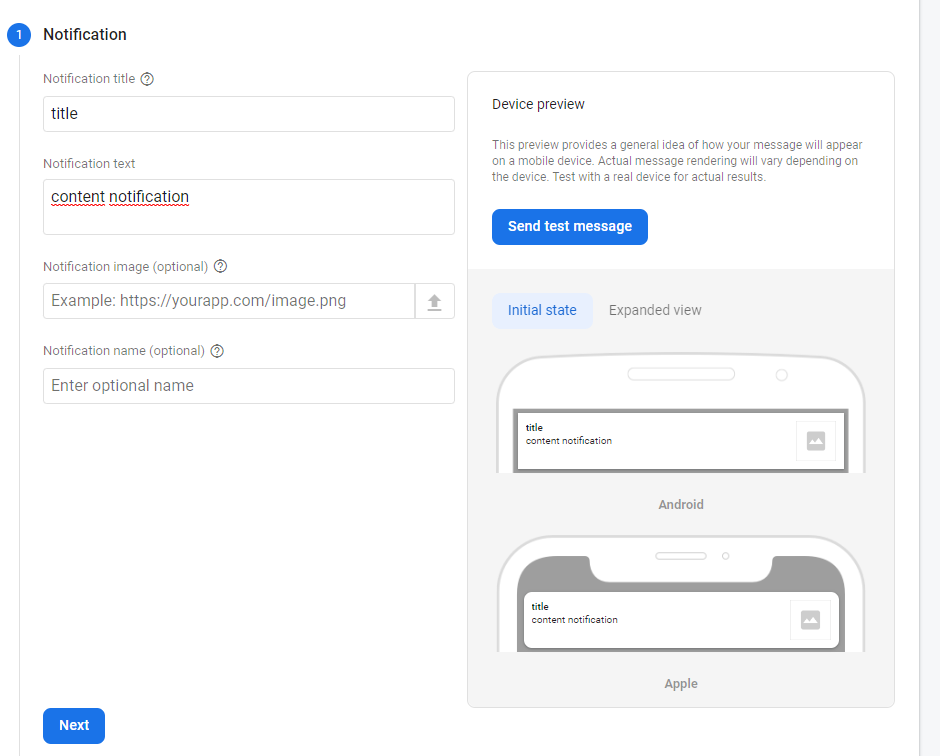
Tiếp đến các bạn đặt Notification title và Notification text:
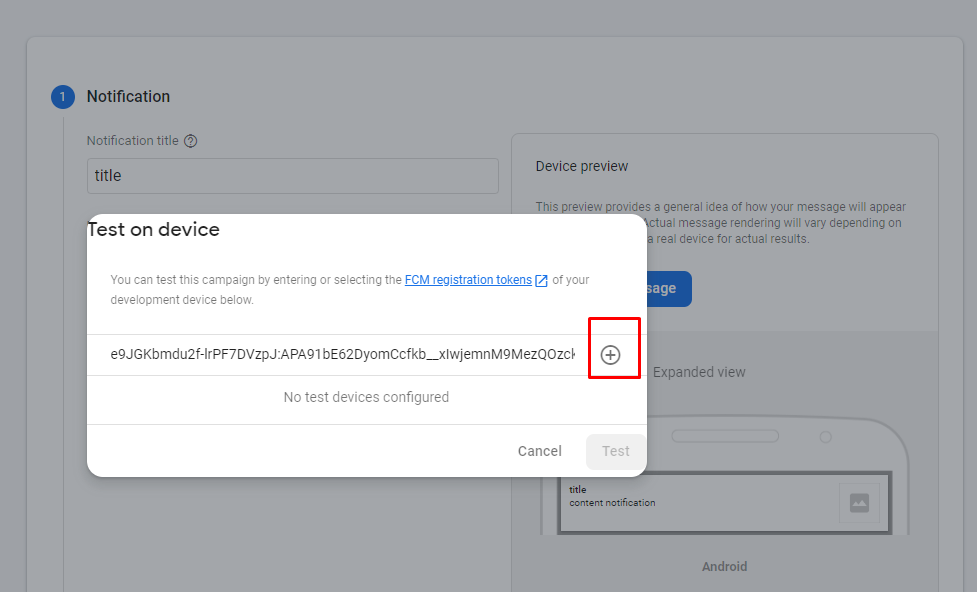
Rồi click vào button send test message ở bên phải. Nó sẽ hiển thị ra popup bạn paste đoạn token mà bạn vừa copy cửa sổ console vào đó rồi nhấn dấu + và cuối cùng nhấn button test
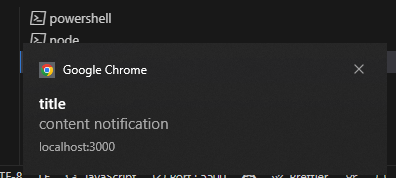
Tuyệt vời đến đã xong sau bao nhiêu bước cuối cùng thông báo đã được đẩy ra 
Bước setup reactjs đã xong tiếp tục chúng ta đến bước setup nodejs
2. Cấu hình firebase cho NodeJS
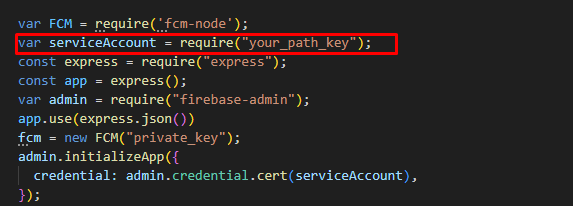
Trong folder nodejs bạn tạo file index.js và copy đoạn code dưới đây
var FCM = require('fcm-node');
var serviceAccount = require("your_path_key");
const express = require("express");
const app = express();
var admin = require("firebase-admin");
app.use(express.json())
fcm = new FCM("private_key");
admin.initializeApp({
  credential: admin.credential.cert(serviceAccount),
});

const certPath = admin.credential.cert(serviceAccount);

exports.sendPushNofication = (req, res, next) => {
    console.log(req)

}

app.post('/send-noti', (req, res) => {

    try {
        let message = {
            to:'token_client',
            notification: {
                title: req.body.title,
                body: req.body.content
            },
        }
        fcm.send(message, function(err, resp) {
            if (err) {
                return res.status(500).send({
                    message: err
                })
            } else {
                return res.status(200).send({
                    message: resp
                })
            }
        })
    } catch (err) {
        console.log(err)
    }
})

app.listen(5000, function() {
    console.log(`port run on localhost:5000`);
})
Sau đó bạn vào lại trang firebase vào chọn tab như ảnh ở dưới:
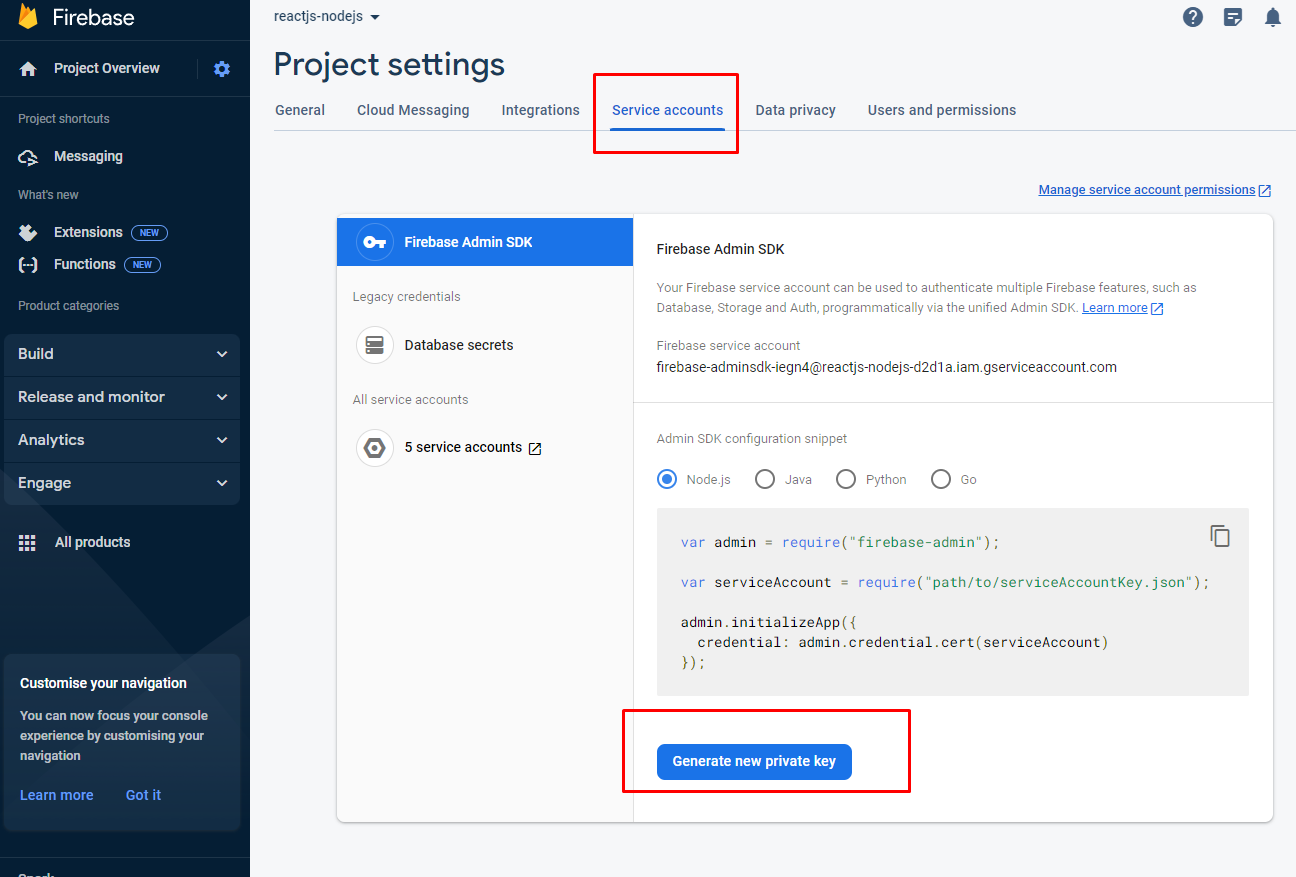
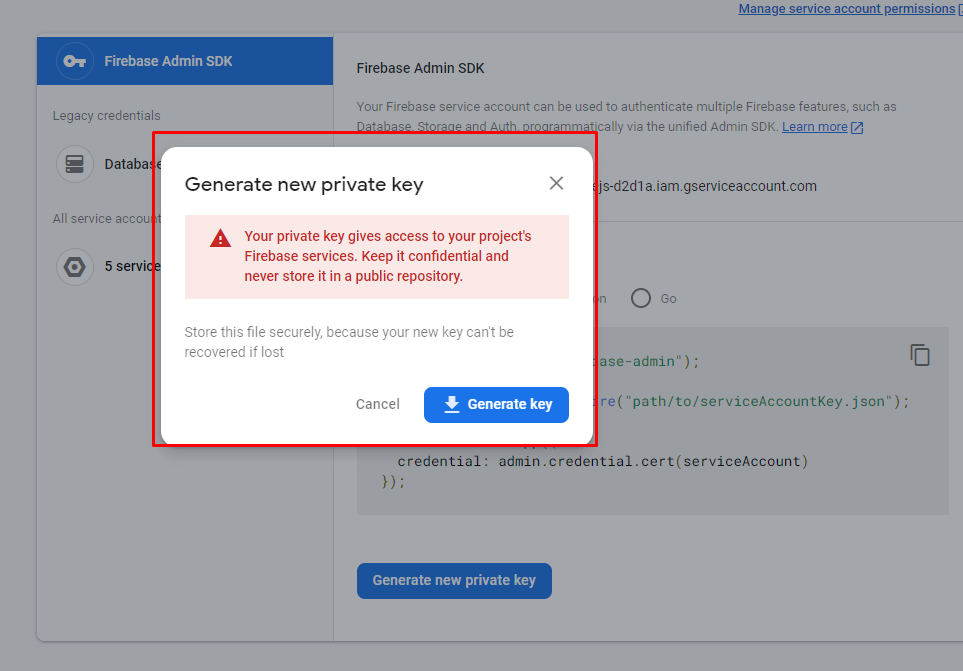
Bạn nhấn vào genarate nút Generate new private key để tạo key sau đó lưu nó vào thư mục nodejs
và thay thế your_path_key trong code nằm ở ngay trên đầu thành đường dẫn chưa key của bạn vừa tải về:
Tiếp tục các bạn chọn tab như trong ảnh và click vào trang button Manage API in Google Cloud Console để chuyển sang trang quản lý goog cloud để enable firebase
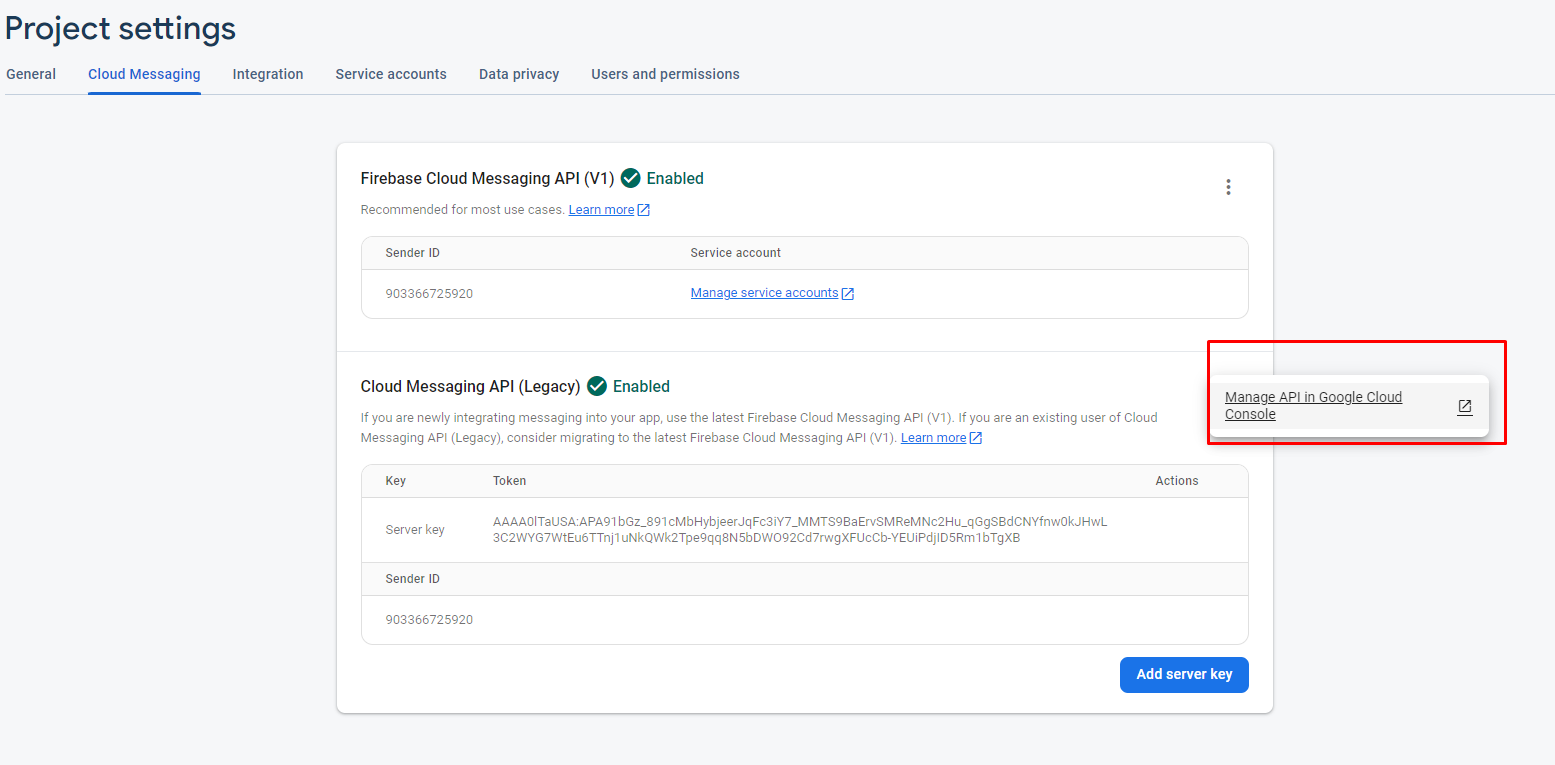
Sau khi bạn enable xong load lại trang quản lý firebase sẽ thấy xuất hiện đoạn server key
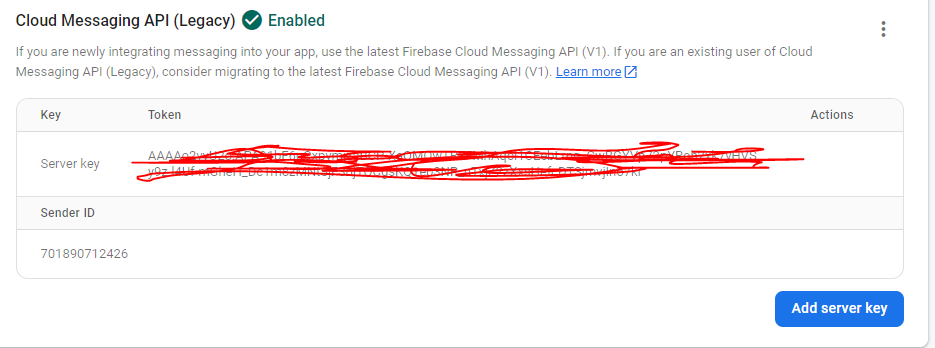
Copy và paste vào thay private_key trong fcm = new FCM("private_key");
Bước cuối cùng bạn vào lại trình duyệt http://localhost:3000/ , và bật cửa sổ console của trình duyệt lên và xem sẽ xuất hiện 1 chuỗi token cho client:
copy chuỗi trên vào thay thê token_client nằm ở trong
 let message = {
        to:'token_client',
         notification: {
                title: req.body.title,
                body: req.body.content
          },
    }
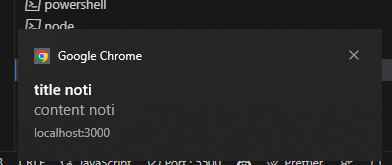
Ok sau bao nhiêu bước giờ đã xong chúng ta cùng kiểm tra thành quả thôi nào Bây giờ chúng ta sẽ dùng postman để test nhé. Nôi dung postman bạn điền giống như mình nhé
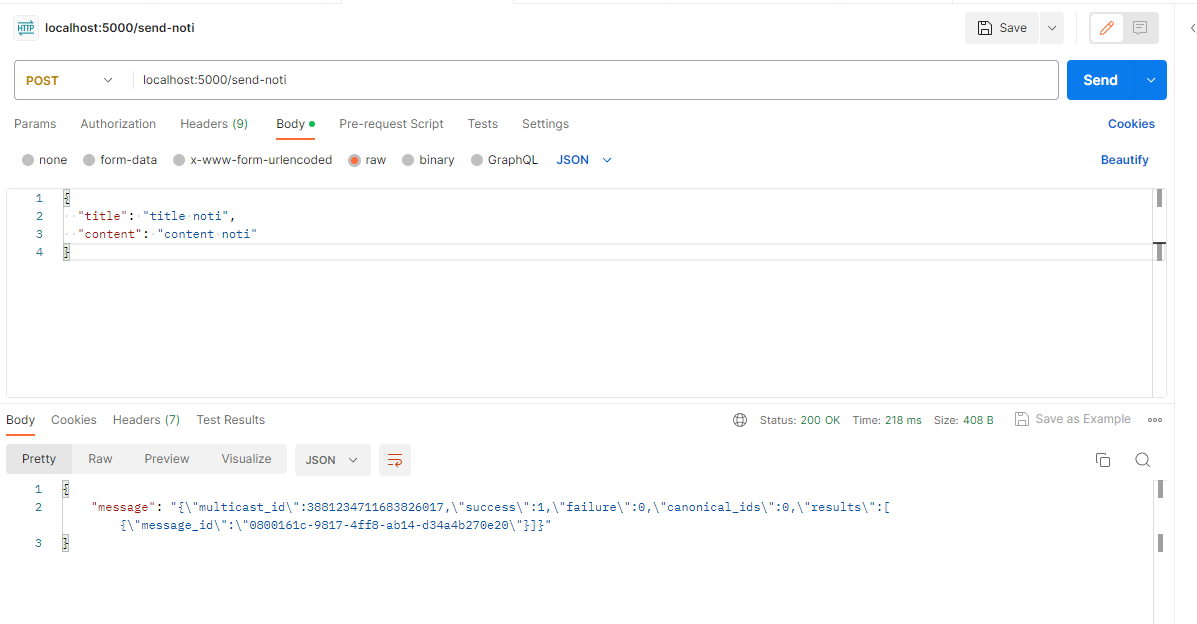
Sau khi sử dụng postman để gửi bạn sẽ thấy thông báo đã được đẩy ra
5. Kết luận
Bạn này cũng khá dài có thể khi mình viết sẽ còn nhiều thiếu sót hoặc không mô tả được hết ý, mong mọi người góp ý để mình nâng cao chất lượng bài viết. Mình xin cảm ơn mọi người hãy follow và ủng hộ mình
All rights reserved
