Project 1 - Markdown Notebook (phần 2)
Bài đăng này đã không được cập nhật trong 6 năm
Multiple notes
Tiếp nối phần trước (https://viblo.asia/p/project-1-markdown-notebook-phan-1-1VgZv4Bm5Aw), ở phần này ngoài việc cho phép lưu multiple notes, mình sẽ thêm một vài tính năng khác như hiển thị danh sách các notes, rename lại note, cho note vào danh sách ưa thích, etc.
The note list
- Thêm nơi hiển thị các notes:
<!-- Notebook app -->
<div id="notebook">

<!-- Sidebar -->
    <aside class="side-bar">
        <!-- Here will be the note list -->
    </aside>

    <!-- Main pane -->
    <section class="main">
...
- Khởi tạo mảng
notes:
data () {
    return {
        content: ...
        // New! A note array
        notes: [],
} },
A method to create a new note
Mỗi một note sẽ có các thuộc tính như: id, title, content, created, favorite.
Thêm method addNote:
// Add a note with some default content and select it
addNote () {
    const time = Date.now()

    // Default new note
    const note = {
        id: String(time),
        title: 'New note ' + (this.notes.length + 1),
        content: '**Hi!** This notebook is using [markdown](https://github.com/adam-p/markdown-here/wiki/Markdown-Cheatsheet) for formatting!',
        created: time,
        favorite: false,
    },

    // Add to the list
    this.notes.push(note)
},
Button and click events with v-on
Thêm button Add note:
<aside class="side-bar">
    <!-- Toolbar -->
    <div class="toolbar">
    <!-- Add note button -->
        <button><i class="material-icons">add</i> Add note</button>
    </div>
</aside>
Set sự kiện click cho button addNote:
<button v-on:click="addNote"><i class="material-icons">add</i> Add note</button>
Chúng ta có thể thay thế v-on:click bằng cú pháp ngắn gon hơn @click:
<button @click="addNote"><i class="material-icons">add</i> Add note</button>
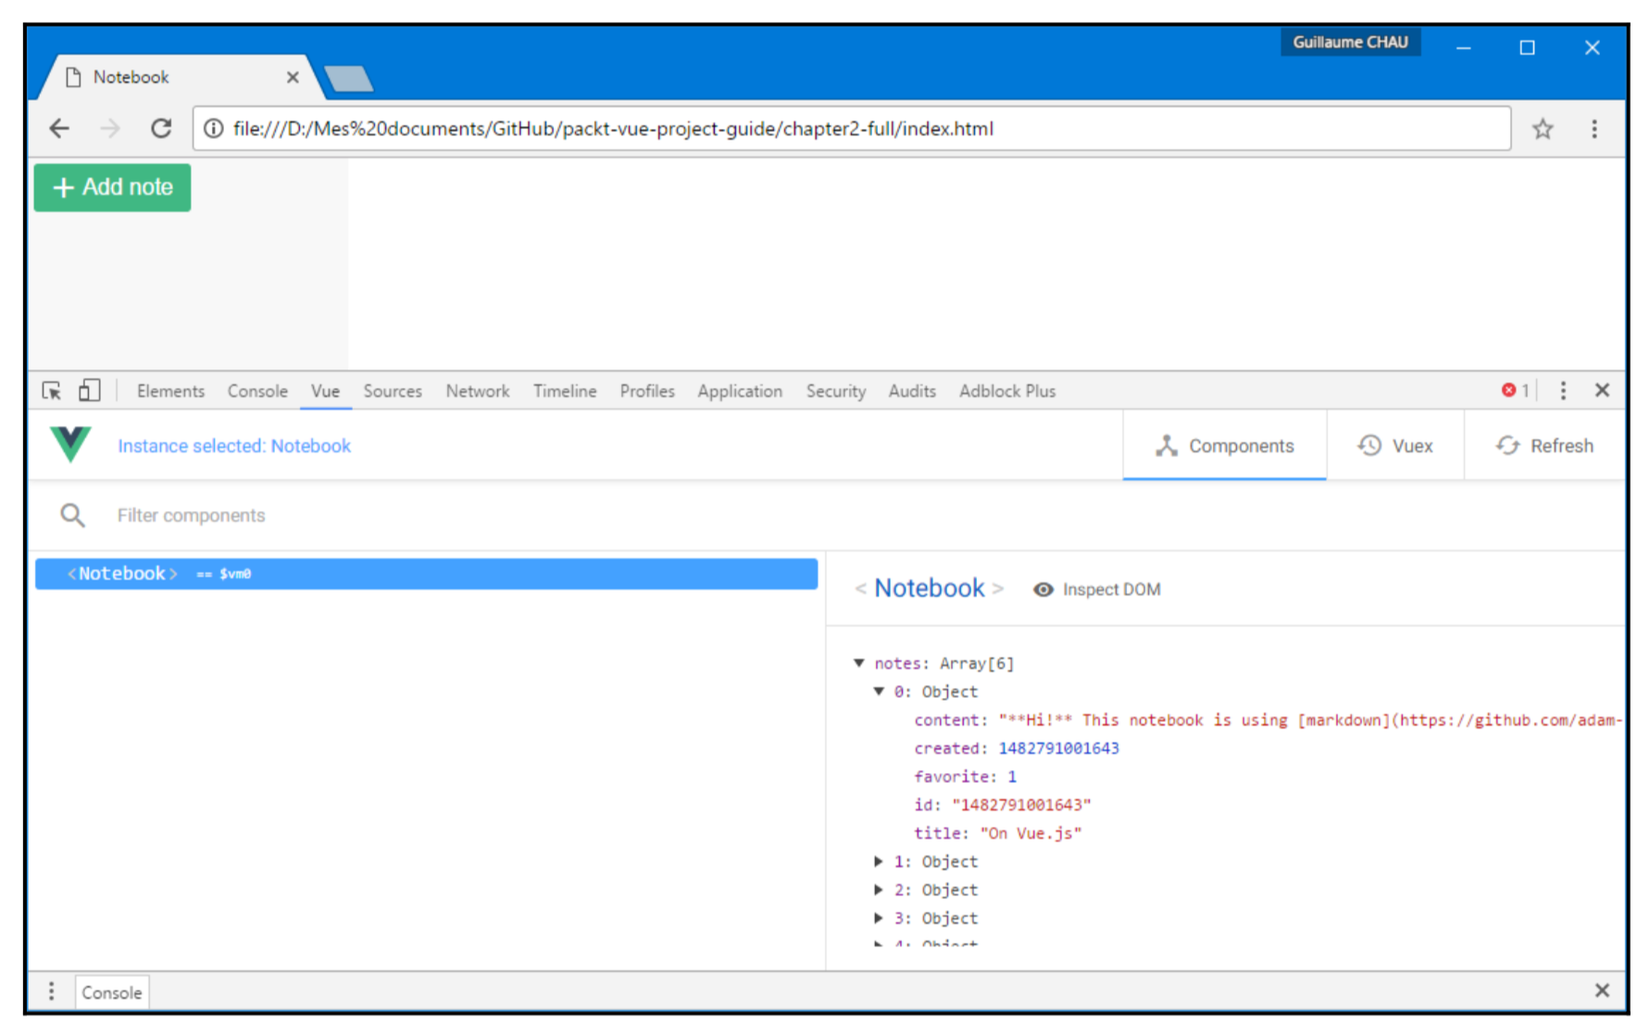
Click vào button Add note, chúng ta có thể thấy các note đã được thêm ở devtool.
Binding attributes with v-bind
Sẽ hữu ích hơn cho người dùng khi họ bấm vào button Add note thì xuất hiện một tooltip thông báo số lượng các note đã được thêm. Ví dụ:
<button title="3 note(s) already">
Chúng ta có thể sử dụng v-bind:
<button v-bind:title="notes.length + ' note(s) already'">
Khi người dùng rê chuột vào button Add note sẽ nhận được kết quả như hình dưới:
 Giống như
 v-on, chúng ta có thể sử dụng cú pháp ngắn gọn hơn. Khác biệt là v-on thì dùng @ còn v-bind dùng ::
<button :title="notes.length + ' note(s) already'">
TIP:
v-bindwill sẽ cập nhật giá trị của thuộc tính một cách tự động. Chúng ta có thể sử dụngv-bindkết hợp vớicomputednhư sau:
computed: {
    ...
    addButtonTitle () {
        return notes.length + ' note(s) already'
    },
},
<button :title="addButtonTitle">
Displaying a list with v-for
- Thêm list để hiển thị các notes:
<aside class="side-bar">
    <div class="toolbar">
        <button @click="addNote"><i class="material-icons">add</i>
            Add note
        </button>
    </div>
    <div class="notes">
        <!-- Note list here -->
    </div>
</aside>
Sử dụng vòng lặpv-for để hiển thị các notes. Ví dụ:
<div v-for="item of items">{{ item.title }}</div>
Chúng ta có thể thay of băng in cũng được:
<div v-for="item in items">{{ item.title }}</div>
Tưởng tượng rằng chúng ta có một list chứa các notes:
data () {
    return {
        items: [
            { title: 'Item 1' },
            { title: 'Item 2' },
            { title: 'Item 3' },
        ]
    }
}
Sau khi in ra thì các notes sẽ được xuất hiện ở DOM như thế này:
<div>Item 1</div>
<div>Item 2</div>
<div>Item 3</div>
- Quay trở lại cuốn notebook của chúng ta. Chúng ta lưu chúng trong
notescủadata(), nên việc cần làm bây giờ là tạo vòng lặp để in ra chúng:
<div class="notes">
    <div class="note" v-for="note of notes">{{note.title}}</div>
</div>
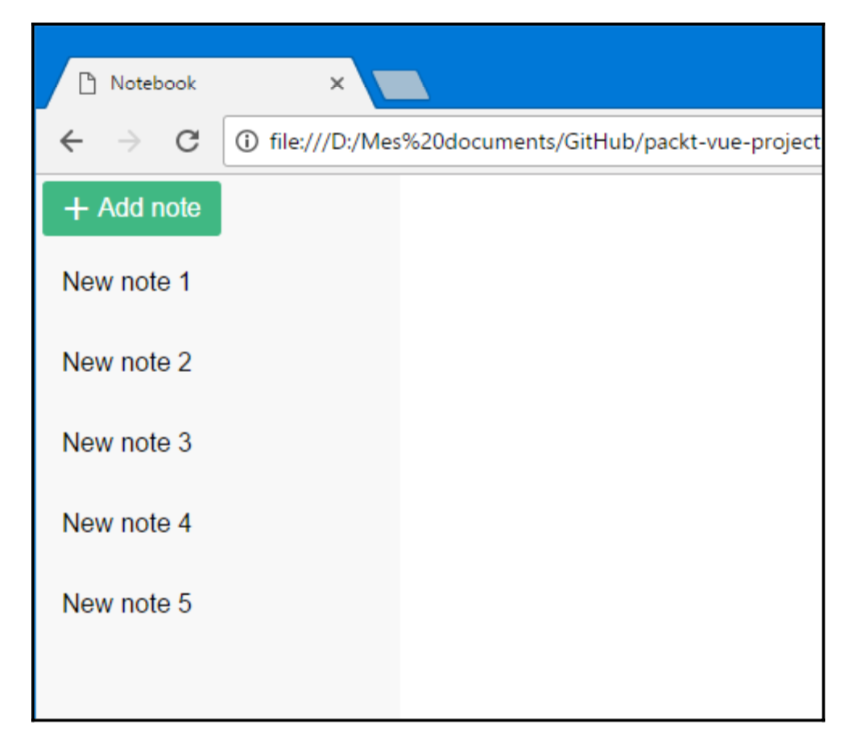
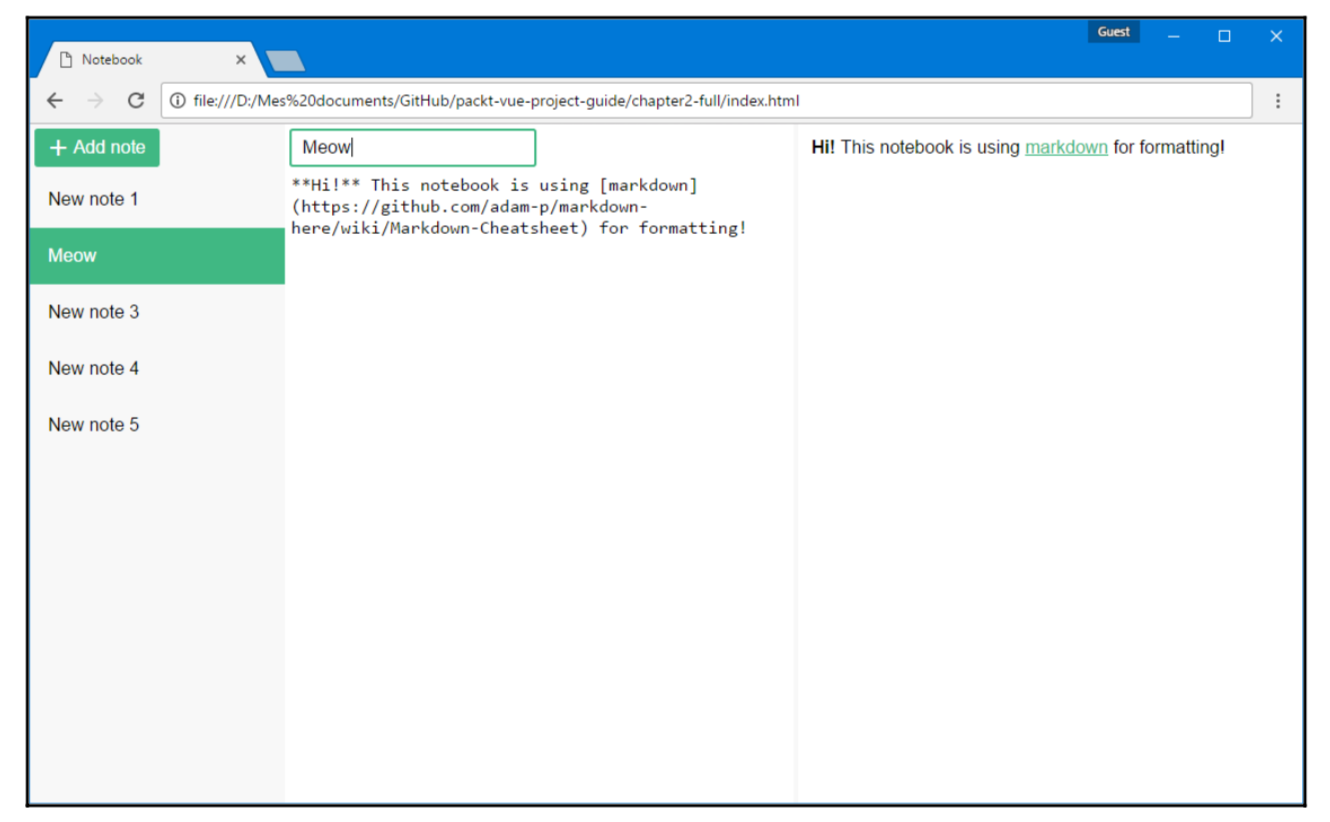
Kết quả:
Selecting a note
- Thêm
selectedIdvào trongdata()để lưu lại giá trị của các note được chọn:
data () {
    return {
        content: localStorage.getItem('content') || 'You can write in **markdown**',
        notes: [],
        // Id of the selected note
        selectedId: null,
    }
},
- Thêm method khi chọn note
selectNote():
methods: {
    ...
    selectNote (note) {
    this.selectedId = note.id
    },
}
- Thêm sự kiện
click:
<div class="notes">
    <div class="note" v-for="note of notes" @click="selectNote(note)">{{note.title}}</div>
</div>
Giờ chúng ta có thể kiểm tra giá trị selectedId trên devtool đã được cập nhật mỗi khi chúng ta click vào một note.
The current note
- Thêm
selectedNoteđể lấy ra object note được chọn:
computed: {
    ...
    selectedNote () {
    // We return the matching note with selectedId
        return this.notes.find(note => note.id === this.selectedId)
    },
}
- Thay đổi hiển thị phần
content:
<textarea v-model="selectedNote.content"></textarea>
- Và
notePreview:selectedNote:
notePreview () {
    // Markdown rendered to HTML
    return this.selectedNote ? marked(this.selectedNote.content) : ''
},
Dynamic CSS classes
Vue.js cho phép chúng ta tuỳ biến các class một cách dễ dàng. Ví dụ: thay vì truyền cho class một string, chúng ta có thể truyền một array:
<div :class="['one', 'two', 'three']">
Kết quả ở DOM:
<div class="one two three">
Hoặc cho ẩn hiện các class:
<div :class="{ one: true, two: false, three: true }">
Kết quả ở DOM:
<div class="one three">
Áp dụng vào notebook của chúng ta, class của note được chọn sẽ được viết như thế này:
<div :class="{ selected: note === selectedNote }">
Đầy đủ code của note list sẽ là:
<div class="notes">
    <div class="note" v-for="note of notes" @click="selectNote(note)" :class="{selected: note === selectedNote}">
        {{note.title}}
    </div>
</div>
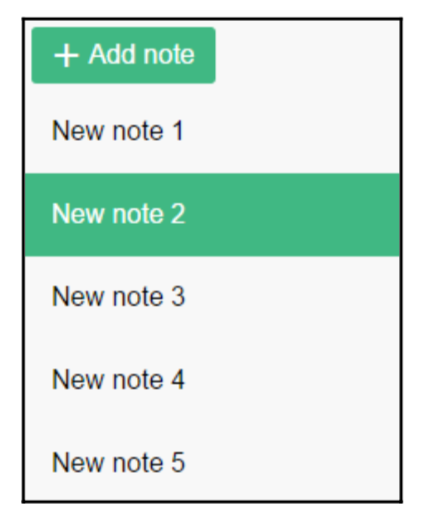
Note sẽ đổi màu khi được chọn như hình bên dưới:
Codintional templates with v-if
Thêm một chút message hiển thị cho người dùng nếu trong quá trình hiển thị preview note gặp trục trặc:
<div v-if="loading">
    Loading...
</div>
Chúng ta có thể sử dụng thêm v-else-if và v-else:
<div v-if="loading">
     Loading...
</div>

<div v-else-if="processing">
    Processing
</div>

<div v-else>
    Content here
</div>
Quay trở lại cuốn notebook của chúng ta, chúng ta sẽ thêm điều kiện v-if="selectedNote"ở cả main và preview panes để chúng chưa được thêm vào DOM cho đến khi note được chọn:
<template v-if="selectedNote">
    <!-- Main pane -->
    <section class="main">
        ...
    </section>
    <!-- Preview pane -->
    <aside class="preview" v-html="notePreview">
    </aside>
</template>
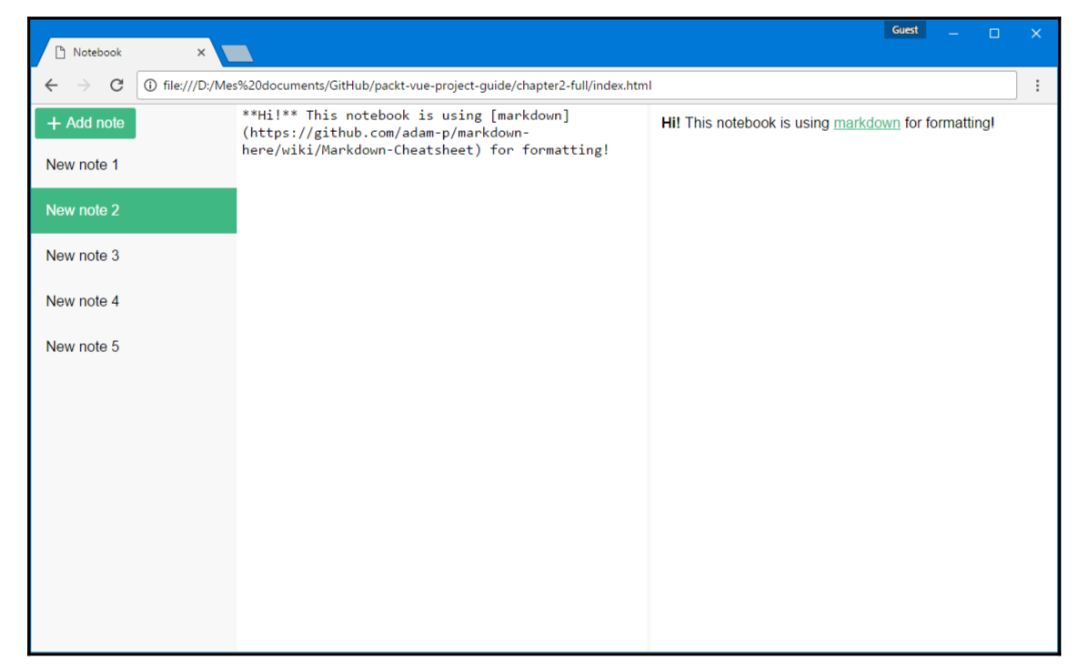
Cuốn notebook của chúng ta hiện tại sẽ có hình thù như thế này:
Saving the notes with the deep option
Chúng ta sẽ lưu lại note giữa các session, giống như cách mà chúng ta làm với note content:
- Tạo method
saveNotes()(chúng ta sử dụngJSON.stringifyvì APIlocalStoragekhông cho phép chung ta lưu mảng mà chỉ cho lưu string):
methods: {
    ...
    saveNotes () {
    // Don't forget to stringify to JSON before storing
        localStorage.setItem('notes', JSON.stringify(this.notes))
        console.log('Notes saved!', new Date())
    },
},
Như đã làm với note content, chúng ta sẽ sử dụng watch:
2. Thêm option watch:
watch: {
notes: 'saveNotes',
}
Kiểm tra ở console sau khi thêm note:
Notes saved! Mon Apr 42 2042 17:40:23 GMT+0100 (Paris, Madrid)
Notes saved! Mon Apr 42 2016 17:42:51 GMT+0100 (Paris, Madrid)
- Thay đổi giá trị ban đầu của notes để khi người dùng vào trình duyệt, họ sẽ thấy được các note ở thời điểm gần nhất:
data () {
    return {
        notes: JSON.parse(localStorage.getItem('notes')) || [],
        selectedId: null,
    }
},
Đáng ra mảng notes sẽ được restored khi người dùng refresh lại trang. Tuy nhiên, khi chúng ta thay đổi nội dung của một note, chúng ta sẽ thấy rằng watcher hiện tại chưa hoạt động => notes chưa được lưu.
Lý do là: watchers mặc định lưu những thay đổi đơn giản như: object assignment, adding, removing hoặc removing item in an array. Ví dụ:
// Assignment
this.selectedId = 'abcd'

// Adding or removing an item in an array
this.notes.push({...})
this.notes.splice(index, 1)

// Sorting an array
this.notes.sort(...)
Những operations như ở dưới sẽ không được watchers thực thi:
// Assignment to an attribute or a nested object
this.myObject.someAttribute = 'abcd'
this.myObject.nestedObject.otherAttribute = 42

// Changes made to items in an array
this.notes[0].content = 'new content'
Trường hợp này chúng ta cần phải thêm deep: true vào trong watch.
watch: {
    notes: {
        // The method name
        handler: 'saveNotes',
        // We need this to watch each note's properties inside the array
        deep: true,
    },
}
Saving the selection
Sẽ tốt hơn cho cuốn notebook của chúng ta nếu nó lưu lại các note đã được chọn từ lần đóng trình duyệt gần nhất:
watch: {
    ...
    // Let's save the selection too selectedId (val) {
        localStorage.setItem('selected-id', val)
    },
}
data () {
    return {
        notes: JSON.parse(localStorage.getItem('notes')) || [],
        selectedId: localStorage.getItem('selected-id') || null,
    }
},
The note toolbar with extras inside
Chúng ta sẽ thêm một vài tính năng cho cuốn notebook như:
- Renaming the note
- Deleting the note
- Marking the note as favorite
Thêm một chút HTML:
<!-- Main pane -->
<section class="main">
    <div class="toolbar">
        <!-- Our toolbar is here! -->
    </div>
    <textarea v-model="selectedNote.content"></textarea>
</section>
Renaming the note
<input v-model="selectedNote.title" placeholder="Note title" />
Deleting the note
- Thêm button
delete:
<button @click="removeNote" title="Remove note"><i class="material-icons">delete</i></button>
- Thêm method
removeNote():
removeNote () {
    if (this.selectedNote && confirm('Delete the note?')) {
    // Remove the note in the notes array
        const index = this.notes.indexOf(this.selectedNote)

        if (index !== -1) {
            this.notes.splice(index, 1)
        }
    }
}
Favorite notes
- Thêm một chút HTML để thực hiện tính năng
favorite notes:
<button @click="favoriteNote" title="Favorite note">
    <i class="material-icons">{{ selectedNote.favorite ? 'star' : 'star_border' }}</i>
</button>
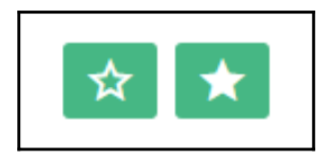
Nếu note được favorite thì ngôi sao sẽ được tô đậm, và ngược lại:
- Tạo một method với mục đích đơn giản là đảo ngược giá trị favorite (true hoặc false) của note được chọn:
favoriteNote () {
    this.selectedNote.favorite = !this.selectedNote.favorite
},
- Thay đổi vị trí của các note bình thường với các note được favorite (favorite note sẽ ưu tiên cho lên trước):
computed: {
    ...
    sortedNotes () {
        return this.notes.slice()
            .sort((a, b) => a.created - b.created)
            .sort((a, b) => (a.favorite === b.favorite)? 0 : a.favorite ? -1 : 1)
    },
}
- 0: 2 note như nhau.
- -1: note này sẽ được đẩy lên trước.
- 1: note này sẽ được đẩy về phía sau.
Sau khi đã có một list các notes được sorted, chúng ta sẽ show nó ra:
<div v-for="note of sortedNotes">
Chúng ta có thể thêm một icon nho nhỏ khi note được favorite:
<i class="icon material-icons" v-if="note.favorite">star</i>
- Code của list note sẽ được update như thế này:
<div class="notes">
    <div class="note" v-for="note of sortedNotes" :class="{selected: note === selectedNote}" @click="selectNote(note)">
        <i class="icon material-icons" v-if="note.favorite"> star</i>
        {{note.title}}
    </div>
</div>
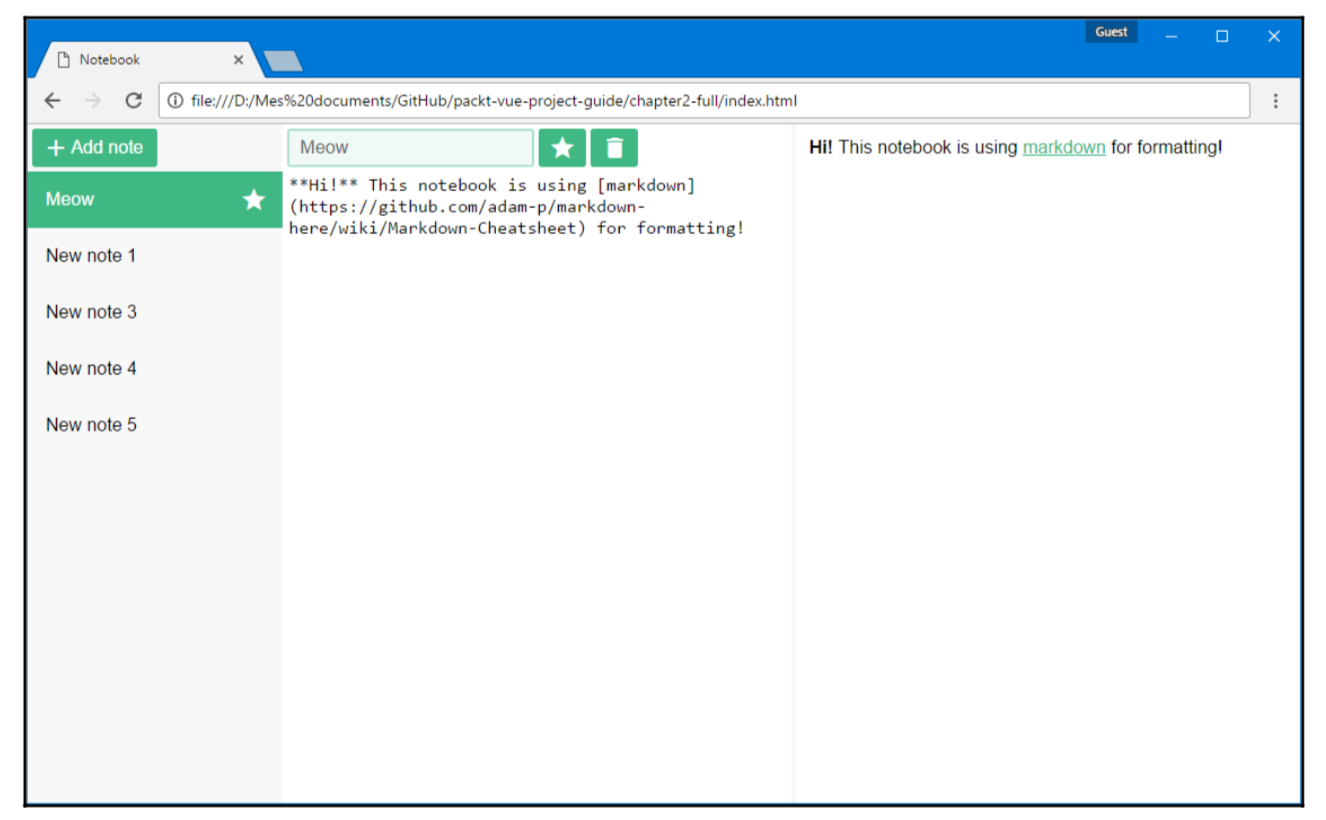
Đây là hình thù cuốn notebook hiện tại của chúng ta:
Source code
https://github.com/anhv-1376/learn-vue/tree/develop/markdown-notebook
Tham khảo
Chau, G. (2017). Vue.js 2 web development projects. Birmingham, UK: Packt Publishing.
All rights reserved
