Phần 7: Redis Sentinel sử dụng ACL
Bài đăng này đã không được cập nhật trong 4 năm
Seri Redis của chúng ta gồm những phần sau:
Phần 1: Cài đặt redis cơ bản + Turning redis.
Phần 2: Lệnh quản trị redis cơ bản
Phần 3: Bảo mật cho redis. (redis security)
Phần 4: Access List Redis (tính năng mới từ bản 6)
Phần 5: Các mô hình Redis replication, Ưu và nhược điểm
Phần 6: Redis Master-Salve sử dụng ACL
Phần 7: Redis Sentinel sử dụng ACL
Phần 8: Cài đặt Redis Cluster
Phần 9: Di chuyển data từ redis đơn sang cluster và ngược lại.
Phần 10: Data type trong Redis, một vài ví dụ sử dụng (String/hash/sort/list/queue/pub-sub....).
Phần 11: Một số lỗi thường gặp khi quản trị hệ thống Redis.
Phần 12: Continue...
Phần 7: Redis Sentinel sử dụng ACL
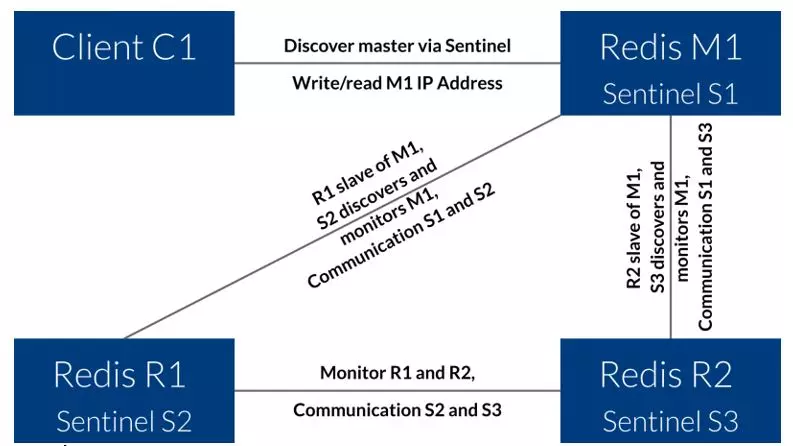
Mô hình: (nên ít nhất là có 3 node sentinel, để tránh hiện tượng bình bầu split-brain, còn M-S có thể là 2 hoặc 3 tùy ý)
192.168.88.12: Master
192.168.88.13: Slave
192.168.88.14: Slave

192.168.88.12: Sentinel
192.168.88.13: Sentinel
192.168.88.14: Sentinel
Bước 1: Bật ACL Sentinel
(Thực hiện trên cả Master và Slave, vì sau này có thể slave được promote thành Master)
# redis-cli -p 6379 --user default --pass matkhau_default
> ACL SETUSER sentinel_user on >matkhau_sentinel allchannels +multi +slaveof +ping +exec +subscribe +config|rewrite +role +publish +info +client|setname +client|kill +script|kill
> CONFIG REWRITE
Bước 2: chuẩn bị config Sentinel trên cả 3 node M-S-S
# vi /opt/redis/conf/sentinel.conf
port 26379
bind 0.0.0.0
daemonize yes
pidfile "/var/run/redis_26379.pid"
logfile "/opt/redis/log/sentinel.log"
dir "/tmp"
sentinel monitor mymaster 192.168.88.12 6379 2

sentinel auth-user mymaster sentinel_user
sentinel auth-pass mymaster matkhau_sentinel

sentinel down-after-milliseconds mymaster 3000

sentinel failover-timeout mymaster 10000
sentinel deny-scripts-reconfig yes
Bước 3: Chuẩn bị init.d sentinel hoặc systemd
adduser redis --no-create-home
touch /etc/init.d/redis_sentinel
chmod +x /etc/init.d/redis_sentinel
chmod 700 /etc/init.d/redis_sentinel
chown redis.redis /etc/init.d/redis_sentinel

Thêm file init.d
# vim /etc/init.d/redis_sentinel
#!/bin/sh
#Configurations injected by install_server below....

EXEC=/usr/local/bin/redis-sentinel
CLIEXEC=/usr/local/bin/redis-cli
REDISPORT="26379"
CLIEXEC="/usr/local/bin/redis-cli -p ${REDISPORT}"
PIDFILE=/var/run/redis_26379.pid
CONF="/opt/redis/conf/sentinel.conf"
###############
# SysV Init Information
# chkconfig: - 58 74
# description: redis_6379 is the redis daemon.
### BEGIN INIT INFO
# Provides: redis_6379
# Required-Start: $network $local_fs $remote_fs
# Required-Stop: $network $local_fs $remote_fs
# Default-Start: 2 3 4 5
# Default-Stop: 0 1 6
# Should-Start: $syslog $named
# Should-Stop: $syslog $named
# Short-Description: start and stop redis_6379
# Description: Redis daemon
### END INIT INFO


case "$1" in
    start)
        if [ -f $PIDFILE ]
        then
            echo "$PIDFILE exists, process is already running or crashed"
        else
            echo "Starting Redis server..."
            $EXEC $CONF
        fi
        ;;
    stop)
        if [ ! -f $PIDFILE ]
        then
            echo "$PIDFILE does not exist, process is not running"
        else
            PID=$(cat $PIDFILE)
            echo "Stopping ..."
            $CLIEXEC -p $REDISPORT shutdown
            while [ -x /proc/${PID} ]
            do
                echo "Waiting for Redis to shutdown ..."
                sleep 1
            done
            echo "Redis stopped"
        fi
        ;;
    status)
        PID=$(cat $PIDFILE)
        if [ ! -x /proc/${PID} ]
        then
            echo 'Redis is not running'
        else
            echo "Redis is running ($PID)"
        fi
        ;;
    restart)
        $0 stop
        $0 start
        ;;
    *)
        echo "Please use start, stop, restart or status as first argument"
        ;;
esac

Thực hiện bật sentinel lên
# /etc/init.d/redis_sentinel start
Bước 4: Kiểm tra hoạt động của sentinel
[root@master-node conf]# redis-cli -p 26379 info | tail
# Sentinel
sentinel_masters:1
sentinel_tilt:0
sentinel_tilt_since_seconds:-1
sentinel_running_scripts:0
sentinel_scripts_queue_length:0
sentinel_simulate_failure_flags:0
master0:name=mymaster,status=ok,address=192.168.88.12:6379,slaves=2,sentinels=3
Kiểm tra failover sentinel (đổi master-slave cho node khác)
[root@master-node conf]# redis-cli -p 26379
127.0.0.1:26379> SENTINEL FAILOVER mymaster

Thực hiện lệnh trên cả 3 node. thấy Master và Slave đã đổi
[root@master-node conf]# redis-cli -p 6379 --user default --pass matkhau_default  info | grep role

> Mô hình mới ta nhận được:
192.168.88.12: Slave
192.168.88.13: Master
192.168.88.14: Slave
Bonus: Cài đặt HA-Proxy tự động phát hiện master.
Bài toán: Client gặp khó khăn khi Write vào node Master trong trường hợp: Master-Slave được đổi vị trí cho nhau
Khắc phục: Sử dụng HA-Proxy để đẩy luồng write chỉ vào node Master
Link: https://vnsys.wordpress.com/2019/01/16/ha-redis-sentinel-su-dung-haproxy/
(cảm ơn tác giả bài viết)
Nguồn: https://redis.io/topics/acl
All rights reserved
