(Phần 3) Spring boot 3.0 và Spring security 6.0
Trong phần 2 của series https://viblo.asia/p/phan-2-spring-boot-30-va-spring-security-60-qPoL7z8lJvk chúng ta đã hoàn thành bước phân quyền cho ứng dụng. Ở bài viết này, thay vì hard code user detail, chúng ta sẽ lưu và lấy dữ liệu user detail ra từ database
1. Khởi tạo database
Bước đầu tiên tất nhiên là tạo database, cú pháp như sau:
CREATE DATABASE spring_security_basic;

CREATE USER 'sc'@'localhost' IDENTIFIED  BY '123456';

GRANT ALL PRIVILEGES ON spring_security_basic.* TO 'sc'@'localhost';
2. Kết nối Spring boot và database
Bước đầu tiên để kết nối đến database là cần phải define các thông tin vào trong file application.properties:
#spring.security.user.name=hach
#spring.security.user.password=hacheery
spring.datasource.url=jdbc:mysql://localhost:3306/spring_security_basic
spring.datasource.username=sc
spring.datasource.password=123456
spring.jpa.hibernate.ddl-auto=update
spring.jpa.show-sql=true
# Logs the JDBC parameters passed to a query
spring.jpa.properties.hibernate.dialect=org.hibernate.dialect.MySQLDialect
spring.jpa.properties.hibernate.format_sql=true
Ngoài ra chúng ta cũng cần thêm các dependency vào file pom.xml:
<dependency>
    <groupId>org.springframework.boot</groupId>
    <artifactId>spring-boot-starter-data-jpa</artifactId>
</dependency>
<dependency>
    <groupId>com.mysql</groupId>
    <artifactId>mysql-connector-j</artifactId>
    <scope>runtime</scope>
</dependency>
3. Khởi tạo entity
Để Spring boot có thể làm việc với database thì chúng ta cần phải có những entity tương ứng với table trong database. Đầu tiên chúng ta sẽ tạo package entity và class UserInfo:
@Entity // dùng để khai báo với Spring Boot rằng đây là 1 entity biểu diễn table trong db
@Data // annotation này sẽ tự động khai báo getter và setter cho class
@AllArgsConstructor // dùng để khai báo constructor với tất cả các properties
@NoArgsConstructor // dùng để khai báo constructor rỗng không có param
public class UserInfo {
    @Id
    @GeneratedValue(strategy =  GenerationType.IDENTITY)
    private int id;
    private String name;
    private String email;
    private String password;
    private String roles;
}
Nếu mọi người muốn tìm hiểu kỹ hơn thì có thể search từng annotation ra để hiểu rõ.
4. Khởi tạo repository
Repository là thành phần quan trọng có trách nhiệm giao tiếp với các DB, xử lý query và trả về các kiểu dữ liệu mà service yêu cầu. Ở đây chúng ta sẽ khởi tạo package repository và khai báo interface UserInfoRepository như sau:
public interface UserInfoRepository extends JpaRepository<UserInfo, Integer> {
        Optional<UserInfo> findByName(String username);
}
Như mọi người thấy thì mình có extends JpaRepository. Đây là 1 interface có chứa những chức năng cơ bản như thêm sửa xóa, paging, sorting,... giúp chúng ta giảm thiểu số lượng code dư thừa.
5. Khởi tạo service
Tầng Service chính là tầng xử lý logic và đưa ra yêu cầu cho Repository để query dữ liệu.
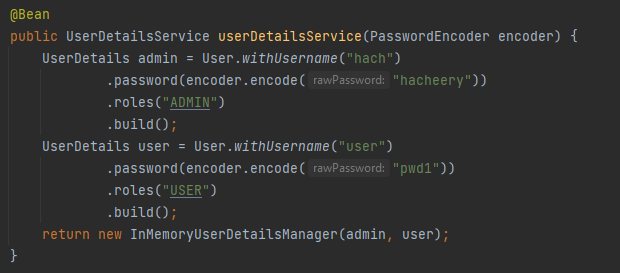
Ở trong SecurityConfig chúng ta có 1 đoạn hard code username và password như dưới đây:
package com.learnsecurity.service;

import com.learnsecurity.entity.UserInfo;
import com.learnsecurity.repository.UserInfoRepository;
import lombok.RequiredArgsConstructor;
import org.springframework.security.core.userdetails.UserDetails;
import org.springframework.security.core.userdetails.UserDetailsService;
import org.springframework.security.core.userdetails.UsernameNotFoundException;
import org.springframework.stereotype.Service;

import java.util.Optional;

@Service
@RequiredArgsConstructor
public class UserInfoDetailService implements UserDetailsService {
    private final UserInfoRepository userInfoRepository;
    @Override
    public UserDetails loadUserByUsername(String username) throws UsernameNotFoundException {
        Optional<UserInfo> userInfo = userInfoRepository.findByName(username);
        return null;
    }
}
Ở đây chúng ta implements UserDetailsService để tận dùng hàm có sẵn loadUserByUsername. Tuy nhiên hàm này trả về 1 object có data type là UserDetails. Vì vậy trước khi viết tiếp logic của service, chúng ta cần implement UserDetails từ UserInfo class.
6. Implement UserDetails vào trong class UserInfo
Trước khi Implement, chúng ta cần tạo ra Enum Role:
public enum Role {
    USER,
    ADMIN
}
Sau khi implements UserDetails ta có class UserInfo như sau:
@Entity // dùng để khai báo với Spring Boot rằng đây là 1 entity biểu diễn table trong db
@Data // annotation này sẽ tự động khai báo getter và setter cho class
@AllArgsConstructor // dùng để khai báo constructor với tất cả các properties
@NoArgsConstructor // dùng để khai báo constructor rỗng không có param
public class UserInfo implements UserDetails {
    @Id
    @GeneratedValue(strategy =  GenerationType.IDENTITY)
    private int id;
    private String name;
    private String email;
    private String password;
    @Enumerated(EnumType.STRING)
    private Role role;

    @Override
    public Collection<? extends GrantedAuthority> getAuthorities() {
        return List.of(new SimpleGrantedAuthority(role.name()));
    }

    @Override
    public String getUsername() {
        return name;
    }

    @Override
    public boolean isAccountNonExpired() {
        return UserDetails.super.isAccountNonExpired();
    }

    @Override
    public boolean isAccountNonLocked() {
        return UserDetails.super.isAccountNonLocked();
    }

    @Override
    public boolean isCredentialsNonExpired() {
        return UserDetails.super.isCredentialsNonExpired();
    }

    @Override
    public boolean isEnabled() {
        return UserDetails.super.isEnabled();
    }
}
Ở đây, nếu như bài trước mọi người đọc vào phần method roles("ADMIN") mà mình đề cập thì Spring Boot có sử dụng new SimpleGrantedAuthority("ROLE_" + role), cho nên ở đây mình cũng sử dụng hàm này để tạo quyền.
Lúc này, chúng ta có class UserInfoDetailService hoàn chỉnh như sau:
@Service
@RequiredArgsConstructor
public class UserInfoDetailService implements UserDetailsService {
    private final UserInfoRepository userInfoRepository;
    @Override
    public UserDetails loadUserByUsername(String username) throws UsernameNotFoundException {
        Optional<UserInfo> userInfo = userInfoRepository.findByName(username);
        if (userInfo.isPresent()) {
            return userInfo.get();
        }
        throw new UsernameNotFoundException(username);
    }
}
7. Thêm user vào database
Về cơ bản, chúng ta đã config xong phần lấy thông tin user từ database, tiếp theo chúng ta sẽ sửa phần hard code trong SecurityConfig. Bây giờ chúng ta sẽ sử dụng UserInfoService đã được tạo ra bằng cách implments UserDetailsService, và sẽ trở thành như sau:
....
@RequiredArgsConstructor
public class SecurityConfig {
    private final UserInfoRepository repository;
    @Bean
    public UserDetailsService userDetailsService() {
//        UserDetails admin = User.withUsername("hach")
//                .password(encoder.encode("hacheery"))
//                .roles("ADMIN")
//                .build();
//        UserDetails user = User.withUsername("user")
//                .password(encoder.encode("pwd1"))
//                .roles("USER")
//                .build();
//        return new InMemoryUserDetailsManager(admin, user);
        return new UserInfoService(repository);
    }
....
Từ bây giờ, các request sẽ được gửi đến UserInfoService và fetch user object từ db bằng username được truyền vào từ param. Để có thể làm được việc đó, đầu tiên chúng ta cần phải thêm user vào trong db. Như thường lệ thì chúng ta sẽ tạo repository(ở đây dùng luôn UserInfoRepository đã tạo sẵn ở trên) sau đó tạo UserService gọi đến repo và cuối cùng là viết UserController để lấy dữ liệu từ client và chuyển tiếp cho service. Dưới đây là code hoàn chỉnh:
UserService:
package com.example.springsecurity.service;

import com.example.springsecurity.entity.UserInfo;
import com.example.springsecurity.repository.UserInfoRepository;
import org.springframework.security.crypto.password.PasswordEncoder;
import org.springframework.stereotype.Service;

/**
 * Created by HachNV on 31/05/2023
 */
@Service
public record UserService(UserInfoRepository repository,
                          PasswordEncoder passwordEncoder) {
    public String addUser(UserInfo userInfo) {
        userInfo.setPassword(passwordEncoder.encode(userInfo.getPassword()));
        repository.save(userInfo);
        return "Thêm user thành công!";
    }
}
UserController:
package com.example.springsecurity.controller;

import com.example.springsecurity.entity.UserInfo;
import com.example.springsecurity.service.UserService;
import lombok.RequiredArgsConstructor;
import org.springframework.web.bind.annotation.RequestBody;
import org.springframework.web.bind.annotation.RequestMapping;
import org.springframework.web.bind.annotation.RestController;

/**
 * Created by HachNV on 31/05/2023
 */
@RestController
@RequestMapping("/user")
@RequiredArgsConstructor
public class UserController {

    private final UserService userService;

    @PostMapping("/new")
    public String addUser(@RequestBody UserInfo userInfo) {
        return userService.addUser(userInfo);
    }
}
Tuy nhiên, có một vấn đề ở đây, nếu chúng ta gọi đến địa chỉ http://localhost:8080/user/new thì sẽ lại trả về trang login, trong khi cần phải có tài khoản thì mới login được?? =))) chính vì vậy chúng ta cần phải thay đổi config một chút:
...
.requestMatchers("/hello", "/user/new").permitAll()
...
Ở đây chúng ta thêm 1 patterns nữa là "/user/new" để không cần login khi truy cập.
Để có thể test được thì chúng ta sẽ sử dụng Postman với url: http://localhost:8080/user/new method là post như hình:
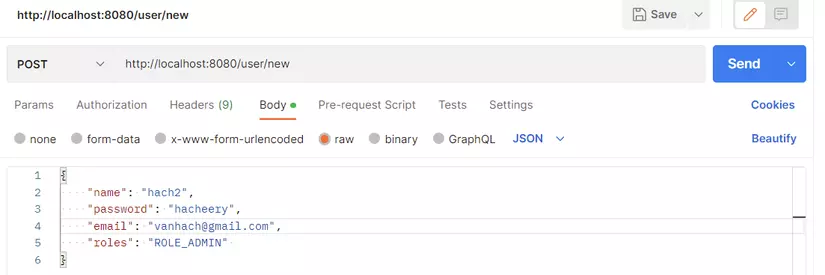
Mọi người check kỹ thông tin như hình nhé, tránh việc không call được api ^^
Sau khi call api ta có kết quả như sau:

6. Config AuthenticationProvider
Như vậy thì bây giờ đã có thể sử dụng dynamic account rồi, chúng ta sẽ thực hiện login bằng tài khoản đã tạo ở trên. Tuy nhiên, khi login thì lại có thông báo như sau:
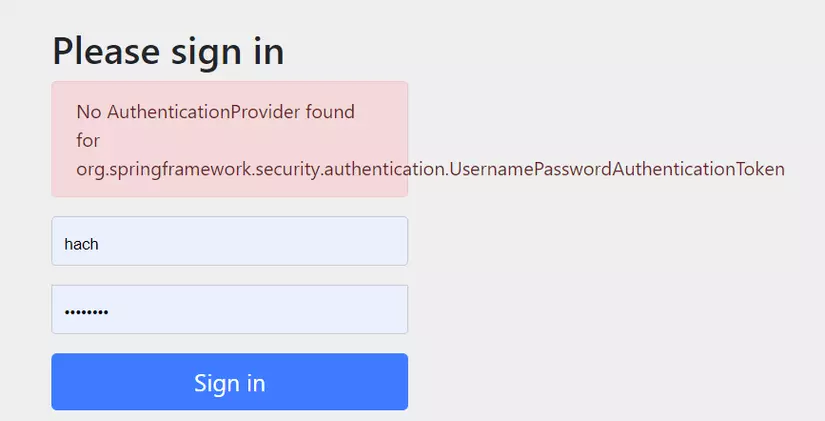
UsernamePasswordAuthenticationToken là loại token mặc định được Spring Security sử dụng để đại diện cho xác thực dựa trên tên người dùng và mật khẩu. Khi chúng ta cố gắng xác thực bằng tên người dùng và mật khẩu, Spring Security tìm kiếm AuthenticationProvider thích hợp để xử lý quá trình xác thực. Tuy nhiên ở đây chúng ta chưa tạo ra nó cho nên chúng ta sẽ tạo ra 1 instance như sau:
@Bean
    public AuthenticationProvider authenticationProvider(){
        DaoAuthenticationProvider authenticationProvider=new DaoAuthenticationProvider();
        authenticationProvider.setUserDetailsService(userDetailsService());
        authenticationProvider.setPasswordEncoder(passwordEncoder());
        return authenticationProvider;
    }
7. Thành quả
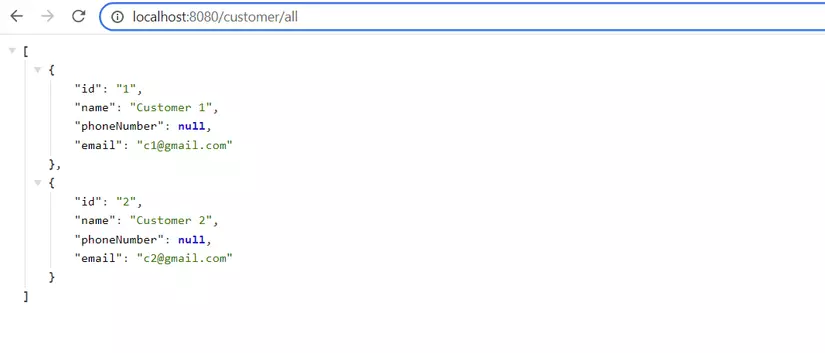
Như vậy sau khi login và đăng nhập vào địa chỉ: http://localhost:8080/customer/all ta sẽ có được data như hình dưới đây:
Vậy là về cơ bản chúng ta đã hoàn thành việc implement security trong Spring boot 3. Hy vọng bài viết này sẽ giúp đỡ mọi người trong việc tìm hiểu về Spring boot 3 và Spring security 6. Nếu có vấn đề gì trong quá trình thực hiện, mọi người có thể comment, mình sẽ hỗ trợ trong khả năng của mình ạ.
Nguồn tham khảo: https://youtu.be/R76S0tfv36w Link github source code: https://github.com/hachnv8/spring-security
All rights reserved
