[Phần 1] Spring Security 6 with JWT, Oauth2
Bài đăng này đã không được cập nhật trong 2 năm
1. Giới thiệu
Tiếp nối series trước mình có chia sẻ về cách config security với Spring Boot 3 và Spring Security 6(bạn nào chưa đọc thì có thể tìm hiểu ở đây: https://viblo.asia/s/spring-boot-3-va-spring-security-6-gwd43EBXLX9) ở series này mình sẽ đi sâu hơn vào Spring Security sử dụng JWT và Oauth2, ngoài ra nếu có thể mình sẽ nói thêm về KeyCloack. Đây là những thành phần quan trọng mà chúng ta sẽ sử dụng trong thực tế.
Link Serie: https://viblo.asia/s/spring-security-6-with-jwt-oauth2-PwlVmQ6rV5Z
2. Setup
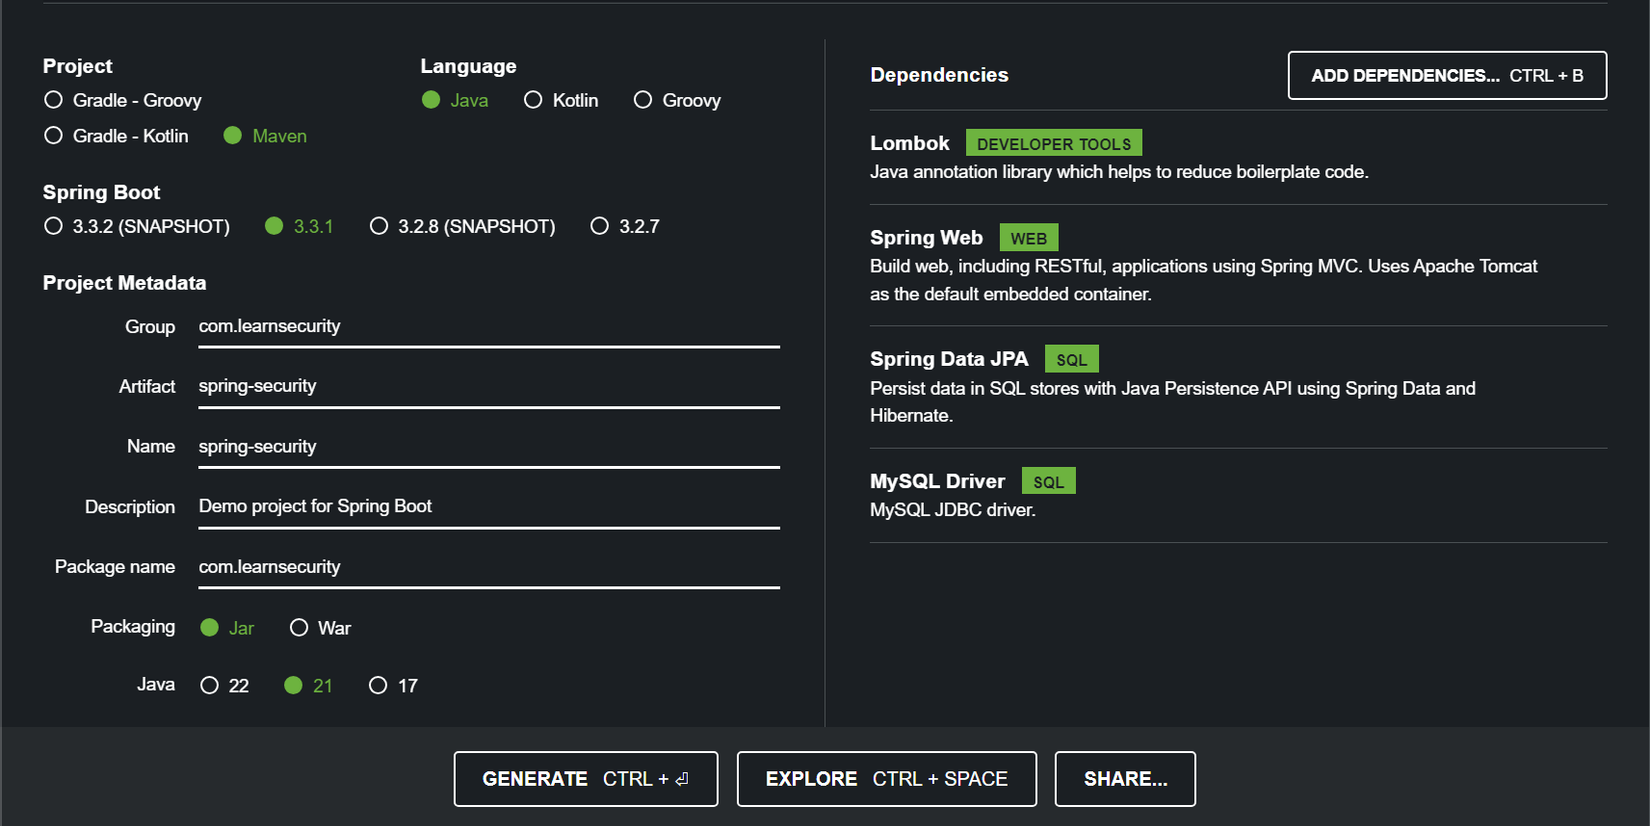
Ở bài viết đầu tiên này, chúng ta sẽ xây dựng Project REST API gồm các API cơ bản để phục vụ cho mục đích bảo mật. Dưới đây là thông tin về project cũng như các dependency mà chúng ta sẽ sử dụng:
Lưu ý: để giảm thiểu độ phức tạp và đảm bảo rằng các API hoạt động chính xác, chúng ta sẽ tạm thời không thêm security dependency vào project, chúng ta sẽ thêm nó ở phần sau.
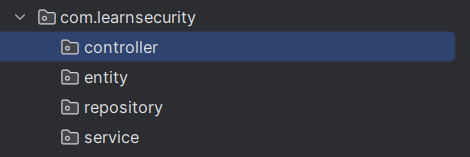
 Các package chúng ta cần có trong project:
Cấu hình application.properties để kết nối đến MySQL:
spring.application.name=spring-security
spring.datasource.url=jdbc:mysql://localhost:3306/spring_security
spring.datasource.username=sc
spring.datasource.password=123456
spring.jpa.hibernate.ddl-auto=update
spring.jpa.show-sql=true
3. Tạo các REST API
3.1. Tạo Entity
Để có thể làm việc với MySQL thì chúng ta cần phải có các Entity(mọi người có thể đọc thêm về Entity để hiểu rõ hơn). Ở đây trong package entity mình sẽ tạo class User như sau:
@Entity
@Table(name = "users")
@Data
@NoArgsConstructor
@AllArgsConstructor
public class User {
    @Id
    @GeneratedValue(strategy = GenerationType.IDENTITY)
    private Long userId;
    private String username;
    private String password;
    private String firstName;
    private String lastName;
    private String email;
}
3.2. Tạo Repository
Có lẽ các bạn cũng khá quen thuộc với Repository trước khi đọc bài này rồi nên mình sẽ chỉ để code ở đây thôi nhé  (vì bản chất việc extends JpaRepository đã có sẵn annotation @Repository rồi nên không cần thêm annotation này ở đây cũng được, mình thêm vào để các bạn nhìn cho dễ hiểu thôi ạ)
@Repository
public interface UserRepository extends JpaRepository<User, Long> {
}
3.3. Tạo Service
Theo coding convention thì chúng ta sẽ tạo UserService interface định nghĩa các method:
public interface UserService {
    User createUser();

    List<User> getUsers();

    User getUserById(Long userId);

    User updateUser(Long userId, User user);
}
Tiếp theo chúng ta sẽ tạo ra package impl nằm bên trong package service, và class UserServiceImpl:
@Service
@RequiredArgsConstructor
public class UserServiceImpl implements UserService {
    private final UserRepository userRepository;

    @Override
    public User createUser(User user) {
        return userRepository.save(user);
    }

    @Override
    public List<User> getUsers() {
        return userRepository.findAll();
    }

    @Override
    public User getUserById(Long userId) {
        return userRepository.findById(userId).orElse(null);
    }

    @Override
    public User updateUser(Long userId, User user) {
        User existingUser = userRepository.findById(userId).orElse(null);
        if (existingUser != null) {
            existingUser.setUsername(user.getUsername());
//            existingUser.setPassword(user.getPassword());
            existingUser.setEmail(user.getEmail());
            existingUser.setFirstName(user.getFirstName());
            existingUser.setLastName(user.getLastName());
            return userRepository.save(existingUser);
        }
        return null;
    }
}
3.4. Tạo Controller
Trong package controller, chúng ta tạo class UserController:
@RestController
@RequestMapping("/api/users")
@RequiredArgsConstructor
public class UserController {
    private final UserServiceImpl userService;

    @PostMapping
    public ResponseEntity<User> createUser(@RequestBody User user) {
        User createdUser = userService.createUser(user);
        return ResponseEntity.ok(createdUser);
    }

    @GetMapping
    public ResponseEntity<List<User>> getUsers() {
        List<User> users = userService.getUsers();
        return ResponseEntity.ok(users);
    }

    @GetMapping("/{userId}")
    public ResponseEntity<User> getUser(@PathVariable Long userId) {
        User user = userService.getUserById(userId);
        return ResponseEntity.ok(user);
    }

    @PutMapping("/{userId}")
    public ResponseEntity<User> updateUser(@PathVariable Long userId, @RequestBody User user) {
        User updatedUser = userService.updateUser(userId, user);
        return ResponseEntity.ok(updatedUser);
    }
}
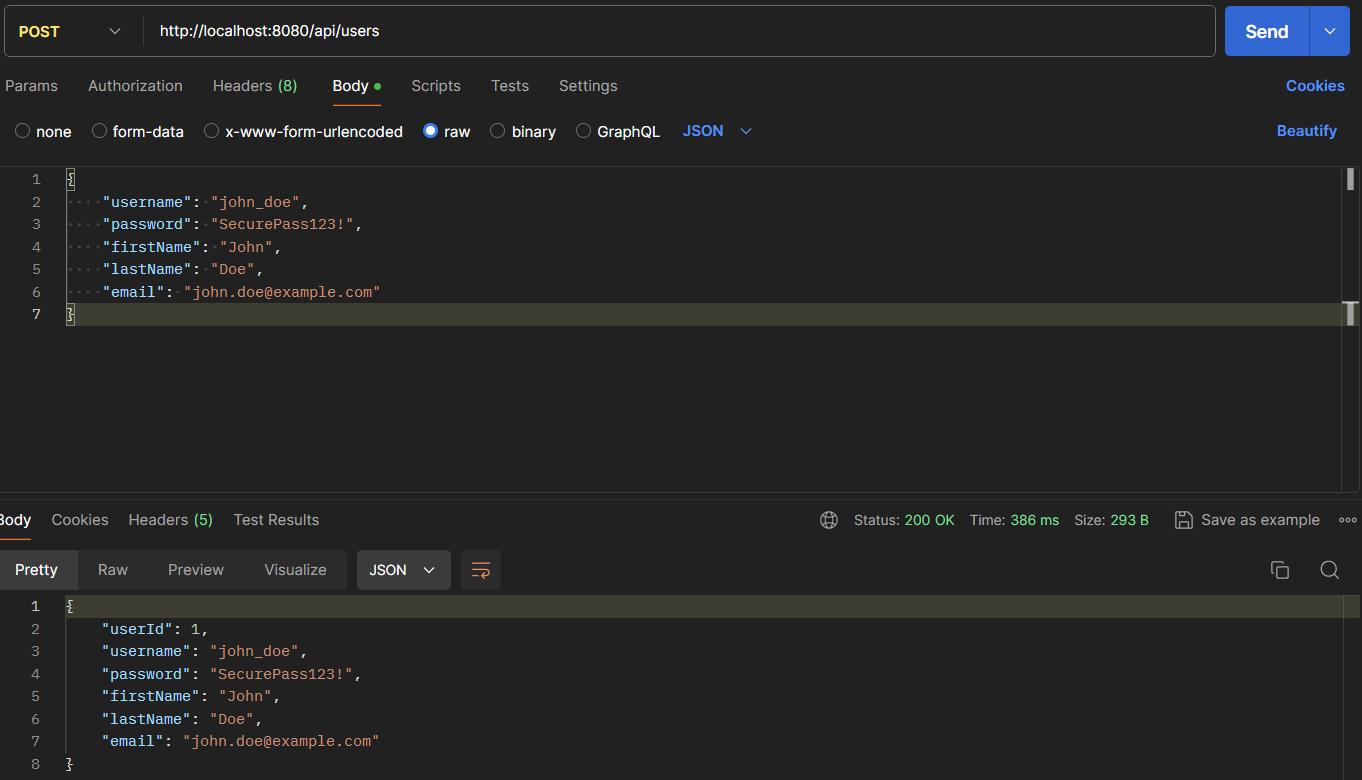
4. Test API bằng Postman
Data test:
{
    "username": "john_doe",
    "password": "SecurePass123!",
    "firstName": "John",
    "lastName": "Doe",
    "email": "john.doe@example.com"
}
5. Kết
Trên đây là Project REST API cơ bản, phần sau mình sẽ thêm security vào trong Project. Source code: https://github.com/hachnv8/spring-security
Phần 2: https://viblo.asia/p/phan-2-them-security-vao-project-5pPLkAD64RZ
All rights reserved
