PET project use MEAN Stack [Part2_Frontend]
Bài đăng này đã không được cập nhật trong 6 năm
Xin chào các bạn, trong Phần 1: PET project use MEAN Stack [Part1_Backend] của bài viết PET project use MEAN Stack, mình đã tạo dựng được backend sử dụng NodeJS, ExpressJS, MongoDB. Trong phần 2 này, mình sẽ tiếp tục hoàn thành phần frontend.
Nội dung
- Cài đặt project Angular 7
- Tạo routing service trong Angular
- Tạo service trong Angular
- Tạo mới Employee
- Hiển thị danh sách employee và xóa employee
- Cập nhật thông tin employee
Chúng ta sẽ mở folder chứa folder backend đã tạo trong phần 1 bằng VS Code.
1. Cài đặt project Angular 7
Cài đặt Angular CLI
npm install @angular/cli -g
Chúng ta sẽ tạo một project Angular cùng cấp với thư mục backend:
ng new user-management-mean-stack
Angular CLI sẽ hỏi một vài lựa chọn để cài đặt cho project
Would you like to add Angular routing? Lựa chọn y và nhấn enter.
Which stylesheet format would you like to use? Lựa chọn CSS và nhấn enter.
Sau đó cd vào thư mục user-management-mean-stack
cd user-management-mean-stack
Để nội dung hiển thị thêm sinh động, chúng ta sẽ sử dụng bootstrap:
npm install bootstrap
Để khai báo bootstrap, mở file angular.json tìm tới “styles”: [] trong phần “build”: [] và thêm nội dung như sau:
"styles": [
          "node_modules/bootstrap/dist/css/bootstrap.min.css",
          "src/styles.css"
         ]
Tạo các component
Để thao tác với các chức năng, ở đây tôi sẽ tạo ra 3 component để thực hiện được 4 chức năng CRUD.
ng g c components/employee-create
ng g c components/employee-edit
ng g c components/employee-list
2. Tạo routing service trong Angular
Để điều hướng được giữa các component hay các màn hình với thao tác như trên, tôi cần cài đặt routing service trong app. Do khi khởi tạo project, tôi đã lựa chọn việc tạo routing trong Angular nên Angular CLI sẽ tự động tạo file app-routing.module.ts và khai báo trong src > app > app.module.ts
Đây là nội dung file app-routing.module.ts:
import { NgModule } from '@angular/core';
import { Routes, RouterModule } from '@angular/router';

import { EmployeeCreateComponent } from './components/employee-create/employee-create.component';
import { EmployeeListComponent } from './components/employee-list/employee-list.component';
import { EmployeeEditComponent } from './components/employee-edit/employee-edit.component';

const routes: Routes = [
  { path: '', pathMatch: 'full', redirectTo: 'create-employee' },
  { path: 'create-employee', component: EmployeeCreateComponent },
  { path: 'edit-employee/:id', component: EmployeeEditComponent },
  { path: 'employees-list', component: EmployeeListComponent }
];

@NgModule({
  imports: [RouterModule.forRoot(routes)],
  exports: [RouterModule]
})

export class AppRoutingModule { }
Tôi sẽ đặt các nút điều hướng trên header của trang, nên đoạn code sau sẽ được thêm vào file app.component.html:
<div class="d-flex flex-column flex-md-row align-items-center p-3 px-md-4 mb-3 bg-white border-bottom shadow-sm">
  <h5 class="my-0 mr-md-auto font-weight-normal">MEAN Stack CRUD</h5>
  <nav class="my-2 my-md-0 mr-md-3">
    <a class="btn btn-outline-primary" routerLinkActive="active" routerLink="/employees-list">View Employees</a>
  </nav>
  <a class="btn btn-outline-primary" routerLinkActive="active" routerLink="/create-employee">Add Employee</a>
</div>

<router-outlet></router-outlet>
3. Tạo service trong Angular để thao tác với RESTful APIs
Để gọi được tới API của bên backend, chúng ta cần tạo các file service. File này sẽ thực hiện các thao tác CRUD thông qua API.
Trước đó chúng ta cần làm 2 việc:
- Import service
HttpClientModulevàoapp.module.ts
import { HttpClientModule } from '@angular/common/http';

@NgModule({
  imports: [
    HttpClientModule
   ]
})
-
Tạo file model
Tạo folder
modelmkdir modelTạo file model
ng g cl model/EmployeeThêm nội dung các trường vào file
employee.ts:export class Employee { name: string; email: string; designation: string; phoneNumber: number; }
Tạo service
src > app > service > api.service.ts. Gõ lệnh:
ng g s service/api
Nội dung file api.service.ts:
import { Injectable } from '@angular/core';
import { Observable, throwError } from 'rxjs';
import { catchError, map } from 'rxjs/operators';
import { HttpClient, HttpHeaders, HttpErrorResponse } from '@angular/common/http';

@Injectable({
  providedIn: 'root'
})

export class ApiService {

  baseUri:string = 'http://localhost:4000/api';
  headers = new HttpHeaders().set('Content-Type', 'application/json');

  constructor(private http: HttpClient) { }

  // Create
  createEmployee(data): Observable<any> {
    let url = `${this.baseUri}/create`;
    return this.http.post(url, data)
      .pipe(
        catchError(this.errorMgmt)
      )
  }

  // Get all employees
  getEmployees() {
    return this.http.get(`${this.baseUri}`);
  }

  // Get employee
  getEmployee(id): Observable<any> {
    let url = `${this.baseUri}/read/${id}`;
    return this.http.get(url, {headers: this.headers}).pipe(
      map((res: Response) => {
        return res || {}
      }),
      catchError(this.errorMgmt)
    )
  }

  // Update employee
  updateEmployee(id, data): Observable<any> {
    let url = `${this.baseUri}/update/${id}`;
    return this.http.put(url, data, { headers: this.headers }).pipe(
      catchError(this.errorMgmt)
    )
  }

  // Delete employee
  deleteEmployee(id): Observable<any> {
    let url = `${this.baseUri}/delete/${id}`;
    return this.http.delete(url, { headers: this.headers }).pipe(
      catchError(this.errorMgmt)
    )
  }

  // Error handling
  errorMgmt(error: HttpErrorResponse) {
    let errorMessage = '';
    if (error.error instanceof ErrorEvent) {
      // Get client-side error
      errorMessage = error.error.message;
    } else {
      // Get server-side error
      errorMessage = `Error Code: ${error.status}\nMessage: ${error.message}`;
    }
    console.log(errorMessage);
    return throwError(errorMessage);
  }

}
Sau đó chúng ta cần khai báo service trong app.module.ts:
import { ApiService } from './service/api.service';

@NgModule({
  providers: [ApiService]
})
4. Tạo mới Employee
Để tạo mới một employee, chúng ta sẽ sử dụng Reactive Forms trên giao diện.
Chúng ta mở file components > employee-create > employee-create.component.ts và nội dung sẽ như sau:
import { Router } from '@angular/router';
import { ApiService } from './../../service/api.service';
import { Component, OnInit, NgZone } from '@angular/core';
import { FormGroup, FormBuilder, Validators } from "@angular/forms";

@Component({
  selector: 'app-employee-create',
  templateUrl: './employee-create.component.html',
  styleUrls: ['./employee-create.component.css']
})

export class EmployeeCreateComponent implements OnInit {
  submitted = false;
  employeeForm: FormGroup;
  EmployeeProfile:any = ['Finance', 'BDM', 'HR', 'Sales', 'Admin']

  constructor(
    public fb: FormBuilder,
    private router: Router,
    private ngZone: NgZone,
    private apiService: ApiService
  ) {
    this.mainForm();
  }

  ngOnInit() { }

  mainForm() {
    this.employeeForm = this.fb.group({
      name: ['', [Validators.required]],
      email: ['', [Validators.required, Validators.pattern('[a-z0-9._%+-]+@[a-z0-9.-]+\.[a-z]{2,3}$')]],
      designation: ['', [Validators.required]],
      phoneNumber: ['', [Validators.required, Validators.pattern('^[0-9]+$')]]
    })
  }

  // Choose designation with select dropdown
  updateProfile(e){
    this.employeeForm.get('designation').setValue(e, {
      onlySelf: true
    })
  }

  // Getter to access form control
  get myForm(){
    return this.employeeForm.controls;
  }

  onSubmit() {
    this.submitted = true;
    if (!this.employeeForm.valid) {
      return false;
    } else {
      this.apiService.createEmployee(this.employeeForm.value).subscribe(
        (res) => {
          console.log('Employee successfully created!')
          this.ngZone.run(() => this.router.navigateByUrl('/employees-list'))
        }, (error) => {
          console.log(error);
        });
    }
  }

}
Tiếp tục fileemployee-create.component.html:
<div class="row justify-content-center">
  <div class="col-md-4 register-employee">
    <!-- form card register -->
    <div class="card-body">
      <form [formGroup]="employeeForm" (ngSubmit)="onSubmit()">
        <div class="form-group">
          <label for="inputName">Name</label>
          <input class="form-control" type="text" formControlName="name">
          <!-- error -->
          <div class="invalid-feedback" *ngIf="submitted && myForm.name.errors?.required">
            Name is required.
          </div>
        </div>

        <div class="form-group">
          <label for="inputEmail3">Email</label>
          <input class="form-control" type="text" formControlName="email">
          <!-- error -->
          <div class="invalid-feedback" *ngIf="submitted && myForm.email.errors?.required">
            Enter your email.
          </div>
          <div class="invalid-feedback" *ngIf="submitted && myForm.email.errors?.pattern">
            Enter valid email.
          </div>
        </div>

        <div class="form-group">
          <label for="inputPassword3">Designation</label>
          <select class="custom-select form-control" (change)="updateProfile($event.target.value)"
            formControlName="designation">
            <option value="">Choose...</option>
            <option *ngFor="let employeeProfile of EmployeeProfile" value="{{employeeProfile}}">{{employeeProfile}}
            </option>
          </select>
          <!-- error -->
          <div class="invalid-feedback" *ngIf="submitted && myForm.designation.errors?.required">
            Choose designation.
          </div>
        </div>

        <div class="form-group">
          <label for="inputVerify3">Mobile No</label>
          <input class="form-control" type="text" formControlName="phoneNumber">
          <!-- error -->
          <div class="invalid-feedback" *ngIf="submitted && myForm.phoneNumber.errors?.required">
            Enter your phone number.
          </div>
          <div class="invalid-feedback" *ngIf="submitted && myForm.phoneNumber.errors?.pattern">
            Enter Numbers Only
          </div>
        </div>

        <div class="form-group">
          <button class="btn btn-success btn-lg btn-block" type="submit">Register</button>
        </div>
      </form>

    </div>
  </div><!-- form card register -->
</div>
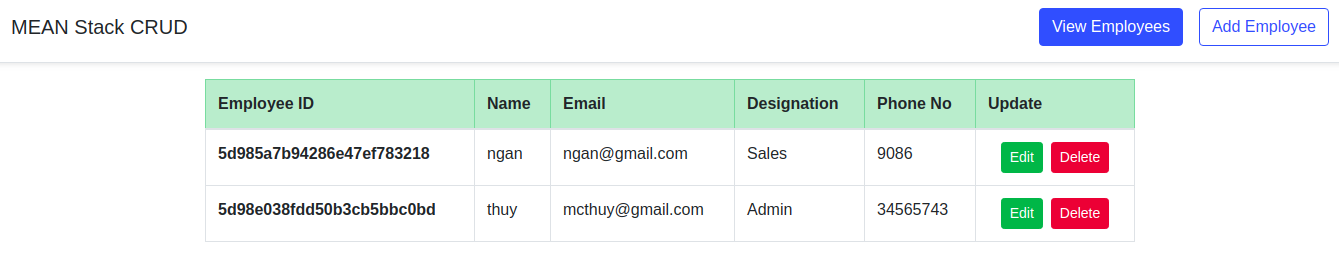
5. Hiển thị danh sách employee và xóa employee
Chúng ta sẽ cho hiển thị list employee. Mở file src/app/components/employee-list/employee-list.component.ts:
import { Component, OnInit } from '@angular/core';
import { ApiService } from './../../service/api.service';

@Component({
  selector: 'app-employee-list',
  templateUrl: './employee-list.component.html',
  styleUrls: ['./employee-list.component.css']
})

export class EmployeeListComponent implements OnInit {

  Employee:any = [];

  constructor(private apiService: ApiService) {
    this.readEmployee();
  }

  ngOnInit() {}

  readEmployee(){
    this.apiService.getEmployees().subscribe((data) => {
     this.Employee = data;
    })
  }

  removeEmployee(employee, index) {
    if(window.confirm('Are you sure?')) {
        this.apiService.deleteEmployee(employee._id).subscribe((data) => {
          this.Employee.splice(index, 1);
        }
      )
    }
  }

}
Tiếp tục file src/app/components/employee-list/employee-list.component.html:
<div class="container">
  <!-- No data message -->
  <p *ngIf="Employee.length <= 0" class="no-data text-center">There is no employee added yet!</p>

  <!-- Employee list -->
  <table class="table table-bordered" *ngIf="Employee.length > 0">
    <thead class="table-success">
      <tr>
        <th scope="col">Employee ID</th>
        <th scope="col">Name</th>
        <th scope="col">Email</th>
        <th scope="col">Designation</th>
        <th scope="col">Phone No</th>
        <th scope="col center">Update</th>
      </tr>
    </thead>
    <tbody>
      <tr *ngFor="let employee of Employee; let i = index">
        <th scope="row">{{employee._id}}</th>
        <td>{{employee.name}}</td>
        <td>{{employee.email}}</td>
        <td>{{employee.designation}}</td>
        <td>{{employee.phoneNumber}}</td>
        <td class="text-center edit-block">
          <span class="edit" [routerLink]="['/edit-employee/', employee._id]">
            <button type="button" class="btn btn-success btn-sm">Edit</button>
          </span>
          <span class="delete" (click)="removeEmployee(employee, i)">
            <button type="button" class="btn btn-danger btn-sm">Delete</button>
          </span>
        </td>
      </tr>
    </tbody>
  </table>
</div>
6. Cập nhật thông tin employee
Để cập nhật thông tin employee ta sẽ nội dung file src/app/components/employee-edit/employee-edit.component.html:
 <div class="row justify-content-center">
   <div class="col-md-4 register-employee">
     <!-- form card register -->
     <div class="card card-outline-secondary">
       <div class="card-header">
         <h3 class="mb-0">Edit Employee</h3>
       </div>
       <div class="card-body">
         <form [formGroup]="editForm" (ngSubmit)="onSubmit()">

           <div class="form-group">
             <label for="inputName">Name</label>
             <input class="form-control" type="text" formControlName="name">
             <div class="invalid-feedback" *ngIf="submitted && myForm.name.errors?.required">
               Name is required.
             </div>
           </div>
           <div class="form-group">
             <label for="inputEmail3">Email</label>
             <input class="form-control" type="text" formControlName="email">
             <!-- error -->
             <div class="invalid-feedback" *ngIf="submitted && myForm.email.errors?.required">
               Enter your email.
             </div>
             <div class="invalid-feedback" *ngIf="submitted && myForm.email.errors?.pattern">
               Enter valid email.
             </div>
           </div>

           <div class="form-group">
             <label for="inputPassword3">Designation</label>
             <select class="custom-select form-control" (change)="updateProfile($event.target.value)"
               formControlName="designation">
               <option value="">Choose...</option>
               <option *ngFor="let employeeProfile of EmployeeProfile" value="{{employeeProfile}}">{{employeeProfile}}
               </option>
             </select>
             <!-- error -->
             <div class="invalid-feedback" *ngIf="submitted && myForm.designation.errors?.required">
               Choose designation.
             </div>
           </div>

           <div class="form-group">
             <label for="inputVerify3">Mobile No</label>
             <input class="form-control" type="text" formControlName="phoneNumber">
             <!-- error -->
             <div class="invalid-feedback" *ngIf="submitted && myForm.phoneNumber.errors?.required">
               Enter your phone number.
             </div>
             <div class="invalid-feedback" *ngIf="submitted && myForm.phoneNumber.errors?.pattern">
               Enter Numbers Only
             </div>
           </div>

           <div class="form-group">
             <button class="btn btn-success btn-lg btn-block" type="submit">Update</button>
           </div>
         </form>
       </div>
     </div><!-- form  -->
   </div>
 </div>
Cuối cùng là file src/app/components/employee-edit/employee-edit.component.ts:
import { Employee } from './../../model/Employee';
import { Component, OnInit } from '@angular/core';
import { ActivatedRoute, Router } from "@angular/router";
import { ApiService } from './../../service/api.service';
import { FormGroup, FormBuilder, Validators } from "@angular/forms";


@Component({
  selector: 'app-employee-edit',
  templateUrl: './employee-edit.component.html',
  styleUrls: ['./employee-edit.component.css']
})

export class EmployeeEditComponent implements OnInit {
  submitted = false;
  editForm: FormGroup;
  employeeData: Employee[];
  EmployeeProfile: any = ['Finance', 'BDM', 'HR', 'Sales', 'Admin']

  constructor(
    public fb: FormBuilder,
    private actRoute: ActivatedRoute,
    private apiService: ApiService,
    private router: Router
  ) {}

  ngOnInit() {
    this.updateEmployee();
    let id = this.actRoute.snapshot.paramMap.get('id');
    this.getEmployee(id);
    this.editForm = this.fb.group({
      name: ['', [Validators.required]],
      email: ['', [Validators.required, Validators.pattern('[a-z0-9._%+-]+@[a-z0-9.-]+\.[a-z]{2,3}$')]],
      designation: ['', [Validators.required]],
      phoneNumber: ['', [Validators.required, Validators.pattern('^[0-9]+$')]]
    })
  }

  // Choose options with select-dropdown
  updateProfile(e) {
    this.editForm.get('designation').setValue(e, {
      onlySelf: true
    })
  }

  // Getter to access form control
  get myForm() {
    return this.editForm.controls;
  }

  getEmployee(id) {
    this.apiService.getEmployee(id).subscribe(data => {
      this.editForm.setValue({
        name: data['name'],
        email: data['email'],
        designation: data['designation'],
        phoneNumber: data['phoneNumber'],
      });
    });
  }

  updateEmployee() {
    this.editForm = this.fb.group({
      name: ['', [Validators.required]],
      email: ['', [Validators.required, Validators.pattern('[a-z0-9._%+-]+@[a-z0-9.-]+\.[a-z]{2,3}$')]],
      designation: ['', [Validators.required]],
      phoneNumber: ['', [Validators.required, Validators.pattern('^[0-9]+$')]]
    })
  }

  onSubmit() {
    this.submitted = true;
    if (!this.editForm.valid) {
      return false;
    } else {
      if (window.confirm('Are you sure?')) {
        let id = this.actRoute.snapshot.paramMap.get('id');
        this.apiService.updateEmployee(id, this.editForm.value)
          .subscribe(res => {
            this.router.navigateByUrl('/employees-list');
            console.log('Content updated successfully!')
          }, (error) => {
            console.log(error)
          })
      }
    }
  }

}
OK. Đã xong phần Frontend, bây giờ chúng ta hãy cùng xem sản phẩm của mình nào:
- Bật server của mongodb:
sudo service mongod start - Mở terminal của VS Code, cd vào thư mục backend và gõ:
node server.js - Mở một terminal mới, cd vào thư mục user-management-mean-stack và gõ:
ng s --o
Đây là kết quả demo của mình:


Trên đây là những hướng dẫn cơ bản về việc tạo dựng frontend sử dụng Angular theo đúng MEAN Stack.
Qua hai bài viết về PET project CRUD này, mình xin chia sẻ tới các bạn cách tạo dựng một project theo mô hình MEAN Stack. Các bạn có thể hình dung khái quát về kiến trúc cũng như cấu trúc tổng thể của mô hình.
Rất mong nhận được sự đóng góp ý kiến từ các bạn. Mình xin cảm ơn.
All rights reserved
