Parse Service và Ứng dụng iOS nho nhỏ phần 2
Bài đăng này đã không được cập nhật trong 4 năm
Tiếp tục phần 2 với việc sử dụng Parser service Đầu tiên chúng ta sẽ sử dụng Parse framework để connect với sever của nó. Vể một chút với Parse framework bạn có thể xem ở đây: http://blog.ios-developers.io/parse-backend-with-swift/ Sau khi có project chúng ta sẽ tiến hành config trong AppDelegate về applicationId, clientKey và sever Parse đã được tạo ở phần 1
    func application(_ application: UIApplication, didFinishLaunchingWithOptions launchOptions: [NSObject: AnyObject]?) -> Bool {
        // Enable storing and querying data from Local Datastore.
        // Remove this line if you don't want to use Local Datastore features or want to use cachePolicy.
        Parse.enableLocalDatastore()

        let parseConfiguration = ParseClientConfiguration(block: { (ParseMutableClientConfiguration) -> Void in
            ParseMutableClientConfiguration.applicationId = "accd5b1cb240a96d125434a8b3b0ba55522xxxxx"
            ParseMutableClientConfiguration.clientKey = "1b1275768c02158df301c2d202777c37b66xxxx"
            ParseMutableClientConfiguration.server = "http://18.220.xxx.xxx:80/parse"
        })

        Parse.initialize(with: parseConfiguration)


        // ****************************************************************************
        // Uncomment and fill in with your Parse credentials:
        // Parse.setApplicationId("your_application_id", clientKey: "your_client_key")
        //
        // If you are using Facebook, uncomment and add your FacebookAppID to your bundle's plist as
        // described here: https://developers.facebook.com/docs/getting-started/facebook-sdk-for-ios/
        // Uncomment the line inside ParseStartProject-Bridging-Header and the following line here:
        // PFFacebookUtils.initializeFacebook()
        // ****************************************************************************

        PFUser.enableAutomaticUser()

        let defaultACL = PFACL();

        // If you would like all objects to be private by default, remove this line.
        defaultACL.getPublicReadAccess = true

        PFACL.setDefault(defaultACL, withAccessForCurrentUser: true)

        if application.applicationState != UIApplicationState.background {
        }

        return true
    }
Đầu tiên sẽ là việc sử dụng Parse trong nhiệm vụ làm chức năng signin và login của app
Mình sẽ tạo 1 giao diện đơn giản như sausau
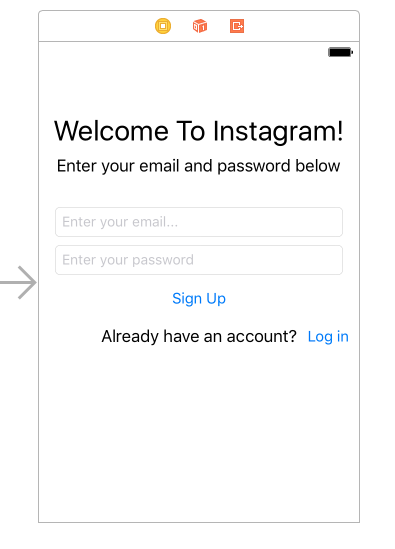
Ở đây đơn giản có nút SignIn or Login và một button chuyển chế độ login và signin Phần chuyển chế độ login và logout thì tạm code đại như thế này
    @IBAction func changeSignupModePressed(_ sender: Any) {
        if signupMode {
            // Change to login mode
            signUpOrLogin.setTitle("Log in", for: [])
            changeSignupMode.setTitle("Sign in", for: [])
            messageLabel.text = "Don't have an account?"
            signupMode = false
        } else {
            // Change to signup mode
            signUpOrLogin.setTitle("Sign up", for: [])
            changeSignupMode.setTitle("Log in", for: [])
            messageLabel.text = "Already have an account?"
            signupMode = true
        }
    }
Tiếp đến để có thể tạo account cho việc Signin và login thì chúng ta cần import Parse và sử dụng như sau
    @IBAction func signUpOrLoginPressed(_ sender: Any) {
        if emailTextField.text ==  "" || passwordTextField.text == "" {
            createAlert(title: "Error in form", message: "Please enter an email and password")

        } else
        {
            onoffActivityIndicator(turnOn: true)
            if signupMode {
                let user = PFUser()
                user.username = emailTextField.text
                user.email = emailTextField.text
                user.password = passwordTextField.text
                user.signUpInBackground(block: {(success, error) in
                    self.onoffActivityIndicator(turnOn: false)
                    if error != nil {
                        self.showError(error: error!)

                    } else {
                        print("user signed up")
                        self.performSegue(withIdentifier: "showUserTable", sender: self)
                    }

                })
            } else {

                // Login mode
                PFUser.logInWithUsername(inBackground: emailTextField.text!, password: passwordTextField.text!, block: {
                (user, error) in
                    self.onoffActivityIndicator(turnOn: false)
                    if error != nil {
                        self.showError(error: error!)
                    } else {
                        print("user logined")
                        self.performSegue(withIdentifier: "showUserTable", sender: self)
                    }
                })
            }
        }
    }
Ở đây sau khi logined thành công thì mình có để nó navigation sang màn hình show thông tin user. Hiện tại bạn có thể kéo đại 1 controller tương tự vào cũng được. Không sao cả, view nào cũng là view  Và ở đây vì khi chúng ta thao tác với sever thì lúc nào cũng tốn một khoảng thời gian request-response vì thể mình sẽ thêm việc bật tắt indicator ở góc màn hình để người dùng thấy được là đang gọi sever.
    func onoffActivityIndicator(turnOn: Bool) {
        if turnOn {
            activityIndicator = UIActivityIndicatorView(frame: CGRect(x: 0, y: 0, width: 50, height: 50))
            activityIndicator.center = self.view.center
            activityIndicator.hidesWhenStopped = true
            activityIndicator.activityIndicatorViewStyle = UIActivityIndicatorViewStyle.gray
            activityIndicator.startAnimating()
            UIApplication.shared.beginIgnoringInteractionEvents()
        } else {
            activityIndicator.stopAnimating()
            UIApplication.shared.endIgnoringInteractionEvents()
        }
    }
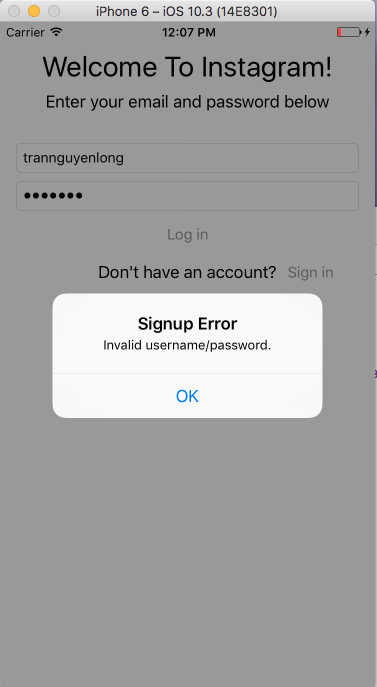
Đồng thời thêm tí màu rảnh rổi lại thêm một cái alert thông báo luônluôn khi có lỗi kiểu như lỗi sever hoặc các trường input đẩy lên ko valid thì sever Parse nó báo về chả hạn
    func createAlert(title: String, message: String) {
        let alert = UIAlertController(title: title, message: message, preferredStyle: UIAlertControllerStyle.alert)
        alert.addAction(UIAlertAction(title: "OK", style: .default, handler: {(action) in
            self.dismiss(animated: true, completion: nil)
        }))
        self.present(alert, animated: true, completion: nil)
    }
 Quay lại một tí về sau khi chúng ta siggin hoặc login thì để check logined hay chưa thì sẽ check như sau
 if PFUser.current() != nil {
            // to do something
        }
Vậy là xong rất đơn giản để làm một chức năng cực kỳ phổ biến hiện nay của các ứng dụng mobile. Chúc mọi người vui vẻ
All rights reserved
