Parse Service
Bài đăng này đã không được cập nhật trong 4 năm
1. Giới thiệu
Parse cung cấp các dịch vụ dựa trên đám mây cho các nhà phát triển ứng dụng di động. Được đưa vào hoạt động từ năm 2012, Parse đã cung cấp dịch vụ cho hơn 180000 ứng dụng Android, iOS và Windows Mobile, và được chạy trên 200 triệu thiết bị.
Parse gồm có các dịch vụ chính:
- Core: lưu trữ dữ liệu, chạy các tác vụ ngầm theo lịch, quản lý cấu hình ứng dụng với Config, sử dụng Webhooks để tương tác với server người dùng,
- Push: gửi push notification tới các thiết bị đa nền tảng, lọc tin nhắn theo từng đối tượng khách hàng.
- Analytics: phân tích việc sử dụng dữ liệu của người dùng, phân tích việc hiệu quả của sử dụng các push notification, tìm và fix các lỗi của ứng dụng.
Trong khuôn khổ bài viết này tôi sẽ hướng dẫn các bạn làm 1 ứng dụng quản lý sản phẩm, đồng bộ dữ liệu lên Parse Server.
2. Demo App
2.1. Tạo ứng dụng
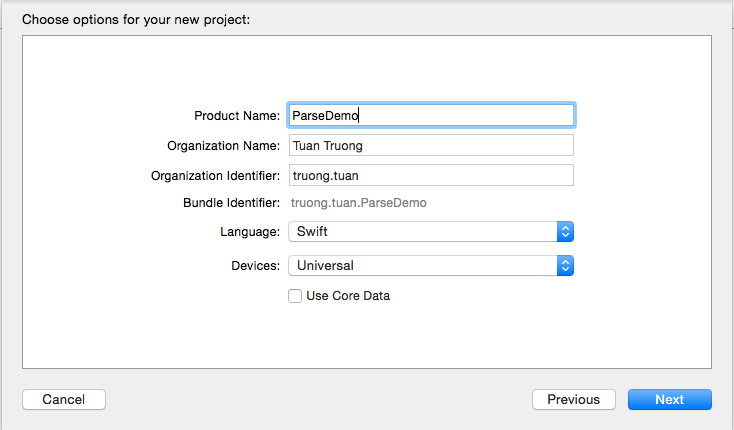
Mở Xcode tạo 1 ứng dụng Single View Application.
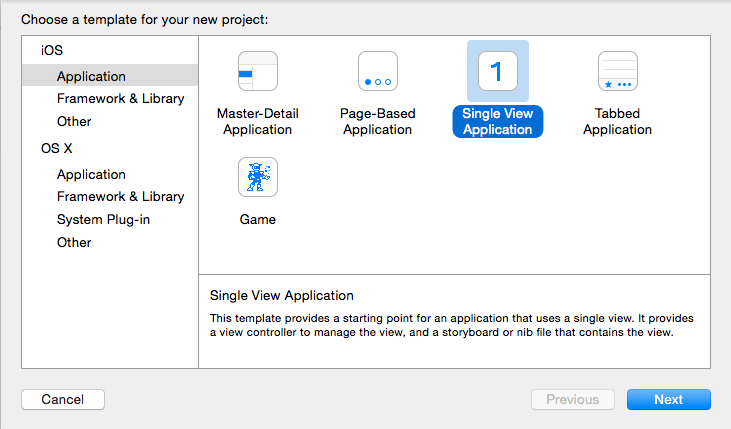
Đặt tên ứng dụng là ParseDemo, ngôn ngữ Swift, bỏ chọn Use Core Data.
2.2. Tạo tài khoản Parse
Vào trang https://www.parse.com và theo các bước tạo tạo tài khoản.
2.3. Tạo ứng dụng trên Parse
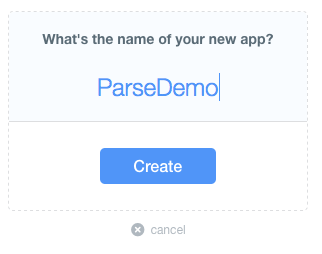
Sau khi tạo tài khoản thành công, bạn vào https://www.parse.com/apps và thêm mới ứng dụng.
Đặt tên ứng dụng là ParseDemo và nhấn nút Create.
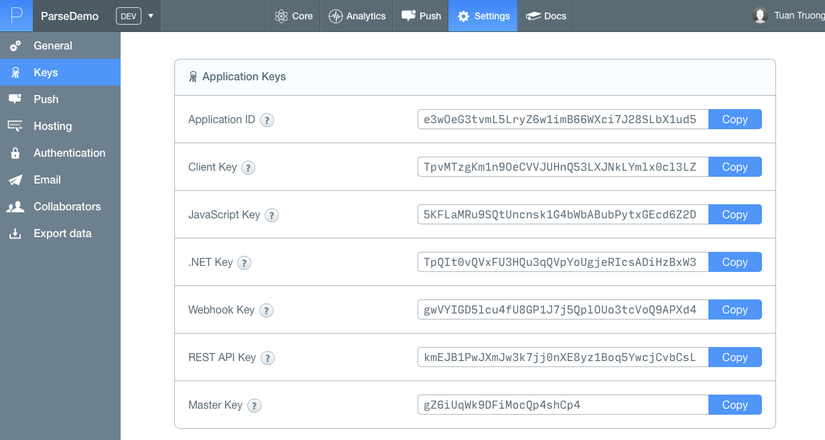
Sau đó nhấn link “grab your keys” để xem key của ứng dụng.
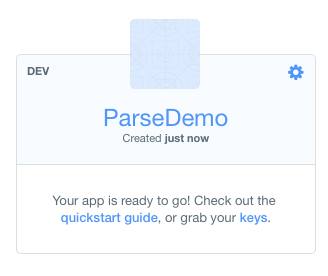
Ghi lại ApplicationID, Client Key
2.4. Download và cấu hình Parse SDK
Vào mục download trên Parse để download SDK mới nhất dành cho iOS, (hiện tại là v1.7.4) https://www.parse.com/downloads/ios/parse-library/latest
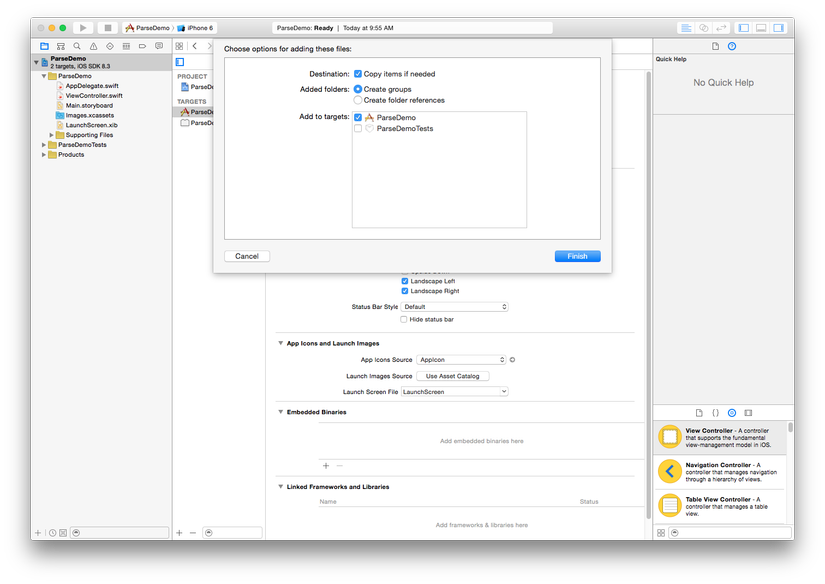
Kéo thả Parse.framework và Bolts.framework bạn vừa download vào project trên Xcode. Tích chọn Copy items if needed
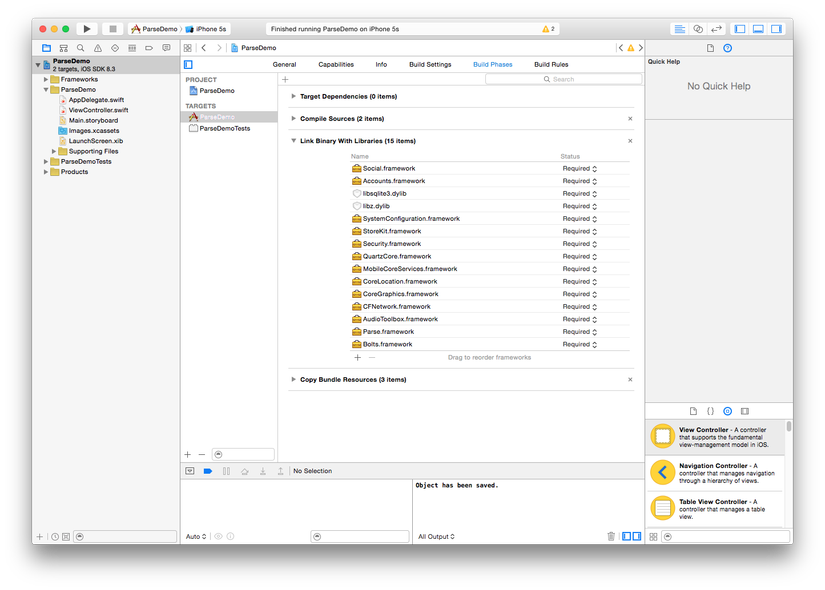
Chọn Targets > ParseDemo > Build Phases tab.
Thêm các library sau vào mục Link Binary With Libraries:
- AudioToolbox.framework
- CFNetwork.framework
- CoreGraphics.framework
- CoreLocation.framework
- MobileCoreServices.framework
- QuartzCore.framework
- Security.framework
- StoreKit.framework
- SystemConfiguration.framework
- libz.dylib
- libsqlite3.dylib
- Accounts.framework
- Social.framework
Cập nhật file AppDelegate như sau, thay ApppicationId và clientKey theo app của bạn.
import UIKit
import Parse
import Bolts

@UIApplicationMain
class AppDelegate: UIResponder, UIApplicationDelegate {

    var window: UIWindow?

    func application(application: UIApplication, didFinishLaunchingWithOptions launchOptions: [NSObject: AnyObject]?) -> Bool {
        // Override point for customization after application launch.

        Parse.enableLocalDatastore()

        // Initialize Parse.
        Parse.setApplicationId("e3wOeG3tvmL5LryZ6w1imB66WXci7J28SLbX1ud5",
            clientKey: "TpvMTzgKm1n9OeCVVJUHnQ53LXJNkLYmlx0cl3LZ")

        // [Optional] Track statistics around application opens.
        PFAnalytics.trackAppOpenedWithLaunchOptions(launchOptions)

        return true
    }
}
2.5. Tạo Product Model
Thêm class Product.swift có nội dung như sau:
class Product: NSObject {
    var id = “"
    var creationDate = NSDate()
    var name = ""
    var price: Float = 0
}
2.6. Tạo Product Service
Tạo Product Service với các chức năng thêm, sửa, xoá và lấy danh sách product. Để đơn giản tôi sẽ viết các hàm synchronous, thực tế các bạn nên sử dụng các hàm asyc để tránh block main thread (ví dụ: findObjectsInBackgroundWithBlock, saveInBackgroundWithBlock, deleteInBackgroundWithBlock…)
import UIKit
import Parse

class ProductService: NSObject {

    func addProduct(product: Product) {
        var obj = PFObject(className: "Product")
        obj.setObject(product.id, forKey: "id")
        obj.setObject(product.creationDate, forKey: "creationDate")
        obj.setObject(product.name, forKey: "name")
        obj.setObject(product.price, forKey: "price")
        obj.save()
    }

    func updateProduct(product: Product) {
        var query = PFQuery(className: "Product")
        query.whereKey("id", equalTo: product.id)
        if let objects = query.findObjects() {
            for obj in objects {
                obj.setObject(product.name, forKey: "name")
                obj.setObject(product.price, forKey: "price")
                obj.save()
            }
        }
    }

    func deleteProduct(productID: String) {
        var query = PFQuery(className: "Product")
        query.whereKey("id", equalTo: productID)
        if let objects = query.findObjects() {
            for obj in objects {
                obj.delete()
            }
        }
    }

    func getProducts() -> [Product] {
        var products = [Product]()
        var query = PFQuery(className: "Product")
        if let objects = query.findObjects() {
            for obj in objects {
                var product = Product()
                product.id = obj.objectForKey("id") as! String
                product.name = obj.objectForKey("name") as! String
                product.price = obj.objectForKey("price") as! Float
                product.creationDate = obj.objectForKey("creationDate") as! NSDate
                products.append(product)
            }
        }

        return products
    }
}
2.7. ProductDelegate
protocol ProductDelegate: class {
    func productDidAdd(product: Product)
    func productDidUpdate(product: Product)
}
2.8. Tạo ViewController
Vào Main.storyboard, xoá UIViewController có sẵn và thêm vào 2 UITableViewController kèm UINavigationController như sau:
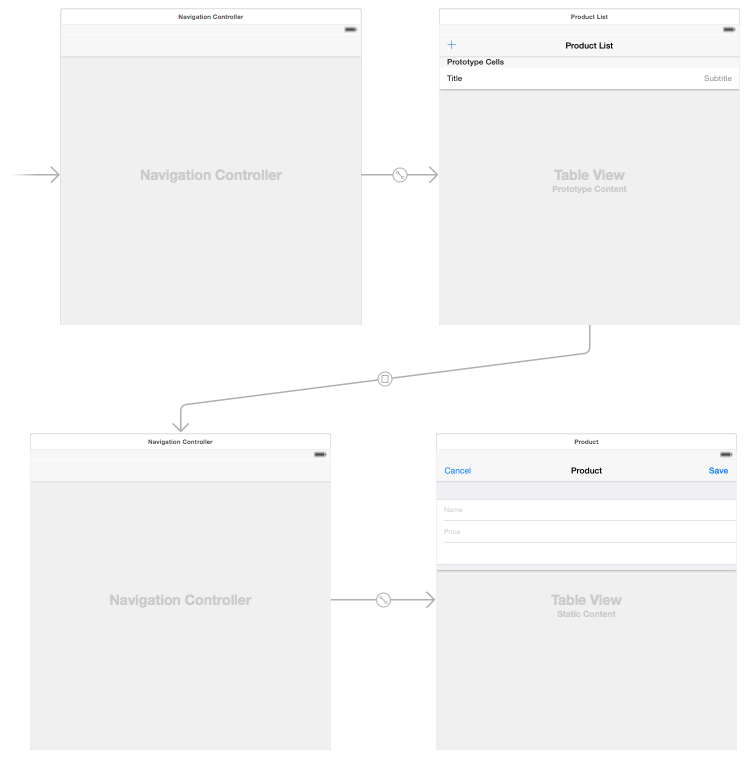
Thêm vào 2 UITableViewController class như sau:
class ProductViewController: UITableViewController {

    @IBOutlet weak var nameTextField: UITextField!

    @IBOutlet weak var priceTextField: UITextField!

    @IBOutlet weak var noteTextField: UITextField!

    var product: Product!

    weak var delegate: ProductDelegate?

    override func viewDidLoad() {
        super.viewDidLoad()

        nameTextField.text = product.name
        priceTextField.text = "\(product.price)"

        nameTextField.becomeFirstResponder()
    }

    override func didReceiveMemoryWarning() {
        super.didReceiveMemoryWarning()
    }

    @IBAction func onSaveButtonClicked(sender: AnyObject) {
        product.name = nameTextField.text
        var string = NSString(string: priceTextField.text)
        product.price = string.floatValue

        if product.id == "" {
            delegate?.productDidAdd(product)
        }
        else {
            delegate?.productDidUpdate(product)
        }

        dismissView()
    }

    @IBAction func onCancelButtonClicked(sender: AnyObject) {
        dismissView()
    }

    private func dismissView() {
        self.dismissViewControllerAnimated(true, completion: nil)
    }

    // MARK: - Table view data source

    override func numberOfSectionsInTableView(tableView: UITableView) -> Int {
        return 1
    }

    override func tableView(tableView: UITableView, numberOfRowsInSection section: Int) -> Int {
        return 3
    }
}
class ProductListViewController: UITableViewController, ProductDelegate {

    var productService = ProductService()
    var products: [Product]!

    override func viewDidLoad() {
        super.viewDidLoad()
        self.navigationItem.rightBarButtonItem = self.editButtonItem()

        products = productService.getProducts()
    }

    override func didReceiveMemoryWarning() {
        super.didReceiveMemoryWarning()
        // Dispose of any resources that can be recreated.
    }

    @IBAction func onAddButtonClicked(sender: AnyObject) {
        self.performSegueWithIdentifier("showProduct", sender: Product())
    }

    // MARK: - Table view data source

    override func numberOfSectionsInTableView(tableView: UITableView) -> Int {
        return 1
    }

    override func tableView(tableView: UITableView, numberOfRowsInSection section: Int) -> Int {
        return products.count
    }

    override func tableView(tableView: UITableView, heightForRowAtIndexPath indexPath: NSIndexPath) -> CGFloat {
        return 44
    }

    override func tableView(tableView: UITableView, didSelectRowAtIndexPath indexPath: NSIndexPath) {
        if self.editing {
            let product = products[indexPath.row]
            self.performSegueWithIdentifier("showProduct", sender: product)
        }
    }

    override func tableView(tableView: UITableView, cellForRowAtIndexPath indexPath: NSIndexPath) -> UITableViewCell {
        let cell = tableView.dequeueReusableCellWithIdentifier("ProductCell", forIndexPath: indexPath) as! UITableViewCell

        let product = products[indexPath.row]
        cell.textLabel?.text = product.name
        cell.detailTextLabel?.text = "$\(product.price)"

        return cell
    }

    override func tableView(tableView: UITableView, canEditRowAtIndexPath indexPath: NSIndexPath) -> Bool {
        return true
    }

    override func tableView(tableView: UITableView, commitEditingStyle editingStyle: UITableViewCellEditingStyle, forRowAtIndexPath indexPath: NSIndexPath) {
        if editingStyle == .Delete {
            let product = products[indexPath.row]
            productService.deleteProduct(product.id)

            var row = -1
            for (index, value) in enumerate(products) {
                if value.id == product.id {
                    row = index
                    break
                }
            }
            if row != -1 {
                products.removeAtIndex(row)
            }
            tableView.deleteRowsAtIndexPaths([indexPath], withRowAnimation: .Fade)
        }
    }

    // MARK: - Navigation

    // In a storyboard-based application, you will often want to do a little preparation before navigation
    override func prepareForSegue(segue: UIStoryboardSegue, sender: AnyObject?) {
        if segue.identifier == "showProduct" {
            var controller = (segue.destinationViewController as! UINavigationController).topViewController as! ProductViewController
            controller.product = sender as! Product
            controller.delegate = self
        }
    }

    // MARK: - ProductDelegate

    func productDidAdd(product: Product) {
        product.id = NSUUID().UUIDString
        productService.addProduct(product)
        products.append(product)
        tableView.insertRowsAtIndexPaths([NSIndexPath(forRow: products.count - 1, inSection: 0)], withRowAnimation: UITableViewRowAnimation.Automatic)
    }

    func productDidUpdate(product: Product) {
        productService.updateProduct(product)
        var row = -1
        for (index, value) in enumerate(products) {
            if value.id == product.id {
                row = index
                break
            }
        }
        if row != -1 {
            tableView.reloadRowsAtIndexPaths([NSIndexPath(forRow: row, inSection: 0)], withRowAnimation: UITableViewRowAnimation.Automatic)
        }
    }
}
2.9. Chạy thử chương trình
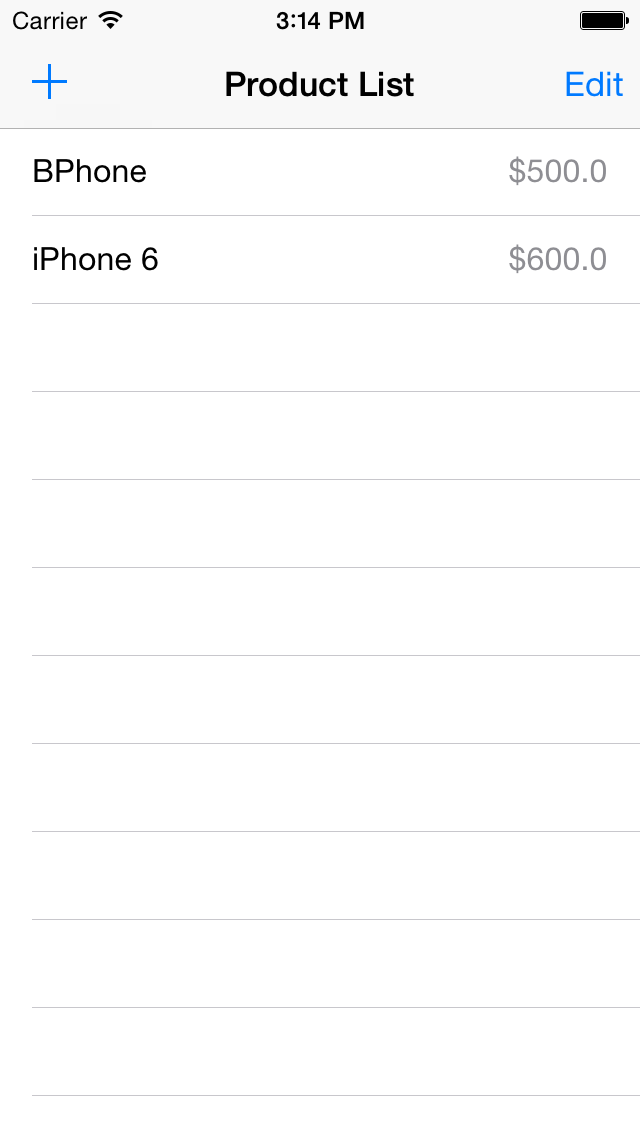
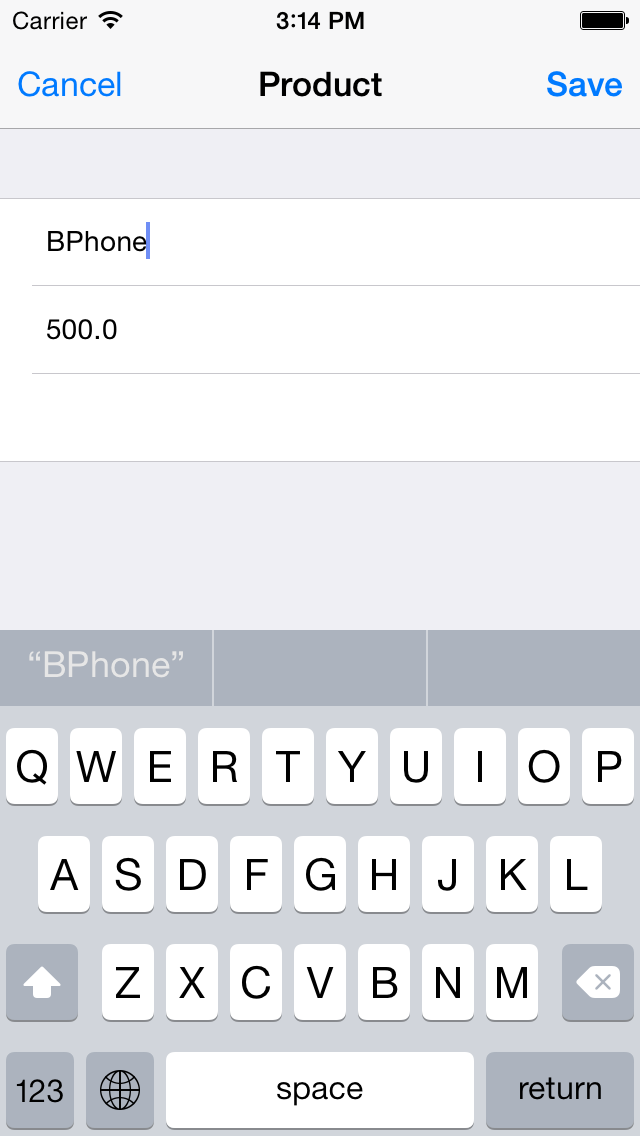
Chạy thử chương trình và thêm 1 số sản phẩm
Màn hình danh sách sản phẩm:
Màn hình thêm sản phẩm:
3. Kết luận
Đến đây, các bạn đã có 1 ứng dụng quản lý sản phẩm đơn giản dùng Parse Service, để hoàn thiện hơn thì các bạn có thể cho thêm phần đăng ký user và quản lý sản phẩm theo user. (tham khảo PFUser class)
All rights reserved
