OPTIONALS in Swift | Beginner's Guide
Bài đăng này đã không được cập nhật trong 9 năm
Back at Apple's 2014 WWDC, they introduced Swift, a type-safe language. This Type safety is the fundamental concept of the Swift programming language and Optionals neatly tie into Swift's strict type safety rules. Form then understanding the notion of Optionals has started widely. This blog is nothing but a little enhancement to this vast tutorial world.
Enough chitchat! Let's talk business!
What are they?

The concept underlying optionals is simple, an optional has a value or it doesn't. Or if I put it in more coded way an optinal can have a nil or a null value rather than a specific value like variables. If you want to dig deeper into Optionals, whats going on under the skin, simply is an Enumeration. You can design your own optional data type by doing following:
enum myOptional<T> {
    case None
    case Some(T)
}
It is an enumeration with 2 possible states, None or Some. None handles returning nil for a value, while some actually holds the value. In here, T is just a generic for all the types out there.
Let's dive into examples and figure out what these are by ourselves.
Open your Xcode's playground.
Suppose you have a model named User and a user usually have a first name, a last name and a middle name. So might define such a User like this:
struct User {
    let firstName: String
    let lastName: String
    let middleName: String
}
Now I can create a User to represent myself. But I don't have any middle name, which is very common in many countries. So I should simply pass nil to middleName attribute, i.e.,
let me = User(firstName: "Mainul", lastName: "Haque", middleName: nil)
But it'll throw an error message: nil is not compatible with expected argument type 'String'
This is beacuse we didn't tell our User model that it can be nil. Hence the error.
This is where Optionals come handy. We have to do a slight modification in order to solve this having middleName dillema.
struct User {
    let firstName: String
    let lastName: String
    let middleName: String?
}
Now I can re-state my statement.
let me = User(firstName: "Mainul", lastName: "Haque", middleName: nil)
This should execute just fine without throwing any warning.
Now let's make alter a User model a little more. We will be adding a computed variable, say fullName.
struct User {
    let firstName: String
    let lastName: String
    let middleName: String?

    var fullName: String {
        return firstName + " " + middleName + " " + lastName
    }
}
But unfortunately it won't work. It will be throwing an error like
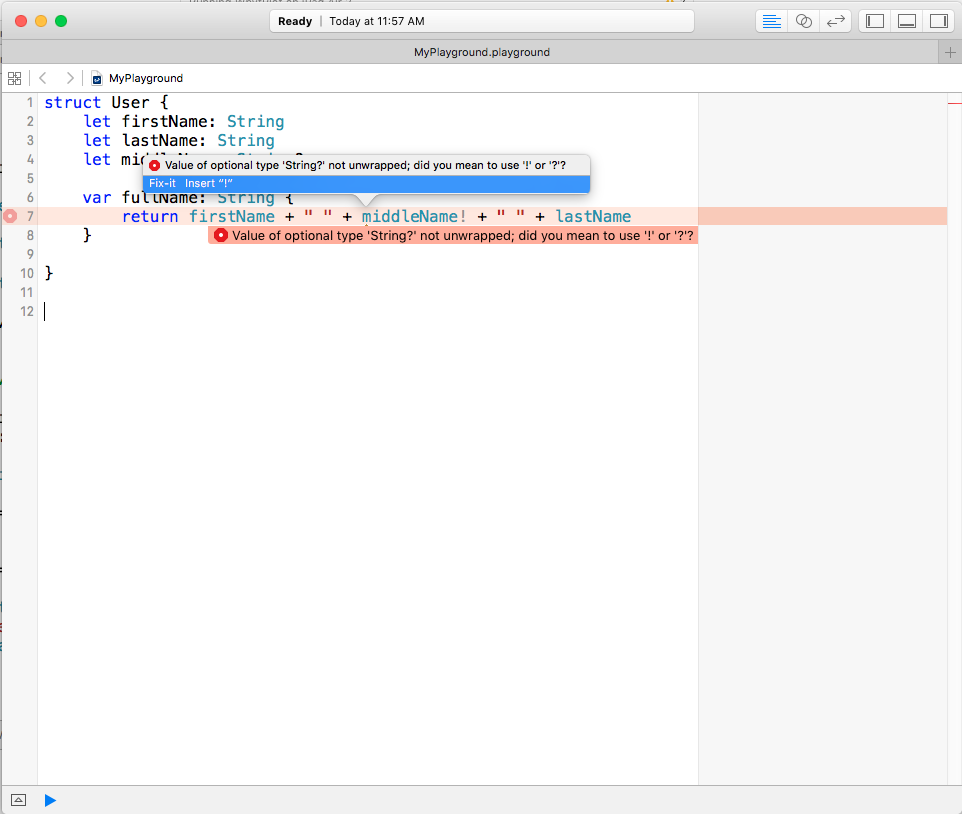
You get a warning Value of optional type String? is not unwrapped; did you mean to use '!' and '?'. You even get a friendly looking Fix-it from Xcode to Insert !. It’s a trap. Don’t do it!
The ! suffix is used for “force unwrapping” optionals, and you’re telling the compiler that you swear that this will never be nil, even though it’s an optional. If you’re not careful, this can lead to runtime crashes which is really not fun when it happens in production when it crashes for your users.
So how do we appease the compiler without yelling! at! it! by! force! upwrapping? If you’re coming from another language, your first instinct might be to check for nil like below:
    var fullName: String {
        if middleName != nil {
            return firstName + " " + middleName + " " + lastName
        } else {
            return firstName + " " + lastName
        }
    }
But, surprisingly, you’ll notice that we get the same error message as before. The problem is that even though it might look obvious to you that middleName can’t be nil within the if, it’s not obvious to the compiler(Weird, right?). This is because Swift was designed this way, that aforementioned "Type-safe" way.
To get out from this perplexity, there's a beautiful escape route. If you thought if...else is all you got, you're wrong.
Introducing If let....
If let
An if let statement looks something like this:
if let a = b { // where b is Optional
    p(a) // a has a value, must
}
You can read this as: If b has a non-nil value, assign it to a and execute p and it’s guaranteed that a is non-nil.
In our case, we can rewrite displayName as below.
var fullName: String {
    if let middleName = middleName {
        return firstName + " " + middleName + " " + lastName
    }
    return firstName + " " + lastName
}
You might notice that we used the same variable middleName for the left and right-hand sides of the if let. We could have written if let actualMiddleName = middleName or something like that to make it very clear that the left handside is the non-optional, but you can use same name both side for better understanding.
There's one last thing I need to share with you guys. guard
guard
A guard statement looks like this:
guard let a = b else { // Where b is Optional
    p(a) // Do something with a as nil
    return
}
// Do something with non-Optional a
You can read this as: If b has a non-nil value, assign it to a. Otherwise, execute the else clause assuming b is nil. Below the guard, you can use a which is guaranteed to be non-nil.
In our case, we can use guard as such:
var fullName: String {
    guard let middleName = middleName else {
        return firstName + " " + lastName
    }
    return firstName + " " + middleName + " " + lastName
}
Figuratively, if let and guard is oppposite of one another. But then again, a question arises why should we use guard if if let serves the same purpose. The answer is:
Happy-Path
Happy-Path is a safe path while still being forced to handle early exits caused by possible errors. Of course I am talking in context of control flow.
Suppose we have a checking for an optional property, say a, which have other dependencies, say b,c. If a is nil it would be rudundant to check whether b or c has values in it. The program should exit immediately. In this cases, we ought to use guard.
If we want to delineate Happy-Path a.k.a "Railway Oriented Programming" in a pictorial way, the following image will speak for itself

Isn't guard safe? The naming couldn't be more appropriate.
Anyways thats all for this tutorials. If you want to dig deeper, hover to the reference section. Till then.
Happy Coding!

Reference
All rights reserved
