Object-Oriented Forms Trong VueJS
Bài đăng này đã không được cập nhật trong 7 năm
Lời mở đầu
- Ở bài viết trước mình có giới thiệu về axios để gửi các dữ liệu dưới dạng
XHR Requestmà không cần load lại trang, tiếp tục seriesVueJslần này, mình sẽ hướng dẫn các bạn sử dụng nó trong việc xử lý với các Form HTML. - Bài viết này hướng dẫn các bạn tạo một lớp Form hướng đối tượng (Object-Oriented Forms viết tắt là OOF) chuyên dụng để xử lý các form dữ liệu trong VueJS (kết hợp với Laravel). Nếu như trước đây, ứng dụng của bạn có nhiều form, bạn có thể phải viết đi viết lại các đoạn code tương tự nhau cho từng form, vi phạm quy tắc DRY (Dont Repeat Yourseft) trong lập trình, thì giờ đây với việc trích xuất ra một lớp Form có thể giúp bạn tái sử dụng nhiều lần, mỗi lần cần một form bạn sẽ tạo ra một đối tượng của lớp Form này với các thông tin tương ứng.
Bắt đầu
1. Tạo một project Laravel với form cơ bản
- Tạo một project laravel:
composer create-project --prefer-dist laravel/laravel VueForm - Tạo file view chứa một form cơ bản, form chứa 2 ô input cho phép người dùng nhập vào tên mà mô tả của project:
<!DOCTYPE html> <html lang="en"> <head> <meta charset="UTF-8"> <title>Document</title> <link rel="stylesheet" href="https://cdnjs.cloudflare.com/ajax/libs/bulma/0.2.3/css/bulma.css"> <style>body { padding-top: 40px; }</style> </head> <body> <div id="app" class="container"> @include ('projects.list') <form method="POST" action="/projects"> <div class="control"> <label for="name" class="label">Project Name:</label <input type="text" id="name" name="name"> <div class="control"> <label for="description" class="label">Project Description:</label> <input type="text" id="description" name="description"> </div> <div class="control"> <button class="button is-primary">Create</button> </div> </form> </div> <script src="/js/app.js"></script> </body> </html> - Bình thường, khi ấn nút submit, client sẽ gửi 1 request lên server cùng các tham số trong form tới url trong action của form. Bây giờ chúng ta sẽ làm khác, sẽ sử dụng axios để gửi ajax (XHR Request) lên server mà không chuyển hướng trang.
2. Tạo API
Ta sẽ tạo một API xử lý submit form, trả về kết quả lỗi hay thành công khi tạo project.
File ProjectController sẽ như sau:
<?php

namespace App\Http\Controllers;

use App\Project;

class ProjectsController extends Controller
{
    /**
     * Show the page to create a new project.
     */
    public function create()
    {
        return view('projects.create', [
            'projects' => Project::all()
        ]);
    }

    /**
     * Store a new project in the database.
     */
    public function store()
    {
        $this->validate(request(), [
            'name' => 'required',
            "description" => 'required'
        ]);

        Project::forceCreate([
            'name' => request('name'),
            'description' => request('description')
        ]);

        return ['message' => 'Project Created!'];
    }
}
3. Sử dụng VueJS, dùng Axios tạo ajax request cho form
-
Trước tiên cần import thư viện
axiosvàvuejsvào file view<script src="https://cdnjs.cloudflare.com/ajax/libs/axios/0.15.3/axios.js"></script> <script src="https://unpkg.com/vue@2.1.6/dist/vue.js"></script> -
Để cho nhanh, tạm thời chúng ta sẽ viết luôn js vào file
public/app.jsnew Vue({ el: '#app', data: { name: '', description: '' }, methods: { } }); -
Thêm
v-modelvào cho các thẻ input:<input type="text" id="name" name="name" class="input" v-model="name"> -
Bây giờ chúng ta sẽ viết phương thức
onSubmitxử lý sự kiện submit của form, ở đây sẽ sử dụng axios gửi ajax request . Trong file app.js:methods: { onSubmit() { axios.post('/projects', this.$data); } } -
Gán sự kiện submit cho form ở view:
<form method="POST" action="/projects" @submit.prevent="onSubmit">Ở đây ta sử dụng
@submit.preventđể ngăn chặn form gửi request mặc định lên url action của form -
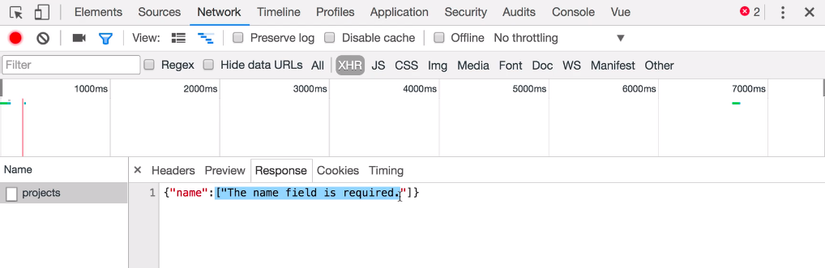
Đến đây, bạn có thể bật F12 lên, xem luồng mạng để kiểm tra response từ server trả về.
-
Tiếp theo nhiệm vụ của chúng ta là cần hiển thị lỗi ra nếu như server trả về lỗi. Tuy nhiên trước tiên chúng ta cần tạo thêm 1 thành phần trong data để lưu các giá trị errors này từ server. Sau đó, trong callback của axios, chúng ta sẽ thông báo "Success" khi submit thành công, còn khi server trả về lỗi thì chúng ta sẽ lưu giá trị nỗi nhận được trong errors của data.
axios.post('/projects', this.$data) .then(response => alert("Success")) .catch(error => this.errors = error.response.data) //lưu giá trị lỗi nhận được từ server -
Đến đây khi đã có thể hiện thị lỗi ra màn hình. Tuy nhiên mình sẽ hướng dẫn xây dựng một lớp để xử lý error, lớp này đặt tên là Errors, với các phương thức xử lý được xây dựng lên khi cần chỉ việc gọi chúng. Trong file
app.js, ta viếtclass Errors { /** * Create a new Errors instance. */ constructor() { this.errors = {}; } /** * Nhận về message thông báo lỗi từ 1 trường * @param {string} field */ get(field) { if (this.errors[field]) { return this.errors[field][0]; } }, /** * Ghi nhận lỗi nhận được từ server * @param {object} errors */ record(errors) { this.errors = errors; } } new Vue({ el: '#app', data: { errors: new Errors(), //Khởi tạo đối tượng lớp Errors }, methods: { onSubmit() { axios.post('/projects', this.$data) .then(response => alert("Success")) .catch(error => this.errors.record(error.response.data)) // lưu giá trị lỗi nhận được từ server } } }); -
Đến đây, việc hiện thị lỗi, ta sử dụng thẻ span ngay dưới mỗi ô input và gán v-text cho nó
<form method="POST" action="/projects" @submit.prevent="onSubmit"> <div class="control"> <label for="name" class="label">Project Name:</label> <input type="text" id="name" name="name" class="input" v-model="form.name"> <span class="help is-danger" v-text="errors.get('name')"></span> <!-- Hiển thị lỗi trường name nếu có lỗi từ server response --> </div> <div class="control"> <label for="description" class="label">Project Description:</label> <input type="text" id="description" name="description" class="input" v-model="form.description"> <span class="help is-danger" v-text="errors.get('description')"></span> <!-- Hiển thị lỗi trường description nếu có lỗi từ server response --> </div> <div class="control"> <button class="button is-primary">Create</button> </div> </form> -
Kết quả: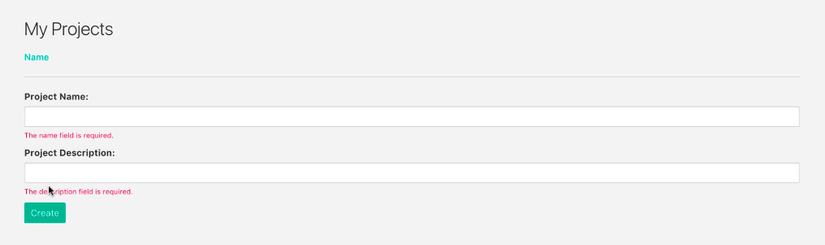
4. Tạo lớp Form chuyên biệt
- Như vậy, ta đã biết cách gọi ajax xử lý submit cho form đồng thời xử lý, hiển thị các thông điệp lỗi xác thực. Chúng ta sẽ tạo một lớp Form chuyên dụng để có thể tái sử dụng cho tất cả các form. Lớp này có thể chịu trách nhiệm đặt lại các trường (field) của chính nó, gửi yêu cầu AJAX đến máy chủ, tự cập nhật lỗi.
- Class Form được định nghĩa như sau:
File app.js
Lớpclass Form { /** * Create a new Form instance. * @param {object} data */ constructor(data) { this.originalData = data; // Khởi tạo giá trị for (let field in data) { this[field] = data[field]; } // Không quên khởi tạo giá trị lỗi this.errors = new Errors(); } /** * Fetch all relevant data for the form. */ data() { let data = {}; for (let property in this.originalData) { data[property] = this[property]; } return data; } /** * Reset the form fields. */ reset() { for (let field in this.originalData) { this[field] = ''; } this.errors.clear(); } /** * Send a POST request to the given URL. * @param {string} url */ post(url) { return this.submit('post', url); } /** * Submit the form. * @param {string} requestType * @param {string} url */ submit(requestType, url) { return new Promise((resolve, reject) => { axios[requestType](url, this.data()) .then(response => { this.onSuccess(response.data); resolve(response.data); }) .catch(error => { this.onFail(error.response.data); reject(error.response.data); }); }); } /** * Handle a successful form submission. * @param {object} data */ onSuccess(data) { alert(data.message); // temporary this.reset(); } /** * Handle a failed form submission. * @param {object} errors */ onFail(errors) { this.errors.record(errors); } } new Vue({ el: '#app', data: { form: new Form({ name: '', description: '' }) }, methods: { onSubmit() { this.form.post('/projects') .then(response => alert('Wahoo!')); } } });Formđã thực hiện set các trường trong form, có các hàm xử lý thành công và thất bại, hàm gửi dữ liệu. - Sửa code phần view để có thể nhận được dữ liệu:
<form method="POST" action="/projects" @submit.prevent="onSubmit">
    <div class="control">
        <label for="name" class="label">Project Name:</label>

        <input type="text" id="name" name="name" class="input" v-model="form.name">

        <span class="help is-danger" v-if="form.errors.has('name')" v-text="form.errors.get('name')"></span>
    </div>

    <div class="control">
        <label for="description" class="label">Project Description:</label>

        <input type="text" id="description" name="description" class="input" v-model="form.description">

        <span class="help is-danger" v-if="form.errors.has('description')" v-text="form.errors.get('description')"></span>
    </div>

    <div class="control">
        <button class="button is-primary" :disabled="form.errors.any()">Create</button>
    </div>
</form>
Kết luận
Kết thúc bài viết bày ta có 2 lớp chuyên dụng là Errors xử lý lỗi và Form. Lớp Form chúng ta hoàn toàn có thể sử dụng trong các form truyền dữ liệu khác chứ không chỉ ở trong form tạo Project như ví dụ này. Ngoài ra bạn cũng có thể hoàn toàn mở rộng 2 class này (đặc biệt là class Form) để có thể tối ưu hóa việc xử lý các from dữ liệu trong VueJS.
Hi vọng bài viết có thể giúp ích cho bạn. Tài liệu tham khảo:
All rights reserved
