Nhập môn React với TicTacToe - Phần 2
Bài đăng này đã không được cập nhật trong 4 năm
Giới thiệu
- Bài viết chỉ dành cho những ai vừa mới tập học ReactJS.
- Bài viết dựa trên ví dụ TicTacToe trên trang chủ của ReactJS (https://facebook.github.io/react/tutorial/tutorial.html)
- Link demo mẫu của bài viết này:(https://codepen.io/NguyenHoangAnhDung/pen/PjmRQR?editors=0010)
- Bài viết này tiếp nối của bài viết "Nhập môn React với TicTacToe - Phần 1" (https://viblo.asia/p/nhap-mon-react-voi-tictactoe-phan-1-OeVKBgNyZkW)
Bắt đầu
1. Mục tiêu
- Hiển thị lịch sử kèm với vị trí đã chọn.
- Sắp xếp danh sách theo thứ tự từ nhỏ đến lớn hoặc ngược lại.
- Đánh dấu dòng thắng cuộc.
2. Thực hiện Ở phần trước, source của chúng ta đã có như sau:
- Game.js:
import React from 'react';
import Board from './Board';

function calculateWinner(squares) {
  const lines = [
    [0, 1, 2],
    [3, 4, 5],
    [6, 7, 8],
    [0, 3, 6],
    [1, 4, 7],
    [2, 5, 8],
    [0, 4, 8],
    [2, 4, 6],
  ];
  for (let i = 0; i < lines.length; i++) {
    const [a, b, c] = lines[i];
    if (squares[a] && squares[a] === squares[b] && squares[a] === squares[c]) {
      return squares[a];
    }
  }
  return null;
}

class Game extends React.Component{
  constructor(){**a. Hiển thị lịch sử kèm với vị trí đã chọn:**
    super();
    this.state = {
      squares: Array(9).fill(null),
      xIsNext: true,
      stepNumber: 0,
    };
  }

  handleClick(i){
    const squares = this.state.squares.slice();
    if(calculateWinner(squares) || squares[i]){
      return;
    }
    squares[i] = this.state.xIsNext ? 'X' : 'O';
    this.setState({
      squares: squares,
      xIsNext: !this.state.xIsNext,
      stepNumber: this.state.stepNumber + 1
    });
  }

  render(){
    const squares = this.state.squares.slice();
    const winner = calculateWinner(squares);
    let status;
    if(winner){
      status = "Winner is: " + winner;
    }else if(this.state.stepNumber === 9){
      status = "No one win";
    }else{
      status = "Next player is: " + (this.state.xIsNext ? 'X' : 'O');
    }
    return(
      <div>
        <div className="game"><Board squares={squares} onClick={i => this.handleClick(i)} /></div>
        <div className="game-info">
          <p>{status}</p>
        </div>
      </div>
    );
  }
}

export default Game;
- Board.js:
import React from 'react';
import Square from './Square';

class Board extends React.Component{
  renderSquare(i){
    return <Square value={this.props.squares[i]} onClick={() => this.props.onClick(i)}/>
  }

  render(){
    const matrixSize = Math.sqrt(this.props.squares.length);
    const rows = Array(matrixSize).fill(null);
    const cols = rows;
    const board = rows.map((row, i) => {
      const squares = cols.map((col, j) => {
        const squareKey = i * matrixSize + j;
        return <span key={squareKey}>{this.renderSquare(squareKey)}</span>;
      });
      return <div className="board-row" key={i}>{squares}</div>
    });
    return(
      <div>
        <div>Board</div>
        <div>{board}</div>
      </div>
    );
  }
}

export default Board;
- Square.js:
import React from 'react';

class Square extends React.Component{
  render(){
    return(
      <button className="square" onClick={this.props.onClick}>{this.props.value}</button>
    );
  }
}

export default Square;
Giờ chúng ta sẽ tiếp tục với các chức năng mới: a. Hiển thị lịch sử kèm với vị trí đã chọn: Để hiển thị lịch sử sau mỗi lần click lên mỗi ô vuông, chúng ta sẽ lưu lịch sử bằng cách sử dụng mảng đặt tên là history:
- Trong mảng sẽ chứa giá trị của squares.
- Mỗi lần click vào một ô vuông sẽ thêm vào history một squares mới.
- Ta tiến hành sửa đổi Game.js như sau:
# Game.js
class Game extends React.Component{
  constructor(){
    super();
    this.state = {
      history: [{
        squares: Array(9).fill(null),
      }], // Thêm mảng history vào, trong history lưu object squares như trước
      xIsNext: true,
      stepNumber: 0,
    };
  }

  handleClick(i){
    const history = this.state.history.slice(0, this.state.stepNumber + 1); // Chúng ta cần clone history ra bản phụ tránh làm ảnh hưởng bản chính
    const current = history[history.length - 1]; // Lấy history của lần gần nhất
    const squares = current.squares.slice(); // Clone object squares của thằng current
    if(calculateWinner(squares) || squares[i]){
      return;
    }
    squares[i] = this.state.xIsNext ? 'X' : 'O';
    this.setState({
      history: history.concat([{ // Thêm history mỗi khi click vào ô vuông
        squares: squares
      }]),
      xIsNext: !this.state.xIsNext,
      stepNumber: history.length // Vì stepNumber bằng với độ dài của history.
    });
  }

  render(){
    // Vì những nội dung sau chỉ sử dụng để view nên không cần clone, chỉ viết cho gọn thôi
    const history = this.state.history;
    const current = history[this.state.stepNumber];
    const squares = current.squares;
    const winner = calculateWinner(squares);
    let status;
    if(winner){
      status = "Winner is: " + winner;
    }else if(this.state.stepNumber === 9){
      status = "No one win";
    }else{
      status = "Next player is: " + (this.state.xIsNext ? 'X' : 'O');
    }
    return(
      <div>
        <div className="game"><Board squares={squares} onClick={i => this.handleClick(i)} /></div>
        <div className="game-info">
          <p>{status}</p>
        </div>
      </div>
    );
  }
}
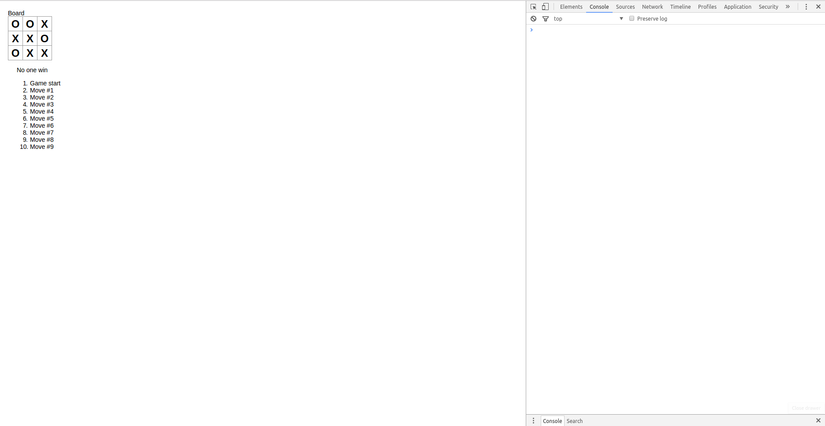
- Chúng ta đã thêm history vào, giờ chỉ cần hiển thị ra thôi là đủ. Tương tự với return trong Board.js đã biết ở phần 1. Thêm đoạn code sau vào Game.js:
const moves = history.map((step, move) => {
  const description = move ? `Move #${move}` : 'Game start'; // move = 0 là lúc game mới start.
  return <li key={move}>{description}</li>
});
return(
  <div>
    <div className="game"><Board squares={squares} onClick={i => this.handleClick(i)} /></div>
    <div className="game-info">
      <p>{status}</p>
      <ol>{moves}</ol>
    </div>
  </div>
);
- Kết quả như sau:

- Tiếp theo, chúng ta muốn click vào mỗi step thì sẽ hiển thị ra trạng thái tương ứng của bàn cờ. Thêm nội dung sau vào Game.js:
jumpTo(move){
    this.setState({
      stepNumber: move,
      xIsNext: (move % 2) ? false : true,
    });
  }

render(){
    // Các code cũ ở trên
    const moves = history.map((step, move) => {
      const description = move ? `Move #${move}` : 'Game start';
      return <li key={move}><a href="#" onClick={this.jumpTo(move)}>{description}</a></li> // Thêm thẻ a và disable href đi, thêm sự kiện onClick vào
    });
   // ...
}
Như vậy chúng ta đã xong phần hiển thị lịch sử, như đã nói ở trên, chúng ta phải hiển thị vị trí đã chọn nữa:
- Thêm nội dung sau vào Game.js:
constructor(){
    super();
    this.state = {
      history: [{
        squares: Array(9).fill(null),
        moveLocation: '', //Thêm moveLocation vào
      }],
      xIsNext: true,
      stepNumber: 0,
    };
  }
// ...
handleClick(i){
    const history = this.state.history.slice(0, this.state.stepNumber + 1);
    const current = history[history.length - 1];
    const squares = current.squares.slice();
    if(calculateWinner(squares) || squares[i]){
      return;
    }

    const matrixSize = Math.sqrt(history[0].squares.length);
    const moveLocation = [Math.floor(i / matrixSize) + 1, (i % matrixSize) + 1].join(", "); // (row = vị trí / matrixSize, col = vị trí % matrixSize)
    squares[i] = this.state.xIsNext ? 'X' : 'O';
    this.setState({
      history: history.concat([{
        squares: squares,
        moveLocation: moveLocation,
      }]),
      xIsNext: !this.state.xIsNext,
      stepNumber: history.length
    });
  }
// ...
render(){
 // ...
 const moves = history.map((step, move) => {
  const description = move ? `Move #${move} (${step.moveLocation})` : 'Game start'; // Thêm moveLocation vào
  return <li key={move}><a href="#" onClick={() => this.jumpTo(move)}>{description}</a></li>
});
// ...
}
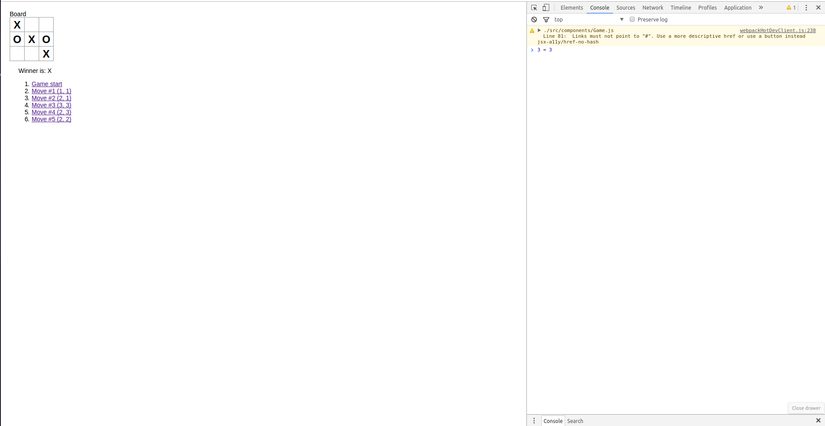
- Ta được kết qủa như sau:
 Đến đây chúng ta đã hoàn thành mục đích hiển thị lịch sử kèm với vị trí đã chọn.
b. Sắp xếp danh sách theo thứ tự từ nhỏ đến lớn hoặc ngược lại Để sắp xếp danh sách hiển thị thì ta cần sử dụng hàm reverse() trong JS.
- Thêm nội dung sau vào Game.js:
class Game extends React.Component{
    constructor(){
        super();
        this.state = {
          history: [{
            squares: Array(9).fill(null),
            moveLocation: '',
          }],
          xIsNext: true,
          stepNumber: 0,
          isReverse: false, // Thêm cờ isReverse để nhận biết hướng sắp xếp
        };
  }
  // ...
  changeReverse(isReverse){
    this.setState({
      isReverse: !isReverse
    });
  }
  render(){
   // ...
   return(
      <div>
        <div className="game"><Board squares={squares} onClick={i => this.handleClick(i)} /></div>
        <div className="game-info">
          <p>{status}</p>
          <ol>{isReverse ? moves.reverse() : moves}</ol>
          <button onClick={() => this.changeReverse(isReverse)}>Reverse list</button>
        </div>
      </div>
    );
  }
}
- Kết quả như sau:

- Tuy nhiên khi sắp xếp thì chúng ta chỉ mới sắp xếp phần nội dung, còn phần thứ tự 1,2,3,4,5, ... thì không được sắp xếp lại ...,5, 4, 3, 2, 1. Do đó, cần thêm đoạn code sau vào dòng hiển thị <ol>:
<ol reversed={isReverse ? 'reverse' :''}>{isReverse ? moves.reverse() : moves}</ol>
Chúng ta đã xong phần sắp xếp danh sách theo thứ tự từ bé đến lớn và ngược lại. c. Đánh dấu dòng thắng cuộc: Mục đích của chúng ta là bôi đen người thắng cuộc đã thắng ở vị trí nào.
- Thêm nội dung sau vào Game.js, :
function calculateWinner(squares) {
  const lines = [
    [0, 1, 2],
    [3, 4, 5],
    [6, 7, 8],
    [0, 3, 6],
    [1, 4, 7],
    [2, 5, 8],
    [0, 4, 8],
    [2, 4, 6],
  ];
  for (let i = 0; i < lines.length; i++) {
    const [a, b, c] = lines[i];
    if (squares[a] && squares[a] === squares[b] && squares[a] === squares[c]) {
      return { // Chúng ta sẽ gửi về 2 giá trị là: Người thắng cuộc và vị trí thắng cuộc.
        winnerLocation: [a,b,c],
        winnerPlayer: squares[a]
      };
    }
  }
  return null;
}
class Game extends React.Component{
     // ...
     render(){
        // ...
        let status;
        if(winner){
          status = "Winner is: " + winner.winnerPlayer; // Sửa lại chút đoạn hiển thị winner
        }else if(this.state.stepNumber === 9){
          status = "No one win";
        }else{
          status = "Next player is: " + (this.state.xIsNext ? 'X' : 'O');
        }

        // ...

        return(
          <div>
            <div className="game">
              <Board squares={squares} onClick={i => this.handleClick(i)} winner={winner && winner.winnerLocation}/> // Sử dụng && để phòng T.Hợp winner là null
            </div>
            <div className="game-info">
              <p>{status}</p>
              <ol reversed={isReverse ? 'reverse' :''}>{isReverse ? moves.reverse() : moves}</ol>
              <button onClick={() => this.changeReverse(isReverse)}>Reverse list</button>
            </div>
          </div>
        );
     }
}
- Thêm nội dung sau vào hàm renderSquare trong Board.js:
renderSquare(i){
    const winner = this.props.winner;
    return <Square value={this.props.squares[i]} onClick={() => this.props.onClick(i)} winner={winner && winner.includes(i) ? 'winner' : ''}/>
}
- Thêm nội dung sau vào Square.js:
render(){
    const squareClass = `square ${this.props.winner}`;
    return(
      <button className={squareClass} onClick={this.props.onClick}>{this.props.value}</button>
    );
  }
- Thêm nội dung sau vào index.css để bôi đen vị trí chiến thắng:
.winner{
  background-color: #d3d3d3;
}
Chúng ta được kết quả sau:

Tổng kết
Như vậy sau 2 phần nhập môn với ReactJS, chúng ta đã hoàn thành các mục tiêu sau:
- Hiển thị bảng chơi TicTacToe.
- Cho phép User chơi và tính toán người chiến thắng.
- Hiển thị lịch sử kèm với vị trí đã chọn.
- Đánh dấu dòng thắng cuộc.
- Sắp xếp danh sách theo thứ tự từ nhỏ đến lớn hoặc ngược lại. Xin cảm ơn các bạn đã theo dõi.
Tài liệu tham khảo
All rights reserved