Nested Attributes và Nested Forms
Bài đăng này đã không được cập nhật trong 6 năm
Giới thiệu
Thay vì trước đây ta chỉ quen với việc tạo, update một bản ghi của một đối tượng thì nay ta có thể tạo, update luôn các đối tượng con có liên kết với nhau. Nested Attributes cho phép bạn lưu các thuộc tính của bản ghi của đối tượng thông qua đối tượng cha của nó. Mặc định thì Nested Attributes đã bị tắt nên cần thêm vào model class method #accepts_nested_attributes_for. Ví dụ:
class Book < ActiveRecord::Base
  has_one :author
  has_many :pages

  accepts_nested_attributes_for :author, :pages
end
Thực hành:
Để làm quen nhanh với Nested Attributes thì ta thử tạo một app nhỏ đơn giản
rails new demo_app -d mysql
Tạo 2 model
rails g scaffold user name:string email:string
rails g model address user:references street:string
chạy rails db:migrate
Ở model User:
class User < ApplicationRecord
  has_many :address

  accepts_nested_attributes_for :address
end
Ở UsersController
  def new
    @user = User.new
    // tạo mới một instance quan hệ liên kết, ta có thể tạo 1 hay nhiều instance cùng một lúc
    @user.address.build
    @user.address.build
  end

  ...

  private
    def user_params
      // cập nhật strong parameters cho phép tạo User và Address cùng lúc
      params.require(:user).permit(:name, :email, address_attributes: [:id, :street, :_destroy])
    end
Ở views/users/_form.html.erb ta dùng fields_for dùng trong Nested Forms
<%= form_with(model: user, local: true) do |form| %>
  <div class="field">
    <%= form.label :name %>
    <%= form.text_field :name %>
  </div>

  <div class="field">
    <%= form.label :email %>
    <%= form.text_field :email %>
  </div>

  <div class="field">
    <%= form.fields_for :address do |ff| %>
      <%= ff.label :street %>
      <%= ff.text_field :street %>
    <% end %>
  </div>

  <div class="actions">
    <%= form.submit %>
  </div>
<% end %>
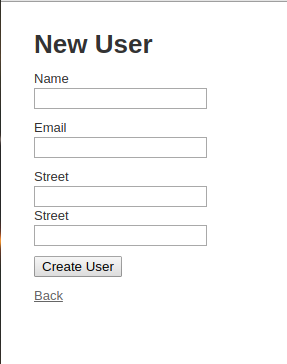
Tới đây ta đã xây dựng được một nested forms có thể tạo một đối tượng user và liên kết address của nó cùng một lúc.


Nâng cao hơn tí xíu
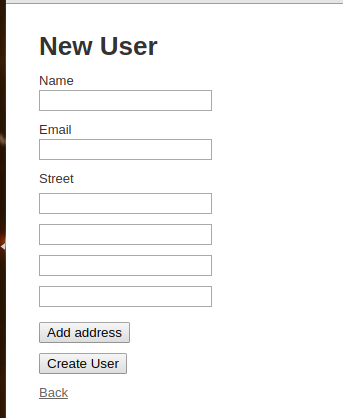
Ở trên là hướng dẫn cơ bản để làm quen Nested Attributes và Nested forms. Nhược điểm của form ở trên chỉ là một Static form, ta không thể biết trước User muốn add bao nhiêu Address được nên giờ ta hãy thử tạo 1 Dynamic form cho phép user muốn thêm address thì chỉ cần 1 cú click chuột.
Sửa lại form 1 chút xíu, add thêm class và thêm js, css.
  <div class="field address-container">
    <%= form.label :street %>
    <%= form.fields_for :address do |ff| %>
      <%= ff.text_field :street, class: "street-field" %>
    <% end %>
  </div>

  <div class="field">
    <button type="button" class="js-btn-add">Add address</button>
  </div>

// thêm js

<script type="text/javascript">
  $(".js-btn-add").on("click", function() {
    addAddressField();
  })

  function addAddressField() {
    var length = $(".street-field").length;
    var div = document.createElement("div");
    var input = document.createElement("input");

    input.type = "text";
    input.name = "user[address_attributes]["+ length +"][street]"
    input.className = "street-field"
    input.id = "user_address_attributes_" + length + "_street"

    div.appendChild(input)
    $(".address-container").append(div);
  }
</script>

// thêm css

<style type="text/css">
  .street-field {
    margin-top: 5px;
    margin-bottom: 5px;
  }
</style>
Sau bước làm trên bạn sẽ có 1 form như thế này. Giờ nó đã trở thành một Dynamic form cho phép bạn có thể tạo thêm nhiều address.

Việc tiếp theo chỉ cần điền thông tin và ấn submit để xem kết quả.
Nguồn:
Trên là những bước cơ bản giúp làm quen nhanh với Nested Attributes. Ngoài ra để kỹ hơn có thể tham khảo thêm ở dưới.
https://api.rubyonrails.org/classes/ActiveRecord/NestedAttributes/ClassMethods.html
http://jyrkis-blogs.blogspot.com/2014/06/adding-fields-on-fly-with-ruby-on-rails.html
https://www.tutorielsenfolie.com/en/tutorials-7-Dynamic-form-in-JavaScript.html
All rights reserved