Multiple Images upload in Rails with Gem Carrierwave
Bài đăng này đã không được cập nhật trong 4 năm
1.1 Giới thiệu

Upload ảnh là một trong những chức năng hầu như không thể thiếu trong bất kì Rails nào. Hôm nay tôi sẽ giới thiệu tới các bạn một Gem trong rails giúp bạn có thể làm chức năng upload ảnh một cách dễ dàng và nhanh chóng đó là Gem Carrierwave.
2.2 Các bước thực hiện
- Tạo một project mới.
rails new upload_multiple_image -d mysql
- Add thêm gem vào Gemfile
#Gemfile

gem 'carrierwave'
- Chạy bundle install
bundle install
- Chạy tiếp lệnh sau 'rails generate uploader Photo' để tạo ra file "app/uploaders/photo_uploader.rb"

- Tạo ra Item đầy đủ chức năng thêm, sửa, xóa với lệnh scaffold
rails generate scaffold item name:string
#config/routes.rb

Rails.application.routes.draw do
  root "items#index"
  resources :items
end
rake db:migrate
rails s
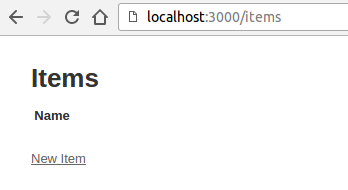
Trên trang 'root' http://localhost:3000/ ta thu được như sau
- Tạo ra Model chứa ảnh
rails generate model ItemPhoto item_id:integer photo:string
-
Ở trong file models/item.rb chúng ta phải khai báo quan hệ 1 item có nhiều item_photos bằng cách thêm vào "has_many :item_photos"
-
Nested Attributes cho phép bạn lưu các thuộc tính liên quan đến Item. Ở đây chúng ta dùng "accepts_nested_attributes_for" để định nghĩa cho các specified association
#models/item.rb

class Item < ApplicationRecord
  has_many :item_photos
  accepts_nested_attributes_for :item_photos, allow_destroy: true, reject_if: proc { |attributes| attributes['photo'].blank? }
end
- Item_photos mount_uploader đến trường "photo" trong bảng Item_photo. Điều đó có nghĩa là link của file ảnh sau khi upload sẽ được lưu tại trường photo trong bảng Item_photo.
#models/item_photo.rb

class ItemPhoto < ApplicationRecord
  mount_uploader :photo, PhotoUploader
  belongs_to :item
end
- Trong controllers/items_controller.rb cần thêm attributes cho item_params " params.require(:item).permit(:name, item_photos_attributes: [:id, :item_id, :photo])"
#controllers/items_controller.rb

class ItemsController < ApplicationController
  before_action :set_item, only: [:show, :edit, :update, :destroy]

  def index
    @items = Item.all
  end

  def show
    @item_photos = @item.item_photos.all
  end

  def new
    @item = Item.new
    @item_photo = @item.item_photos.build
  end

  def edit
  end

  def create
    @item = Item.new(item_params)

    respond_to do |format|
      if @item.save
        params[:item_photos]['photo'].each do |a|
          @item_photo = @item.item_photos.create!(:photo => a)
        end
        format.html { redirect_to @item, notice: 'Item was successfully created.' }
      else
        format.html { render :new }
      end
    end
  end

  def update
    respond_to do |format|
      if @item.update(item_params)
        params[:item_photos]['photo'].each do |a|
          @item_photo = @item.item_photos.create!(:photo => a)
        end
        format.html { redirect_to @item, notice: 'Item was successfully updated.' }
      else
        format.html { render :edit }
      end
    end
  end

  def destroy
    @item.destroy
    respond_to do |format|
      format.html { redirect_to items_url, notice: 'Item was successfully destroyed.' }
    end
  end

  private
  def set_item
    @item = Item.find(params[:id])
  end

  def item_params
    params.require(:item).permit(:name, item_photos_attributes: [:id, :item_id, :photo])
  end
end
- Sau khi có được các setting trong model và controller thì trong form tạo mới item chúng ta cần thêm thuộc tính sau để có thể upload nhiều ảnh: "html: {multipart: true}".
#views/items/_form.html.erb

<%= form_for(@item, html: {multipart: true}) do |f| %>
  <div class="field">
    <%= f.label :name %>
    <%= f.text_field :name %>
  </div>

  <%= f.fields_for :item_photos do |p| %>
    <div class="field">
      <%= p.label :photo %><br>
      <%= p.file_field :photo, multiple: true, name: "item_photos[photo][]", class: "upload-image" %>
    </div>
  <% end %>
  <div id="preview"></div>

  <div class="actions">
    <%= f.submit %>
  </div>
<% end %>
#views/items/show.html.erb

<p id="notice"><%= notice %></p>

<p>
  <strong>Name:</strong>
  <%= @item.name %>
</p>

<% @item_photos.each do |p| %>
  <%= image_tag p.photo_url, style: "max-width: 200px; max-height: 200px" %>
  <%= link_to "Destroy", item_photo_path(p), method: :delete %>
<% end %>

<%= link_to 'Edit', edit_item_path(@item) %> |
<%= link_to 'Back', items_path %>
Chúng ta cần tạo thêm chức năng xóa ảnh trong màn hình show Item
rails generate controller ItemPhotos
#controllers/item_photos_controller.rb

class ItemPhotosController < ApplicationController
  def destroy
    @item_photo = ItemPhoto.find(params[:id])
    item = @item_photo.item
    @item_photo.destroy
    respond_to do |format|
      format.html {redirect_to item_url(item), notice: 'Item photo was successfully destroyed.'}
    end
  end
end
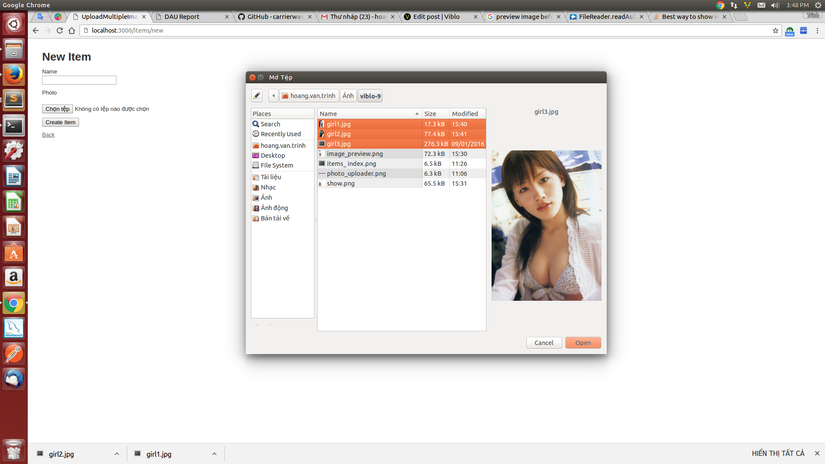
=> Đến đây chúng ta đã hoàn thành các công việc để upload nhiều ảnh lên. Trong màn hình tạo Item, sau khi nhấn nút "Chọn tệp" chúng ta có thể dùng phím shift để lựa chọn nhiều file ảnh để upload cùng lúc như hình bên dưới đây.
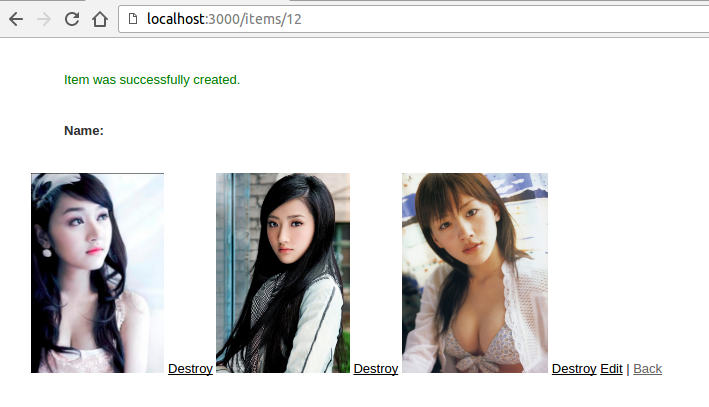
Và sau khi tạo xong Item thì sẽ chuyển sang màn hình show như sau:
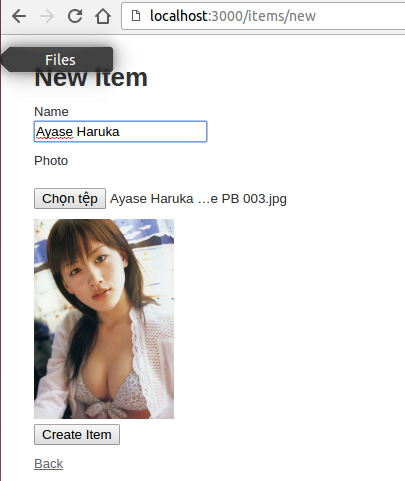
- Xem ảnh trước khi upload
Để có thể làm được chức năng preview image chúng ta tạo file preview_images.js sau
#app/assets/javascripts/preview_images.js

$(function(){
  $(".upload-image").on("change", function(){
    var preview = document.querySelector('#preview');
    var files   = document.querySelector('input[type=file]').files;

    function readAndPreview(file) {

      if ( /\.(jpe?g|png|gif)$/i.test(file.name) ) {
        var reader = new FileReader();

        reader.addEventListener("load", function () {
          var image = new Image();
          image.height = 100;
          image.width = 100;
          image.title = file.name;
          image.src = this.result;
          preview.appendChild( image );
        }, false);

        reader.readAsDataURL(file);
      }

    }

    if (files) {
      [].forEach.call(files, readAndPreview);
    }
  })
})
Sau khi hoàn thành chúng ta thu được màn hình như sau:
3. Lời kết và tài liệu tham khảo
Tất cả source code của toàn bộ bài viết được upload tại đây:
>>Source Code
Như vậy là tôi đã giới thiệu xong tới các bạn chức năng upload nhiều ảnh sử dụng gem Carrierwave
Mọi thắc mắc các bạn xin vui lòng comment bên dưới. Cảm ơn đã đọc bài viết của tôi.
-- Hoàng Văn Trình AS Việt Nhật K55 Đại học Bách Khoa Hà Nội
All rights reserved
