Một vài tips và tricks cho người mới bắt đầu học React
Bài đăng này đã không được cập nhật trong 7 năm
Giới thiệu
Xin chào cả nhà, hôm nay mình xin giới thiệu một số tips và tricks dành cho những anh em mới bắt đầu học React 
Tips & Tricks
1. Naming components
Khi đặt tên component, chúng ta nên đặt tên theo path-based-component-naming, tức là đặt tên component tương ứng với đường dẫn của nó.
Ví dụ: component trong file components/User/List.jsx sẽ được đặt tên thành UserList.
When the file is inside a folder with same name, we don’t need to repeat the name. That said, components/User/Form/Form.jsx, would be named as UserForm and not as UserFormForm.
Khi file nằm trong folder cùng tên, chúng ta không cần lặp lại tên đó.
Ví dụ: component trong file components/User/Form/Form.jsx sẽ được đặt tên thành UserForm (không phải là UserFormForm).
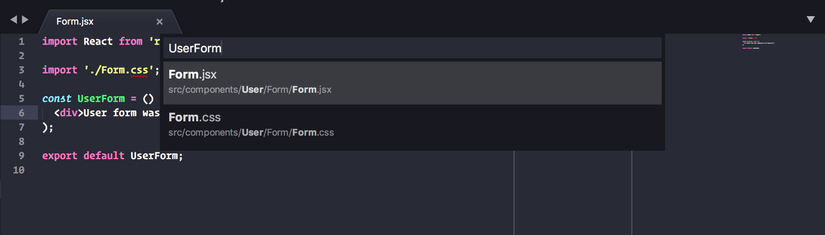
Nếu IDE hoặc editor của bạn có hỗ trợ fuzzy search, việc đặt tên như vậy sẽ giúp chúng ta tìm kiếm file dễ dàng hơn nhiều:
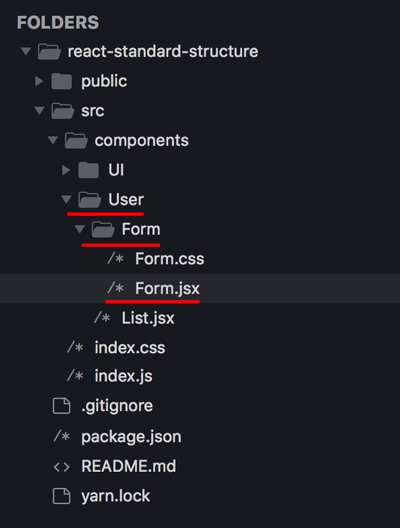
Hoặc chỉ đơn giản hơn là nghe tên component là có thể tìm kiếm ngay tại folder tree:
2. Sử dụng functional components
Nếu component chỉ có tác dụng hiển thị dữ liệu, thay vì dùng class component như:
class Watch extends React.Component {
  render () {
    return <div>{this.props.hours}:{this.props.minutes}</div>
  }
}
chúng ta có thể dùng functional component để thay thế:
const Watch = (props) =>
  <div>{props.hours}:{props.minutes}</div>;
=> Ngắn hơn và không cần sử dụng this nữa.
3. Sử dụng React.Fragment thay cho div
Tất cả các component phải được gói gọi vào trong 1 template, thường thì chúng ta sẽ dùng thẻ div.
Vậy trong trường hợp có nhiều thẻ div lồng nhau thì sao? Nếu sử dụng <div><div>...</div></div>, React sẽ không complie được code của bạn.
May mắn là, React version 16 cung cấp cho chúng ta một feature khá hữu ích, đó là React.Fragment. React.Fragment cho phép chúng ta nhóm một tập hợp các component con mà không cần 2 đầu node. Ví dụ:
<div class="app">

    (...a bunch of other elements)

    <div> (my react component)
        <ComponentA></ComponentA>
        <ComponentB></ComponentB>
        <ComponentC></ComponentC>
    </div>

    (...a bunch more elements)

</div>
=>
<div class="app">

    (...a bunch of other elements)

    <React.Fragment> (my react component) // Thay thế node <div>
        <ComponentA></ComponentA>
        <ComponentB></ComponentB>
        <ComponentC></ComponentC>
    </React.Fragment>

    (...a bunch more elements)

</div>
4. Binding functions trong component
Xét ví dụ:
class DatePicker extends React.Component {
   handleDateSelected({target}){
     // Do stuff
   }
   render() {
     return <input type="date" onChange={this.handleDateSelected}/>
   }
 }
=> Không chạy. Nguyên nhân là: giá trị this chưa được ràng buộc trong component. Có một số cách khắc phục việc binding this như sau:
- Cách 1: Sử dụng
arrow function.
<input type="date" onChange={(event) => this.handleDateSelected(event)}/>
- Cách 2: Bind
thisvào component constructor.
constructor () {
 this.handleDateSelected = this.handleDateSelected.bind(this);
}
- Cách 3: Khai báo function như 1 class field (arrow function syntax).
handleDateSelected = ({target}) => {
  // Do stuff
}
5. Follow SoC principle
Xét ví dụ:
export class DatePicker extends React.Component {
  state = { currentDate: null };

  handleDateSelected = ({target}) =>
     this.setState({ currentDate: target.value });

  render = () =>
     <input type="date" onChange={this.handleDateSelected}/>
}
Component DatePicker đang đảm nhận 2 nhiệm vụ: render tample và xử lý user action cùng một lúc. Sẽ tốt hơn nếu chúng ta tách DatePick thành 2 component:
const DatePicker = (props) =>
  <input type="date" onChange={props.handleDateSelected}/>
và
export class DatePickerController extends React.Component {
  // ... No changes except render function ...
  render = () =>
     <DatePicker handleDateSelected={this.handleDateSelected}/>;
}
Component DatePickerContainer sẽ xử lý tương tác người dùng hoặc call API nếu cần thiết, sau đó sẽ render ra DatePicker.
Ý tưởng là, chúng ta sẽ cố gắng chia component sao cho chúng nhỏ nhất có thể để có thể dễ dàng hiểu, test và maintain.
Tham khảo
https://hackernoon.com/structuring-projects-and-naming-components-in-react-1261b6e18d76
All rights reserved
