Một vài hiệu ứng animation đẹp cho iOS app
Bài đăng này đã không được cập nhật trong 6 năm
Làm cho ứng dụng của bạn đẹp hơn? Tại sao không?
Điều kiện tiên quyết
Bạn không cần phải có kiến thức chuyên sâu về phát triển ứng dụng iOS, vì vậy cứ thoải mái! Tất cả những gì bạn cần là một máy tính có MacOS và Xcode.
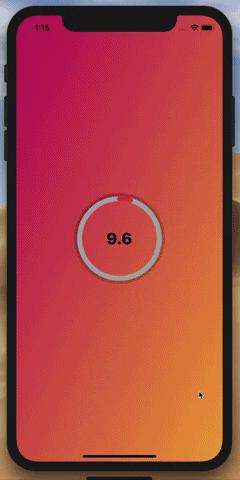
Đến cuối bài, chúng ta sẽ có:
- Background animation quay vòng liên tục qua các màu được xác định trước.
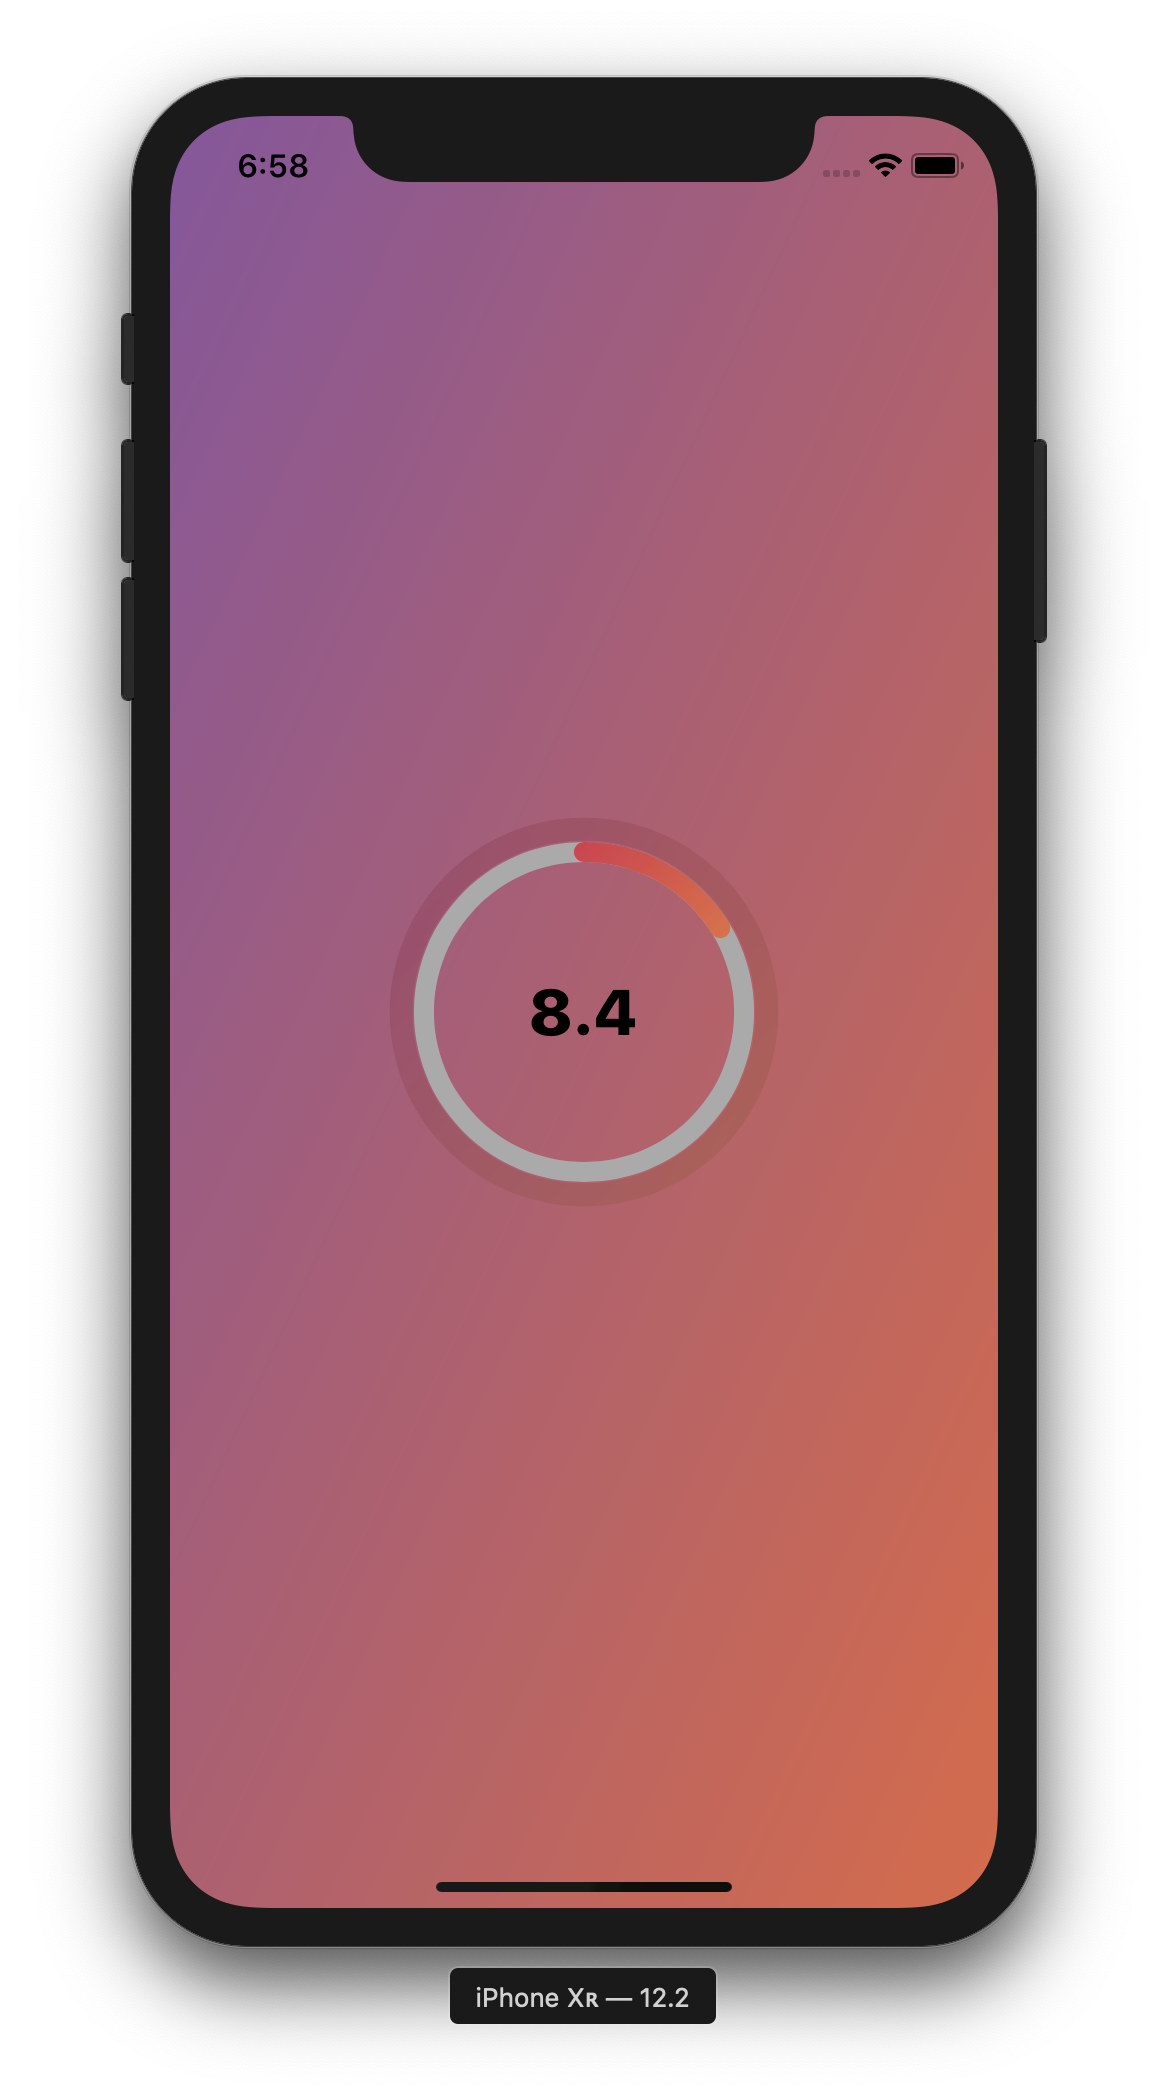
- Countdown progress bar nằm ở giữa.
- Pulsing animation xung quanh progress bar.
Ít thôi nhưng tôi hy vọng nó sẽ giúp được phần nào khi bạn bắt đầu với Core Animation!
Hướng dẫn
Cùng đi tiếp và tạo một ứng dụng mới trong Xcode. Trước tiên chúng ta sẽ bắt đầu với background, và làm thế nào để có được animation như vậy.
Gradient Background
CAGradientLayer
Một layer vẽ một dải màu trên màu nền của nó, điền vào hình dạng của layer (bao gồm các góc tròn)
Đối với nền, chúng tôi sẽ sử dụng CAGradientLayer để tạo hiệu ứng cho nó. Chúng tôi sẽ khai báo các biến như vậy:
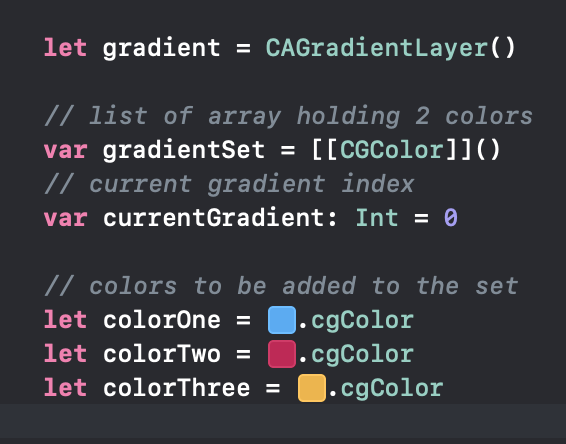
Đầu tiên chúng ta đã tạo ra CAGradientLayer và cũng là một mảng sẽ chứa nhiều màu sắc khác nhau, sẽ được sử dụng làm gradient sau.
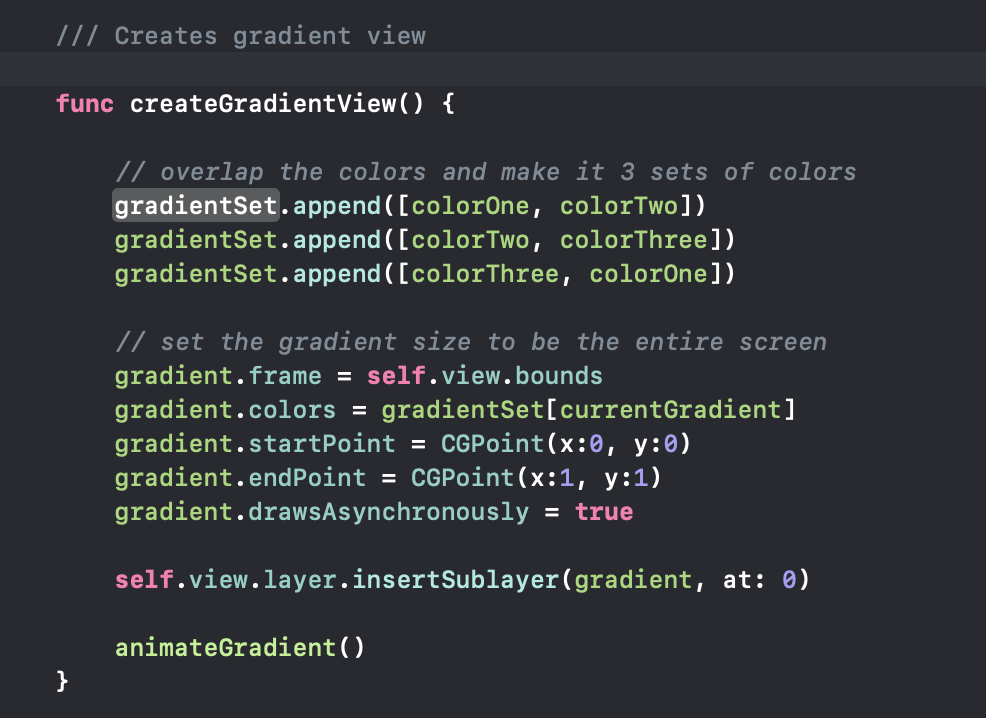
Khi View tải, chúng ta sẽ tạo chế độ view gradient như trên.
- Nối tất cả các màu có sẵn vào Set
- Đặt khung gradient để chiếm toàn bộ màn hình
- Đặt màu ban đầu được sử dụng, là chỉ số 0 trong tập gradient của chúng ta
- Chúng ta đã xác định điểm bắt đầu và điểm kết thúc sao cho gradient flow theo đường chéo từ trên trái sang dưới phải.
- Và cuối cùng, tôi chèn gradient làm first layer tiên trong sublayers.
Sau khi tôi đã thiết lập layer gradient, đây là lúc để tạo hiệu ứng cho layer!
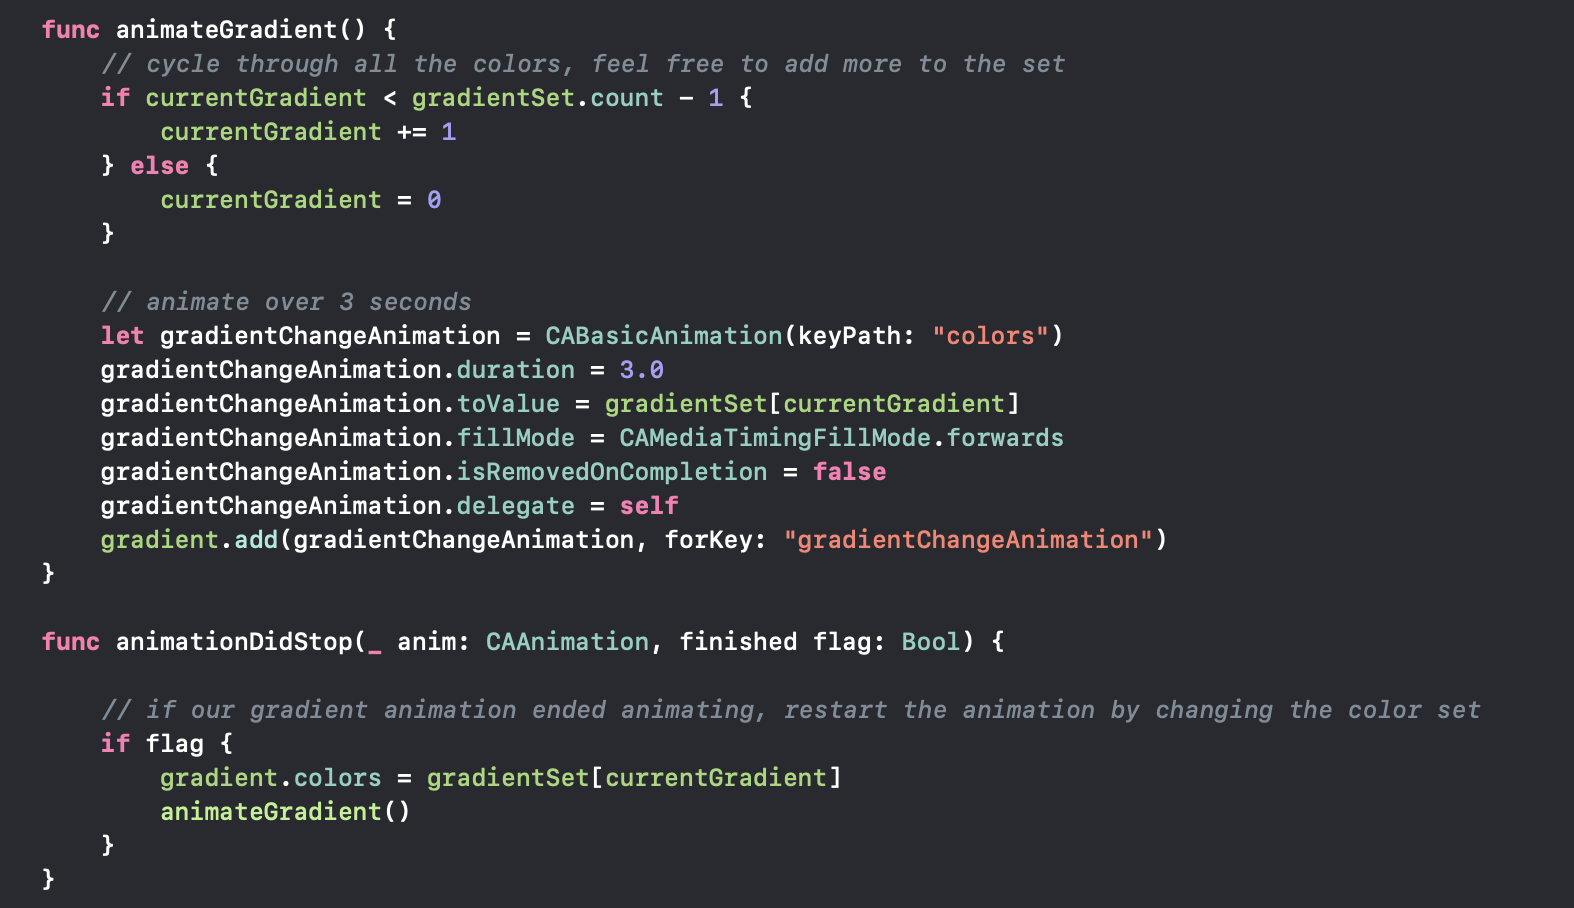
- Bất cứ khi nào hàm này được gọi, tôi sẽ tăng chỉ số
currentGradientlên 1 và lặp lại theo đó. - Thiết lập
CABasicAnimationđể thay đổicolors - Set animation để animate
toValuechỉ số màu hiện tại của tôi trong bộ của chúng tôi trong thời gian 3 giây. - Một vài dòng tiếp theo để đảm bảo rằng hình ảnh động gradient của chúng tôi không bị xóa khi hoàn thành.
- Sử dụng delegate
animationDidStopđể detect khi animation gradient của chúng ta đã hoàn thành. Nếu nó đã kết thúc, hãy update màu gradient hiện tại thành chỉ mục hiện tại của chúng ta (điều này sẽ hoạt động giống nhưfromValuetrong animation của chúng ta) và gọi lạianimateGradient ().
Tuyệt quá! Animating background thông qua CAGradientLayer khá đơn giản! Hãy để đi trước và thêm một thanh tiến trình đếm ngược!
Countdown Progress Bar
Để đạt được hiệu quả như trên, chúng ta sẽ cần những điều sau đây:
- 3
CAShapeLayers- Một cho background, một cho foreground và một cho pulsation - 2
CAGradientLayer—Điều này là để có một nét với một số gradient so với mộtUIColorrắn Timerđể theo dõi thời gian còn lại và updateUILabeltrên màn hình
Đầu tiên, tôi đã tạo một lớp và tuân thủ nó theo UIView để tôi có thể sử dụng nó theo chương trình hoặc thông qua storyboard.
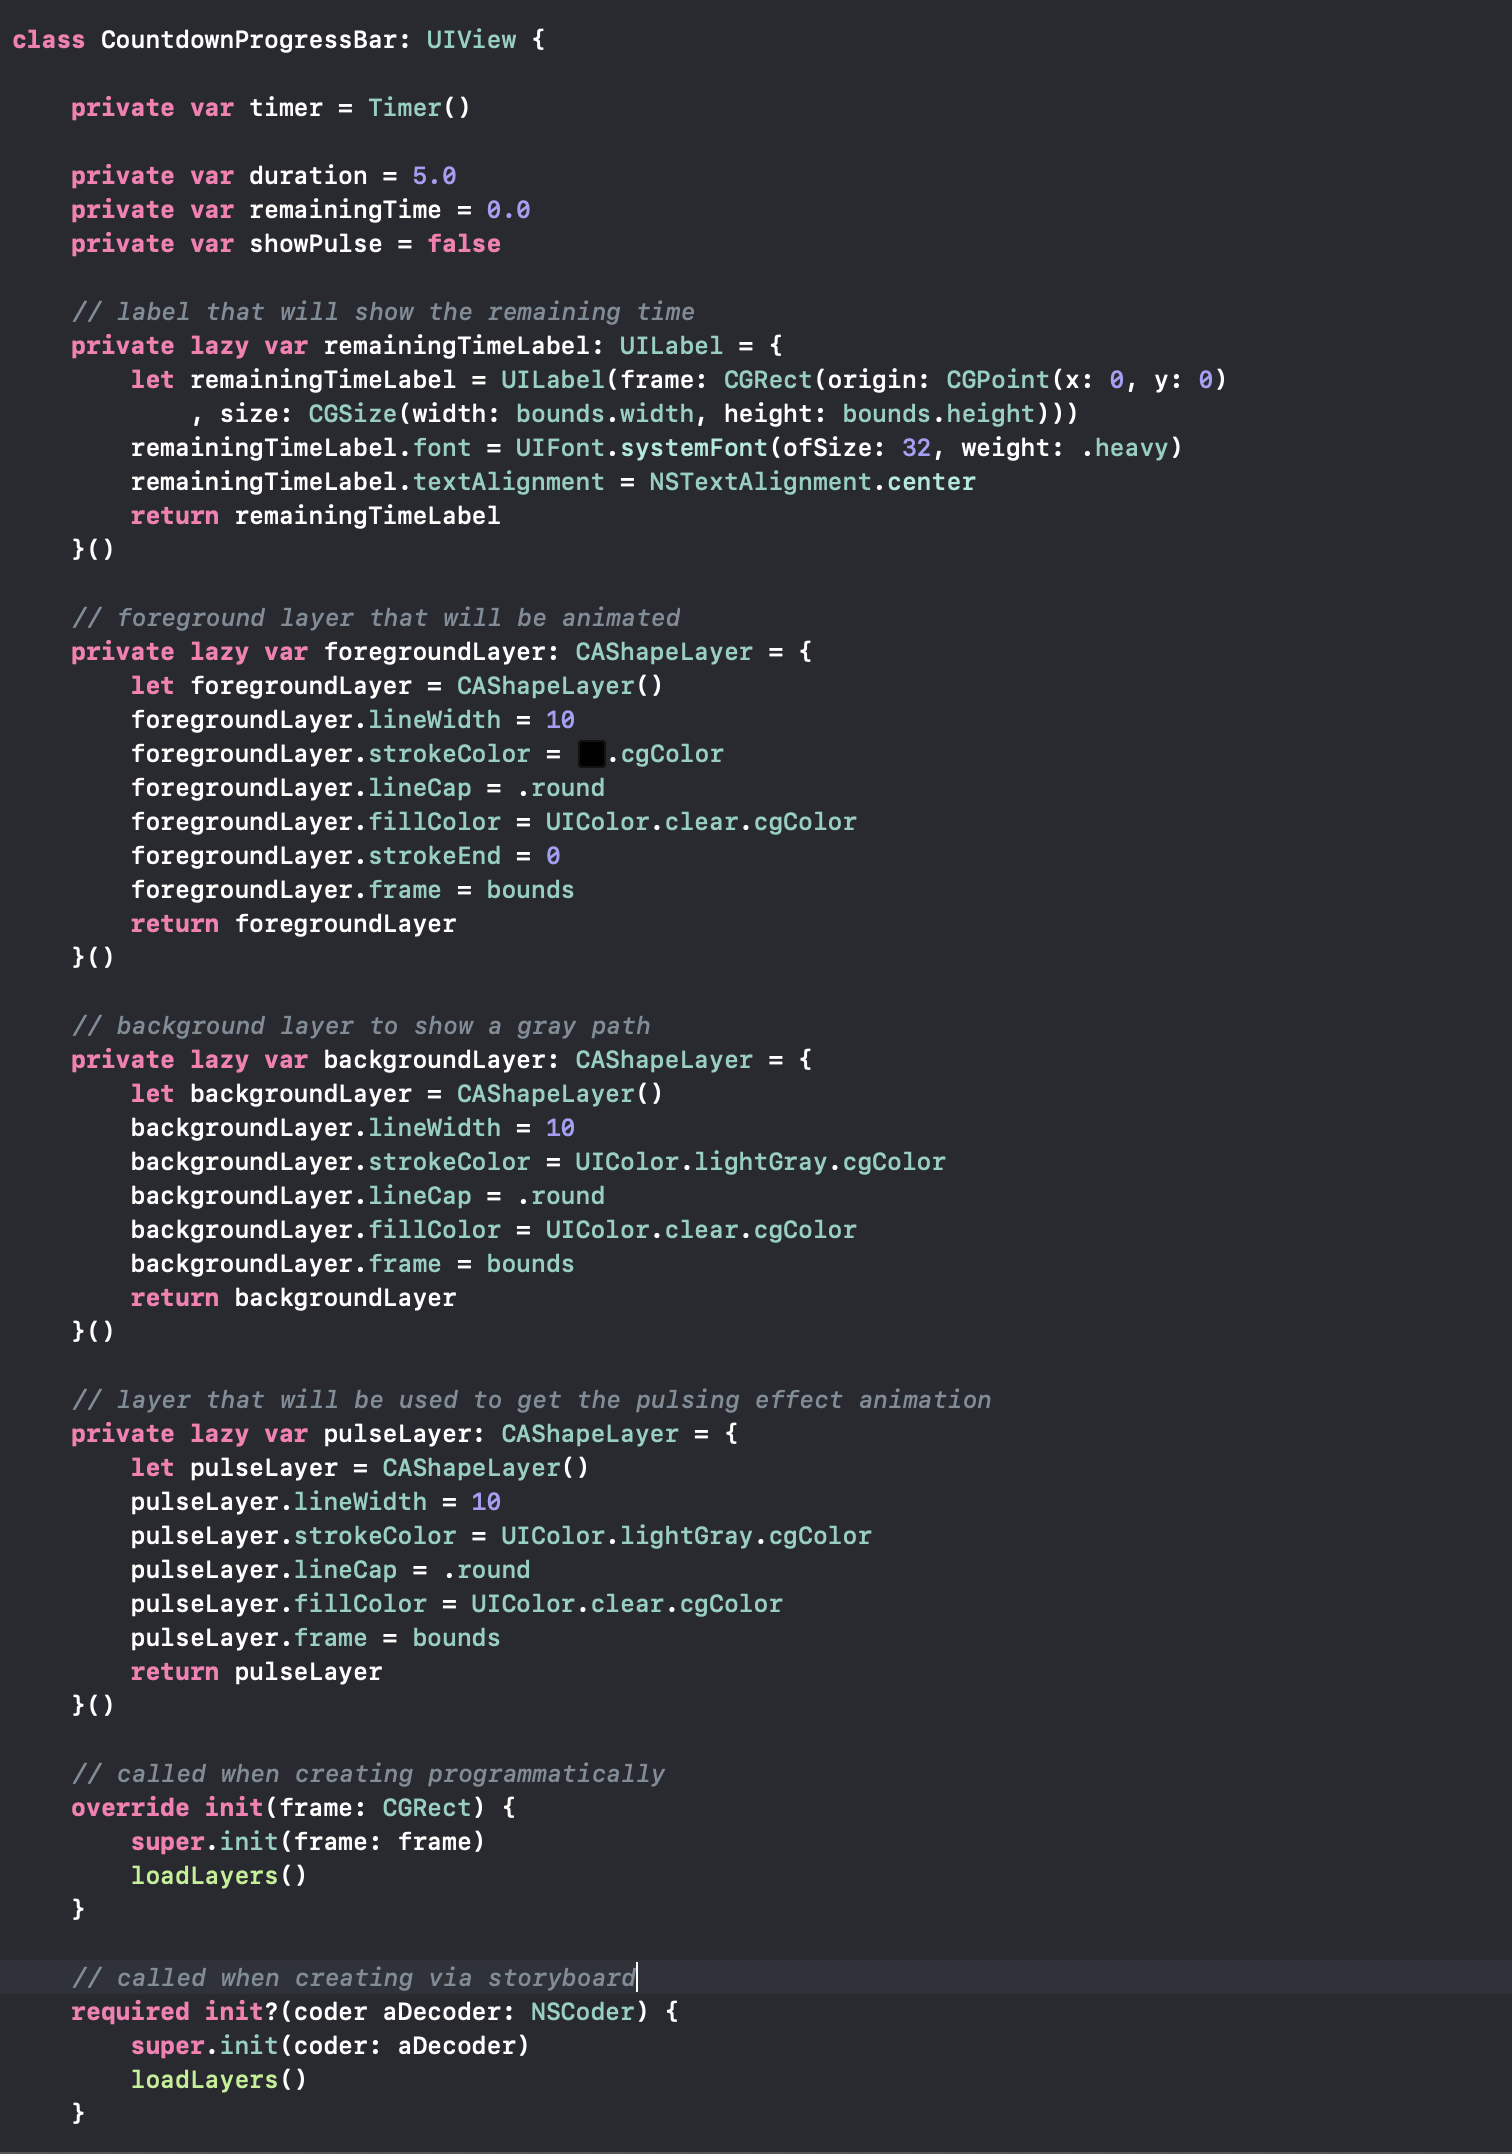
Những gì tôi đã tuyên bố ban đầu là 3 CAShapeLayer cần thiết và một UILabel, đó là các biến lười biếng và tôi đã cho chúng các giá trị ban đầu. Lazy có nghĩa là các closures sẽ được thực thi khi các biến này được gọi trong thời gian chạy.
Ngoài ra, vì tôi có timer, tôi cũng đã thêm một deinit để đảm bảo rằng timer không hợp lệ khi chế độ xem bị hủy:
deinit {
 timer.invalidate()
}
Ngoài ra, vì tôi muốn foreground và pulse của mình có một số gradientc, tôi đã tạo thêm 2 biến, thuộc loại CAGradientLayer. Chúng ta sẽ che foreground và pulse của chúng ta trên các lớp gradient để đạt được hiệu quả mà chúng ta muốn.
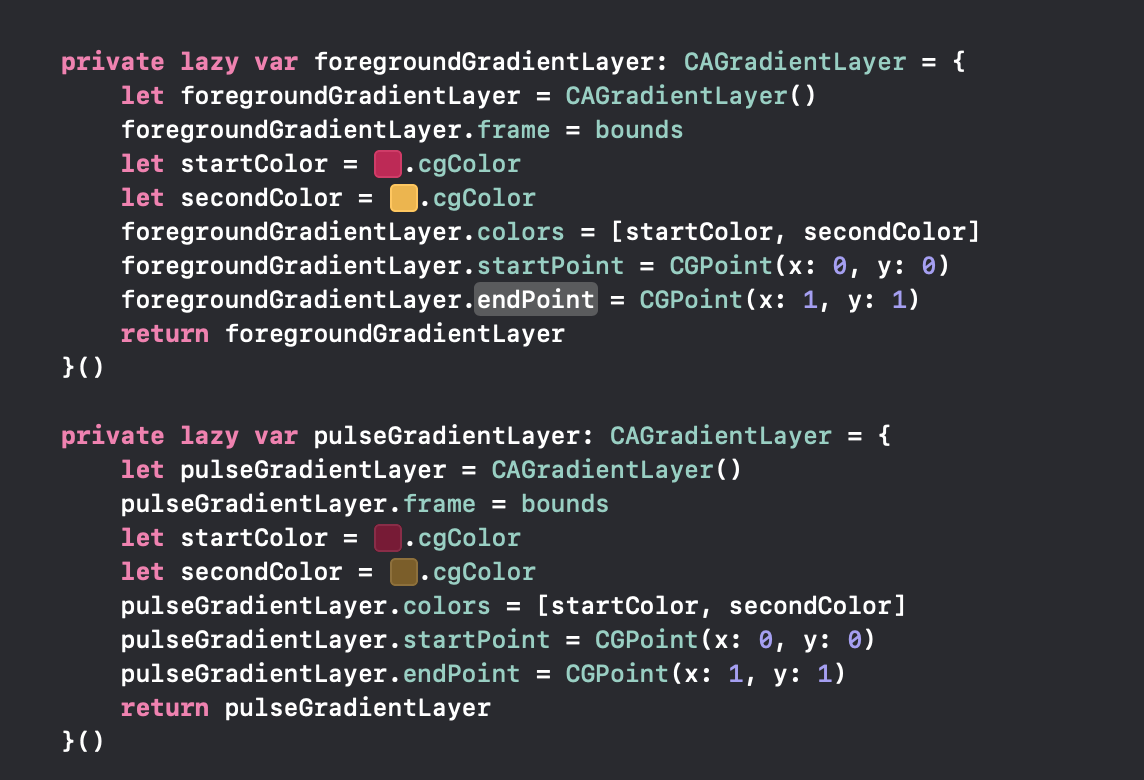
Tôi đã cho họ một số màu gradient cũng như vị trí của họ. Đây là tất cả các biến chúng ta cần để bắt đầu! Hàm init gọi một phương thức loadLayers () để cho phép xem điều đó làm gì.
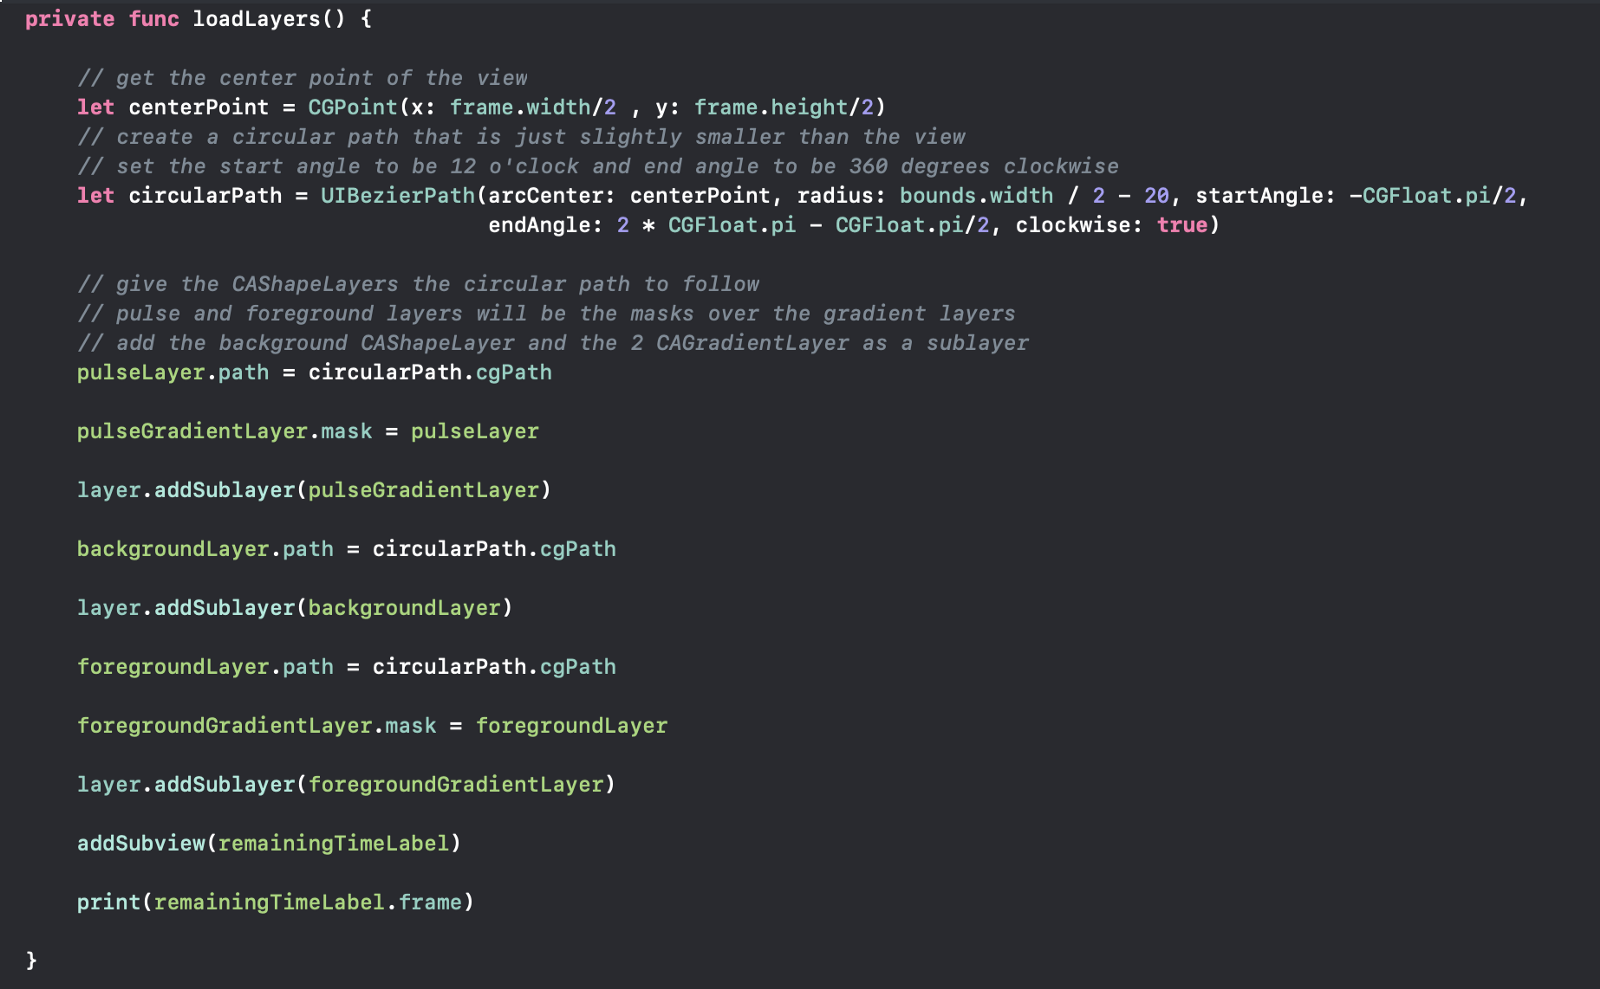
Khi chúng ta gọi phương thức, đầu tiên chúng ta tạo một circular path sẽ được CAShapeLayers sử dụng. Vì chúng tôi muốn các foreground và pulse có gradient, tôi đã áp dụng mặt nạ tương ứng. Cuối cùng, tôi đã thêm UILabel ở giữa View sẽ được sử dụng để hiển thị thời gian còn lại.
Animating cho layers
Bây giờ chúng ta đã thiết lập tất cả các layers, hãy để xem xét cách chúng ta có thể đạt được animations. Dưới đây cho thấy làm thế nào chúng ta có thể làm animate foreground layer.
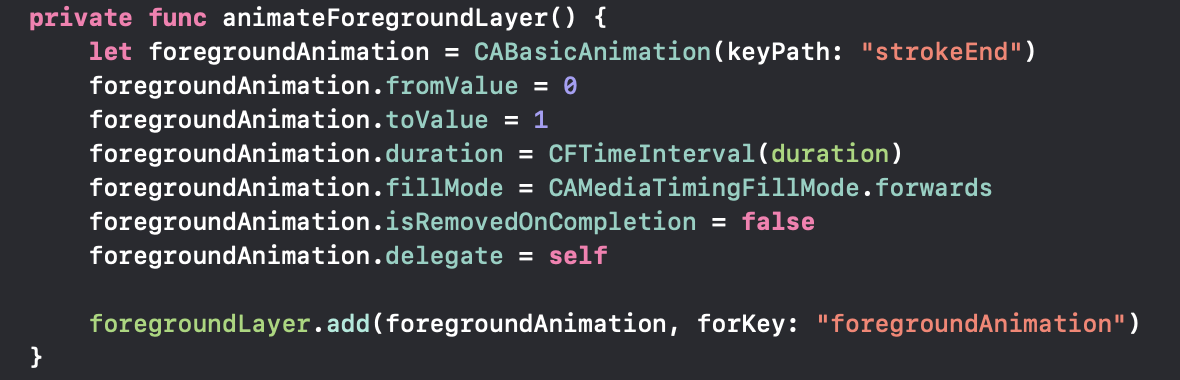
Chúng tôi đã khai báo CABasicAnimation với keyPath 'StroEnd' Điều này có nghĩa là chúng ta muốn tạo hiệu ứng nơi stroke sẽ kết thúc.
Animation sẽ đi từ đầu đến cuối (là một vòng tròn như được chỉ định trong đường dẫn của chúng ta trước đó) trong một khoảng thời gian được chỉ định. Cuối cùng, chúng ta không muốn Animation của mình bị xóa khi hoàn thành, vì vậy chúng ta đặt isRemondOnCompletion thành false. Bước cuối cùng là thêm Animation vào foregroundLayer (CAShapeLayer)của chúng ta
pulsing layer animation gần như giống nhau, ngoại trừ việc chúng ta sẽ nhóm 2 animation. Nếu bạn thấy kết quả cuối cùng, pulse layer của chúng ta sẽ scales ra bên ngoài và cũng trở nên ít nhìn thấy hơn về cuối.
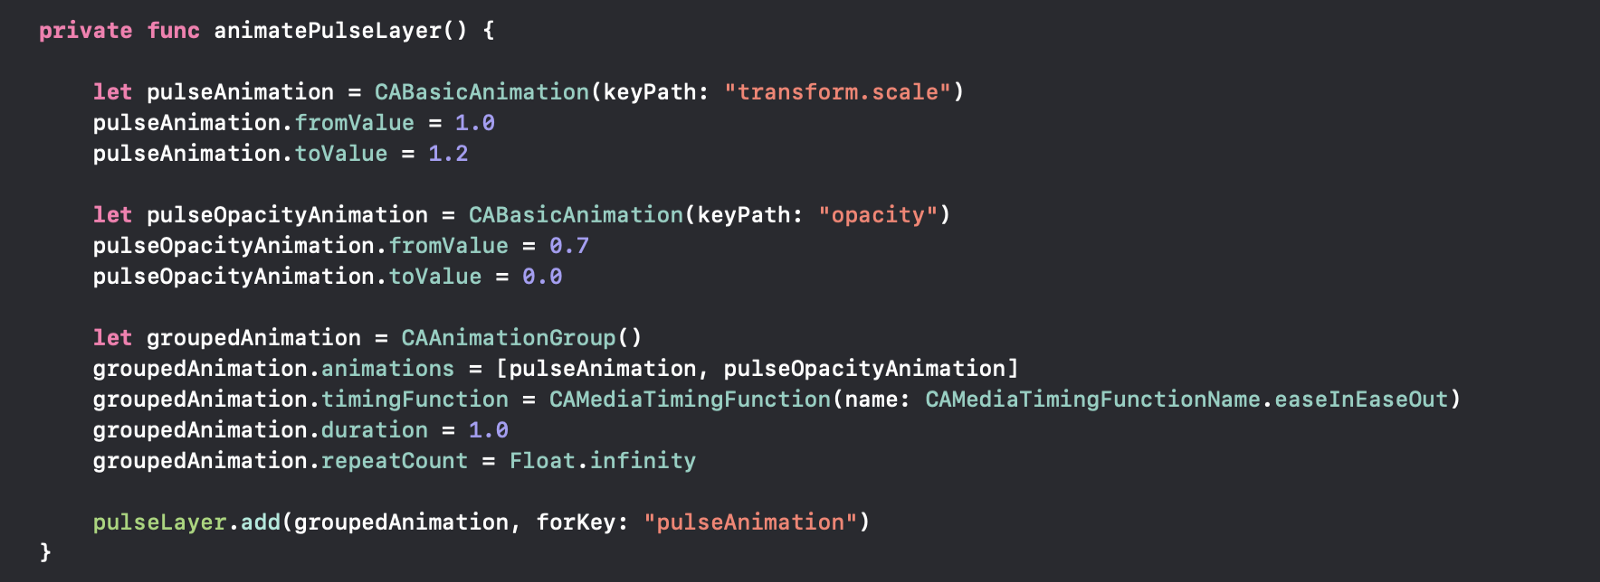
Chúng tôi sẽ khai báo 2 CABasicAnimations với các đường dẫn transform.scale để điều chỉnh kích thước và opacity để điều chỉnh mức độ hiển thị. Layer sẽ tăng 20% kích thước và giảm đến 0 opacity trong suốt thời gian của animation. Khi chúng ta đã khai báo 2 animations, chúng ta có thể sử dụng CAAnimationgroup để thêm các animations lại với nhau. Sau đó, để làm cho nó trông đẹp hơn và không tuyến tính như foreground animation của chúng ta, chúng ta đã đặt timingFunction thành easyInEaseOut, điều này có nghĩa là animation của chúng ta sẽ bắt đầu chậm, tăng tốc giữa duration của nó và sau đó chậm lại trước khi kết thúc. Cuối cùng, chúng ta đã đặt duration là 1 giây và lặp lại animation liên tục. Nhưng đừng lo lắng, khi chúng ta phát hiện ra rằng foreground animation của chúng ta đã dừng (có nghĩa là thời gian còn lại là 0), chúng ta cũng sẽ loại bỏ pulsing animation.
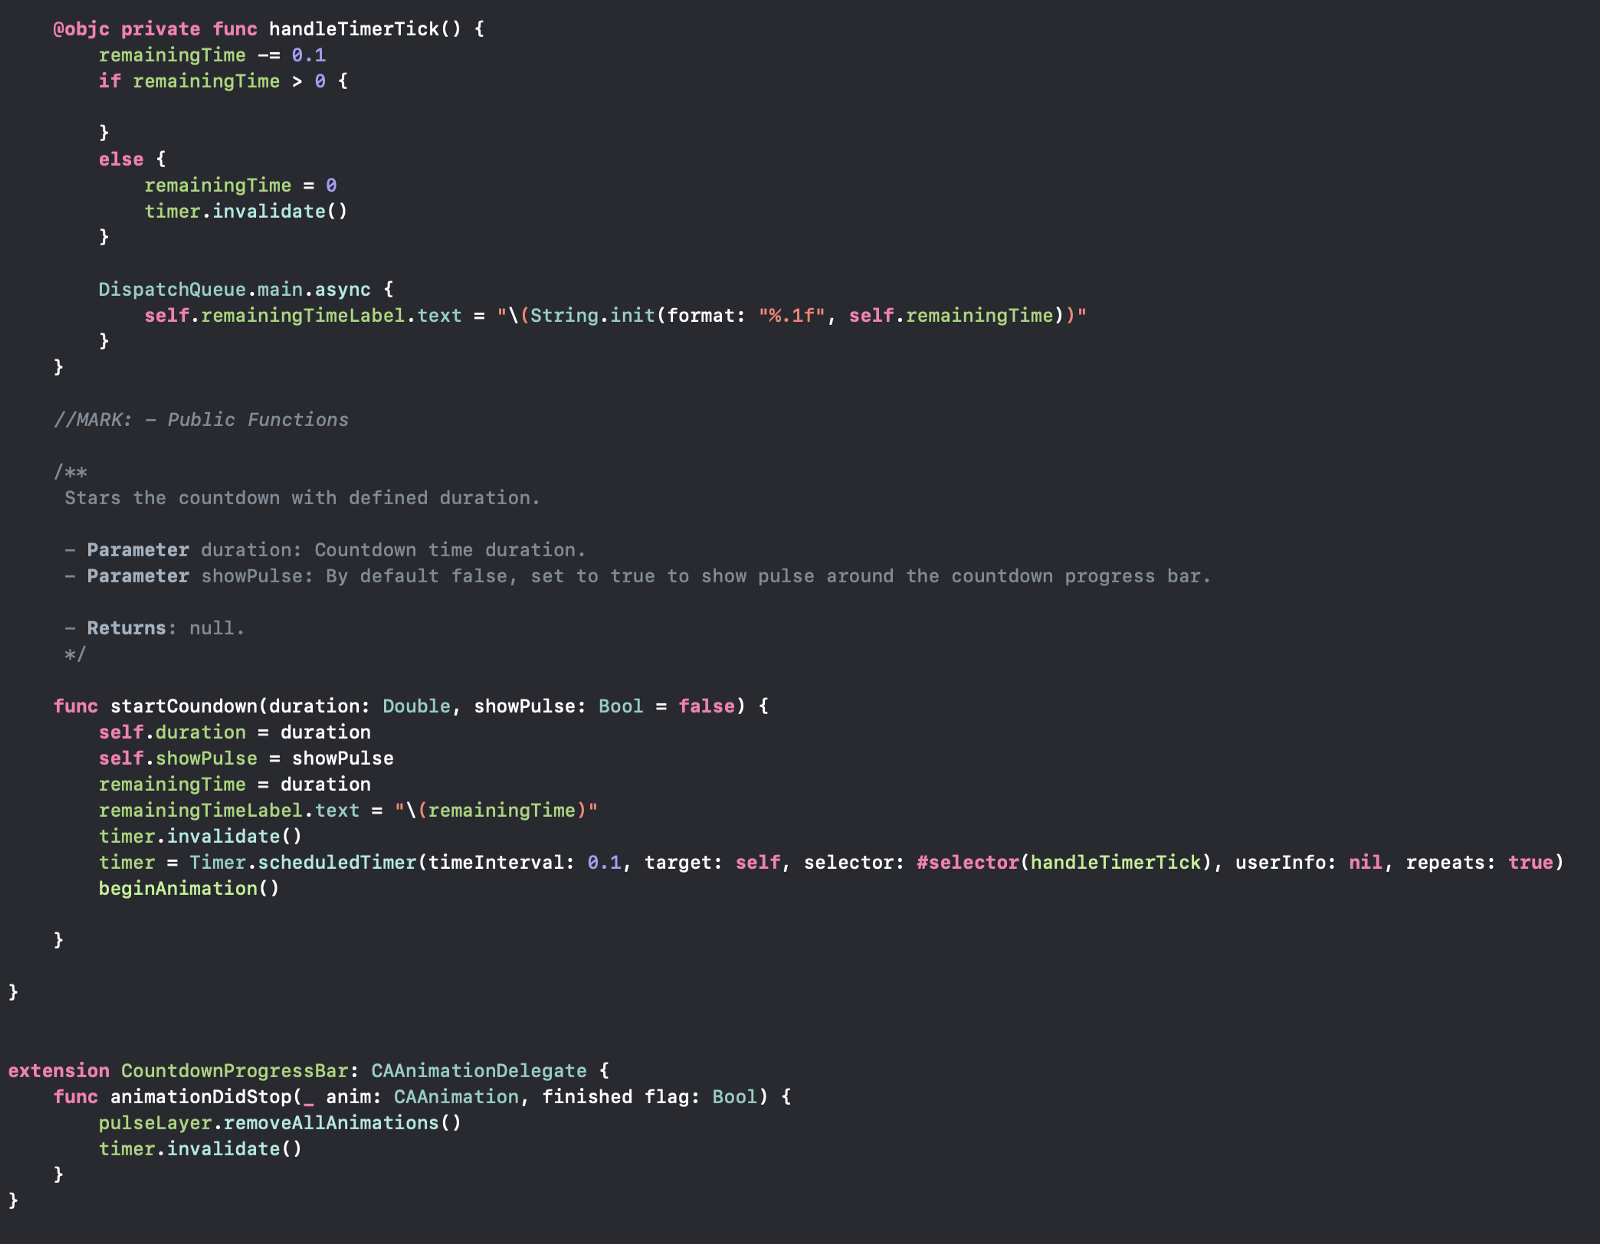
Cuối cùng, đây là phần còn lại của các methods được tìm thấy trong tệp của chúng ta. HandleTimerTick giảm thời gian còn lại 0,1 giây và cập nhật UILabel của chúng ta bằng cách sử dụng main thread (vì đây là thao tác UI).
Public method duy nhất của chúng ta là startCountdown, mất nhiều thời gian và có animate hay không.
AnimationDidStop delegate hoạt động giống như background gradient của chúng ta, chúng ta đã làm trước đó. Khi foreground layer của chúng ta kết thúc animating, chúng ta sẽ xóa tất cả animations và làm mất hiệu lựctimer của chúng ta.
Đó là tất cả những gì chúng ta thực sự cần để có được đầu ra giống nhau! Dưới đây là 2 tập tin nếu có ai bị mất.
//
//  ViewController.swift
//  Core Animations
//
//  Created by Bilguun Batbold on 29/3/19.
//  Copyright © 2019 Bilguun. All rights reserved.
//
import UIKit

class ViewController: UIViewController, CAAnimationDelegate {


    let gradient = CAGradientLayer()

    // list of array holding 2 colors
    var gradientSet = [[CGColor]]()
    // current gradient index
    var currentGradient: Int = 0

    // colors to be added to the set
    let colorOne = #colorLiteral(red: 0.2392156869, green: 0.6745098233, blue: 0.9686274529, alpha: 1).cgColor
    let colorTwo = #colorLiteral(red: 0.8078431487, green: 0.02745098062, blue: 0.3333333433, alpha: 1).cgColor
    let colorThree = #colorLiteral(red: 0.9607843161, green: 0.7058823705, blue: 0.200000003, alpha: 1).cgColor


    // create outlet in the storyboard with type CountdownProgressBar
    @IBOutlet weak var countdownProgressBar: CountdownProgressBar!

    override func viewDidLoad() {
        super.viewDidLoad()
        // Do any additional setup after loading the view.
        view.addGestureRecognizer(UITapGestureRecognizer(target: self, action: #selector(handleTap)))
    }


    override func viewDidLayoutSubviews() {
        super.viewDidLayoutSubviews()

        createGradientView()
        countdownProgressBar.startCoundown(duration: 10, showPulse: true)
    }

    /// Creates gradient view

    func createGradientView() {

        // overlap the colors and make it 3 sets of colors
        gradientSet.append([colorOne, colorTwo])
        gradientSet.append([colorTwo, colorThree])
        gradientSet.append([colorThree, colorOne])

        // set the gradient size to be the entire screen
        gradient.frame = self.view.bounds
        gradient.colors = gradientSet[currentGradient]
        gradient.startPoint = CGPoint(x:0, y:0)
        gradient.endPoint = CGPoint(x:1, y:1)
        gradient.drawsAsynchronously = true

        self.view.layer.insertSublayer(gradient, at: 0)

        animateGradient()
    }

    @objc func handleTap() {
        print("Tapped")

        countdownProgressBar.startCoundown(duration: 10, showPulse: true)
    }

    func animateGradient() {
        // cycle through all the colors, feel free to add more to the set
        if currentGradient < gradientSet.count - 1 {
            currentGradient += 1
        } else {
            currentGradient = 0
        }

        // animate over 3 seconds
        let gradientChangeAnimation = CABasicAnimation(keyPath: "colors")
        gradientChangeAnimation.duration = 3.0
        gradientChangeAnimation.toValue = gradientSet[currentGradient]
        gradientChangeAnimation.fillMode = CAMediaTimingFillMode.forwards
        gradientChangeAnimation.isRemovedOnCompletion = false
        gradientChangeAnimation.delegate = self
        gradient.add(gradientChangeAnimation, forKey: "gradientChangeAnimation")
    }

    func animationDidStop(_ anim: CAAnimation, finished flag: Bool) {

        // if our gradient animation ended animating, restart the animation by changing the color set
        if flag {
            gradient.colors = gradientSet[currentGradient]
            animateGradient()
        }
    }
}
//
//  CountdownProgressBar.swift
//  Core Animations
//
//  Created by Bilguun Batbold on 29/3/19.
//  Copyright © 2019 Bilguun. All rights reserved.
//
import Foundation
import UIKit

class CountdownProgressBar: UIView {

    private var timer = Timer()

    private var duration = 5.0
    private var remainingTime = 0.0
    private var showPulse = false

    // label that will show the remaining time
    private lazy var remainingTimeLabel: UILabel = {
        let remainingTimeLabel = UILabel(frame: CGRect(origin: CGPoint(x: 0, y: 0)
            , size: CGSize(width: bounds.width, height: bounds.height)))
        remainingTimeLabel.font = UIFont.systemFont(ofSize: 32, weight: .heavy)
        remainingTimeLabel.textAlignment = NSTextAlignment.center
        return remainingTimeLabel
    }()

    // foreground layer that will be animated
    private lazy var foregroundLayer: CAShapeLayer = {
        let foregroundLayer = CAShapeLayer()
        foregroundLayer.lineWidth = 10
        foregroundLayer.strokeColor = #colorLiteral(red: 0, green: 0, blue: 0, alpha: 1).cgColor
        foregroundLayer.lineCap = .round
        foregroundLayer.fillColor = UIColor.clear.cgColor
        foregroundLayer.strokeEnd = 0
        foregroundLayer.frame = bounds
        return foregroundLayer
    }()

    // background layer to show a gray path
    private lazy var backgroundLayer: CAShapeLayer = {
        let backgroundLayer = CAShapeLayer()
        backgroundLayer.lineWidth = 10
        backgroundLayer.strokeColor = UIColor.lightGray.cgColor
        backgroundLayer.lineCap = .round
        backgroundLayer.fillColor = UIColor.clear.cgColor
        backgroundLayer.frame = bounds
        return backgroundLayer
    }()

    // layer that will be used to get the pulsing effect animation
    private lazy var pulseLayer: CAShapeLayer = {
        let pulseLayer = CAShapeLayer()
        pulseLayer.lineWidth = 10
        pulseLayer.strokeColor = UIColor.lightGray.cgColor
        pulseLayer.lineCap = .round
        pulseLayer.fillColor = UIColor.clear.cgColor
        pulseLayer.frame = bounds
        return pulseLayer
    }()

    // called when creating programmatically
    override init(frame: CGRect) {
        super.init(frame: frame)
        loadLayers()
    }

    // called when creating via storyboard
    required init?(coder aDecoder: NSCoder) {
        super.init(coder: aDecoder)
        loadLayers()
    }

    deinit {
        timer.invalidate()
    }


    private lazy var foregroundGradientLayer: CAGradientLayer = {
        let foregroundGradientLayer = CAGradientLayer()
        foregroundGradientLayer.frame = bounds
        let startColor = #colorLiteral(red: 0.8078431487, green: 0.02745098062, blue: 0.3333333433, alpha: 1).cgColor
        let secondColor = #colorLiteral(red: 0.9607843161, green: 0.7058823705, blue: 0.200000003, alpha: 1).cgColor
        foregroundGradientLayer.colors = [startColor, secondColor]
        foregroundGradientLayer.startPoint = CGPoint(x: 0, y: 0)
        foregroundGradientLayer.endPoint = CGPoint(x: 1, y: 1)
        return foregroundGradientLayer
    }()

    private lazy var pulseGradientLayer: CAGradientLayer = {
        let pulseGradientLayer = CAGradientLayer()
        pulseGradientLayer.frame = bounds
        let startColor = #colorLiteral(red: 0.5090036988, green: 0.04135338217, blue: 0.2113225758, alpha: 1).cgColor
        let secondColor = #colorLiteral(red: 0.4990308285, green: 0.3679353595, blue: 0.1137484089, alpha: 1).cgColor
        pulseGradientLayer.colors = [startColor, secondColor]
        pulseGradientLayer.startPoint = CGPoint(x: 0, y: 0)
        pulseGradientLayer.endPoint = CGPoint(x: 1, y: 1)
        return pulseGradientLayer
    }()

    private func loadLayers() {

        // get the center point of the view
        let centerPoint = CGPoint(x: frame.width/2 , y: frame.height/2)
        // create a circular path that is just slightly smaller than the view
        // set the start angle to be 12 o'clock and end angle to be 360 degrees clockwise
        let circularPath = UIBezierPath(arcCenter: centerPoint, radius: bounds.width / 2 - 20, startAngle: -CGFloat.pi/2,
                                        endAngle: 2 * CGFloat.pi - CGFloat.pi/2, clockwise: true)

        // give the CAShapeLayers the circular path to follow
        // pulse and foreground layers will be the masks over the gradient layers
        // add the background CAShapeLayer and the 2 CAGradientLayer as a sublayer
        pulseLayer.path = circularPath.cgPath

        pulseGradientLayer.mask = pulseLayer

        layer.addSublayer(pulseGradientLayer)

        backgroundLayer.path = circularPath.cgPath

        layer.addSublayer(backgroundLayer)

        foregroundLayer.path = circularPath.cgPath

        foregroundGradientLayer.mask = foregroundLayer

        layer.addSublayer(foregroundGradientLayer)

        addSubview(remainingTimeLabel)

        print(remainingTimeLabel.frame)

    }

    private func beginAnimation() {

        animateForegroundLayer()

        // only show the pulse if required
        if showPulse {
            animatePulseLayer()
        }

    }

    private func animateForegroundLayer() {
        let foregroundAnimation = CABasicAnimation(keyPath: "strokeEnd")
        foregroundAnimation.fromValue = 0
        foregroundAnimation.toValue = 1
        foregroundAnimation.duration = CFTimeInterval(duration)
        foregroundAnimation.fillMode = CAMediaTimingFillMode.forwards
        foregroundAnimation.isRemovedOnCompletion = false
        foregroundAnimation.delegate = self

        foregroundLayer.add(foregroundAnimation, forKey: "foregroundAnimation")
    }

    private func animatePulseLayer() {

        let pulseAnimation = CABasicAnimation(keyPath: "transform.scale")
        pulseAnimation.fromValue = 1.0
        pulseAnimation.toValue = 1.2

        let pulseOpacityAnimation = CABasicAnimation(keyPath: "opacity")
        pulseOpacityAnimation.fromValue = 0.7
        pulseOpacityAnimation.toValue = 0.0

        let groupedAnimation = CAAnimationGroup()
        groupedAnimation.animations = [pulseAnimation, pulseOpacityAnimation]
        groupedAnimation.timingFunction = CAMediaTimingFunction(name: CAMediaTimingFunctionName.easeInEaseOut)
        groupedAnimation.duration = 1.0
        groupedAnimation.repeatCount = Float.infinity

        pulseLayer.add(groupedAnimation, forKey: "pulseAnimation")
    }

    @objc private func handleTimerTick() {
        remainingTime -= 0.1
        if remainingTime > 0 {

        }
        else {
            remainingTime = 0
            timer.invalidate()
        }

        DispatchQueue.main.async {
            self.remainingTimeLabel.text = "\(String.init(format: "%.1f", self.remainingTime))"
        }
    }

    //MARK: - Public Functions

    /**
     Stars the countdown with defined duration.

     - Parameter duration: Countdown time duration.
     - Parameter showPulse: By default false, set to true to show pulse around the countdown progress bar.

     - Returns: null.
     */

    func startCoundown(duration: Double, showPulse: Bool = false) {
        self.duration = duration
        self.showPulse = showPulse
        remainingTime = duration
        remainingTimeLabel.text = "\(remainingTime)"
        timer.invalidate()
        timer = Timer.scheduledTimer(timeInterval: 0.1, target: self, selector: #selector(handleTimerTick), userInfo: nil, repeats: true)
        beginAnimation()

    }

}


extension CountdownProgressBar: CAAnimationDelegate {
    func animationDidStop(_ anim: CAAnimation, finished flag: Bool) {
        pulseLayer.removeAllAnimations()
        timer.invalidate()
    }
}
Sử dụng lớp CountdownProgressBar
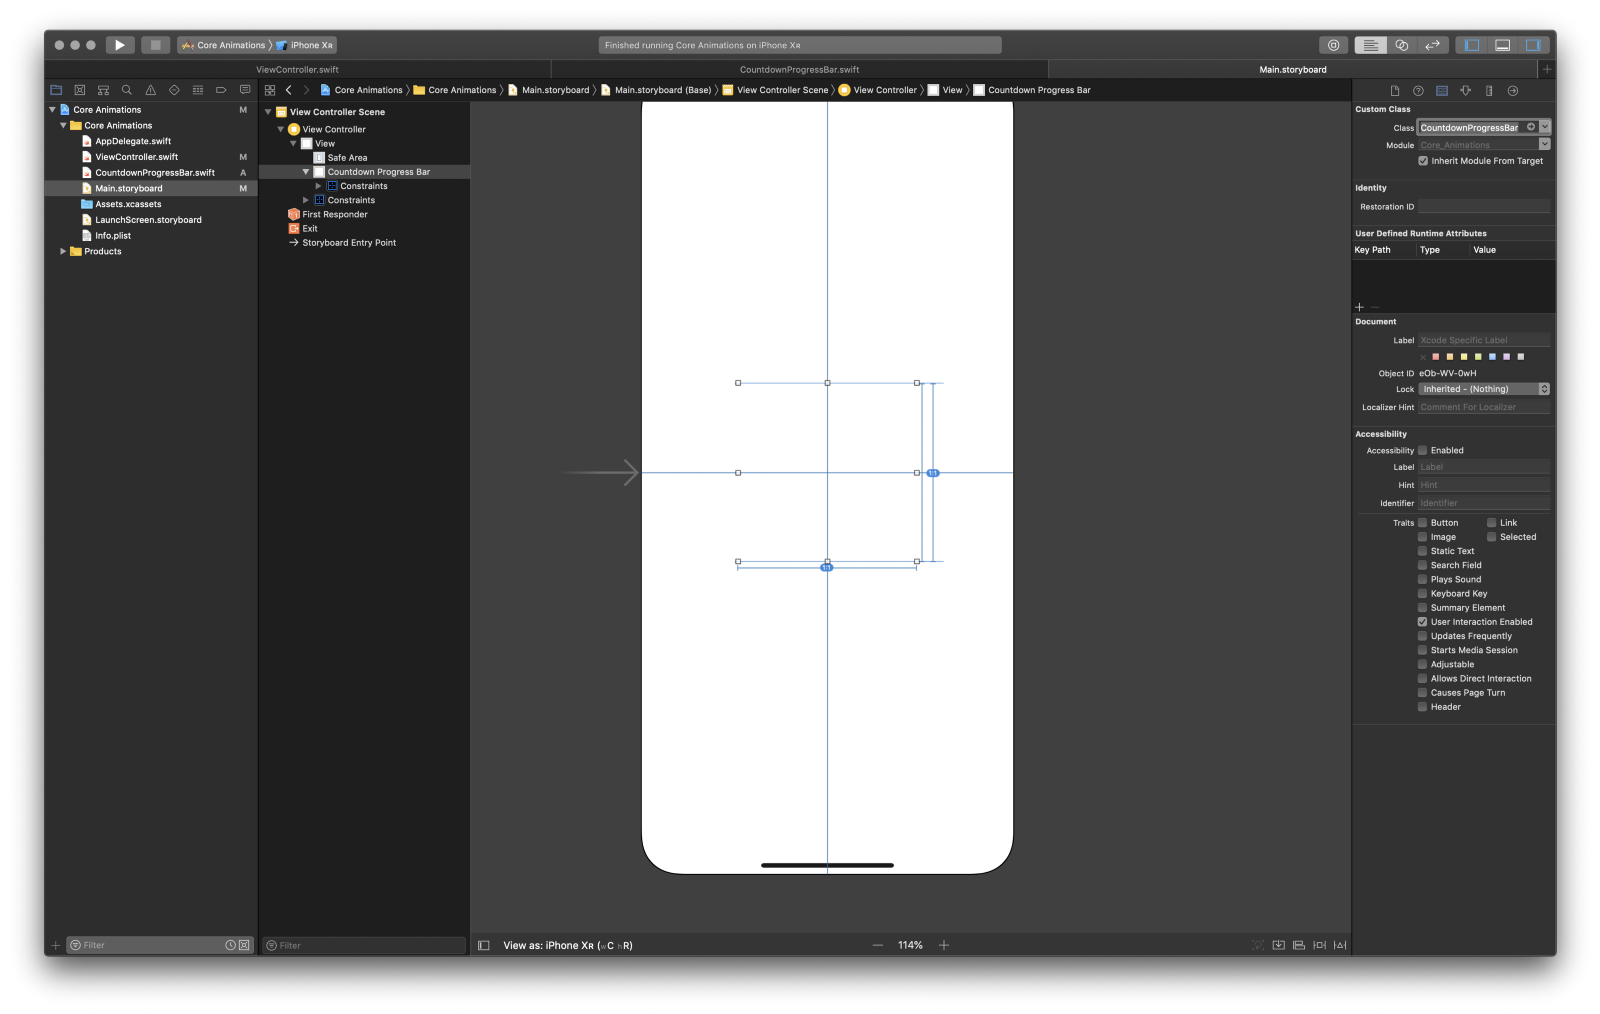
Để sử dụng lớp của chúng ta, đầu tiên tôi đã tạo một UIView và đặt nó ở giữa View. Sau đó tôi đã thay đổi class của nó thành lớp CountdownProgressBar của chúng ta. Cuối cùng, trong ViewControll.swiftcủa tôi, tôi bắt đầu animation như sau:
countdownProgressBar.startCoundown(duration: 10, showPulse: true)
Hãy thử xem pulsation animation hoặc thử vô hiệu hóa nó.
Thế là xong! Chúng ta đã thực hiện một vài animations thực sự thú vị mà không khó chút nào! Ban đầu tôi đã viết custom countdown class của riêng mình cho một dự án tôi đang làm, và không thể tìm thấy nhiều ví dụ trực tuyến. Hãy sửa đổi và sử dụng mã như bạn muốn.
Có rất nhiều điều thú vị mà bạn có thể làm, với hiệu quả cao hơn UIView, bằng cách sử dụng CALayers!
Đầu tiên, bạn có thể thử nghiệm với các giá trị và màu sắc khác nhau để thực sự hiểu cách hoạt động của mã. Ví dụ: bạn có thể chỉnh sửa màu background , điều chỉnh radius của hiệu ứng pulsing của chúng ta hoặc chơi với màu của foreground layer.
Đây chỉ là một số ví dụ đơn giản làm thế nào bạn có thể thêm gia vị cho ứng dụng của bạn. Sẽ rất tuyệt khi kết hợp một animated background cho Login Page của bạn hoặc tạo custom loading bar của riêng bạn.
All rights reserved
