Một số kỹ thuật cơ bản trong Rails (Phần 1)
Bài đăng này đã không được cập nhật trong 7 năm
Giới thiệu
Xin chào các bạn, hôm nay mình sẽ giới thiệu cách sử dụng một số kỹ thuật cơ bản trong Rails dành cho các bạn mới bắt đầu tìm hiểu về Rails.
Đầu tiên chúng ta tạo 1 project để demo
rails new Demo
cd Demo
Thêm một số gem cơ bản vào Gemfile
gem "bootsnap", ">= 1.1.0", require: false
gem "coffee-rails", "~> 4.2"
gem "jbuilder", "~> 2.5"
gem "jquery-rails"
gem "mini_racer"
gem "puma", "~> 3.0"
gem "rails", "~> 5.2.1"
gem "sass-rails", "~> 5.0"
gem "turbolinks", "~> 5"
gem "uglifier", ">= 1.3.0"
Kỹ thuật tạo Modal
Để áp dụng được model, ta cài đặt một số file như sau:
Thêm boostrap vào Gemfile
gem 'bootstrap-sass'
Trong file application.js, thêm 2 dòng sau:
//= require jquery
//= require bootstrap-sprockets
Thêm bootstrap vào file application.scss
@import "bootstrap-sprockets";
@import "bootstrap";
Bây giờ chúng ta sẽ tạo ra model tên là Product với 2 trường là name và price:
rails g resource Product name price:decimal
rake db:migrate
Chúng ta đã có cơ sở dữ liệu, ta sẽ tạo một số dữ liệu fake để demo bằng gem "faker". Cách sử dụng nó bạn có thể tham khảo ở đây
20.times do |n|
  name = Faker::Food.dish
  price = Faker::Number.decimal(2)
  Product.create!(name: name, price: price)
end
Sau khi viết hàm tạo dữ liệu, bạn chay lệnh rake db:seed để tạo
Tiếp theo, chúng ta sẽ tạo modal để thêm, sửa, xóa một product
Thêm các route vào file route:
resources :products do
    get "delete"
end
Trong file app/controllers/products_controller.rb, ta thêm các hàm để thêm, sửa, xóa và xem danh sách sản phẩm:
class ProductsController < ApplicationController
  def index
    @products = Product.order created_at: :desc
  end

  def show
    @product = Product.find_by id: params[:id]
  end

  def new
    @product = Product.new
  end

  def create
    @product = Product.create product_params
  end

  def edit
    @product = Product.find(params[:id])
  end

  def update
    @products = Product.all
    @product = Product.find(params[:id])
    @product.update_attributes(product_params)
  end

  def delete
    @product = Product.find(params[:product_id])
  end

  def destroy
    @products = Product.all
    @product = Product.find(params[:id])
    @product.destroy
  end

private
  def product_params
    params.require(:product).permit(:name, :price)
  end
end
Trong views/products tạo file index.html.erb để hiển thị danh sách sản phẩm
<div class="container">
<div class="well">
<%= link_to "New Product", new_product_path, remote: true, class: "btn btn-primary" %>
</div>
<div class="new-product"></div>
<table class="table table-bordered table-striped">
<thead>
<tr>
<th>Name</th>
<th>Price</th>
<td> </td>
<td> </td>
</tr>
</thead>
<tbody>
<%= render @products %>
</tbody>
</table>
</div>
Thêm dòng sau vào index.html.erb để hiển thị modal trên nền của trang này
<div id="product-modal" class="modal fade"></div>
Tạo file _product.html.erb, tại mỗi nút bấm để áp dụng Ajax bạn thêm tùy chọn remote: true
<tr>
  <td><%= product.name %></td>
  <td><%= number_to_currency product.price %></td>
  <td><%= link_to "Edit", edit_product_path(product), remote: true, class: "btn btn-default" %></td>
  <td><%= link_to "Delete", product_delete_path(product), remote: true, class: "btn btn-danger" %></td>
</tr>
Tiếp theo để thêm và sửa, ta tạo file _form.html.erb
<div class="modal-dialog">
  <div class="modal-content">
    <%= form_for @product, remote: true, html: { style: "display:inline;" } do |f| %>
      <div class="modal-body">
        <ul class="errors"></ul>

        <div class="form-group">
          <%= f.label :name, class:"control-label" %>
          <%= f.text_field :name, class: "form-control" %>
        </div>
        <div class="form-group">
          <%= f.label :price, class: "control-label" %>
          <%= f.text_field :price, class: "form-control" %>
        </div>
      </div>
      <div class="modal-footer">
        <%= f.submit class: "btn btn-primary" %>
        <%= link_to "Cancel", "#", class: "btn", data: {dismiss: "modal"} %>
      </div>
    <% end %>
  </div>
</div>
Với tính năng tạo product mới ta thêm 2 file sau:
File _new.html.erb
<div class="modal-header">
<h3>New Product</h3>
</div>
<%= render "form" %>
File để áp dụng Ajax khi click vào nút Tạo mới new.js.erb
$("#product-modal").html("<%= j render "new" %>")
$("#product-modal").modal("show")
Tương tự với tính năng sửa sản phẩm, ta thêm 2 file sau:
File _edit.html.erb
<div class="modal-header">
  <h3><%= "Editing #{@product.name}" %></h3>
</div>
<%= render "form" %>
File edit.js.erb
$("#product-modal").html("<%= j render "edit" %>")
$("#product-modal").modal("show")
Và xóa product ta tạo các file sau:
File _delete.html.erb để hiển thị modal khi click vào nút xóa
<div class="modal-dialog">
  <div class="modal-content">
      <div class="modal-header">
        <h3>Delete Product</h3>
      </div>
      <div class="modal-body">
          <ul class="errors"></ul>Are you sure you wish to delete <b><%= @product.name %></b>?
      </div>
      <div class="modal-footer">
        <%= link_to "Yes, Delete This Product", product_path(@product), method: :delete, remote: true, class: "btn btn-danger" %>
        <%= link_to "No, Please Don't", "#", class: "btn btn-default", data: { dismiss: "modal" } %>
      </div>
  </div>
</div>
File app/views/products/delete.js.erb để áp dụng Ajax khi click nút Xóa
$("#product-modal").html("<%= j render "delete" %>")
$("#product-modal").modal("show")
Kỹ thuật áp dụng Ajax cho phân trang với gem "kaminari"
Để sử dụng gem kaminari để phân trang, ta thêm vào Gemfile 2 gem sau:
gem "kaminari"
gem "bootstrap4-kaminari-views"
Gem kaminari là cài đặt để hiển thị thanh phân trang, boostrap4-kaminari-views để hiển thị thanh phân trang với theme tùy chọn. Sau đó chạy bundle để cài đặt chúng
Ở method index trong controller ta thêm như sau:
  def index
    @products = Product.order(created_at: :desc).page(params[:page]).per 5
    // 5 là số bản ghi sẽ hiện trong 1 trang
  end
Để hiển thị phân trang và áp dụng Ajax cho phân trang bằng kaminari, ta sửa file index.html.erb như sau
<div class="container">
<div class="well">
<%= link_to "New Product", new_product_path, remote: true, data: {toggle: "modal", target: "#product-modal"}, class: "btn btn-primary" %>
</div>
<div class="new-product"></div>
<table class="table table-bordered table-striped">
<thead>
<tr>
<th>Name</th>
<th>Price</th>
<td> </td>
<td> </td>
</tr>
</thead>
<tbody id="products">
<%= render @products %>
</tbody>
</table>
<div class="text-center" id="paginator">
<%= paginate @products, remote: true , theme: "twitter-bootstrap-4"%>
</div>
</div>
Tùy chọn theme: "twitter-bootstrap-4" để hiển thị thanh phân trang chuẩn bootstrap 4
Tiếp theo, ta thêm file index.js.erb để áp dụng Ajax cho phân trang với nội dung như sau:
$("#products").html("<%= j render(@products) %>");
$("#paginator").html("<%= j paginate(@products, theme: "twitter-bootstrap-4", remote: true) %>");
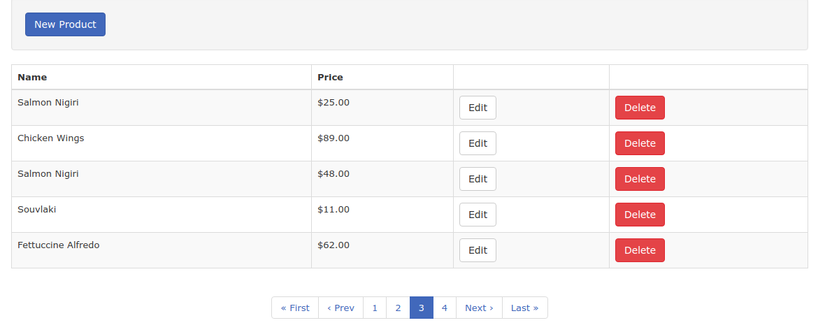
Vậy là ta đã hoàn thành việc áp dụng Ajax cho phân trang kết quả như sau:
Tự tạo Snippets trong Sublime Text
Giới thiệu chung
Sublime Text, là một Editor với nhiều tính năng mạnh mẽ chắc không phải bàn cãi, mặc dù càng nhiều plugin được viết ra để hỗ trợ các lập tình viên làm việc, nhưng các bạn cũng có thể tự viết cho riêng mình những plugins, snippets phù hợp với nhu cầu cá nhân để nâng cao hiệu quả trong việc code.
Mình sẽ hướng dẫn các bạn tự viết một snippet để phục vụ nhu cầu cá nhân.
Snippet là gì?
Hiểu nôm na, khi bạn phải code nhiều file, đoạn code mà cấu trúc của nó giống hệt nhau, hoặc một hàm nào đó mà bạn cảm thấy lười phải gõ từng chữ cái một cách hoàn chỉnh thay vì gõ một vài kí tự viết tắt, bạn phải dùng đến snippet. Nhờ có snippet mà các lập trình viên có thể rút ngắn thời gian gõ bàn phím để làm việc khác, quay tay chẳng hạn? (just funny)
Tự tạo snippet trong Sublime Text 3?
Ok, biết như vậy là quá đủ rồi nếu bạn không muốn bị trử khử vì biết quá nhiều :v Bắt đầu nào, mình sẽ hướng dẫn các bạn tạo một snippet cho C++, các bạn có thể đọc theo và tự “customize” cho cá nhân mình!
Việc đầu tiên là mở Sublime Text lên! Trên thanh công cụ, chọn Tools -> Develop -> New Snippet…
Sublime Text sẽ mở ra cho bạn một đoạn code, các bạn cần sửa nó và tạo các snippets cho riêng mình!
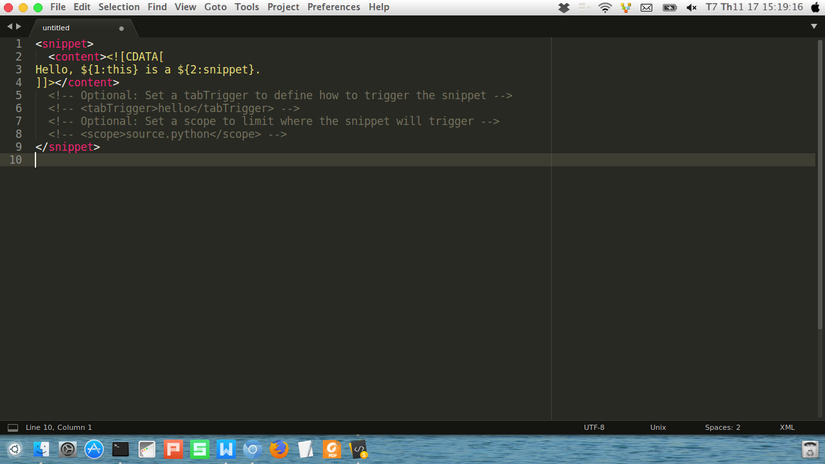 Đoạn mã trong hàm
 <content><![CDATA[…]]></content> chính là nội dung của snippet khi nó hiển thị đầy đủ!
Ở bên dưới, công cụ này đã giải thích về các hàm cần sử dụng theo như <tabTrigger> hay <scope>
Ví dụ, chúng ta cần tạo snippet với Rails như sau
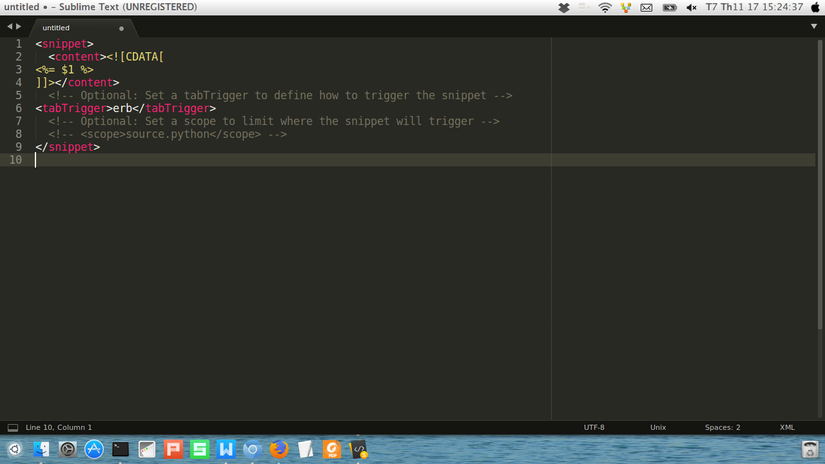 Sau đó lưu lại:
 Ctrl + S dưới dạng file snippets file_name.sublime-snippet
Như vậy, chỉ cần gõ erb rồi tab thì bạn đã có ngay <%= %> Khi bạn gọi snippet ra, con trỏ mặc định sẽ đặt ở vị trí $1, tương tự sẽ có $2 $3 $4,.. để chuyển con trỏ từ vị trí $1 sang $2 $3 bạn chỉ cần dùng phím “tab” trên bàn phím. Nhờ đó mà các thao tác thừa khi sử dụng chuột sẽ loại bỏ một cách đáng kể!
Tham khảo
Tổng hợp từ một số bài viết trên Viblo
https://cachhoc.net/2013/08/21/ubuntu-tao-snippets-cho-sublime-text/
All rights reserved
