Một số giải pháp thiết lập HTTPS ở localhost
Bài đăng này đã không được cập nhật trong 7 năm
Trong thời gian qua, mình đã gặp một vấn đề nho nhỏ về HTTPS. Đó là, mình cần test ứng dụng của mình bằng kết nối an toàn trước khi deploy lên server. Và, mình cần enable HTTPS ở localhost. Sau một thời gian tọc mạch trải nghiệm, mình xin phép chia sẻ lại cho anh em nào cần.
1. Tunnelling
Cách đơn giản nhất để sử dụng HTTPS là sử dụng ngrok. Ưu điểm của tool này là đơn giản, khả năng truy cập từ nhiều nơi và đặc biệt free. Nhược điểm của nó là khá chậm do chị hạn chế số lượng request trên 1 thời điểm. Do đó, theo mình công cụ này phù hợp khi để test nhanh API.
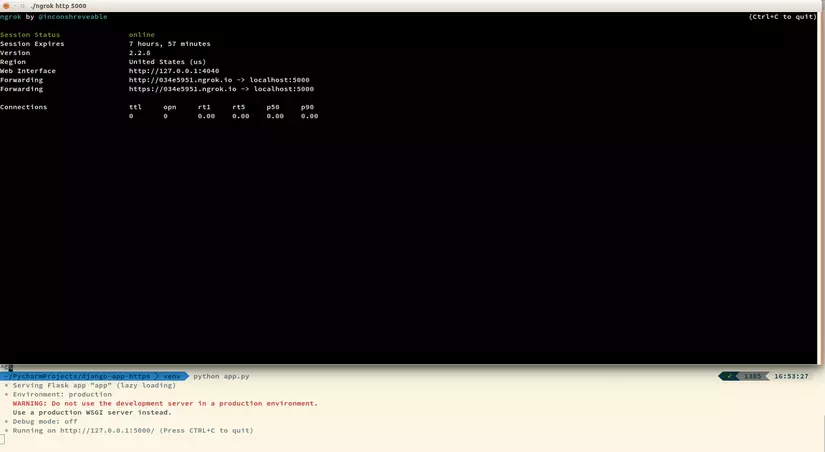
Ví dụ mình chạy web server ở địa điểm A:
$ python app.py
 * Serving Flask app "app" (lazy loading)
 * Environment: production
   WARNING: Do not use the development server in a production environment.
   Use a production WSGI server instead.
 * Debug mode: off
 * Running on http://127.0.0.1:5000/ (Press CTRL+C to quit)
Sau đó bật ngrok lên:
$./ngrok http 5000
Và đây là kết quả:
Và mình có thể sử dụng đường dẫn:
để truy cập từ bất cứ địa điểm nào.
2. Use Extension of Framework
Mình code web bằng các framework của Python, do đó mình mạn phép chỉ giới thiệu các extension cho framework Python.
1. Flask
Flask là microframework được based từ Werkzeug, Jinja 2. Trong đó, Werkzeug hỗ trợ rất tốt cho việc sử dụng on-the-fly certificates.
Để sử dụng được HTTPS ở localhost với Flask, bạn cần cài additional dependency: pyopenssl
$ pip install pyopenssl
Sau đó, bạn cần thêm ssl_context='adhoc' vào trong app.run().
Ex:
from flask import Flask
app = Flask(__name__)

@app.route("/")
def hello():
    return "Hello World!"

if __name__ == "__main__":
    app.run(ssl_context='adhoc')
2. Django
Django có 2 extension hỗ trợ việc sử dụng HTTPS ở localhost. Cũng như Flask, bạn bắt buộc phải cài pyopenssl.
2.1 Django SSL Server
Source: https://github.com/teddziuba/django-sslserver
2.1.1 Setup
Cài thêm gói django-sslserver vào Python distribution hoặc virtualenv
$ pip install django-sslserver
2.1.2 Using
Add sslserver vào INSTALLED_APPS trong settings:
...
INSTALLED_APPS = (
  ...
    "sslserver",
  ...
)
Start SSL:
$ python manage.py runsslserver
Ok. Bây giờ bạn có thể access vào app với địa chỉ: https://localhost:8000. Tuy nhiên, lúc này bạn không thể access vào http://localhost:8000. Bạn buộc phải restart lại server sử dụng runserver của Django.
2.2 Django Extensions
Source: https://django-extensions.readthedocs.io/en/latest/index.html
Django Extensions là một tập hợp các custom extensions dành cho Django framework.
2.2.1 Setup
Bạn có thể get Django Extensions bằng cách sử dụng pip:
$ pip install django-extensions
2.2.2. Using
Add django_extensions vào INSTALLED_APPS trong settings:
...
INSTALLED_APPS = (
  ...
    "django_extensions",
  ...
)
Run server:
$ python manage.py runserver_plus --cert certname
* Running on https://127.0.0.1:8000/ (Press CTRL+C to quit)
* Restarting with stat
Performing system checks...

System check identified no issues (0 silenced).

Django version 1.10, using settings 'demo.settings'
Development server is running at https://[127.0.0.1]:8000/
Using the Werkzeug debugger (http://werkzeug.pocoo.org/)
Quit the server with CONTROL-C.
 * Debugger is active!
 * Debugger PIN: 133-224-687
Tới đây, bạn có thể access vào https://[127.0.0.1]:8000/.
3. Self-Signed Certificates
3.1 Generate
Mình sẽ generate self-signed certificates sử dụng openssl trên Ubuntu.
$ openssl req -x509 -newkey rsa:4096 -nodes -out cert.pem -keyout key.pem -days 365
Ở đây, mình sẽ generate một new certificate năm ở cert.pem tương ứng với private key key.pem và thời hạn sử dụng 365 ngày.
Trong quá trình generate,bạn sẽ cân trả lời một số câu hỏi:
Ex:
Generating a 4096 bit RSA private key
......................++
...................................++
writing new private key to 'key.pem'
-----
You are about to be asked to enter information that will be incorporated
into your certificate request.
What you are about to enter is what is called a Distinguished Name or a DN.
There are quite a few fields but you can leave some blank
For some fields there will be a default value,
If you enter '.', the field will be left blank.
-----
Country Name (2 letter code) [AU]:VN
State or Province Name (full name) [Some-State]:HaNoi
Locality Name (eg, city) []:CauGiay
Organization Name (eg, company) [Internet Widgits Pty Ltd]:Random
Organizational Unit Name (eg, section) []:
Common Name (e.g. server FQDN or YOUR name) []:localhost
Email Address []:minhhahao@gmail.com
Sau khi xong, bạn sẽ có 2 file: cert.pem và key.pem
3.2 Using
3.2.1 Flask
Ở trên, mình add ssl_context='adhoc' vào trong app.run(). Tuy nhiên, sau khi mình có Self-Signed Certificates. Mình có thể sử dụng nó ngay:
Ex:
from flask import Flask
app = Flask(__name__)

@app.route("/")
def hello():
    return "Hello World!"

if __name__ == "__main__":
    # app.run(ssl_context='adhoc')
    app.run(ssl_context=('cert.pem', 'key.pem'))
Sau đó chạy như bình thường :v
$ python app.py
 * Serving Flask app "app" (lazy loading)
 * Environment: production
   WARNING: Do not use the development server in a production environment.
   Use a production WSGI server instead.
 * Debug mode: off
 * Running on https://127.0.0.1:5000/ (Press CTRL+C to quit)
3.2.2 Django
Tương tự, với extension Django SSL Server.
$ python manage.py runsslserver --certificate ~/cert.pem --key ~/key.pem
Validating models...

System check identified no issues (0 silenced).
August 17, 2018 - 09:21:09
Django version 1.10, using settings 'demo.settings'
Starting development server at https://127.0.0.1:8000/
Using SSL certificate: /home/ha.hao.minh/cert.pem
Using SSL key: /home/ha.hao.minh/key.pem
Quit the server with CONTROL-C.
3.2.3 Gunicorn & Nginx
Câu hỏi là làm thế nào để cài đặt SSL trên production server??
Với gunicorn, việc đó cũng đơn giản:
$ gunicorn --certfile cert.pem --keyfile key.pem -b 0.0.0.0:8080 app:hello
[2018-08-17 16:28:15 +0700] [13913] [INFO] Starting gunicorn 19.9.0
[2018-08-17 16:28:15 +0700] [13913] [INFO] Listening at: https://0.0.0.0:8080 (13913)
[2018-08-17 16:28:15 +0700] [13913] [INFO] Using worker: sync
[2018-08-17 16:28:15 +0700] [13916] [INFO] Booting worker with pid: 13916
Ồ quên, nếu các bạn chưa biết về Gunicorn thì bạn có thể tìm nó ở đây.
Còn với Nginx, bạn có thể cấu hình như sau:
server {
    listen 443 ssl;
    server_name example.com;
    ssl_certificate /path/to/cert.pem;
    ssl_certificate_key /path/to/key.pem;
    # ...
}
Dưới đây là một số cách để thiết lập được HTTPS ở local mà mình đã sử dụng. Thanks for reading!
All rights reserved
