Một chút về MVC, MVP và MVVM
Bài đăng này đã không được cập nhật trong 8 năm
MVC, MVP, và MVVM là 3 mô hình thông dụng khi phát triển phần mềm. Trong bài viết này, mình sẽ giới thiệu với các bạn 3 mô hình Model View Controller (MVC), Model View Presenter (MVP) và Model View View-model (MVVM). Tất cả những mô hình trên đều giúp đỡ chúng ta rất nhiều trong việc phát triển một ứng dụng dễ kết hợp, dễ kiểm thử và dễ duy trì. Bài viết này mình sẽ viết trong hoàn cảnh là nền tảng Android.
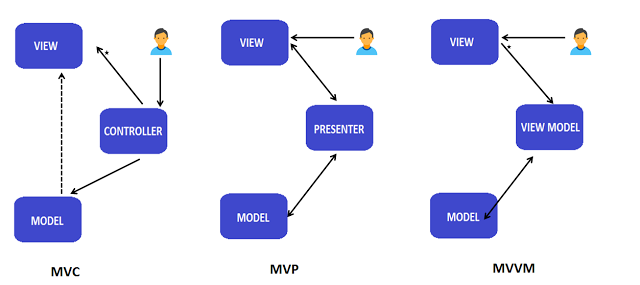
Model View Controller (MVC)
Mô hình MVC chia ứng dụng ra thành 3 thành phần chính: Model, View và Controller.
Model
Model nghĩa là các dữ liệu cần thiết để hiển thị ở View. Model đại diện cho một tập hợp các lớp mô tả business logic (business model và data model). Nó cũng định nghĩa các business rules cho dữ liệu (nghĩa là cách mà dữ liệu thay đổi và được dùng)
View
View đại diện cho các thành phần UI như XML, HTML. View sẽ hiển thị dữ liệu đã qua xử lý từ Controller. Model và View tương tác với nhau qua Observer pattern.
Controller
Controller có trách nhiệm xử lý các yêu cầu (request) được gửi đến. Nó sẽ xử lý các dữ liệu của người dùng qua Model và trả về kết quả ở View
Ví dụ
Áp dụng mô hình MVC cho Tic Tac Toe game, ta có luồng hoạt động:
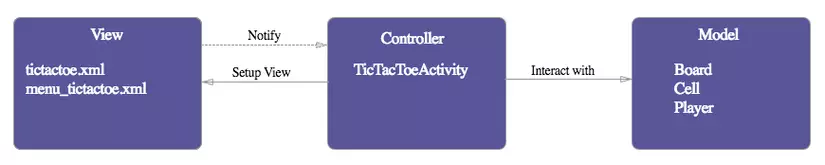
Code ví dụ:
public class TicTacToeActivity extends AppCompatActivity {

   private Board model;

   /* View Components referenced by the controller */
   private ViewGroup buttonGrid;
   private View winnerPlayerViewGroup;
   private TextView winnerPlayerLabel;

   /**
    * In onCreate of the Activity we lookup & retain references to view components
    * and instantiate the model.
    */
   @Override
   protected void onCreate(Bundle savedInstanceState) {
       super.onCreate(savedInstanceState);
       setContentView(R.layout.tictactoe);
       winnerPlayerLabel = (TextView) findViewById(R.id.winnerPlayerLabel);
       winnerPlayerViewGroup = findViewById(R.id.winnerPlayerViewGroup);
       buttonGrid = (ViewGroup) findViewById(R.id.buttonGrid);

       model = new Board();
   }

   /**
    * Here we inflate and attach our reset button in the menu.
    */
   @Override
   public boolean onCreateOptionsMenu(Menu menu) {
       MenuInflater inflater = getMenuInflater();
       inflater.inflate(R.menu.menu_tictactoe, menu);
       return true;
   }
   /**
    *  We tie the reset() action to the reset tap event.
    */
   @Override
   public boolean onOptionsItemSelected(MenuItem item) {
       switch (item.getItemId()) {
           case R.id.action_reset:
               reset();
               return true;
           default:
               return super.onOptionsItemSelected(item);
       }
   }

   /**
    *  When the view tells us a cell is clicked in the tic tac toe board,
    *  this method will fire. We update the model and then interrogate it's state
    *  to decide how to proceed.  If X or O won with this move, update the view
    *  to display this and otherwise mark the cell that was clicked.
    */
   public void onCellClicked(View v) {

       Button button = (Button) v;

       int row = Integer.valueOf(tag.substring(0,1));
       int col = Integer.valueOf(tag.substring(1,2));

       Player playerThatMoved = model.mark(row, col);

       if(playerThatMoved != null) {
           button.setText(playerThatMoved.toString());
           if (model.getWinner() != null) {
               winnerPlayerLabel.setText(playerThatMoved.toString());
               winnerPlayerViewGroup.setVisibility(View.VISIBLE);
           }
       }

   }

   /**
    * On reset, we clear the winner label and hide it, then clear out each button.
    * We also tell the model to reset (restart) it's state.
    */
   private void reset() {
       winnerPlayerViewGroup.setVisibility(View.GONE);
       winnerPlayerLabel.setText("");

       model.restart();

       for( int i = 0; i < buttonGrid.getChildCount(); i++ ) {
           ((Button) buttonGrid.getChildAt(i)).setText("");
       }
   }
}
Đánh giá
MVC rất tốt trong việc phân chia model và view. Chắc chắn sẽ dễ dàng test model vì nó không liên quan đến view và view không có gì nhiều để test (unit test). Tuy nhiên Controller vẫn còn nhiều hạn chế.
Mặt hạn chế của Controller
- Khả năng kiểm thử (test) - Controller bị ràng buộc với Android API nên sẽ khó để thực hiện unit test.
- Tính linh hoạt - Controller liên quan khá chặt chẽ với các view. Nếu chúng ta thay đổi view chúng ta sẽ phải thay đổi lại ở controller.
- Khả năng duy trì - Qua thời gian, controller sẽ ngày càng phình to ra do việc thêm code dẫn đến việc khó kiểm soát.
Để giải quyết vấn đễ này, chúng ta dùng mô hình MVP!
Model View Presenter (MVP)
Mô hình MVP cũng gần giống với mô hình MVC. Nó được kế thừa từ mô hình MVC, trong đó Controller được thay thế bới Presenter. Mô hình này chia ứng dụng thành 3 phần chính: Model, View và Presenter
Model
Model đại diện cho một tập hợp các lớp mô tả business logic (business model and the data model). Nó cũng định nghĩa các business rules cho dữ liệu (nghĩa là cách mà dữ liệu thay đổi và được dùng)
View
View là thành phần tương tác trực tiếp với người dùng như XML, Activity, fragments. Nó không bao gồm bất kỳ việc xử lý logic nào.
Presenter
Presenter sẽ nhận input của người dùng thông qua View, rồi xử lý dữ liệu của người dùng với sự trợ giúp của Model và trả kết quả về View. Presenter giao tiếp với View qua interface. Interface được định nghĩa trong lớp Presenter(với cái nó cần truyền dữ liệu). Activity/fragment hoặc các view component khác implement interface này và render dữ liệu.
Trong cấu trúc MVP, presenter thao túng model và cập nhật ở view. View và Presenter tách biệt với nhau hoàn toàn và giao tiếp với nhau qua thông qua interface. Vì nếu tách riêng từng phần ở view sẽ dễ dàng cho việc kiểm thử ứng dụng ở MVP hơn so với mô hình MVC.
Ví dụ
Áp dụng mô hình MVP cho Tic Tac Toe game, ta có luồng hoạt động:

Code mẫu:
public class TicTacToePresenter implements Presenter {

    private TicTacToeView view;
    private Board model;

    public TicTacToePresenter(TicTacToeView view) {
        this.view = view;
        this.model = new Board();
    }

    // Here we implement delegate methods for the standard Android Activity Lifecycle.
    // These methods are defined in the Presenter interface that we are implementing.
    public void onCreate() { model = new Board(); }
    public void onPause() { }
    public void onResume() { }
    public void onDestroy() { }

    /**
     * When the user selects a cell, our presenter only hears about
     * what was (row, col) pressed, it's up to the view now to determine that from
     * the Button that was pressed.
     */
    public void onButtonSelected(int row, int col) {
        Player playerThatMoved = model.mark(row, col);

        if(playerThatMoved != null) {
            view.setButtonText(row, col, playerThatMoved.toString());

            if (model.getWinner() != null) {
                view.showWinner(playerThatMoved.toString());
            }
        }
    }

    /**
     *  When we need to reset, we just dictate what to do.
     */
    public void onResetSelected() {
        view.clearWinnerDisplay();
        view.clearButtons();
        model.restart();
    }
}
Để hoạt động mà không cần viết activity vào presenter chúng ta tạo interface để activity implements nó.
public interface TicTacToeView {
    void showWinner(String winningPlayerDisplayLabel);
    void clearWinnerDisplay();
    void clearButtons();
    void setButtonText(int row, int col, String text);
}
Đánh giá
MVP sẽ "clear" hơn so với MVC. Chúng ta có thể dễ dàng viết unit test cho presenter vì nó không gắn với bất cứ view và API nào của Android và nó cũng cho phép chúng ta làm việc với các view khác miễn là view đó implement interface liên kết.
Mặt hạn chế của Presenter
- Khả năng duy trì - Cũng giống như Controller, Presenter dễ dàng bị thêm các business logic rải rác qua thời gian. Các developers sẽ rất khó để chia nhỏ presenter khi đã quá lớn.
Tất nhiên, một developer có thể ngăn ngừa điều này nếu cẩn thận phòng tránh vấn đề này theo thời gian. Tuy nhiên, MVVM có thể giúp giải quyết vấn đề này bằng cách làm ngắn gọn hơn!
Model View View-model (MVVM)
Mô hình MVVM hỗ trợ two-way data binding giữa View và View-Model. Điều này cho phép tự động lan truyền sự thay đổi, trong state của View-Model đến View. Tổng quan, View-Model sử dụng mô hình obsever để thông báo sự thay đổi trong View-Model đến Model.
View-Model
Nó có trách nhiệm phơi bày các phương thức, lệnh, và các properties khác giúp duy trì state của view, vận dụng model như là kết quả của các hành động ở view, và trigger các sự kiện ở chính bản thân view. View có reference đến View-Model nhưng View-Model không có thông tin gì về View. Có mối quan hệ many-to-one giữa View và View-Model nghĩa là nhiều View có thể được map với một View-Model. View hoàn toàn độc lập.
Bi-directional data binding hay two-way data binding giữa View và View-Model đảm bảo rằng các models và properties ở View-Model được đồng bộ với View. Mô hình MVVM sẽ phù hợp với những ứng dụng cần được hỗ trợ bi-directional data binding.
Ví dụ
Áp dụng mô hình MVVM cho Tic Tac Toe game, ta có luồng hoạt động:

Code mẫu:
public class TicTacToeViewModel implements ViewModel {

    private Board model;

    /*
     * These are observable variables that the viewModel will update as appropriate
     * The view components are bound directly to these objects and react to changes
     * immediately, without the ViewModel needing to tell it to do so. They don't
     * have to be public, they could be private with a public getter method too.
     */
    public final ObservableArrayMap<String, String> cells = new ObservableArrayMap<>();
    public final ObservableField<String> winner = new ObservableField<>();

    public TicTacToeViewModel() {
        model = new Board();
    }

    // As with presenter, we implement standard lifecycle methods from the view
    // in case we need to do anything with our model during those events.
    public void onCreate() { }
    public void onPause() { }
    public void onResume() { }
    public void onDestroy() { }

    /**
     * An Action, callable by the view.  This action will pass a message to the model
     * for the cell clicked and then update the observable fields with the current
     * model state.
     */
    public void onClickedCellAt(int row, int col) {
        Player playerThatMoved = model.mark(row, col);
        cells.put("" + row + col, playerThatMoved == null ?
                                                     null : playerThatMoved.toString());
        winner.set(model.getWinner() == null ? null : model.getWinner().toString());
    }

    /**
     * An Action, callable by the view.  This action will pass a message to the model
     * to restart and then clear the observable data in this ViewModel.
     */
    public void onResetSelected() {
        model.restart();
        winner.set(null);
        cells.clear();
    }

}
Layouts:
<!--
    With Data Binding, the root element is <layout>.  It contains 2 things.
    1. <data> - We define variables to which we wish to use in our binding expressions and
                import any other classes we may need for reference, like android.view.View.
    2. <root layout> - This is the visual root layout of our view.  This is the root xml tag in the MVC and MVP view examples.
-->
<layout xmlns:android="http://schemas.android.com/apk/res/android"
    xmlns:tools="http://schemas.android.com/tools"
    xmlns:app="http://schemas.android.com/apk/res-auto">

    <!-- We will reference the TicTacToeViewModel by the name viewModel as we have defined it here. -->
    <data>
        <import type="android.view.View" />
        <variable name="viewModel" type="com.acme.tictactoe.viewmodel.TicTacToeViewModel" />
    </data>
    <LinearLayout...>
        <GridLayout...>
            <!-- onClick of any cell in the board, the button clicked will invoke the onClickedCellAt method with its row,col -->
            <!-- The display value comes from the ObservableArrayMap defined in the ViewModel  -->
            <Button
                style="@style/tictactoebutton"
                android:onClick="@{() -> viewModel.onClickedCellAt(0,0)}"
                android:text='@{viewModel.cells["00"]}' />
            ...
            <Button
                style="@style/tictactoebutton"
                android:onClick="@{() -> viewModel.onClickedCellAt(2,2)}"
                android:text='@{viewModel.cells["22"]}' />
        </GridLayout>

        <!-- The visibility of the winner view group is based on whether or not the winner value is null.
             Caution should be used not to add presentation logic into the view.  However, for this case
             it makes sense to just set visibility accordingly.  It would be odd for the view to render
             this section if the value for winner were empty.  -->
        <LinearLayout...
            android:visibility="@{viewModel.winner != null ? View.VISIBLE : View.GONE}"
            tools:visibility="visible">

            <!-- The value of the winner label is bound to the viewModel.winner and reacts if that value changes -->
            <TextView
                ...
                android:text="@{viewModel.winner}"
                tools:text="X" />
            ...
        </LinearLayout>
    </LinearLayout>
</layout>
Đánh giá
Thực hiện Unit testing bây giờ sẽ rất dễ dàng, vì bạn thực sự không phụ thuộc vào view. Khi test bạn chỉ cần xác nhận rằng các biến observable được set thích hợp khi model thay đổi. Không cần phải tạo mockup cho view để test như ở mô hình MVP.
Mặt hạn chế của Presenter
- Khả năng duy trì - Khi view có thể gán cả biến và biểu thức, các logic không liên quan sẽ tăng dần theo thời gian, ảnh hưởng đến việc thêm code vào XML. Để phòng tránh điều nay, luôn luôn lấy giá trị trực tiếp từ ViewModel so với việc cố gắng tính toán và viết lại chúng khi gán biểu thức ở view.
Kết luận
Cả MVP và MVVM đều tốt hơn MVC trong việc chia nhỏ ứng dụng thành các modular, các component đơn mục đích, nhưng chúng cũng làm ứng dụng của bạn phức tạp hơn. Với một ứng dụng đơn giản với chỉ một hoặc hai screens, MVC sẽ ổn. MVVM với data binding sẽ ít code hơn.
Vậy mô hình nào sẽ tốt nhất cho bạn? Nếu bạn đang băn khoăn giữa MVP và MVVM, thì tuỳ theo thói quen cá nhân để quyết định, thực hành mỗi mô hình sẽ giúp bạn hiểu lợi ích và cách cân bằng giữa các mô hình.
Nếu bạn có hứng thú làm quen với MVP và MVVM, mình recommend bạn tham khảo Google Architecture Blueprints.
Cảm ơn bạn vì đã đọc bài viết này!
Link tham khảo: https://github.com/googlesamples/android-architecture
All rights reserved
