Microservices with Spring Boot: Eureka-Server + Config-Server
Xây Dựng Dự Án Microservice với Spring Boot
Tham Khảo: github Và 1 bài viết khác nữa: viblo.asia
Lưu ý bài viết do người mới học về microservice chia sẻ 😇😇😇 có sai sót gì mong m.n bỏ qua.
Kiến trúc hệ thống mà mình xây dựng tương tự với Microservices with Spring Cloud Advanced Demo Project
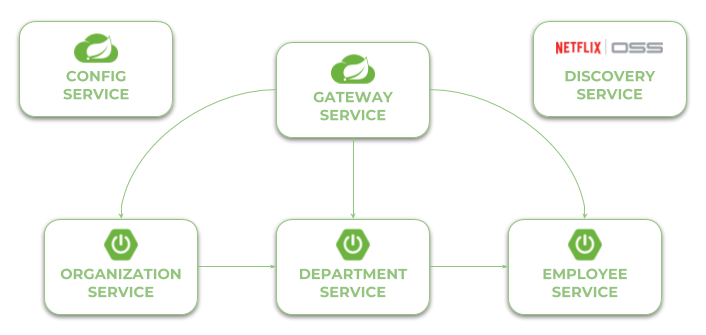
Project của mình làm ra sau khi tham khảo các project và bài viết khác: github.oniamey
Cấu trúc tổng
ví dụ: Sample Microservices-Eureka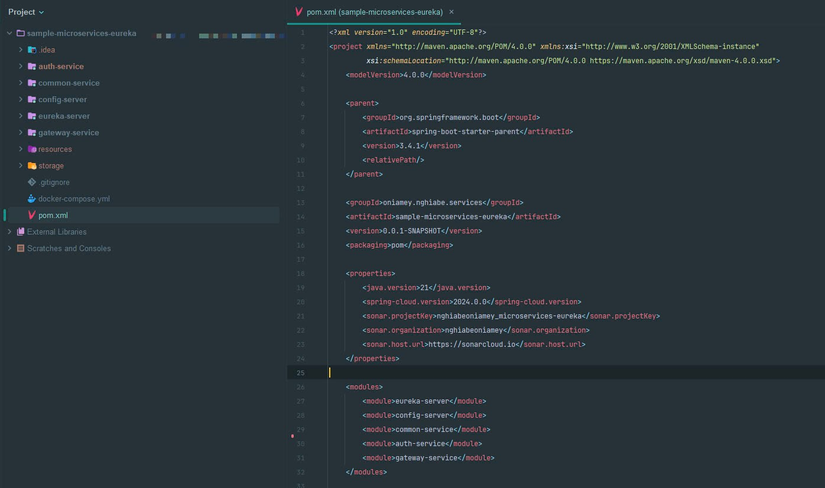
Tạo 1 folder thường có tên Sample Microservices-Eureka
Mở folder Sample Microservices-Eureka bằng intellij idea và tạo file pom.xml với nội dụng
Lưu ý ở bài này mình dùng JDK-21 nhé
<?xml version="1.0" encoding="UTF-8"?>
<project xmlns="http://maven.apache.org/POM/4.0.0" xmlns:xsi="http://www.w3.org/2001/XMLSchema-instance"
         xsi:schemaLocation="http://maven.apache.org/POM/4.0.0 https://maven.apache.org/xsd/maven-4.0.0.xsd">
    <modelVersion>4.0.0</modelVersion>

    <parent>
        <groupId>org.springframework.boot</groupId>
        <artifactId>spring-boot-starter-parent</artifactId>
        <version>3.4.1</version>
        <relativePath/>
    </parent>

    <groupId>oniamey.nghiabe.services</groupId>
    <artifactId>sample-microservices-eureka</artifactId>
    <version>0.0.1-SNAPSHOT</version>
    <packaging>pom</packaging>

    <properties>
        <java.version>21</java.version>
        <spring-cloud.version>2024.0.0</spring-cloud.version>
        <sonar.projectKey>nghiabeoniamey_microservices-eureka</sonar.projectKey>
        <sonar.organization>nghiabeoniamey</sonar.organization>
        <sonar.host.url>https://sonarcloud.io</sonar.host.url>
    </properties>

    <modules>
<!--        <module>eureka-server</module>-->
<!--        <module>config-server</module>-->
<!--        <module>common-service</module>-->
<!--        <module>auth-service</module>-->
<!--        <module>gateway-service</module>-->
    </modules>

    <dependencyManagement>
        <dependencies>
            <dependency>
                <groupId>org.springframework.cloud</groupId>
                <artifactId>spring-cloud-dependencies</artifactId>
                <version>${spring-cloud.version}</version>
                <type>pom</type>
                <scope>import</scope>
            </dependency>
        </dependencies>
    </dependencyManagement>

    <build>
        <plugins>
            <plugin>
                <groupId>org.springframework.boot</groupId>
                <artifactId>spring-boot-maven-plugin</artifactId>
            </plugin>
            <plugin>
                <groupId>org.cyclonedx</groupId>
                <artifactId>cyclonedx-maven-plugin</artifactId>
            </plugin>
        </plugins>
    </build>

</project>
Các bạn nào mới học giống mình chú ý phần modules dùng đến cáo nào thì bỏ comment ra nhé!
<modules>
<!--        <module>eureka-server</module>-->
<!--        <module>config-server</module>-->
<!--        <module>common-service</module>-->
<!--        <module>auth-service</module>-->
<!--        <module>gateway-service</module>-->
</modules>
Khi tạo mới 1 module click chuột phải vào folder Sample Microservices-Eureka chọn tạo mới 1 module

Module _ Config Server - Eureka Server _
Config Server
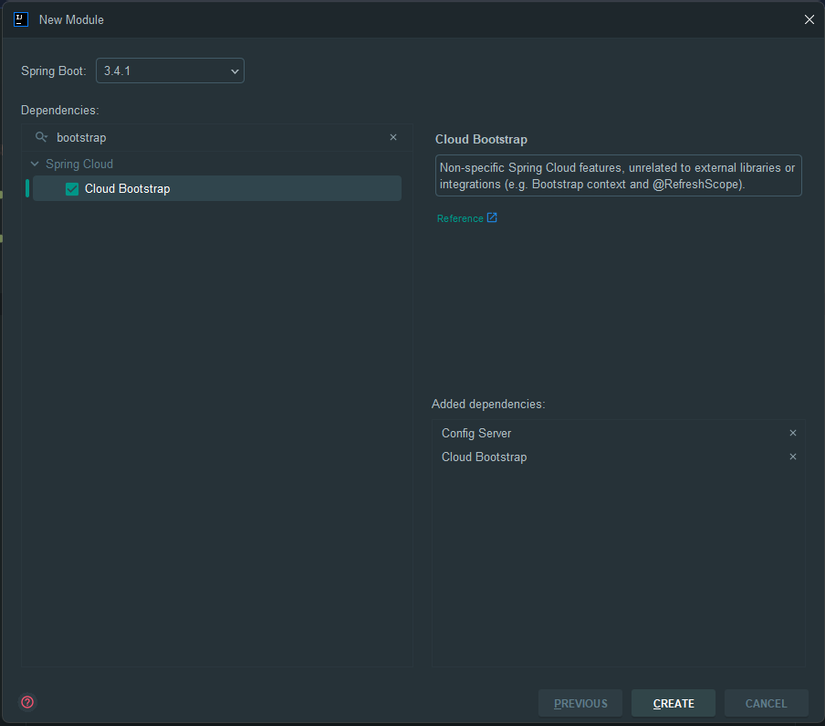
Tạo 1 module Spring Boot tên là Config Server với các dependences
spring-cloud-config-server
spring-cloud-starter-bootstrap
spring-dotenv : Cái này để thêm biến khi build rất tiện nha
Dependencies
<dependency>
    <groupId>org.springframework.cloud</groupId>
    <artifactId>spring-cloud-config-server</artifactId>
</dependency>
<dependency>
    <groupId>org.springframework.cloud</groupId>
    <artifactId>spring-cloud-starter-bootstrap</artifactId>
</dependency>
<dependency>
    <groupId>me.paulschwarz</groupId>
    <artifactId>spring-dotenv</artifactId>
    <version>4.0.0</version>
</dependency>
Lưu ý mục quan trọng spring cloud config server Có 2 cách để lấy các file config
Cách 1 là đẩy lên repo git những file config application.yml của các module
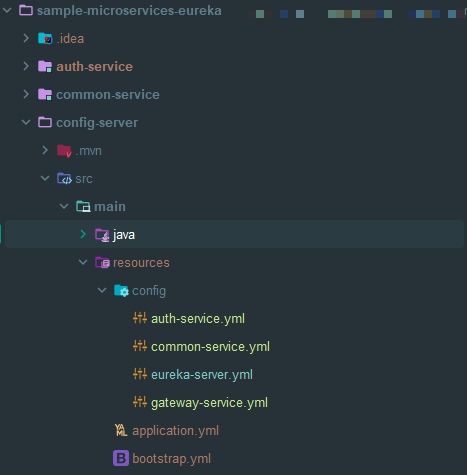
Cách 2 là tạo 1 folder config trong resrouces (Mình sẽ hướng dẫn cách 2 nha)
Ảnh Minh Họa Các Bạn Xem Cấu Trúc Nhé
Sau khi tạo xong cấu hình application.yml
server:
  port: 8088

spring:
  profiles:
    active: native
  output:
    ansi:
      enabled: always
  cloud:
    config:
      server:
#        git:
#          uri: https://github.com/nghiabeoniamey/microservices-config-server
        native:
          search-locations: classpath:/config
        encrypt:
          enabled: false
        bootstrap: true
      allow-override: true
logging:
  level:
    root: info
    com.banking: debug
  pattern:
    console: "%clr(%d{yyyy-MM-dd HH:mm:ss}){blue} %clr(${LOG_LEVEL_PATTERN:-%5p}) %m%n"
bootstrap.yml
spring:
  application:
    name: config-server
Cấu hình ServerApplication Thêm @EnableConfigServer
package oniamey.nghiabe.configserver;

import org.springframework.boot.SpringApplication;
import org.springframework.boot.autoconfigure.SpringBootApplication;
import org.springframework.cloud.config.server.EnableConfigServer;

@SpringBootApplication
@EnableConfigServer
public class ConfigServerApplication {

    public static void main(String[] args) {
        SpringApplication.run(ConfigServerApplication.class, args);
    }

}
Tạo mục config như trên ảnh minh họa phía trên Link đến mục
Nội dung eureka-server.yml
Các mục quan trọng là port - serviceUrl.defaultZone
server:
  port: 8061

eureka:
  server:
    renewal-percent-threshold: 0.5
    enable-self-preservation: true
    eviction-interval-timer-in-ms: 1000
  renewalPercentThreshold: 0.85
  instance:
    hostname: localhost
  client:
    registerWithEureka: false
    fetchRegistry: false
    serviceUrl:
      defaultZone: http://${eureka.instance.hostname}:${server.port}/eureka/

logging:
  pattern:
    console: "%clr(%d{yyyy-MM-dd HH:mm:ss}){blue} %clr(${LOG_LEVEL_PATTERN:-%5p}) %m%n"

spring:
  output:
    ansi:
      enabled: always

management:
  tracing:
    sampling:
      probability: 1.0
Đến đây thì tiến hành chạy config-server

Eureka Server
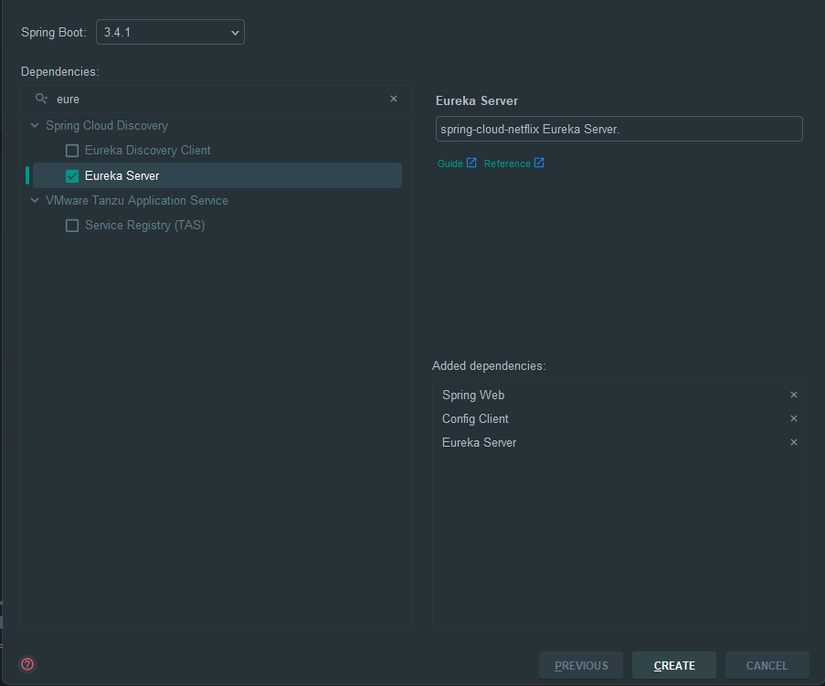
Tạo 1 module Spring Boot tên là Eureka-Server Hoặc bên ngoài họ đặt là Discovery-Service với các dependences
spring-cloud-starter-netflix-eureka-server
spring-cloud-starter-config
spring-boot-starter-web Phần starter-web này mình lúc mới tạo bị lỗi không chạy được server lên không rõ sao mất cả buổi chiều đấy !!!
Dependencies
<dependency>
    <groupId>org.springframework.boot</groupId>
    <artifactId>spring-boot-starter-web</artifactId>
</dependency>
<dependency>
    <groupId>org.springframework.cloud</groupId>
    <artifactId>spring-cloud-starter-netflix-eureka-server</artifactId>
</dependency>
<dependency>
    <groupId>org.springframework.cloud</groupId>
    <artifactId>spring-cloud-starter-config</artifactId>
</dependency>
application.yml
Lưu ý: Mục application.name: eureka-server khá quan trọng vì sẽ lấy file eureka-server tương ứng trong file config của config-server
spring:
  application:
    name: eureka-server
  config:
    import: "optional:configserver:http://localhost:8088"
ServerApplication
Thêm @EnableEurekaServer
package oniamey.nghiabe.eurekaserver;

import org.springframework.boot.SpringApplication;
import org.springframework.boot.autoconfigure.SpringBootApplication;
import org.springframework.cloud.netflix.eureka.server.EnableEurekaServer;

@SpringBootApplication
@EnableEurekaServer
public class EurekaServerApplication {

    public static void main(String[] args) {
        SpringApplication.run(EurekaServerApplication.class, args);
    }

}
Đến đây thì tiến hành chạy eureka-server
Lưu ý: Phải chạy config-server trước để config-server (Mỗi lần update file yml ở config chạy lại config-server trước rồi chạy các module để lấy cấu hình của eureka-server.yml ở file config)

Nếu bạn chạy được đến đây thì eureka đã lấy được file config từ config server rồi nha! Hẹn gặp các bạn ở bài viết sau
All rights reserved