Messenger using websocket-protobuf
Bài đăng này đã không được cập nhật trong 4 năm
Google Protocol Buffer
1. What are “Protocol Buffers”?
Protocol buffers are a flexible, efficient, automated mechanism for serializing structured data – think XML, but smaller, faster, and simpler. You define how you want your data to be structured once, then you can use special generated source code to easily write and read your structured data to and from a variety of data streams and using a variety of languages. You can even update your data structure without breaking deployed programs that are compiled against the "old" format.
2. Why “Protocol Buffer”?
Protocol buffers have many advantages over XML for serializing structured data. Protocol buffers:
- are simpler
- are 3 to 10 times smaller
- are 20 to 100 times faster
- are less ambiguous
- generate data access classes that are easier to use programmatically
For example, let's say you want to model a person with a name and an email. In XML, you need to do:
<person>
<name>John Doe</name>
<email>jdoe@example.com</email>
</person>
When this message is encoded to the protocol buffer binary format it would probably be 28 bytes long and take around 100-200 nanoseconds to parse. The XML version is at least 69 bytes if you remove whitespace, and would take around 5,000-10,000 nanoseconds to parse.
3. Maked .proto file
- Define a message type
message RequestMessage
{
required string content = 1;
required string perReceipt = 2;
option string perSend = 3;
}
- Assigning tags
Each field in the message definition has a unique numbered tag. These tags are used to identify your fields in the message binary format
- Specifying fields rules
You specify that message fields are one of the following:
- required: a well-formed message must have exactly one of this field.
- optional: a well-formed message can have zero or one of this field (but not more than one).
- repeated: this field can be repeated any number of times (including zero) in a well-formed message. The order of the repeated values will be preserved.
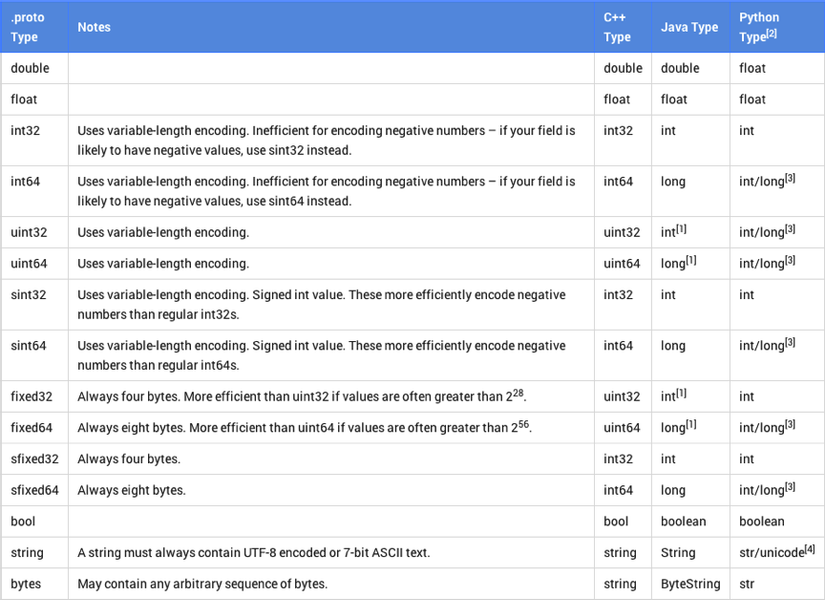
- Value types

- Option fields and default value
optional int32 result_per_page = 3 [default = 10];
- Enumeration
enum MessageType
{
    MESSAGE_REQUEST = 1;
    MESSAGE_REPONSE = 2;
    MESSAGE_USES = 3;
}
- Related Messages
Using as field type, when you want to include other message type to your message:
message SearchResponse {
repeated Result result = 1;
}
and
message Result {
required string url = 1;
optional string title = 2;
repeated string snippets = 3;
}
- Importing definitions
import "myproject/other_protos.proto";
- Extensions
Extensions let you declare that a range of field numbers in a message are available for third-party extensions. Other people can declare new fields for your message type with those numeric tags in their own .proto files without having to edit the original file. Example:
message Foo {
// ...
extensions 100 to 199;
}
This says that the range of field numbers [100, 199] in Foo is reserved for extensions. Other users can now add new fields to Foo in their own .proto files that import your .proto, using tags within your specified range – for example:
extend Foo {
optional int32 bar = 126;
}
- Genarating Classes in Obj-C
protoc --proto_path=IMPORT_PATH --cpp_out=DST_DIR --java_out=DST_DIR --python_out=DST_DIR path/to/file.proto
- IMPORT_PATH specifies a directory in which to look for .proto files when resolving import directives. If omitted, the current directory is used. Multiple import directories can be specified by passing the --proto_path option multiple times; they will be searched in order. -I=IMPORT_PATH can be used as a short form of --proto_path.
- You can provide one or more output directives:
- --cpp_out generates C++ code in DST_DIR. See the C++ generated code reference for more.
- --java_out generates Java code in DST_DIR. See the Java generated code reference for more.
- --python_out generates Python code in DST_DIR. See the Python generated code reference for more.
-
As an extra convenience, if the DST_DIR ends in .zip or .jar, the compiler will write the output to a single ZIP-format archive file with the given name. .jar outputs will also be given a manifest file as required by the Java JAR specification. Note that if the output archive already exists, it will be overwritten; the compiler is not smart enough to add files to an existing archive.
-
You must provide one or more .proto files as input. Multiple .proto files can be specified at once. Although the files are named relative to the current directory, each file must reside in one of the IMPORT_PATHs so that the compiler can determine its canonical name.
Instaling and using Google Protocol Buffer
1. Download Compiler for ObjC
Down load Compiler from link:
https://github.com/mingchen/protobuf-ios
Note: We can download any version of compiler GG ProtoBuf but we have to check the supporting language, which has to include Obj-C language. (Some versions of compiler not support).
2. Make compiler and install
- cd to folder, holding downloaded Compiler source.
- cd compiler
- ./autogen.sh
- ./configure
- make
- make install
Note: We need “autoconf” to compile .proto files. So we can install autoconf
- brew install autoconf If brew command not found, run:
- ruby -e "$(curl -fsSL https://raw.githubusercontent.com/Homebrew/install/master/install)”
If there is an error : “aclocal: not such file or directory”, run:
- brew install automake If there if an error like this : “undefined macro: AC_PROG_LIBTOOL”, run command to install libtool:
- brew install libtool
3. Create .proto files
Use editor for creating .proto files with content like this: Example file MessageRequest.proto :
message RequestMessage
{

required string content = 1;
required PersionReceipt perReceipt = 2;
required PersionSend perSend = 3;

message PersionReceipt {

    required int32 userID = 1;
    required string userName = 2;
    required bytes userAvatar = 3;
}

message PersionSend {

    required int32 userID = 1;
    required string userName = 2;
    required bytes userAvatar = 3;

}

}
To make clear what is the content of .proto file please read in file “Google Protocol Buffer”
4. Compile file .h and .m for obj-C
Run:
- ./src/protoc --objc_out=. MessageRequest.proto
After compiling, we will receive 2 files:
- MessageRequest.h
- MessageRequest.m
Note: if there is an error: “—obj_out: not define”, plz redownload right version of compiler, which support Obj-C.
5. Using ProtoBuf in Xcode
-
Add all files that you have just compiled to project.
-
Add ProtoBuf project for Xcode from dowloaded compiler: /runtime/protobuf-ios/ to project. ** Note: add non-arc compiler flag for protobuf project files : -fno-objc-arc
-
Add file config.h to project ( Generated from config.h.in by configure)
-
Build “protobuf-ios.xcodeproj” (add lib: libprotobuf-lite.a after building if needed).
-
Now we can use classes, which generated by protobuf compler like this:
-
To create message:
-
RequestMessage_PersionReceipt *perReceipt = [[[[[RequestMessage_PersionReceipt builder] setUserId:2] setUserName:@"User 2"] setUserAvatar:data] build];
-
RequestMessage_PersionSend *perSend = [[[[[RequestMessage_PersionSend builder] setUserId:1] setUserName:@"User 1"] setUserAvatar:data] build];
-
RequestMessage *messageSend = [[[[[RequestMessage builder] setContent:text] setPerReceipt:perReceipt] setPerSend:perSend] build];
-
-
To decode message:
- GeneralMessage *genMessage = [GeneralMessage parseFromData:responseObject];
-
Demo app using websocket - protobuf
1. Open Xcode Project
- Download demo source: https://github.com/TequilarTomsk/DemoProtobuf
- Open Demo_Chat/iOSClient/ConnectSecket/ConnectSocket.xcodeproj
- Build on simulator
2. Run web client
- Open Demo_Chat/WebClient/index.html
3. Create local sever
- Download node js pre-built installer at link: http://nodejs.org/download/
- cd Demo_Chat/websocket_server
- run: node server_chat.js
4. Change your IP address in file “Global.h”
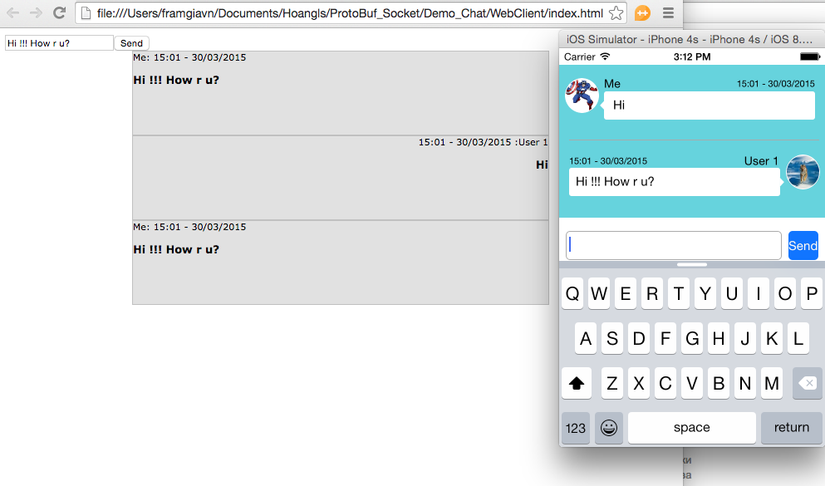
5. Start chatting between ios-client and web-client

All rights reserved