Material UI in ReactJs - Xây dựng giao diện dễ dàng hơn
Bài đăng này đã không được cập nhật trong 4 năm
Như tiêu đề, mà cũng không cần phải giới thiệu đâu nhỉ. Bộ giao diện MaterialUI chắc hẳn không còn xa lạ gì đối với lập trình viên FrontEnd hay kể cả trên mobile nữa rồi. Ngày hôm nay mình sẽ đi vào một số những tính năng cơ bản trong bộ giao diện này khi kết hợp cùng với Reactjs. Với gần 70 nghìn stars trên github, chắc chắn độ thông dụng của nó là điều không thể phủ nhận. Chúng ta cùng bắt đầu thôi nhé.

1. Cài đặt
Mình đã có một project Reactjs cài đặt từ trước với create-react-app. Với material-ui chúng ta sẽ cài đặt như mọi package khác thông qua npm hoặc yarn. Ở đây mình dùng npm luôn cho thông dụng nhé:
$ npm install @material-ui/core
với yarn chúng ta dùng:
yarn add @material-ui/core
Phiên bản mới nhất (ngày 16/07/2021) đang là v4.12.1 và yêu cầu tối thiểu react >= 16.8.0, react-dom >= 16.8.0 nhé.
Chỉ cần câu lệnh đơn giản như trên là chúng ta có thể sử dụng material-ui trong project Reactjs của mình rồi. Bây giờ chúng ta thử dùng xem được chưa nhé:
import logo from './logo.svg';
import './App.css';
import Button from '@material-ui/core/Button'; ///button material

function App() {
  return (
    <div className="App">
      <header className="App-header">
        <img src={logo} className="App-logo" alt="logo" />
        <p>
          Edit <code>src/App.js</code> and save to reload.
        </p>
        <Button variant="contained" color="primary"> Learn Material-ui </Button>
      </header>
    </div>
  );
}

export default App;
 Xong phần cài đặt. Chúng ta cùng chuyển qua các Components mà material-ui đã xây dựng sẵn nhé.
2. Components:
Layout:
Layout hay gọi là cách bố trí cho một trang web. Với phần này material-ui đã xây dựng các Components rất tiện dụng cho chúng ta như : Box, Container, Grid, Hidden, Image List.
Inputs:
Inputs là những components được xây dựng để nhận dữ liệu, thao tác với form. Với các Components như: Button, Button Group, Checkbox, Floating Action Button, Date/Time, Radio, Select, Slider, Switch, Text Field, Transfer List
Navigations:
Với các Components đã tích hợp sẵn phục vụ cho mục đích Navigate hay điều hướng ứng dụng. Quá tiện lợi và không kém phần chuyên nghiệp khi chúng ta sử dụng thư viện UI này. Framework đã tích hợp sẵn các Components như: BottomNavigations, BreadCrumbs, Drawer, Link, Menu, Stepper, Tabs.
Surfaces:
Material cũng đã tạo cho chúng ta khung chứa nội dung có sẵn , chúng ta có thể sử dụng các component như: App Bar, Paper, Card, Accordition
Feedback:
Chúng ta có các Components giúp disabled chức năng tùy chỉnh trên màn hình và chờ đợi phản hồi xong components đó thì mới có thể hoạt động lại các chức năng khác. Có một số components như: Progress, Dialog, Snackbar, Backdrop. Trong đó đơn giản như component Progress chúng ta có thể tạo hiệu ứng Loading xoay tròn đợi phản hồi từ phía backend rồi mới tắt Loading đi.
Data Display
Material-UI đã hỗ trợ cho chúng ta những cách hiển thị dữ liệu cơ bản mà hầu như là có tất cả những thứ cần trên một ứng dụng với các Components: Avatar, Badge, Chip, Divider, Icons, List, Table, Tooltip, Typography (định dạng cho chữ).
Ngoài ra chúng ta còn có thể tận dụng rất nhiều components khác giúp trang web chúng ta trở nên chuyên nghiệp hơn như: Modal, Poover, Transitions... mọi người có thể vào trong trang chủ để tham khảo thêm nhé. https://material-ui.com/
3. Sử dụng đơn giản:

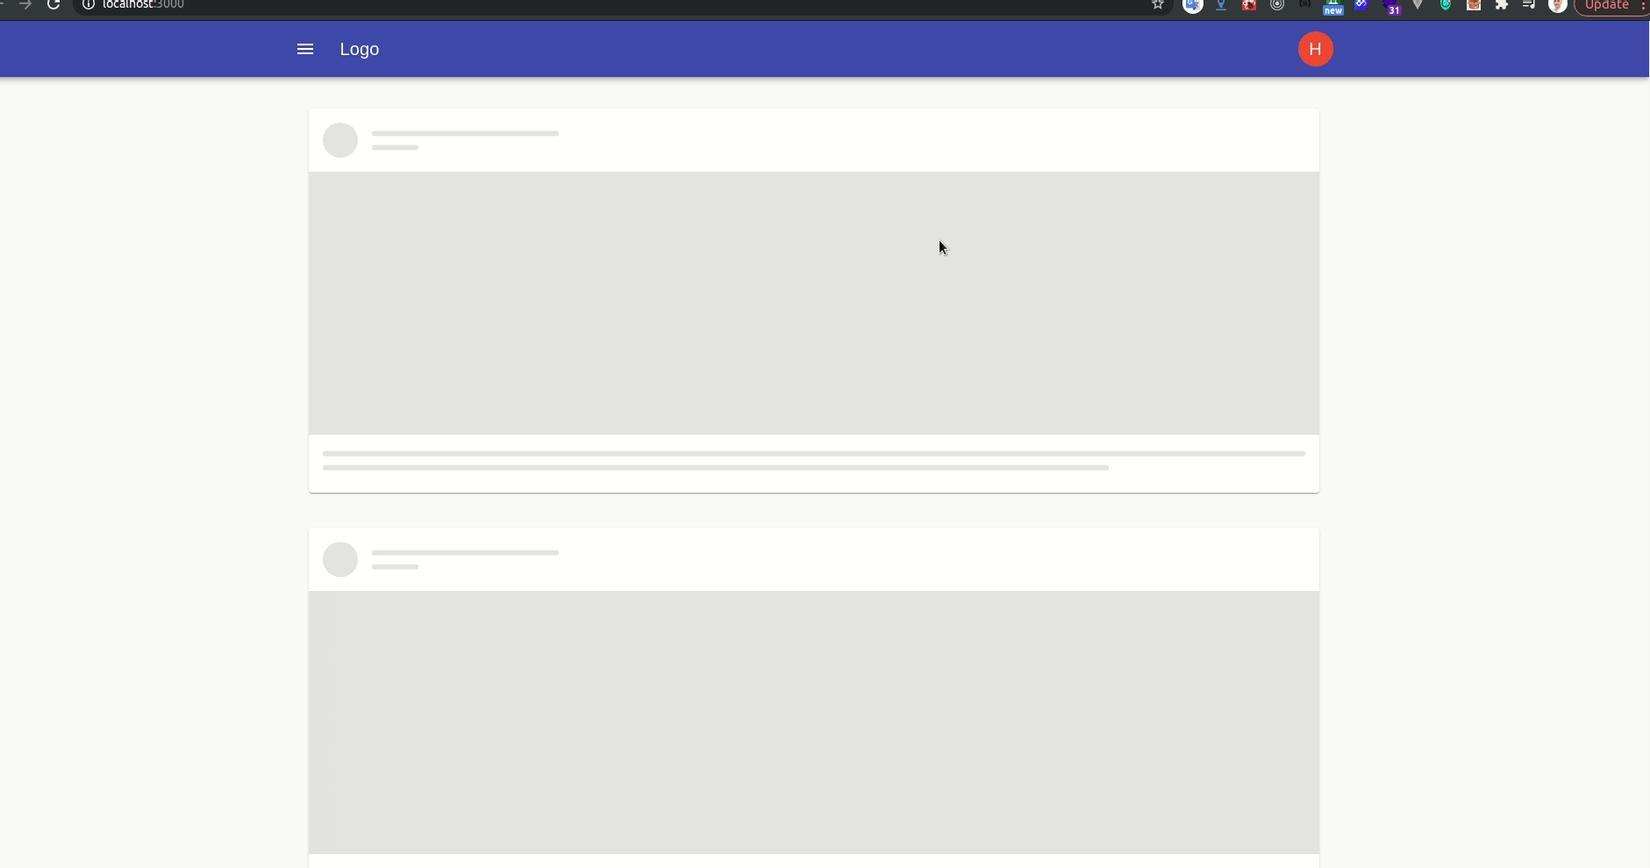
Ở đây mình đã kết hợp các component để tạo ra một layout đơn giản . Ngoài việc cài đặt material-ui/core chúng ta cần cài đặt thêm
npm install @material-ui/icons
npm install @material-ui/lab
Để sử dụng được icon và một số Component phụ của Material UI
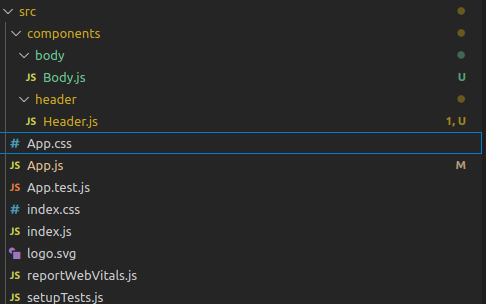
Quay lại Project chúng ta tạo thêm một folder components chứa body và header, cấu trúc sẽ như sau :

Mình tạo nhanh vì vậy cấu trúc folder không chuẩn mọi người có thể tạo theo cách riêng mình.
import React from 'react';

import { makeStyles } from '@material-ui/core/styles';
import IconButton from '@material-ui/core/IconButton';
import MenuIcon from '@material-ui/icons/Menu';
import { deepOrange, deepPurple } from '@material-ui/core/colors';
import NotificationsNoneIcon from '@material-ui/icons/NotificationsNone';

import {
  AppBar,
  Toolbar,
  Button,
  Popover,
  Avatar,
  Typography,
  Container
} from '@material-ui/core';

const useStyles = makeStyles((theme) => ({
  root: {
    flexGrow: 1,
    backgroundColor:'white',
  },
  menuButton: {
    marginRight: theme.spacing(2),
  },
  title: {
    flexGrow: 1,
  },
  orange: {
    color: theme.palette.getContrastText(deepOrange[500]),
    backgroundColor: deepOrange[500],
    cursor: 'pointer'
  },
  typography: {
    padding: theme.spacing(2),
  },
}));
const Header = () => {

  const classes = useStyles();
  const [anchorEl, setAnchorEl] = React.useState(null);

  const handleClick = (event) => {
    setAnchorEl(event.currentTarget);
  };

  const handleClose = () => {
    setAnchorEl(null);
  };

  const open = Boolean(anchorEl);
  const id = open ? 'simple-popover' : undefined;

  return (
    <div className={classes.root}>
      <AppBar position="fixed">
        <Container maxWidth="lg">
          <Toolbar>
              <IconButton edge="start" className={classes.menuButton} color="inherit" aria-label="menu">
                <MenuIcon />
              </IconButton>
              <Typography variant="h6" className={classes.title}>
                Logo
              </Typography>
              <Avatar className={classes.orange} aria-describedby={id} onClick={handleClick}>H</Avatar>
          </Toolbar>
          <Popover
            id={id}
            open={open}
            anchorEl={anchorEl}
            onClose={handleClose}
            anchorOrigin={{
              vertical: 'bottom',
              horizontal: 'center',
            }}
            transformOrigin={{
              vertical: 'top',
              horizontal: 'right',
            }}
          >
            <Typography className={classes.typography}>The content of the Popover.</Typography>
          </Popover>
        </Container>
      </AppBar>
    </div>
  );
};

export default Header;
import React from 'react';
import CssBaseline from '@material-ui/core/CssBaseline';
import Typography from '@material-ui/core/Typography';
import Container from '@material-ui/core/Container';
import Skeleton from '@material-ui/lab/Skeleton';
import { makeStyles } from '@material-ui/core/styles';

import {
  Card,
  CardHeader,
  Avatar,
  CardMedia,
  CardContent,
} from '@material-ui/core'

const useStyles = makeStyles((theme) => ({
  card: {
    maxWidth: '100%',
    margin: theme.spacing(5),
  },
  media: {
    height: 300,
  },
}));

const Body = () => {
  const classes = useStyles();

  return (
    <>
      <CssBaseline />
      <Container maxWidth="lg">
        <Typography component="div" style={{ height: 'max-content', marginTop: '100px' }}>
          {
            [1, 2, 3].map(() => <Card className={classes.card}>
            <CardHeader
              avatar={<Skeleton animation="wave" variant="circle" width={40} height={40} />}
              title={<Skeleton animation="wave" height={10} width="20%" style={{ marginBottom: 6 }} />}
              subheader={<Skeleton animation="wave" height={10} width="5%" />}
            />
              <Skeleton animation="wave" variant="rect" className={classes.media} />
            <CardContent>
                <React.Fragment>
                  <Skeleton animation="wave" height={10} style={{ marginBottom: 6 }} />
                  <Skeleton animation="wave" height={10} width="80%" />
                </React.Fragment>
            </CardContent>
            </Card>)
          }
        </Typography>
      </Container>
    </>
  );
};

export default Body;
import logo from './logo.svg';
import Header from './components/header/Header'
import Body from './components/body/Body'


function App() {
  return (
    <div style={{ display: 'block'}}>
      <Header />
      <Body />
    </div>
  );
}

export default App;
4. Kết luận:
Qua bài viết này mình chỉ giới thiệu qua về Material-ui cũng như thực hiện một giao diện rất đơn giản giúp làm quen với thư viện này. Nếu thấy hay hoặc muốn tìm hiểu thêm về phần nào của thư viện này mọi người hãy để lại comments để mình viết tiếp về thư viện này. Hoặc cũng có thể lên trang chủ của https://material-ui.com/ để tìm hiểu thêm về nó nhé. Cảm ơn mọi người đã theo dõi bài viết. Hẹn gặp lại vào những bài viết sau.
All rights reserved