Magento grid admin với custom column
Bài đăng này đã không được cập nhật trong 4 năm
Mình sẽ tạo 1 trang list trong Admin của Magento. Trang này sẽ:
- Sử dụng layout của Grid (1 template có sẵn của magento chuyên dùng cho trang list)
- Hiển thị toàn bộ danh sách Customer giống như phần “Manage Customer”
- Thay cột edit = 1 cột mới có button để gọi ajax và thực hiện 1 hành động nào đó
- Thêm 1 cột để lọc ra các Customer đã có ít nhất 1 order có trạng thái là complete
Đầu tiên ta cần phải tạo ra trang list trước để hiển thị toàn bộ danh sách Customer. Phần này khá đơn giản, ta có thể copy lại các block của phần “Manage Customer” cho nhanh. Module mình tạo ra có tên là DT_Adminhtml với file config.xml như sau:
<?xml version="1.0"?>
<config>
    <modules>
        <DT_Adminhtml>
            <version>0.1.0</version>
        </DT_Adminhtml>
    </modules>
    <global>
        <blocks>
            <dt_adminhtml>
                <class>DT_Adminhtml_Block</class>
            </dt_adminhtml>
        </blocks>
    </global>
    <admin>
        <routers>
            <adminhtml>
                <args>
                    <modules>
                        <dt_adminhtml before="Mage_Adminhtml">DT_Adminhtml</dt_adminhtml>
                    </modules>
                </args>
            </adminhtml>
        </routers>
    </admin>
</config>
file adminhtml.xml(Để hiển thị đường dẫn trên menu của Customer) như sau:
<?xml version="1.0"?>
<config>
    <menu>
        <customer translate="title" module="customer">
            <children>
                <dt_test translate="title" module="customer">
                    <title>DT - Manage Customers</title>
                    <action>adminhtml/customer_test/</action>
                    <sort_order>0</sort_order>
                </dt_test>
            </children>
         </customer>
    </menu>
    <acl>
        <resources>
            <admin>
                <children>
                    <customer translate="title" module="customer">
                        <children>
                            <dt_test translate="title">
                                <title>DT - Manage Customers</title>
                                <sort_order>10</sort_order>
                            </dt_test>
                        </children>
                    </customer>
                </children>
            </admin>
        </resources>
    </acl>
</config>
Lưu ý: Vì mình đã khai báo override controller của Mage_Adminhtml trong file config.xml nên mọi controller trong folder controllers của mình giờ sẽ chạy với front_name là của module Adminhtml nên đường dẫn để chạy controller mà mình sẽ tạo là: adminhtml/customer_test/
Xóa cache đi rồi vào lại Admin, ta sẽ thấy hiện ra trên menu:
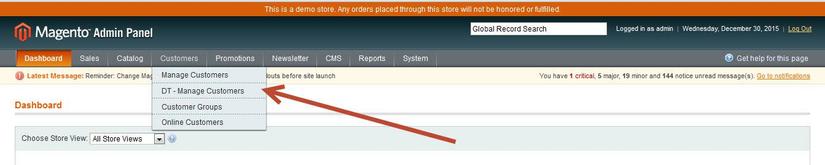
Tiếp theo ta cần tạo controller để hiển thị trang list. Mình đặt controller của mình với tên và đường dẫn như sau để tương ứng với đường dẫn đã khai báo trong file adminhtml.xml: app\code\local\DT\Adminhtml\controllers\Customer\TestController.php
<?php

class DT_Adminhtml_Customer_TestController extends Mage_Adminhtml_Controller_Action
{
    public function indexAction()
    {
        $this->_title($this->__('Customer Test'));
        $this->loadLayout();
        $this->_setActiveMenu('customer/customer');
        $this->_addContent($this->getLayout()->createBlock('dt_adminhtml/customer_test'));
        $this->renderLayout();
    }

    public function gridAction()
    {
        $this->loadLayout();
        $this->getResponse()->setBody(
            $this->getLayout()->createBlock('dt_adminhtml/customer_test_grid')->toHtml()
        );
    }
}
Hàm indexAction là hàm sẽ hiển thị ra trang list của chúng ta khi click vào link trên menu. Còn hàm gridAction sẽ được thực thi khi chúng ta sử dụng filter, search trên layout của grid (sử dụng ajax)
$this->_addContent($this->getLayout()->createBlock('dt_adminhtml/customer_test'));
Trong hàm addContent này ta sẽ khởi tạo block container DT_Adminhtml_Block_Customer_Test extend từ block Mage_Adminhtml_Block_Widget_Grid_Container: class DT_Adminhtml_Block_Customer_Test extends Mage_Adminhtml_Block_Widget_Grid_Container
{
    public function __construct()
    {
        $this->_blockGroup = 'dt_adminhtml'; // Tên của block group của module hiện tại
        $this->_controller = 'customer_test'; // cái này sẽ dùng làm đường dẫn để gọi ra block con DT_Adminhtml_Block_Customer_Test_Grid nên ko thể đặt tên tùy tiện được
        $this->_headerText = Mage::helper('dt_adminhtml')->__('List Customer');

        parent::__construct();
        $this->_removeButton('add'); // Bỏ nút add của template Grid đi
    }
}
Từ block container này sẽ kế thừa block Mage_Adminhtml_Block_Widget_Grid_Container nên nó sẽ tự động gọi block grid dựa trên _blockGroup và _controller được khai báo trong block container. Vậy nên tiếp theo chúng ta sẽ tạo block grid: DT_Adminhtml_Block_Customer_Test_Grid
class DT_Adminhtml_Block_Customer_Test_Grid extends Mage_Adminhtml_Block_Widget_Grid
{
    public function __construct()
    {
        parent::__construct();
        $this->setId('dtTestGrid');
        $this->setDefaultSort('entity_id');
        $this->setSaveParametersInSession(true);
        $this->setUseAjax(true);
        $this->setTemplate('dt_adminhtml/customer_grid.phtml');
    }

    protected function _prepareCollection()
    {
        $collection = Mage::getResourceModel('customer/customer_collection')
            ->addNameToSelect()
            ->addAttributeToSelect('email')
            ->addAttributeToSelect('created_at')
            ->addAttributeToSelect('group_id')
            ->joinAttribute('billing_postcode', 'customer_address/postcode', 'default_billing', null, 'left')
            ->joinAttribute('billing_city', 'customer_address/city', 'default_billing', null, 'left')
            ->joinAttribute('billing_telephone', 'customer_address/telephone', 'default_billing', null, 'left')
            ->joinAttribute('billing_region', 'customer_address/region', 'default_billing', null, 'left')
            ->joinAttribute('billing_country_id', 'customer_address/country_id', 'default_billing', null, 'left');

        $this->setCollection($collection);

        return parent::_prepareCollection();
    }

    protected function _prepareColumns()
    {
        $this->addColumn('entity_id', array(
            'header'    => Mage::helper('customer')->__('ID'),
            'width'     => '50px',
            'index'     => 'entity_id',
            'type'  => 'number',
        ));
        $this->addColumn('name', array(
            'header'    => Mage::helper('customer')->__('Name'),
            'index'     => 'name'
        ));
        $this->addColumn('email', array(
            'header'    => Mage::helper('customer')->__('Email'),
            'width'     => '150',
            'index'     => 'email'
        ));

        $groups = Mage::getResourceModel('customer/group_collection')
            ->addFieldToFilter('customer_group_id', array('gt'=> 0))
            ->load()
            ->toOptionHash();

        $this->addColumn('group', array(
            'header'    =>  Mage::helper('customer')->__('Group'),
            'width'     =>  '100',
            'index'     =>  'group_id',
            'type'      =>  'options',
            'options'   =>  $groups,
        ));

        $this->addColumn('Telephone', array(
            'header'    => Mage::helper('customer')->__('Telephone'),
            'width'     => '100',
            'index'     => 'billing_telephone'
        ));

        $this->addColumn('billing_postcode', array(
            'header'    => Mage::helper('customer')->__('ZIP'),
            'width'     => '90',
            'index'     => 'billing_postcode',
        ));

        $this->addColumn('billing_country_id', array(
            'header'    => Mage::helper('customer')->__('Country'),
            'width'     => '100',
            'type'      => 'country',
            'index'     => 'billing_country_id',
        ));

        $this->addColumn('billing_region', array(
            'header'    => Mage::helper('customer')->__('State/Province'),
            'width'     => '100',
            'index'     => 'billing_region',
        ));

        $this->addColumn('customer_since', array(
            'header'    => Mage::helper('customer')->__('Customer Since'),
            'type'      => 'datetime',
            'align'     => 'center',
            'index'     => 'created_at',
            'gmtoffset' => true
        ));

        if (!Mage::app()->isSingleStoreMode()) {
            $this->addColumn('website_id', array(
                'header'    => Mage::helper('customer')->__('Website'),
                'align'     => 'center',
                'width'     => '80px',
                'type'      => 'options',
                'options'   => Mage::getSingleton('adminhtml/system_store')->getWebsiteOptionHash(true),
                'index'     => 'website_id',
            ));
        }

        return parent::_prepareColumns();
    }

    public function getGridUrl()
    {
        return $this->getUrl('*/*/grid', array('_current'=>true));
    }
}
Giải thích 1 chút: Block grid này kế thừa block grid của Magento và nó sửa template mặc định của grid, nhưng mình sẽ sử dụng template của mình để thêm vào đó 1 số đoạn javascript.
$this->setTemplate('dt_adminhtml/customer_grid.phtml');
Vậy nên chúng ta sẽ tạo ra file app\design\adminhtml\default\default\template\dt_adminhtml\customer_grid.phtml giống hệt với file app\design\adminhtml\default\default\template\widget\grid.phtml
Hàm __prepareCollection() _là hàm khởi tạo collection và lấy ra danh sách customer. Nó sẽ được sử dụng trong template của grid.
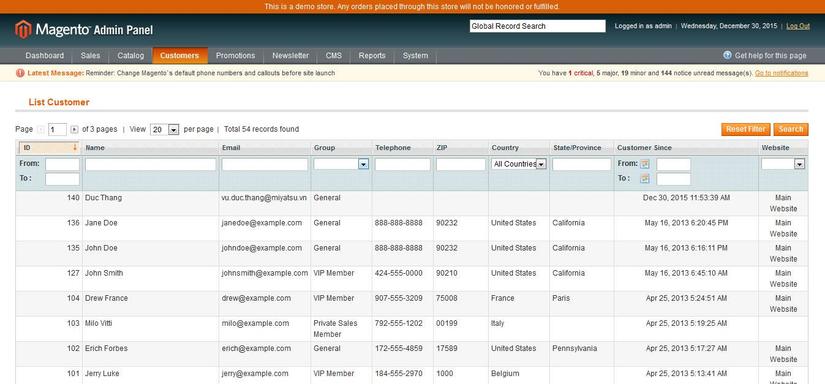
Hàm _prepareColumns() chính là hàm để tạo ra các column trên trang grid. Trang list mà mình tạo ra giống với trang list của “Manage Customers” nhưng có bỏ đi 2 cột: cột check box và côt action.
Click vào link trên menu và xem thử trang list của chúng ta nào:
Vậy là đã có trang list, giờ mình sẽ thêm 1 cột mới vào cho trang list này thông qua hàm __prepareColumns()_. Bạn hãy xem qua hàm addColumn của grid nhé:
$this->addColumn('entity_id', array(
	'header'    => Mage::helper('customer')->__('ID'),
	'width'     => '50px',
	'index'     => 'entity_id',
	'type'  => 'number'
));
‘entity_id’ đầu tiên là tên của column
‘header’ Là tên hiển thị của column
‘width’ Là chiều rộng của column
‘index’ Là key để sử dụng cho việc filter, search. Key này ko đặt bừa bãi được. Grid của magento sẽ sử dụng key này để đưa vào câu query như là tên 1 cột (khi lấy ra danh sách customer trong hàm _prepareCollection()). Hoặc trong 1 số column đặc biệt hoặc column mới do chúng ta tạo ra, ta sẽ sử dụng key này để sửa lại collection của grid và hiển thị ra dữ liệu theo ý muốn.
‘type’ Phần này cũng vậy, type này sẽ ảnh hưởng tới cách hiển thị dữ liệu của column. Bạn có thể tham khảo 1 số loại type có sẵn mà Magento tạo ra như: text, price, currency, … trong Mage_Adminhtml_Block_Widget_Grid_Column.
Giờ chúng ta sẽ thêm 2 column mới cho trang list bằng cách sử dụng hàm addColumn() trong hàm __prepareColumn()_:
$this->addColumn('check_action', array(
	'header'    => Mage::helper('customer')->__('Check Action'),
	'id'        => 'entity_id',
	'width'     => '180',
	'renderer'  => 'DT_Adminhtml_Block_Customer_Test_Renderer_Check',
	'filter'    => false,
	'sortable'  => false,
));

$this->addColumn('loyal_customer', array(
    'header'    =>  Mage::helper('customer')->__('Loyal Customer'),
    'width'     =>  '30',
    'index'     =>  'loyal_customer',
    'type'      =>  'options',
    'options'   => array(
        '1' => Mage::helper('customer')->__('Have no complete orders'),
        '2' => Mage::helper('customer')->__('Have any complete orders')
    ),
    'sortable'  => false,
    'filter_condition_callback' => array($this, '_loyalCustomerFilter')
));
Ở column thứ nhất mình thêm field renderer vào để sử dụng block của mình thay vì các block renderer sẵn có của Magento.
Và tạo block mới DT_Adminhtml_Block_Customer_Test_Renderer_Check:
class DT_Adminhtml_Block_Customer_Test_Renderer_Check extends Mage_Adminhtml_Block_Widget_Grid_Column_Renderer_Abstract
{

    public function render(Varien_Object $row)
    {
        $id =  $row->getId();
        $html = '
        <input style="width: 90px;" type="text" class="input-text " value="" name="check_input_' . $id . '" id="check_input_' . $id . '">
        <a href="javascript:void(0)" style="text-decoration: none;" class="form-button" onclick="checkName(\'check_input_' . $id . '\', \'' . $row->getName() . '\')">Check</a>
        ';

        return $html;
    }
}
Block này sẽ được gọi trong block grid của magento với 1 số hàm quy định trước nên ta cần extend block Mage_Adminhtml_Block_Widget_Grid_Column_Renderer_Abstract và sửa lại hàm render() để trả về html mà mình mong muốn cho column mới. Trong hàm render() trên mình trả về html là 1 input và 1 thẻ a với 1 sự kiện onclick.
Trong block thứ 2 mình muốn header của nó hiện kiểu dropdown giống column country nên phải để type là ‘options’ và truyền option cho dropdown đó thông qua field options. Còn field ‘filter_condition_callback’ chứa tên hàm sẽ được gọi khi ta sử dụng filter, search của cột này trên trang grid. Cột loyal_customer này có 2 option, 1 là lọc ra các customer mà có bất cứ order nào có status là complete và 2 là lọc ra các customer chưa có order nào có status là complete. Vậy nên ta có hàm ‘filter_condition_callback‘ như sau:
protected function _loyalCustomerFilter($collection, $column)
    {
        $filterValue = $column->getFilter()->getValue();

        // Get the resource model
        $resource = Mage::getSingleton('core/resource');
        // Retrieve the read connection
        $readConnection = $resource->getConnection('core_read');
        $orderTableName = Mage::getSingleton('core/resource')->getTableName('sales/order');
        $where = $readConnection->quoteInto('customer_id IS NOT NULL AND status = \'complete\'');
        $query = $readConnection->select()->from($orderTableName,array('customer_id'))->where($where)->group('customer_id');
        $customerIds = $readConnection->fetchAll($query);

        switch ($filterValue) {
            case '1':   // Have no complete orders
                $collection->addFieldToFilter('entity_id', array('nin' => $customerIds));
                break;
            case '2':   // Have any complete orders
                $collection->addFieldToFilter('entity_id', array('in' => $customerIds));
                break;
            default:
                break;
        }
    }
Trong hàm này chúng ta sẽ dùng 1 query khác để lọc ra các id của customer mà có order có status là complete. Sau đó add thêm filter cho collection chính của grid bằng hàm addFieldToFilter()
F5 lại trang list ta sẽ thấy có column mới:
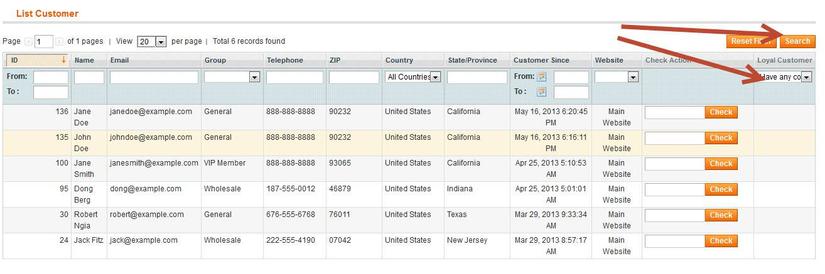
Vậy là xong cái giao diện và chức năng của cột ‘Loyal Customer’ rồi  . Bạn thử chọn option của cột ‘Loyal Customer’ và ấn nút search để xem kết quả nhé.
Giờ còn cột ‘Check Action’ nữa. Cột này mình làm 1 cái text box và 1 nút check (thật ra là thẻ a nhưng mà có gắn sự kiện onclick) để gọi ajax về server thực hiện 1 việc nào đó. Trong bài này mình sẽ làm đơn giản là mỗi lẫn click vào nút ‘Check’ thì sẽ tạo 1 request về server, gửi kèm theo nó là tên của customer ở row tương ứng. Trên server nhận được request sẽ kiểm tra tên được gửi về, nếu bắt đầu = chữ A thì sẽ trả kết quả về là true, ngược lại là false. Sau khi nhận đc kết quả trả về của server thì sẽ hiện kết quả lên text box bên cạnh.
Chức năng cần làm là như vậy, giờ chúng ta sẽ tạo function để tạo ajax trong file app\design\adminhtml\default\default\template\dt_adminhtml\customer_grid.phtml. Ta sẽ thêm vào phần script trong file này:
// AJax to check name
function checkName(textBoxId, customerName) {
	var url  =  '<?php echo Mage::getUrl("*/*/check/");?>';
	jQuery('#loading-mask').show();
	jQuery.ajax({
		url: url + '?isAjax=true',
		type: 'POST',
		dataType: 'json',
		data: {form_key: '<?php echo $this->getFormKey()?>', customer_name: customerName},
		success: function (response) {
			jQuery('#loading-mask').hide();
			if (response.result == true) {
				jQuery('#' + textBoxId).val(true);
			} else {
				jQuery('#' + textBoxId).val(false);
			}
		},
		error: function (e) {
			console.log(e);
		}
	});
}
Bạn có thể dùng ajax của Prototype cũng được, nhưng mình khoái dùng jQuery hơn nên mình sẽ khai báo thêm file layout của module này và add thêm file jquery vào block head.
Khai báo file layout trong file config.xml và ta sẽ được file config mới như sau:
<?xml version="1.0"?>
<config>
    <modules>
        <DT_Adminhtml>
            <version>0.1.0</version>
        </DT_Adminhtml>
    </modules>
    <global>
        <blocks>
            <dt_adminhtml>
                <class>DT_Adminhtml_Block</class>
            </dt_adminhtml>
        </blocks>
    </global>
    <admin>
        <routers>
            <adminhtml>
                <args>
                    <modules>
                        <dt_adminhtml before="Mage_Adminhtml">DT_Adminhtml</dt_adminhtml>
                    </modules>
                </args>
            </adminhtml>
        </routers>
    </admin>
    <adminhtml>
        <layout>
            <updates>
                <dt_adminhtml>
                    <file>dt_adminhtml.xml</file>
                </dt_adminhtml>
            </updates>
        </layout>
    </adminhtml>
</config>
Tạo file layout app\design\adminhtml\default\default\layout\dt_adminhtml.xml với nội dung:
<?xml version="1.0"?>
<layout>
    <adminhtml_customer_test_index>
        <reference name="head">
            <action method="addJs"><file>jquery/jquery-1.11.3.js</file></action>
            <action method="addJs"><file>jquery/jquery.noConflict.js</file></action>
        </reference>
    </adminhtml_customer_test_index>
</layout>
Vậy là đã có thể sử dụng jQuery trên trang list mới rồi. Quay lại hàm tạo ajax vừa nãy chút, đây là url để gọi về
echo Mage::getUrl("*/*/check/");
Mình tạo ngay trong controller của module 1 hàm checkAction() để check name, //check: tức là sẽ gọi về frontname hiện tại với controller hiện tại và action là check.
Có 1 điểm cần chú ý ở đây chính là form_key. Nếu ko có form_key thì Magento sẽ reject request này ngay, nên trong data mà chúng ta gửi về phải gửi kèm theo form_key.
Có ajax rồi ta sẽ sửa lại file controller, thêm vào đó action mới:
public function checkAction() {
	$name = $this->getRequest()->getParam('customer_name', 'Test Name');
	$jsonData = array('result' => $name[0] === 'A' ? true : false);
	$this->getResponse()->setHeader('Content-type', 'application/json');
	$this->getResponse()->setBody(Mage::helper('core')->jsonEncode($jsonData));
}
OK rồi đó, bạn hãy quay lại trang list và test thử nhé.
Note: Thật ra thì trong ví dụ này chúng ta ko cần set lại template của block grid cũng được. Thay vào đó ta sử dụng template mặc định của block grid và tạo ra 1 file js mới có chứa hàm gọi ajax của ta trong đó cũng được. Nếu làm như vậy thì ta sẽ ko cần lấy form_key theo kiểu code php kia nữa mà gọi đến biến js: FORM_KEY. Bất cứ trang nào trong admin, cũng có biến này(được khai báo ở trên head) nên ta có thể gọi luôn trong file js mà ko cần phải dùng hàm php lấy ra nữa.
Bạn có thể download source code ở đây để tham khảo.
All rights reserved
