Local Notifications với UNNotification trên iOS 10
Bài đăng này đã không được cập nhật trong 4 năm
Với iOS 10, bạn sẽ không thế sử dụng UILocalNotification để tạo thông báo đẩy dưới local nữa vì nó đã bị deprecated, và bạn sẽ phải làm quen với một framework mới hỗ trợ Notification.
Cài đặt
Rất đơn giản, chỉ cần tiến hành import thư viện mang tên "UserNotifications"
// Swift
import UserNotifications

// Objective-C (with modules enabled)
@import UserNotifications;
Để quản lý các Notification, chúng ta sử dụng một shared singleton của lớp UNUserNotificationCenter:
// Swift
let center = UNUserNotificationCenter.current()

// Objective-C
UNUserNotificationCenter *center = [UNUserNotificationCenter currentNotificationCenter];
Authorization
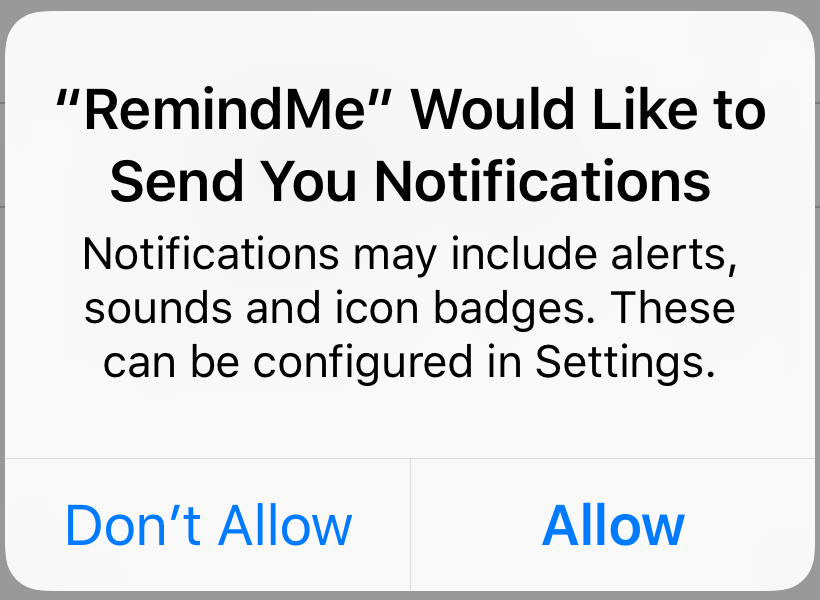
Cũng giống như framework cũ, chúng ta cần có sự cho phép của người dùng để có thể thực hiện push Notification với các kiểu mà chúng ta đăng ký sẵn. Hãy chắc chắn rằng thao tác yêu cầu người dùng cung cấp quyền này được thực hiện sớm nhất có thể, ngay khi người dùng vừa mở app. Thông thường chúng ta thường đặt trong AppDelegate application:didFinishLaunchingWithOptions:. Lần đầu tiên sử dụng, ứng dụng sẽ yêu cầu được cấp quyền bằng cách hiển thị một alert thông báo như sau:
 Có 4 kiểu của Notification bao gồm: badge, sound, alert, carPlay mà bạn có thể sử dụng một trong số chúng, hoặc phối hợp chúng, tùy vào mục đích sử dụng. Ví dụ, nếu bạn muốn có cả alert cảnh báo và âm thanh:
// Swift
let options: UNAuthorizationOptions = [.alert, .sound];

// Objective-C
UNAuthorizationOptions options = UNAuthorizationOptionAlert + UNAuthorizationOptionSound;
Đây là cách bạn yêu cầu được cấp quyền nhận và hiển thị notification, bằng cách sử dụng shared instance của Notification center:
// Swift
center.requestAuthorization(options: options) {
  (granted, error) in
    if !granted {
      print("Something went wrong")
    }
}

// Objective-C
[center requestAuthorizationWithOptions:options
 completionHandler:^(BOOL granted, NSError * _Nullable error) {
  if (!granted) {
    NSLog(@"Something went wrong");
  }
}];
Khi người dùng nhấn nút cho phép hoặc không cho phép, completion handler sẽ được gọi đến và giá trị boolean của biến granted sẽ cho biết người dùng có cho phép ứng dụng sử dụng notification hay không.
Lưu ý: Người dùng có thể thay đổi các cài đặt về Notification bất cứ lúc nào họ muốn trong mục Settings của hệ điều hành. Chúng ta có thể kiểm tra các quyền hiện tại của ứng dụng bằng phương thức: getNotificationSettings, phương thức này sẽ trả về một giá trị có kiểu UNNotificationSettings, chúng ta dựa vào nó để đưa ra những xử lý trong từng trường hợp cụ thể:
// Swift
center.getNotificationSettings { (settings) in
  if settings.authorizationStatus != .authorized {
    // Notifications not allowed
  }
}

// Objective-C
[center getNotificationSettingsWithCompletionHandler:^(UNNotificationSettings * _Nonnull settings) {
  if (settings.authorizationStatus != UNAuthorizationStatusAuthorized) {
    // Notifications not allowed
  }
}];
Tạo một Notification request
Một đối tượng UNNotificationRequest sẽ chứa nội dung (content) và điều kiện kích hoạt (trigger conditions)
Notification Contents
Nội dung của Notification được chứa trong một đối tượng có kiểu UNMutableNotificationContent với các thuộc tính bên trong bao gồm:
- title: chứa nội dung tiêu đề của Notification
- subtitle: Chuỗi chứa alert subtitle (if required)
- body: Chuỗi chứa nội dung message của alert
- badge: Số lượng thông báo hiển thị trên icon của ứng dụng bên ngoài màn hình chính
- sound: Âm thanh được phát mỗi khi ứng dụng nhận được notification. Sử dụng âm thanh mặc định bằng UNNotificationSound.default() hoặc tạo một âm thành tùy chỉnh bằng cách sử dụng file âm thanh.
- launchImageName: Tên của ảnh hiển thị lên khi người dùng nhấn vào banner hoặc alert notification để khởi động ứng dụng.
- userInfo: một đối tượng dictionary chứa thông tin tùy chọn.
- attachments: Một array các đối tượng UNNotificationAttachment. Sử dụng để include audio, image hoặc nội dung video.
Lưu ý: nên sử dụng các chuỗi chứa nội dung của title hoặc message cũng như subtitle đã được localize thay vì sử dụng phương thức localizedUserNotificationString(forKey:arguments:), vì phương thức này sẽ khiến notification bị delay cho đến khi nội dung localize được load xong.
// Swift
let content = UNMutableNotificationContent()
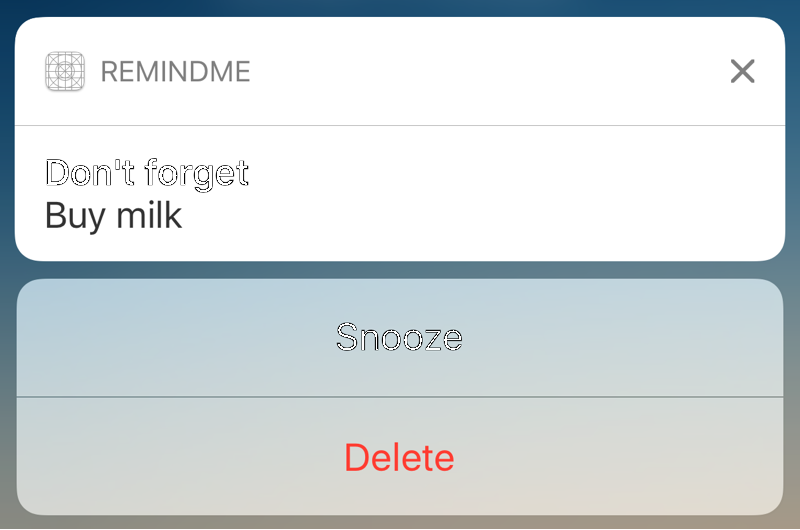
content.title = "Don't forget"
content.body = "Buy some milk"
content.sound = UNNotificationSound.default()
// Objective-C
UNMutableNotificationContent *content = [UNMutableNotificationContent new];
content.title = @"Don't forget";
content.body = @"Buy some milk";
content.sound = [UNNotificationSound defaultSound];
Notification Trigger
Điều kiện kích hoạt của Notification bao gồm: time, calender và location. Điều kiện kích hoạt có thể lặp đi lặp lại bằng:
- Time interval: Chúng ta có thể lên lịch để notification được hiển thị sau một số giây nhất định. Ví dụ sau sẽ hiển thị một notification sau 5 phút:
// Swift
let trigger = UNTimeIntervalNotificationTrigger(timeInterval: 300,
              repeats: false)

// Objective-C
UNTimeIntervalNotificationTrigger *trigger = [UNTimeIntervalNotificationTrigger triggerWithTimeInterval:300
                                  repeats:NO];
- Calendar: Chúng ta có thể hiển thị một notification vào một ngày giờ cụ thể, bằng cách tạo một trigger sử dụng đối tượng DateTimeComponent. Có thể convert một đối tượng Date sang DateTimeComponents bằng cách sử dụng Shared instance của đối tượng Calendar, như sau:
// Swift
let date = Date(timeIntervalSinceNow: 3600)
let triggerDate = Calendar.current.dateComponents([.year,.month,.day,.hour,.minute,.second,], from: date)

// Objective-C
NSDate *date = [NSDate dateWithTimeIntervalSinceNow:3600];
NSDateComponents *triggerDate = [[NSCalendar currentCalendar]
              components:NSCalendarUnitYear +
              NSCalendarUnitMonth + NSCalendarUnitDay +
              NSCalendarUnitHour + NSCalendarUnitMinute +
              NSCalendarUnitSecond fromDate:date];
Sau đây là các tạo một trigger từ DateTimeComponents vừa tạo ở bước trên:
// Swift
let trigger = UNCalendarNotificationTrigger(dateMatching: triggerDate,
              repeats: false)

// Objective-C
UNCalendarNotificationTrigger *trigger = [UNCalendarNotificationTrigger triggerWithDateMatchingComponents:triggerDate
                                         repeats:NO];
Để tạo một trigger có thể lặp đi lặp lại tại một khoảng thời gian nhất định, chúng ta cần sử dụng một cách chính xác các thành phần khi set DateComponent. Ví dụ, để notification lặp lại hàng ngày tại một giờ phút nhất định, ta làm như sau:
let triggerDaily = Calendar.current.dateComponents([hour,.minute,.second,], from: date)
let trigger = UNCalendarNotificationTrigger(dateMatching: triggerDaily, repeats: true)
Để lặp lại một Notification hàng tuần ở một ngày giờ phút nhất định:
let triggerWeekly = Calendar.current.dateComponents([.weekday,hour,.minute,.second,], from: date)
let trigger = UNCalendarNotificationTrigger(dateMatching: triggerWeekly, repeats: true)
Đây là một thay đổi khá thú vị so với famework cũ, khi mà chúng ta chúng ta set fireDate cho notification và truyền vào một thời gian lặp. Đối tượng NSDateComponents được sử dụng ở framework mới linh hoạt hơn nhưng cũng đem đến không ít khó khăn khi thay thế chúng từ giá trị fireDate được sử dụng ở framework cũ.
- Location: Cho phép hiển thị notification khi người dùng đến hoặc rời một vị trí địa lý nhất định. Ta có thể lấy được vị trí địa lý của người dùng thông qua framework CoreLocation sử dụng đối tượng CLRegion:
// Swift
let trigger = UNLocationNotificationTrigger(triggerWithRegion:region, repeats:false)

// Objective-C
UNLocationNotificationTrigger *locTrigger = [UNLocationNotificationTrigger triggerWithRegion:region repeats:NO];
Lên lịch (Scheduling)
Với content và trigger được tạo ở các bước trên, chúng ta có thể tạo một notification request và add đối tượng này vào Notification center. Mỗi notification request cần một chuỗi identifier:
// Swift
let identifier = "UYLLocalNotification"
let request = UNNotificationRequest(identifier: identifier,
              content: content, trigger: trigger)
center.add(request, withCompletionHandler: { (error) in
  if let error = error {
    // Something went wrong
  }
})

// Objective-C
NSString *identifier = @"UYLLocalNotification";
UNNotificationRequest *request = [UNNotificationRequest requestWithIdentifier:identifier
                                  content:content trigger:trigger]

[center addNotificationRequest:request withCompletionHandler:^(NSError * _Nullable error) {
    if (error != nil) {
        NSLog(@"Something went wrong: %@",error);
    }
}];
Lưu ý: Gọi addNotificationRequest nhiều lần với cũng một chuối identifier sẽ thay thế notification có cùng identifier được thêm trước đó. Nếu muốn lập lịch cho nhiều notification chúng ta cần sử dụng từng identifier khác nhau.
Custom Actions
Để custom action cho notification, đầu tiên chúng ta cần tạo và đăng kí cho notification các category, cho phép nó có một hoặc nhiều action. Ví dụ sau sẽ tạo một cateroty với hai action với ba bước:
- Bước 1: Định nghĩa action cho nottification cho phép người dùng dừng action hoặc khời động ứng dụng từ background.
// Swift
let snoozeAction = UNNotificationAction(identifier: "Snooze",
                   title: "Snooze", options: [])
let deleteAction = UNNotificationAction(identifier: "UYLDeleteAction",
                   title: "Delete", options: [.destructive])

// Objective-C
UNNotificationAction *snoozeAction = [UNNotificationAction actionWithIdentifier:@"Snooze"
  title:@"Snooze" options:UNNotificationActionOptionNone];
UNNotificationAction *deleteAction = [UNNotificationAction actionWithIdentifier:@"Delete"
  title:@"Delete" options:UNNotificationActionOptionDestructive];
- Tạo category cho mỗi action:
// Swift
let category = UNNotificationCategory(identifier: "UYLReminderCategory",
               actions: [snoozeAction,deleteAction],
               intentIdentifiers: [], options: [])

// Objective-C
UNNotificationCategory *category = [UNNotificationCategory categoryWithIdentifier:@"UYLReminderCategory"
  actions:@[snoozeAction,deleteAction] intentIdentifiers:@[]
  options:UNNotificationCategoryOptionNone];
NSSet *categories = [NSSet setWithObject:category];
- Đăng ký category vừa tạo với Notification Center. Chúng ta nên thực hiện bước này khi app vừa khởi động lên.
// Swift
center.setNotificationCategories([category])

// Objective-C
[center setNotificationCategories:categories];
Để mỗi notification sẽ bao gồm action vừa tạo, chúng ta cần set category này cho notification content:
// Swift
content.categoryIdentifier = "UYLReminderCategory"

// Objective-C
content.categoryIdentifier = @"UYLReminderCategory";
Kết quả sẽ như sau:
Notification Delegate
Nếu muốn xử lý mỗi khi người dùng nhận được và nhấn vào notifcation, chúng ta tiến hành implement các phương thức của UNUserNotificationCenterDelegate. Protocol này định nghĩa hai phương thức optional:
- userNotificationCenter(_:willPresent:withCompletionHandler:) được gọi khi ứng dụng đang chạy và nhận được notification. Phương thức trả về cho chúng ta một đối tượng UNNotification chứa một UNNotificationRequest. Chúng ta gọi đến completion handler và truyền vào các tùy chọn có kiểu UNNotificationPresentationOptions để cho phép hiển thị notification, play âm thanh,.. (sử .none không hiển thị bất cứ điều gì).
- userNotificationCenter(_:didReceive:withCompletionHandler:) được gọi khi người dùng chọn vào một action khi nhận được notification. Phương thức trả về cho chúng ta một đối tượng UNNotificationResponse chứa actionIdentifier cho mỗi action ta thêm trước đó, và một đối tượng UNNotification Trong cả hai phương thức trên bạn phải gọi đến completion handler ở cuối mỗi phương thức
Chúng ta có thể đặt các phương thức này trong AppDelegate, tuy nhiên nên đặt chúng trong một lớp riêng sẽ giúp code dễ đọc và khoa học hơn. Như sau
class UYLNotificationDelegate: NSObject, UNUserNotificationCenterDelegate {

  func userNotificationCenter(_ center: UNUserNotificationCenter,
       willPresent notification: UNNotification,
      withCompletionHandler completionHandler: @escaping (UNNotificationPresentationOptions) -> Void) {
    // Play sound and show alert to the user
    completionHandler([.alert,.sound])
  }

  func userNotificationCenter(_ center: UNUserNotificationCenter,
       didReceive response: UNNotificationResponse,
       withCompletionHandler completionHandler: @escaping () -> Void) {

    // Determine the user action
    switch response.actionIdentifier {
    case UNNotificationDismissActionIdentifier:
      print("Dismiss Action")
    case UNNotificationDefaultActionIdentifier:
      print("Default")
    case "Snooze":
      print("Snooze")
    case "Delete":
      print("Delete")
    default:
      print("Unknown action")
    }
    completionHandler()
  }
}
Đừng quên set delegate trước khi ứng dụng finishe launching. Ví dụ, trong phương thức của application delegate là didFinishLaunchingWithOptions:
// Do NOT forget to retain your delegate somewhere
let notificationDelegate = UYLNotificationDelegate()

func application(_ application: UIApplication, didFinishLaunchingWithOptions launchOptions: [UIApplicationLaunchOptionsKey: Any]?) -> Bool {
  let center = UNUserNotificationCenter.current()
  center.delegate = notificationDelegate

  // ...
  return true
}
Managing Pending and Delivered
Famework UILocalNotification cũ luôn cho phép chúng ta xóa một hoặc nhiều notification đang trong trạng thái chờ. Trong Framework UserNotifications mới được mở rộng hơn bằng cách cho chúng ta quản lý cả những notification đang trong trạng thái chờ và những notification đã nhận được và đang hiển thị trên Notification Center. Có ba phương thức cơ bản như sau:
-
getPendingNotificationRequests:completionHandler:
-
getDeliveredNotificationRequests:completionHandler: Cả hai phương thức trên đều trả về một mảng các đối tượng có kiểu UNNotificationRequest trong block. Đối với các notification đã nhận được, mỗi đối tượng UNNotification trong mảng sẽ chứa một UNNotificationRequest và delivery date.
-
removePendingNotificationRequests:withIdentifiers:
-
removeDeliveredNotifications:withIdentifiers: Hai phương thức trên dùng để xóa các request trong trạng thái chờ hoặc notification đã nhận được trước đó. Chúng ta truyền vào một dãy các chuỗi identifier được dùng để lên lịch cho các notification trước đó. Ta có thể lấy identifier trong mảng các UNNotification lấy được từ hai phương thức getPendingNotificationRequests:completionHandler: và getDeliveredNotificationRequests:completionHandler:.
-
removeAllPendingNotificationRequests
-
removeAllDeliveredNotifications Như tên gọi của chúng, ahi phương thức nãy sẽ xóa tất cả các request đang trong trạng thái chờ hoặc các notification đã nhận được trước đó.
Tất cả các phương thức trên được gọi đến thông qua shared instance của Notification center. Ví dụ:
// Swift
center.removeAllPendingNotificationRequests()

// Objective-C
[center removeAllPendingNotificationRequests];
Đọc thêm
Để đọc thêm và tìm hiểu về các framework UserNotification mới của Apple mà một số phần trong bài viết này chưa đề cập đến, độc giả có thể tham khảo thông quan các buổi WWDC sau:
WWDC 2016 Session 707 Introduction to Notifications WWDC 2016 Session 708 Advanced Notifications
All rights reserved
