Load ảnh trong android App
Bài đăng này đã không được cập nhật trong 4 năm
Chào các bạn, hôm nay mình gửi đến các bạn đôi chút chia sẻ về việc sử lý việc load ảnh trong android app. Hẳn ai đã từng viết app android cũng gặp khó khăn trong việc xử lí load ảnh kể cả online, offline nhất là trong xử lí online các quá trình load ảnh, cache ảnh hẳn đã làm khó bạn đôi lần.
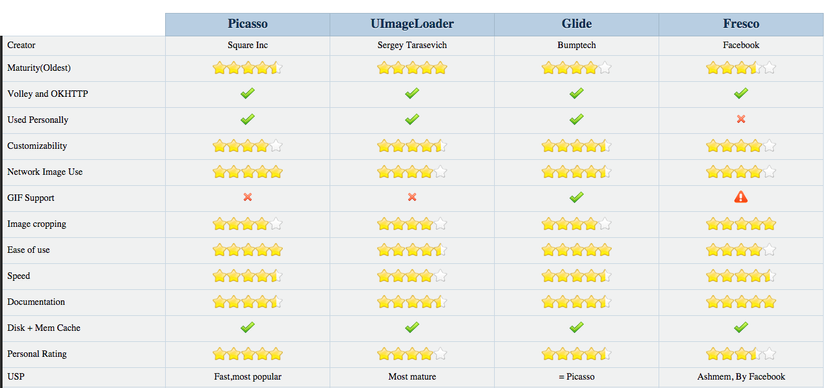
Bản thân mình cũng đã gặp khá nhiều vấn đề trong quá trình xử lí này và cách đầu tiên mình nghĩ đến và đơn giản nhất đó là tìm hiểu những thư viện load ảnh hiện nay phổ biến , mình đã thử qua khá nhiều lib load ảnh : universal image loader, Fresco, Picaso, Glide. Tuy nhiên có lẽ nổi trội và tiện dụng nhất vẫn là glide và picaso, về 2 thư viện này mình cũng không nói sâu về nó nữa vì đã có khá nhiều bài viết phần tích điểm mạnh yếu của 2 thư viện này : vì dụ
https://inthecheesefactory.com/blog/get-to-know-glide-recommended-by-google/en
hoặc :
Sau khi xử dụng 1 thời gian 2 thư viện này, mình có lên tìm hiểu kĩ hơn trên trang dev của android : https://developer.android.com/index.html thì phát hiện ra google cung cấp 1 thư viện load ảnh khá ngon, rất nhỏ gọn, tiện dụng khả năng tùy biến mạnh. ( https://developer.android.com/training/displaying-bitmaps/load-bitmap.html )
Bài viết tại link mình gửi viết khá chi tiết nên tiện đây mình hướng dẫn qua mọi người cách dùng và sự tiện dụng của thư viện này.
Ưu điểm :
- Ứng dụng được cung cấp từ google
 cái này bản thân mình đánh giá khá cao vì khá thích dùng các lib nguyên gốc từ google, nó giải quyết trực tiếp bài toán mình cần đó là load ảnh.
 - Cực kì gọn nhẹ chỉ gồm chưa đến 20 class.
- Xử lí load ảnh, cache ảnh trên cả ram cả thẻ nhớ.
- Load ảnh nhanh, tốn ít ram.
Nhược điểm
- Độ tùy biến ít, phải tùy biến bằng tay nhiều : vì thư viện tập trung giải quyết vẫn đề chính là load ảnh nên chưa tập trung vào việc xử lí các anim hiện ảnh, anim thể hiện ảnh ví như ảnh tròn, ảnh răng cưa ....
Sau đây là 1 số chi tiết mình thấy hay note lại trong bài viết và trong project trên để xử dụng :
- Read Bitmap Dimensions and Type : Trong class displayingbitmaps\util\ImageResizer.java cung cấp cho chúng ta hàm đọc và resize bitmap hợp lí tránh việc OutOfMemory exception
BitmapFactory.Options options = new BitmapFactory.Options();
options.inJustDecodeBounds = true;
BitmapFactory.decodeResource(getResources(), R.id.myimage, options);
int imageHeight = options.outHeight;
int imageWidth = options.outWidth;
String imageType = options.outMimeType;
sau đó sử dụng hàm :
public static int calculateInSampleSize(
            BitmapFactory.Options options, int reqWidth, int reqHeight) {
    // Raw height and width of image
    final int height = options.outHeight;
    final int width = options.outWidth;
    int inSampleSize = 1;

    if (height > reqHeight || width > reqWidth) {

        final int halfHeight = height / 2;
        final int halfWidth = width / 2;

        // Calculate the largest inSampleSize value that is a power of 2 and keeps both
        // height and width larger than the requested height and width.
        while ((halfHeight / inSampleSize) >= reqHeight
                && (halfWidth / inSampleSize) >= reqWidth) {
            inSampleSize *= 2;
        }
    }

    return inSampleSize;
}
public static Bitmap decodeSampledBitmapFromResource(Resources res, int resId,
        int reqWidth, int reqHeight) {

    // First decode with inJustDecodeBounds=true to check dimensions
    final BitmapFactory.Options options = new BitmapFactory.Options();
    options.inJustDecodeBounds = true;
    BitmapFactory.decodeResource(res, resId, options);

    // Calculate inSampleSize
    options.inSampleSize = calculateInSampleSize(options, reqWidth, reqHeight);

    // Decode bitmap with inSampleSize set
    options.inJustDecodeBounds = false;
    return BitmapFactory.decodeResource(res, resId, options);
}
Sau khi tính toán được kích thước hợp lí ta chỉ cần :
mImageView.setImageBitmap(
    decodeSampledBitmapFromResource(getResources(), R.id.myimage, 100, 100));
Ngoài ra tìm hiểu kĩ hơn bạn thấy thư viện sử dụng :
- load ảnh sử dụng AsyncTask
- cache ảnh sử dụng Memory Cache, và Disk Cache
- Cách load ảnh lên UI : Việc load ảnh lên UI khá đơn giản. Trong activity kế thừa từ FragmentActivity bạn khởi tạo
private static final String IMAGE_CACHE_DIR = "images";
public static final String EXTRA_IMAGE = "extra_image";
private ImageFetcher mImageFetcher;
Trong hàm oncreate của activity bạn khởi tạo :
final DisplayMetrics displayMetrics = new DisplayMetrics();
        getWindowManager().getDefaultDisplay().getMetrics(displayMetrics);
        final int height = displayMetrics.heightPixels;
        final int width = displayMetrics.widthPixels;

        // For this sample we'll use half of the longest width to resize our images. As the
        // image scaling ensures the image is larger than this, we should be left with a
        // resolution that is appropriate for both portrait and landscape. For best image quality
        // we shouldn't divide by 2, but this will use more memory and require a larger memory
        // cache.
        final int longest = (height > width ? height : width) / 2;

        ImageCache.ImageCacheParams cacheParams =
                new ImageCache.ImageCacheParams(this, IMAGE_CACHE_DIR);
        cacheParams.setMemCacheSizePercent(0.25f); // Set memory cache to 25% of app memory

        // The ImageFetcher takes care of loading images into our ImageView children asynchronously
        mImageFetcher = new ImageFetcher(this, longest);
        mImageFetcher.addImageCache(getSupportFragmentManager(), cacheParams);
        mImageFetcher.setImageFadeIn(false);
Viết thêm các hàm xử lí phụ :
@Override
    public void onResume() {
        super.onResume();
        mImageFetcher.setExitTasksEarly(false);
    }
    protected void onPause() {
        super.onPause();
        mImageFetcher.setExitTasksEarly(true);
        mImageFetcher.flushCache();
    }
    protected void onDestroy() {
        super.onDestroy();
        mImageFetcher.closeCache();
    }
để load ảnh lúc này bạn chỉ cần :
mImageFetcher.loadImage(mImageUrl, mImageView, ImageWorker.OnImageLoadedListener);
Bạn hãy thử nghiệm thư viện trên với lượng ảnh tương đối lơn nhé, với mình sau khi đã custom khá nhiều thì thấy đây là thư viện nhỏ gọn đúng yêu cầu cho việc load ảnh cũng như cache ảnh. .
Rất cảm ơn các bạn đã đọc chút chia sẻ của mình .
All rights reserved
