Laravel PDF - Tạo và tải xuống file PDF trong Laravel 5.7
Bài đăng này đã không được cập nhật trong 6 năm
 Hôm nay mình muốn chia sẻ với bạn cách tạo pdf và tải xuống pdf trong Ứng dụng laravel 5.7.
Mình sẽ thực hiện chức năng tải pdf với ví dụ từng bước trong dự án dựa trên laravel 5.7.
Và ví dụ này cũng hoạt động với phiên bản laravel 5.8.
Hầu hết các dự án thương mại điện tử, trang web mua sắm, trang web tiếp thị điện tử đã được xây dựng trong laravel.
Các loại trang web này tạo thường hay phải xuất ra hóa đơn, xác nhận, vé và nhiều thứ khác.
Trong trường hợp này, chúng ta sử dụng các gói dom-pdf laravel để dễ dàng tạo hóa đơn, xác nhận, vé, v.v.
Chúng ta sẽ sử dụng gói laravel dom-pdf, tạo và tải xuống pdf trong vài bước đơn giản.
Nào bắt đầu thôi.
Cài đặt ứng dụng Laravel 5.7
Trước tiên chúng ta cần tải xuống laravel 5.7 thiết lập mới. Sử dụng lệnh dưới đây và tải xuống thiết lập laravel mới:
composer create-project --prefer-dist laravel/laravel LaravelPdf
Ở đây mình mặc định là các bạn đã biết tới Laravel và cách cài đặt cơ bản về nó rồi nhé.
Thiết lập cơ sở dữ liệu
Sau khi tải xuống thành công Ứng dụng laravel 5.7, Các bạn chuyển đến tệp .env dự án và thiết lập thông tin xác thực cơ sở dữ liệu và di chuyển bước tiếp theo:
 DB_CONNECTION=mysql
 DB_HOST=127.0.0.1
 DB_PORT=3306
 DB_DATABASE=here your database name here
 DB_USERNAME=here database username here
 DB_PASSWORD=here database password here
Cài đặt gói laravel-dompdf
Bây giờ chúng ta cần tải xuống gói laravel-dompdf, gói này giúp tạo và tải xuống pdf. Laravel dompdf pacakge đã chuyển đổi chế độ xem sang pdf. Sử dụng lệnh dưới đây và tải xuống laravel dompdf:
composer require barryvdh/laravel-dompdf
Sau khi cài đặt thành công gói dompdf laravel, hãy mở config / app.php và cấu hình lại một chút:
'providers' => [

 Barryvdh\DomPDF\ServiceProvider::class,
 ],

'aliases' => [

 'PDF' => Barryvdh\DomPDF\Facade::class,
 ]
Tạo Route
Chúng tôi sẽ tạo hai route trong tệp web.php. Đi tới tệp app / tuyến / web.php và tạo hai route như bên dưới tại đây:
Route::get('notes', 'NotesController@index');
Route::get('pdf', 'NotesController@pdf');
Tạo dữ liệu mẫu
- Các bạn có thể tạo 1 table trong migation bằng lệnh sau:
php atisan make:migration create_note_table --create=notes
- Tiếp theo bạn vào databases/migrations/notes setting các dữ liệu mẫu:
<?php

use Illuminate\Support\Facades\Schema;
use Illuminate\Database\Schema\Blueprint;
use Illuminate\Database\Migrations\Migration;

class CreateNotesTable extends Migration
{
    /**
     * Run the migrations.
     *
     * @return void
     */
    public function up()
    {
        Schema::create('notes', function (Blueprint $table) {
            $table->increments('id');
            $table->string('name');
            $table->text('content');
            $table->timestamps();
        });
    }

    /**
     * Reverse the migrations.
     *
     * @return void
     */
    public function down()
    {
        Schema::dropIfExists('notes');
    }
}
Ở đây mình chỉ làm mẫu 2 column còn nếu muốn nhiều hơn bạn có thể thêm tùy ý nhé. 3.Tiếp đến bạn tạo 1 Factory:
php artisan make:factory NoteFactory
và thêm dòng code sau:
<?php

use Faker\Generator as Faker;

$factory->define(App\Note::class, function (Faker $faker) {
    return [
        'name' => $faker->name,
        'content' => $faker->text(),
    ];
});
4.Tiếp theo là tạo 1 NoteTableseeder:
php artisan make:seeder NoteTableSeeder
và thêm đoạn code :
<?php

use Illuminate\Database\Seeder;

class NoteTableSeeder extends Seeder
{
    /**
     * Run the database seeds.
     *
     * @return void
     */
    public function run()
    {
        factory(App\Note::class, 100)->create();
    }
}
5.Trong file DatabaseSeeder bạn gọi file NoteTableSeeder vào:
<?php

use Illuminate\Database\Seeder;

class DatabaseSeeder extends Seeder
{
    /**
     * Seed the application's database.
     *
     * @return void
     */
    public function run()
    {
        // $this->call(UsersTableSeeder::class);
        $this->call(NoteTableSeeder::class);
    }
}
- Và cuối cùng là bạn chạy lệnh để tạo ra dữ liệu mẫu trên db của bạn: đây là lệnh tạo ra bảng dữ liệu trên database:
php artisan migrate
đây là lệnh chạy seed để tạo ra dữ liệu mẫu:
php artisan db:seed
OK vậy là ta đã có dữ liệu cho project của mình.
Tạo Controller
Chúng ta cần tạo một Controller để test, ở đây mình tạo 1 NotesController . Sử dụng lệnh dưới đây:
php artisan make:controller NotesController
Sau khi tạo thành, hãy truy cập bạn vào file NotesController.php và đặt các phương thức dưới đây:
<?php

namespace App\Http\Controllers;

use App\Note;
use Illuminate\Http\Request;
use Redirect;
use PDF;

class NotesController extends Controller
{

    public function index()
    {
        $data['notes'] = Note::paginate(10);

        return view('notes',$data);
    }

    public function pdf(){

     $data['title'] = 'Notes List';
     $data['notes'] =  Note::get();

     $pdf = PDF::loadView('notes', $data);

     return $pdf->download('tuts_notes.pdf');
    }


}
Tạo view
Tiếp theo các bạn vào app/resource.view. Và tạo một blade tên là notes.blade.php và thêm phần setting như sau:
<!DOCTYPE html>
<html>
<head>
  <meta charset="UTF-8">
  <meta name="viewport" content="width=device-width, initial-scale=1.0">
  <meta http-equiv="X-UA-Compatible" content="ie=edge">
  <meta name="csrf-token" content="{{ csrf_token() }}">
  <title>Export Notes List PDF - Tutsmake.com</title>
  <link href="//maxcdn.bootstrapcdn.com/bootstrap/4.1.1/css/bootstrap.min.css" rel="stylesheet" id="bootstrap-css">
 <style>
   .container{
    padding: 5%;
   }
</style>
</head>
<body>
<div class="container">
    <div class="row">
        <div class="col-12">
           <a href="{{ url('pdf') }}" class="btn btn-success mb-2">Export PDF</a>
          <table class="table table-bordered" id="laravel_crud">
           <thead>
              <tr>
                 <th>Id</th>
                 <th>Name</th>
                 <th>Content</th>
                 <th>Created at</th>
              </tr>
           </thead>
           <tbody>
              @foreach($notes as $note)
              <tr>
                 <td>{{ $note->id }}</td>
                 <td>{{ $note->name }}</td>
                 <td>{{ $note->content }}</td>
                 <td>{{ date('d m Y', strtotime($note->created_at)) }}</td>
              </tr>
              @endforeach
           </tbody>
          </table>
          {!! $notes->links() !!}
       </div>
   </div>
</div>
</body>
</html>
Bây giờ chúng ta tạo thêm một blade view có tên là ghi notes_pdf.blade.php :
<table class="table table-bordered" id="laravel_crud">
 <thead>
    <tr>
       <th>Id</th>
       <th>Name</th>
       <th>Content</th>
       <th>Created at</th>

    </tr>
 </thead>
 <tbody>
    @foreach($notes as $note)
    <tr>
       <td>{{ $note->id }}</td>
       <td>{{ $note->name }}</td>
       <td>{{ $note->content }}</td>
       <td>{{ date('d m Y', strtotime($note->created_at)) }}</td>

    </tr>
    @endforeach
 </tbody>
</table>
Start Development Server
Đến đây chúng có thể bật Server lên để chạy laravel. Sử dụng lệnh sau:
php artisan serve
 // Nếu bạn muốn chạy port khác 80
 php artisan serve --port=8080
Bây giờ các bạn mở trình duyệt lên và nhập URL :
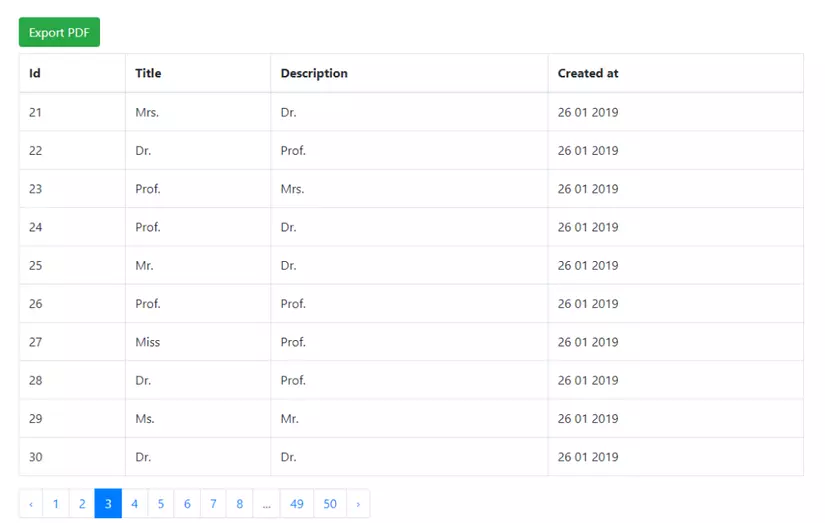
http: // localhost: 8000 / notes
Phần kết luận
Trong hướng dẫn xuất pdf laravel 5.7 này, chúng ta đã tạo thành công tệp PDF và tải xuống tệp pdf. Nếu bạn muốn thay thế dữ liệu khác trong tệp pdf của mình để bạn có thể thay đổi nó. ví dụ :
- Ví dụ tải lên hình ảnh của Laravel trông như thế này:

Ok thế là xong rồi nhé ! Nếu bạn có bất kỳ câu hỏi hoặc suy nghĩ nào để chia sẻ, hãy sử dụng mẫu bình luận bên dưới để liên hệ với mình nhé và mình sẽ cố gắng trả lời.
Nguồn tham khảo : https://www.tutsmake.com/laravel-pdf-create-and-download-pdf-file-in-laravel-5-7
All rights reserved