Laravel DataTables: Quick Start and Tips
Bài đăng này đã không được cập nhật trong 7 năm
I. Lời nói đầu
Chào các bạn, hôm nay mình xin phép được chia sẻ với mọi người một plugin khá hữu ích, đó là Laravel DataTables. Trong bài viết mình sẽ đề cập đến 2 phần: Quick Start và các Tips khi sử dụng Laravel DataTables. Let's begin!
II. Quick Start
1. Cài đặt
Step 1: Tạo một fresh project Laravel.
composer create-project --prefer-dist laravel/laravel laravel_datatables_sample
Sau khi cài đặt thành công, các bạn nhớ
php artisan key:generate
và config database trong file .env nhé. Ex:
DB_CONNECTION=mysql
DB_HOST=127.0.0.1
DB_PORT=3306
DB_DATABASE=laravel_datatables_sample
DB_USERNAME=root
DB_PASSWORD=1
After all, chạy command
php artisan serve
để test xem quá trình tạo project có biến gì không 
Step 2: Tạo sample data.
Mặc định Laravel đã có model User và migration cho việc tạo table users trong database rồi. Chúng ta chỉ cần chạy 2 câu queries:
- Migrate:
php artisan migrate
- Seed data:
php artisan tinker
>>> factory(App\User::class, 100)->create();
2. Bài toán
Giả dụ chúng ta có một task Hiển thị toàn bộ thông tin User, bao gồm các task phụ như Filter, Pagination, Export to Excel (CSV, PDF, etc.).
Expected output:
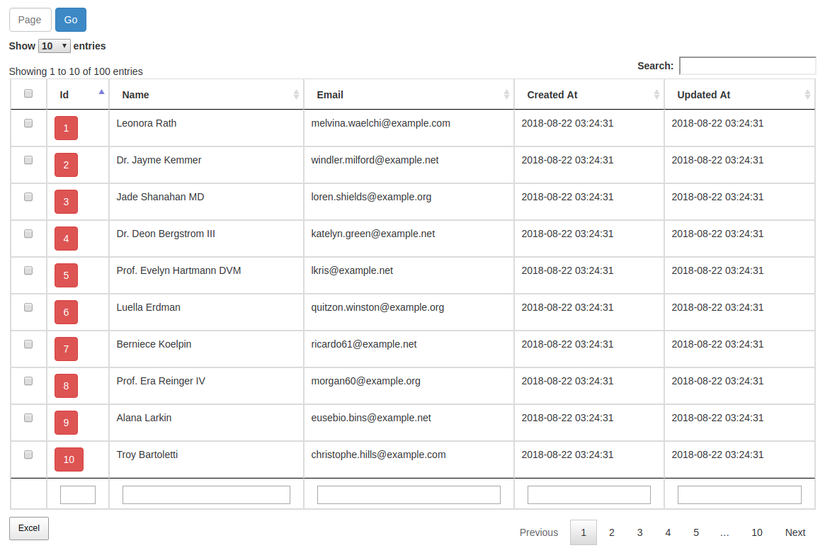
Chúng ta đã có database và data, hãy cùng nhau cài đặt thêm vài thứ linh tinh nào
Step 1: Cài đặt Laravel DataTables.
composer require yajra/laravel-datatables-oracle
Bên trong file config/app.php:
- Thêm
Yajra\Datatables\DatatablesServiceProvider::class,
vào array 'providers'.
- Thêm
'Datatables' => Yajra\Datatables\Facades\Datatables::class,
vào array 'alias'.
Step 2: Tạo routes.
Chúng ta cần 2 routes:
- 1 cho việc vẽ table:
Route::get('users/getData', 'UserController@getData')->name('users.getData');
- 1 cho việc hiển thị table cho người dùng:
Route::get('users', 'UserController@index');
Step 3: Tạo views.
Chúng ta cần 2 views:
- master.blade.php
<!DOCTYPE html>
<html lang='en'>
<head>
    <meta charset='utf-8'>
    <meta http-equiv='X-UA-Compatible' content='IE=edge'>
    <meta name='viewport' content='width=device-width, initial-scale=1'>
    <title>@yield('title')</title>
    <link rel='stylesheet' type='text/css' href='https://netdna.bootstrapcdn.com/bootstrap/3.2.0/css/bootstrap.min.css' >
    @yield('styles')
    <style>
        body {
            padding-top: 40px;
            padding-bottom: 40px;
        }
    </style>
</head>
<body>
<div class='container'>
    @yield('content')
</div>
<script type='text/javascript' src='https://code.jquery.com/jquery-3.3.1.js'></script>
<script type='text/javascript' src='https://netdna.bootstrapcdn.com/bootstrap/3.2.0/js/bootstrap.min.js'></script>
@routes
@yield('scripts')
</body>
</html>
- index.blade.php kế thừa view layout:
@extends('master')
@section('title')
    Laravel DataTables Sample
@endsection
@section('content')
    <table class="table table-bordered" id="listUsers" style="margin-bottom: 10px;">
        <thead>
        <tr>
            <th></th>
            <th>Id</th>
            <th>Name</th>
            <th>Email</th>
            <th>Created At</th>
            <th>Updated At</th>
        </tr>
        </thead>
        <tfoot>
        <tr>
            <th></th>
            <th>Id</th>
            <th>Name</th>
            <th>Email</th>
            <th>Created At</th>
            <th>Updated At</th>
        </tr>
        </tfoot>
    </table>
@endsection
Step 4: Tạo UserController và các functions liên quan.
- Tạo UserController:
php artisan make:controller UserController
- Implement functions:
<?php

namespace App\Http\Controllers;

use App\User;
use Illuminate\Http\Request;
use Yajra\DataTables\DataTables;

class UserController extends Controller
{
    public function getData()
    {
        return Datatables::of(User::query())->make(true);
    }

    public function index()
    {
        return view('index');
    }
}
Tip: Nếu không muốn lấy toàn bộ mà chỉ lấy các một vài trường trong table users, chúng ta có thể viết lại thân hàm getData() như thế này:
public function getData()
{
    $users = User::select([
        'name',
        'email'
    ]);

    return DataTables::of($users)->make(true);
}
Step 5: Import các thư viện của DataTables.
@section('styles')
    <link rel="stylesheet" type="text/css" href="https://cdn.datatables.net/1.10.7/css/jquery.dataTables.min.css">
@endsection

@section('scripts')
    <script type='text/javascript' src='https://cdn.datatables.net/1.10.16/js/jquery.dataTables.min.js'></script>
@endsection
Step 6: Biến normal-table thành data-table nào
- Tip: Trước khi viết js cho table listUsers, chúng ta cài đặt thêm plugin https://github.com/tightenco/ziggy này để có thể sử dụng route trong file js nhé. Note: Plugin này chỉ áp dụng với laravel version 5.6 trở lên
 Các bước cài đặt:
composer require tightenco/ziggy
Sau đó, thêm
Tightenco\Ziggy\ZiggyServiceProvider::class
vào arrray 'providers' trong file config/app.php và
@routes
ở bất cứ đâu trong file template, miễn là @routes nằm trước phần code js bạn viết cho table listUsers.
- Viết js cho table listUsers:
$(function() {
    $('#listUsers').DataTable({
        dom: 'lifrtp',
        processing: true,
        serverSide: true,
        ajax: {
            url: route('users.getData'),
        },
        columns: [
            { data: 'id', name: 'users.id' },
            { data: 'name', name: 'users.name' },
            { data: 'email', name: 'users.email' },
            { data: 'created_at', name: 'users.created_at' },
            { data: 'updated_at', name: 'users.updated_at' }
        ]
    });
});
Tạm thời như vậy đã. Mình xin được giải thích các thuật ngữ của DataTables như: dom, processing, serverSide, data, name, etc. ở phần bên dưới
III. Tips
1. DOM
Theo như https://datatables.net/reference/option/dom, lifrtp là các thành phần cấu tạo nên một DataTables:
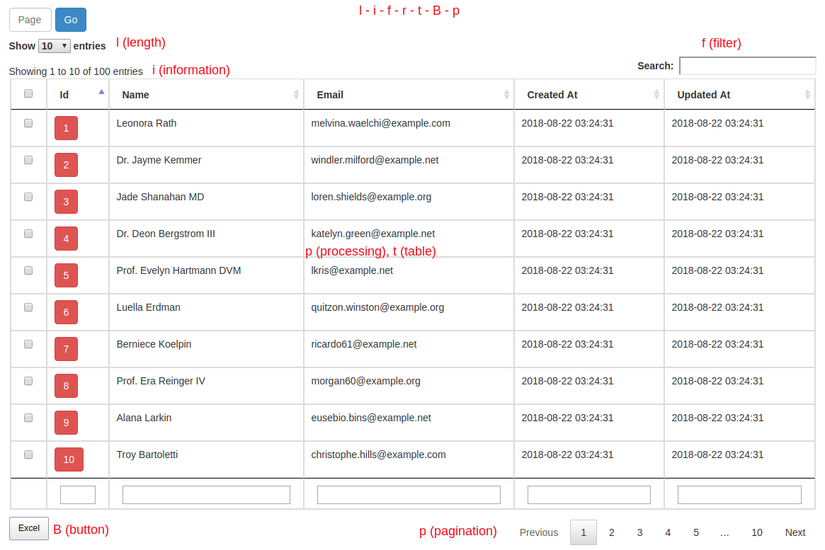
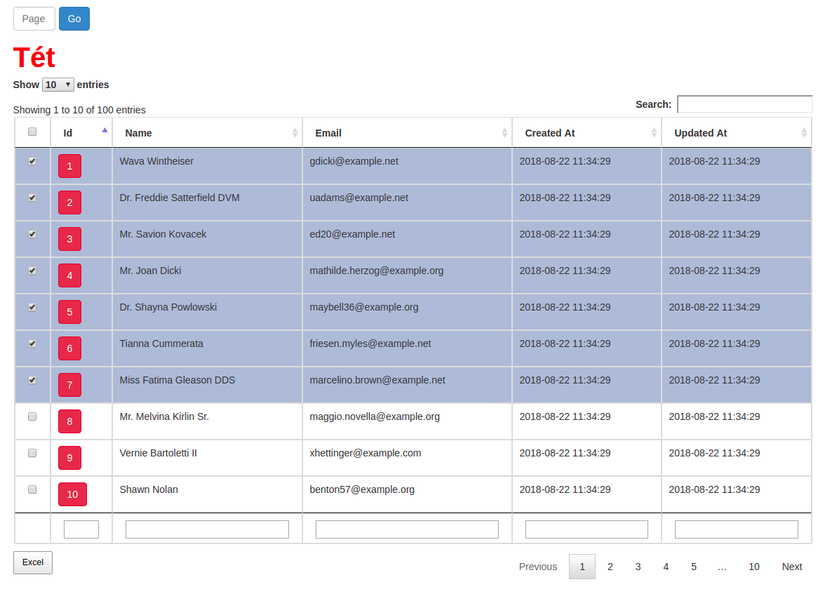
Ngoài ra, bạn có thể custom hoặc thêm những dom khác ngoài những dom có sẵn của DataTables. Ex:
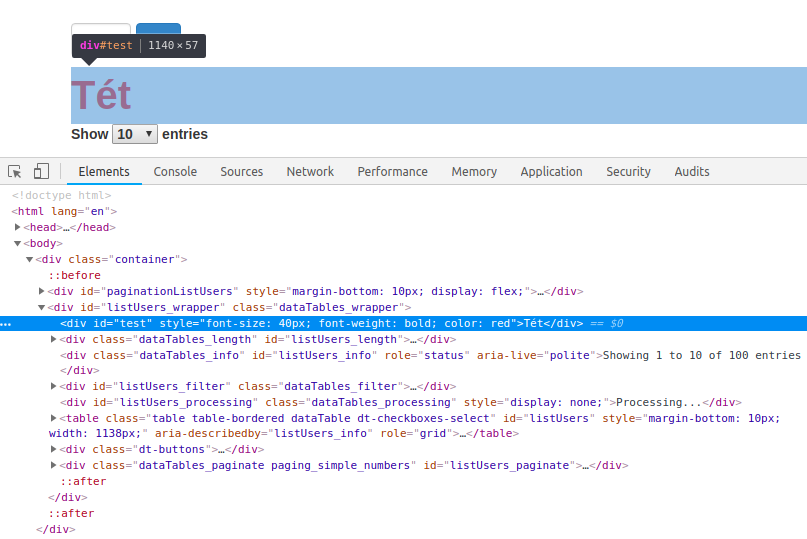
dom: '<"#test">lifrtBp',
Custom chút:
$('#test').text('Tét');
$('#test').attr('style', 'font-size: 40px; font-weight: bold; color: red');
Kết quả:
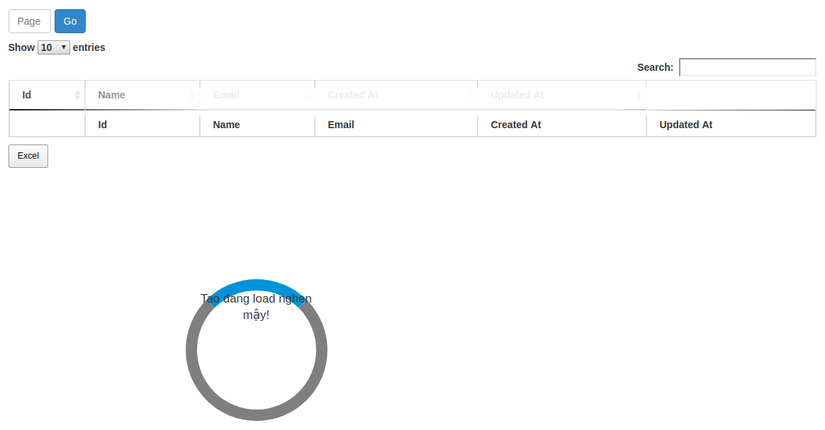
2. Processing
Theo https://datatables.net/reference/event/processing, về cơ bản, khi enable sự kiện processing thành true, khi có 1 hành động như filtering, sorting hay một hành động nào xử lý dữ liệu, DataTables sẽ show cho bạn 1 thông báo kiểu như này:
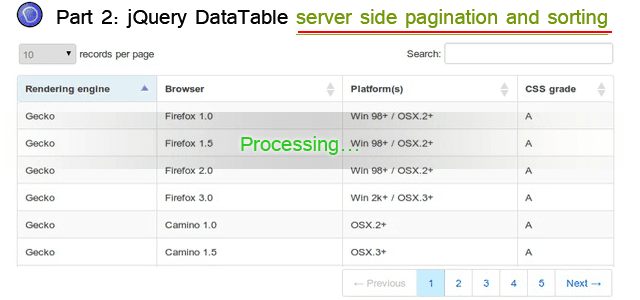
Nguồn: http://www.dotnetawesome.com/2015/11/jquery-datatable-server-side-pagination-sorting.html
Chúng ta cũng có thể custom lại thông báo đó.
- Thêm sự kiện language để edit processing:
listUsers = $('#listUsers').DataTable(
    ...
    processing: true,
    language: {
        processing: "<div id='loader'>Tao đang load nghen mậy!</div>"
    },
);
- Custom chút css cho #loader:
#loader {
    border: 16px solid #f3f3f3;
    border-radius: 50%;
    border-top: 16px solid #3498db;
    width: 200px;
    height: 200px;
    -webkit-animation: spin 2s linear infinite;
    animation: spin 2s linear infinite;
    margin-left: 250px;
    margin-top: 250px;
}
Mình sẽ xóa một cột <th> trong bảng để kiểm tra processing đã được thay đổi chưa. Kết quả:
3. Client-side và Server-side
- Client-side: Chỉ nên dùng khi số lượng bản ghi ít (nhỏ hơn 10.000). Lúc này việc load toàn bộ dữ liệu ra rồi để người dùng tương tác dữ liệu (filtering, sorting, etc.) vẫn ổn, không gây ra quá nhiều ảnh hưởng.
- Server-side: Nên dùng khi xử lý dữ liệu với số lượng bản ghi lớn (lớn hơn 100.000). Lúc này mọi hành động sẽ được xử lý bên server, trước khi chuyển đến cho người dùng. Ví dụ:
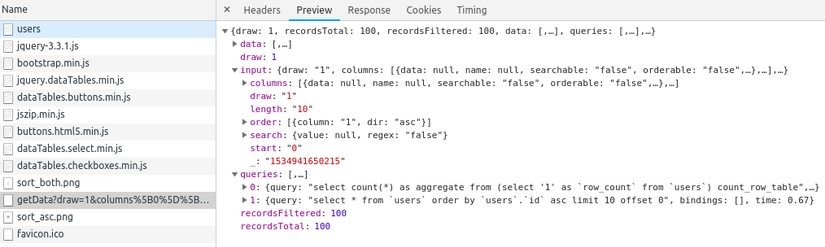
Chúng ta có thể thấy rằng DataTables đã dùng Server-side processing để xử lý dữ liệu thông qua 2 câu queries như này:
select count(*) as aggregate from (select '1' as `row_count` from `users`) count_row_table
và
select * from `users` order by `users`.`id` asc limit 10 offset 0
Ngoài ra, khi số lượng bản ghi vượt quá 6 con số 0, mình nghĩ là nên thay đổi solution để phù hợp với số lượng bản ghi đó, không nên phụ thuộc vào DataTables nữa:
- Tối ưu lại SQL. Ví dụ: sử dụng index, chia lại bảng, etc.
- Nâng cấp server.
- Nếu khách hàng mà giàu thì suggest họ dùng Google BigQuery =)) Theo như một đàn anh của mình kể thì truy xuất 2 tỷ records hết khoảng 5s thì phải

- MongoDB. Đối với MongoDB thì vài triệu bản ghi không thành vấn đề (ngon)
- ...
4. Columns: Data, Name và Render
Phần này là phần quan trọng nhất của DataTables. Nó quyết định những gì xuất hiện trên table để show cho người dùng.
- Data: Tất cả những dữ liệu được return ở controller, ví dụ:
public function getData()
{
    $users = User::select([
        'id',
        'name as username',
        'email'
    ]);

    return DataTables::of($users)->make(true);
}
phải khớp với dữ liệu được return ở phía js:
columns: [
{
    {data: 'id'},
    {data: 'username'},
    {data: 'email'},
],
- Name: Phần này để xác định cụ thể những trường ở trên: id, name, email thuộc table nào. Ex:
columns: [
{
    {data: 'id', name: 'users.id'},
    {data: 'name', name: 'users.name'},
    {data: 'email', name: 'users.email'},
],
Sẽ có các trường hợp bạn bắt buộc phải dùng cả data và name. Ví dụ: khi phải join table roles và users để lấy ra role_name dựa theo role_id chẳng hạn.
- Render: Sau khi lấy ra được dữ liệu, render giúp chúng ta custom dữ liệu đó để hiển thị cho người dùng. Ví dụ, mình sẽ render lại phần id như thế này:
{
    data: 'id',
    name: 'users.id',
    render: function (data) {
        return `<button type="button" class="btn btn-danger">${data}</button>`;
    }
},
5. Order
Chúng ta có thể sắp xếp thứ tự của các bản ghi ngay tại bảng luôn thay vì phải query
select * from users order by id ASC
bên phía controller. Ex:
$(function () {
    listUsers = $('#listUsers').DataTable(
        ...
        order: [1, 'asc'],
    );
});
Chúng ta cũng có thể order by nhiều cột cùng một lúc được. Ex:
// "order" option must be an array of arrays, each inner array comprised of two elements:
order: [[1, 'asc'], [2, 'desc']],
6. Select multiple items
Việc chọn một lúc nhiều items có thể giúp người dùng tiết kiệm thời gian trong việc export data chẳng hạn.
- Thêm thư viện:
<link rel="stylesheet" type="text/css" href="https://cdn.datatables.net/select/1.2.7/css/select.dataTables.min.css">
<link rel='stylesheet' type='text/css' href='https://gyrocode.github.io/jquery-datatables-checkboxes/1.2.10/css/dataTables.checkboxes.css'>
<script type="text/javascript" src="https://cdn.datatables.net/select/1.2.6/js/dataTables.select.min.js"></script>
<script type='text/javascript' src='https://gyrocode.github.io/jquery-datatables-checkboxes/1.2.10/js/dataTables.checkboxes.min.js'></script>
- Thêm chút code cho phần js của listUsers nào:
$(function () {
    listUsers = $('#listUsers').DataTable(
        ...
        columnDefs: [
            {
                'targets': 0,
                'checkboxes': {
                    'selectRow': true
                }
            }
        ],
        select: {
            'style': 'multi'
        },
    );
});
Oops, tí quên, nhớ thêm một cột <th> cho phần checkboxes nhé
Kết quả:
7. Buttons
Cái này phục vụ cho việc export data là nhiều này. Các bạn tham khảo tại https://datatables.net/extensions/buttons/examples/initialisation/select.html nhé.
Công việc khá đơn giản: import thư viện, thêm một chút code js là done.
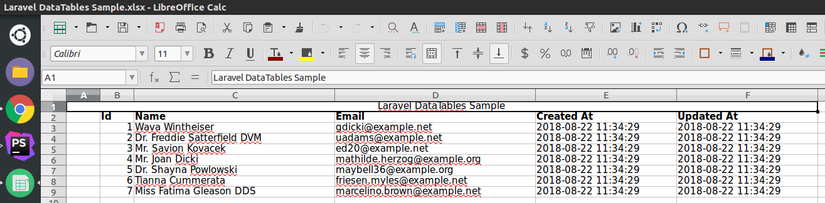
Ngoài ra, đối với việc export dữ liệu, theo như https://datatables.net/faqs/#Server-side-processing:
Q: How can I export the whole table when using serverSide and Buttons?
A: Buttons is a client-side process, so it can only export the data available at the client-side. When server-side processing is enabled, the full data set is not held on the client-side, so only the visible data can be exported. You can either: 1. Use a server-side process to create the files to download (recommended) or 2. Disable server-side processing.
Tức là, khi sử dụng Server-side, DataTables chỉ export những dữ liệu đang hiển thị trên màn hình. Giải pháp đưa ra:
- Disable Server-side và sử dụng Client-side (nghe không khả thi lắm :v)
- Tự viết function cho export data.
- Sử dụng plugin. Có rất nhiều free plugin cho việc export data. Ví dụ: https://github.com/Maatwebsite/Laravel-Excel. Mình thì khoái của cậu này hơn, đáp ứng đủ tiêu chí nhanh - gọn - nhẹ: https://github.com/rap2hpoutre/fast-excel.
8. initComplete và drawCallback
- initComplete: bắt sự kiện khi table được draw thành công ở lần đầu tiên.
- drawCallback: bắt sự kiện bất cứ khi nào table được draw thành công. Chúng ta cùng thử làm một bài toán nho nhỏ nhé: cho phép người dùng filter data ngay tại mỗi cột (như ảnh expected output ở trên cùng chẳng hạn).
$(function () {
    listUsers = $('#listUsers').DataTable(
        ...
        initComplete: function () {
            this.api().columns().every(function () {
                var column = this;
                var input = document.createElement("input");
                $(input).attr('class', 'filter');
                $(input).attr('style', 'width: 100%');
                $(input).appendTo($(column.footer()).empty()).on('keyup change', function () {
                    column.search($(this).val(), false, false, true).draw();
                });
            });
            $('#listUsers > tfoot > tr > th:nth-child(1) > input').hide();
        },
        drawCallback: function () {
            console.log('DataTables has redrawn the table!');
        }
    );
});
Kết quả:
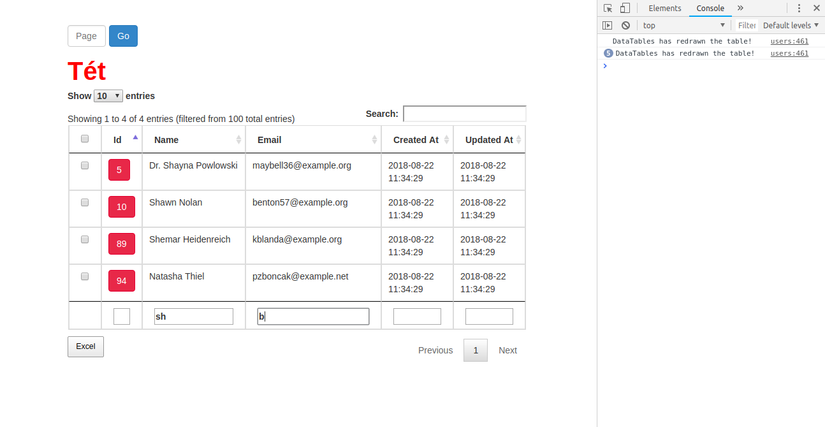
Note: Đối với bài toán trên, có một điều bất tiện xảy ra. Cứ mỗi 1 chữ cái được nhập vào là DataTables sẽ gửi 1 request đến server. Đối với web ít dữ liệu, ít users thì no problem. Nhưng nếu ngược lại thì sẽ là có biến đấy
Solution: Tạm thời, chúng ta nên sử dụng debounce để hạn chế việc gửi quá nhiều request cùng một lúc. Cần phải set một khoảng thời gian nhất định, hết thời gian thì mới gửi 1 request chứa tất cả các param được nhập trong khoảng thời gian đó. Kiểu như là thay vì 1s gửi 1 cái nhỏ thì giờ gom lại sau 3s gửi 1 cái to. Các bạn có thể tham khảo thêm tại https://css-tricks.com/the-difference-between-throttling-and-debouncing/.
9. pageLength
Chúng ta có thẻ thay đổi list các số lượng bản ghi được hiển thị trên một trang thông qua việc custom "lengthMenu". Ex:
$(function () {
    listUsers = $('#listUsers').DataTable(
        ...
        "lengthMenu": [[10, 25, 50, -1], [10, 25, 50, "All"]]
    );
});
10. DataTables Information
Đây là phần mình thấy hay nhất của DataTables.
Note: Các bạn nhớ để listUsers là biến toàn cục nhé, ngang bằng với window ấy.
Bật F12 -> Console -> Gõ:
listUsers.page.info();
Các thông số của listUsers sẽ hiện ra như sau:
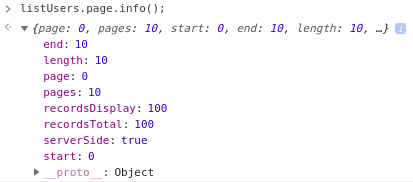
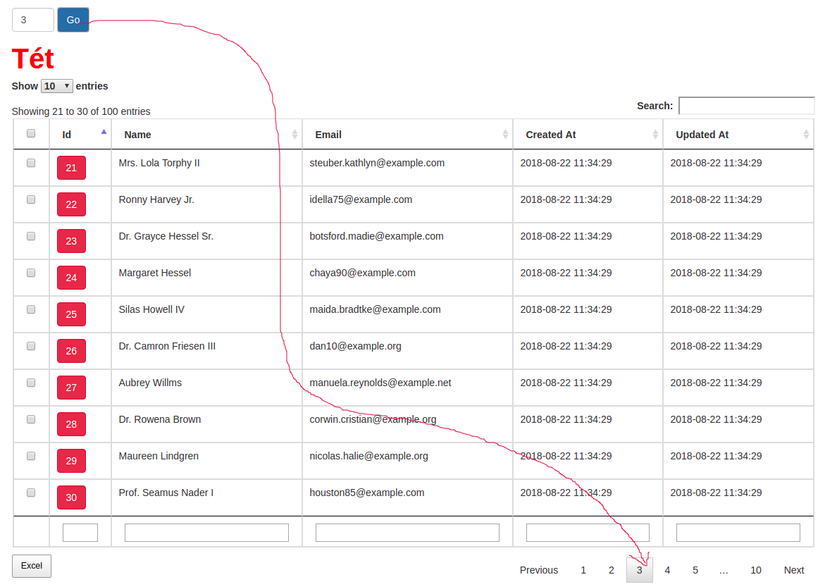
Khá là đầy đụ để ứng dụng Thử làm một bài toán nho nhỏ: cho phép người dùng đi đến số trang mà họ muốn nhé.
- Step 1: Viết một chút HTML:
<div id="paginationListUsers" style="margin-bottom: 10px; display: flex;">
    <input class="form-control"
           type="text"
           placeholder="Page"
           id="inputPaginationListUsers"
           style="width: 60px; margin-right: 5px;">
    <button class="btn btn-primary" id="buttonPaginationListUsers">Go</button>
</div>
- Step 2: Bắt sự kiện click cho button "Go":
$('#buttonPaginationListUsers').click(function () {
    var inputPage = parseInt($('#inputPaginationListUsers').val());
    var totalPages = listUsers.page.info().pages;
    if (!inputPage) {
        alert("Please input the number of page!");
        listUsers.off();
    } else if (inputPage > totalPages) {
        alert("Sorry, this page is unavailable!");
    } else {
        listUsers.page(inputPage - 1).draw(false);
    }
});
Múc:
... Bài viết đã khá dài, mình xin dừng ở con số 10 tips. Còn rất nhiều cái hay của DataTables, nhưng giờ liệt kê khéo đến sáng mai cũng không hết =))
IV. Ưu điểm và Nhược điểm
- Ưu điểm: Tiện lợi, làm được đa tác vụ, tiết kiệm effort.
- Nhược điểm: Dễ gây phụ thuộc. Có những event rất khó để custom.
- Quan điểm cá nhân: Cho đến hiện tại, mình thấy là DataTables là một plugin rất đáng để dùng. Rõ ràng so sánh với việc cực khổ tạo một table "zin" từ đầu, rồi viết functions cho việc hiển thị dữ liệu, autocomplete search, phân trang, etc. thật sự là tiết kiệm được rất nhiều time và effort. But, SQL và JavaScript mới là những điều kiện cần để lấy ra được dữ liệu (SQL), custom chúng để tương tác với người dùng (JavaScript). DataTables cũng chỉ là một plugin giúp chúng ta tiết kiệm công sức hơn so với cách làm truyền thống. Biết đâu sau này công nghệ lại sinh ra một cái mới cao cấp hơn, xịn hơn như là SuperDataTables chẳng hạn, rồi DataTables cũng sẽ trôi vào lãng quên, đến lúc đấy lại phải học cái Super đấy à? Liệu nó có khó để làm quen? Đối với cá nhân mình, mình thấy là, trước khi tiếp cận DataTables, hãy cố gắng để thuần thục combo SQL và JavaScript nhất có thể, vì hiểu được core rồi thì làm việc với các plugin, framework và CMS sẽ dễ dàng hơn nhiều
VI. Tổng kết
Trong bài viết này mình đã chia sẻ với các bạn cách sử dụng plugin Laravel DataTables. Ngoài ra, các bạn có thể tham khảo source code mình đã push lên đây:
https://github.com/hoangvietan96/laravel_datatables_sample
Hi vọng bài viết giúp ích cho các bạn. Hẹn gặp lại các bạn ở các bài viết sau
VII. Tham khảo
https://datatables.yajrabox.com/
https://viblo.asia/p/laravel-datatables-WAyK8V1mlxX
Btw, many thanks to @ththth @vu.huy.tuan @tiennguyenhoang339 for your supporting! (bow)
All rights reserved
