Laravel 5.3 - Passport (Part 3)
Bài đăng này đã không được cập nhật trong 4 năm
Tiếp tục với tutorial laravel passport. Hôm nay mình sẽ hướng dẫn code phần Password Grant 1 trong những grant của Oauth2. Về Password grant là gì thì các bạn có thể tham khảo ở đây. https://viblo.asia/tungshooter/posts/3OEqGjDpR9bL#grant-type-resource-owner-password-credentials-11 Password grant sẽ cho phép ứng dụng của bạn như là một client thứ ba, ví dụ như ứng dụng mobile (1 app android hay 1 app ios) sẽ tạo ra access token khi người dùng cung cấp username/email và password.
Tạo một grant password client
Trước khi tạo access token cho ứng dụng thì bạn phải tạo ra một client để cung cấp access token, client chúng ta tạo sẽ là password client. Bạn run command này trên terminal. Lệnh này sẽ yêu cầu bạn nhập tên ứng dụng, lệnh này thực hiện thành công sẽ insert một record vào trong table oauth_clients với user_id = NULL, 2 thông số client_id và client_secret sẽ được output khi thực hiện command này, chúng ta sẽ dùng 2 thông số này cho vào file .env, khi để ý thì ta sẽ thấy record này có password_client=1 ===> để hiểu client này dùng grant password
php artisan passport:client --password
Command này ở trong phần core của passport đã settup sẵn
File: \vendor\laravel\passport\src\Console\ClientCommand.php
/**
     * Create a new password grant client.
     *
     * @param  \Laravel\Passport\ClientRepository  $clients
     * @return void
     */
    protected function createPasswordClient(ClientRepository $clients)
    {
        $name = $this->option('name') ?: $this->ask(
            'What should we name the password grant client?',
            config('app.name').' Password Grant Client'
        );

        $client = $clients->createPasswordGrantClient(
            null, $name, 'http://localhost'
        );

        $this->info('Password grant client created successfully.');
        $this->line('<comment>Client ID:</comment> '.$client->id);
        $this->line('<comment>Client Secret:</comment> '.$client->secret);
    }
File: \vendor\laravel\passport\src\ClientRepository.php
/**
     * Store a new password grant client.
     *
     * @param  int  $userId
     * @param  string  $name
     * @param  string  $redirect
     * @return Client
     */
    public function createPasswordGrantClient($userId, $name, $redirect)
    {
        return $this->create($userId, $name, $redirect, false, true);
    }
Requesting Tokens
$http = new GuzzleHttp\Client;

$response = $http->post('http://your-app.com/oauth/token', [
    'form_params' => [
        'grant_type' => 'password',
        'client_id' => 'client-id',
        'client_secret' => 'client-secret',
        'username' => 'taylor@laravel.com',
        'password' => 'my-password',
        'scope' => '',
    ],
]);

return json_decode((string) $response->getBody(), true);
Khi bạn tạo được 1 client password, bạn có thể yêu cầu access token để truy cập ứng dụng bằng đoạn code ở trên.
Ở đây có các tham số mà bạn cần lưu ý:
'http://your-app.com/oauth/token': your-app là url trong env của bạn ===> APP_URL=http://localhost/ env('APP_URL') . '/oauth/token'
client_id: là id mà khi bạn tạo app nó sẽ trả về, tham số này chúng ta cũng nên set ở file env để sau này dễ thay đổi ===> API_CLIENT_ID=1 'client_id' => env('API_CLIENT_ID'),
client_secret: tương tự như client id
username/email: là email của user login
password: là password của user login.
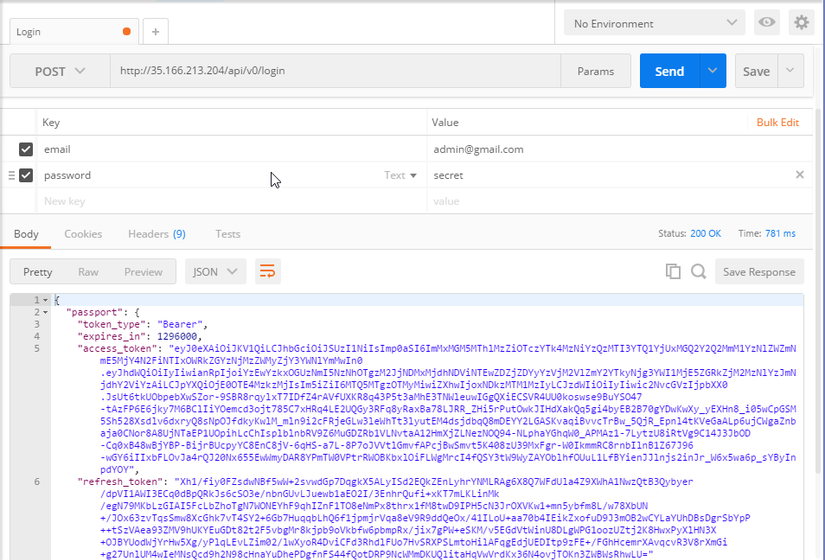
Sau khi run đoạn code này nó sẽ trả về cho bạn 1 access_token và 1 refresh_token, giống như vậy
Phần này mình đã hướng dẫn các bạn tạo access token với grant password, phần tiếp theo mình sẽ hướng dẫn tạo access token đối với grant personal Nguồn: https://laravel.com/docs/5.4/passport#password-grant-tokens
All rights reserved
