Làm việc với Google Map SDK cho iOS
Bài đăng này đã không được cập nhật trong 4 năm
1. Yêu cầu
Để chạy được project sử dụng google map sdk cho iOS thì ta cần sử dụng Xcode 7.3 trở lên
2. Cài đặt Google Map SDK
Ta có thể cài đặt Google Map SDK for iOS thông qua cocoapods:
source 'https://github.com/CocoaPods/Specs.git'
target 'YOUR_APPLICATION_TARGET_NAME_HERE' do
  pod 'GoogleMaps'
  pod 'GooglePlaces'
end
Nếu chưa cài đặt cocoapods ta có thể cài đặt cocoapods sử dụng lệnh sau trên terminal:
sudo gem install cocoapods
3. Thiết lập Google Map Key
Làm theo các bước sau để lấy được API key:
- Truy cập Google API Console.
- Tạo mới hoặc chọn 1 project có sẵn.
- Click chọn Continue và enable Google Maps SDK cho iOS
- Mở page Credentials để lấy API key
- Save
API key lấy được sẽ có dạng:
AIzaSyBdVl-cTICSwYKrZ95SuvNw7dbMuDt1KG0
Add API key vào project:
Trong file AppDelegate.swift import google map:
import GoogleMaps
Thêm dòng code dưới đây vào thân hàm application(:didFinishLaunchingWithOptions:) API key chính là key lấy được ở trên:
GMSServices.provideAPIKey("YOUR_API_KEY")
Nếu sử dụng Place API thì ta thêm dòng sau:
GMSPlacesClient.provideAPIKey("YOUR_API_KEY")
4. Tạo map
Cách 1: Sử dụng code
import UIKit
import GoogleMaps

class ViewController: UIViewController {
  override func loadView() {
    // Create a GMSCameraPosition that tells the map to display the
    // coordinate -33.86,151.20 at zoom level 6.
    let camera = GMSCameraPosition.camera(withLatitude: -33.86, longitude: 151.20, zoom: 6.0)
    let mapView = GMSMapView.map(withFrame: CGRect.zero, camera: camera)
    view = mapView
  }
}
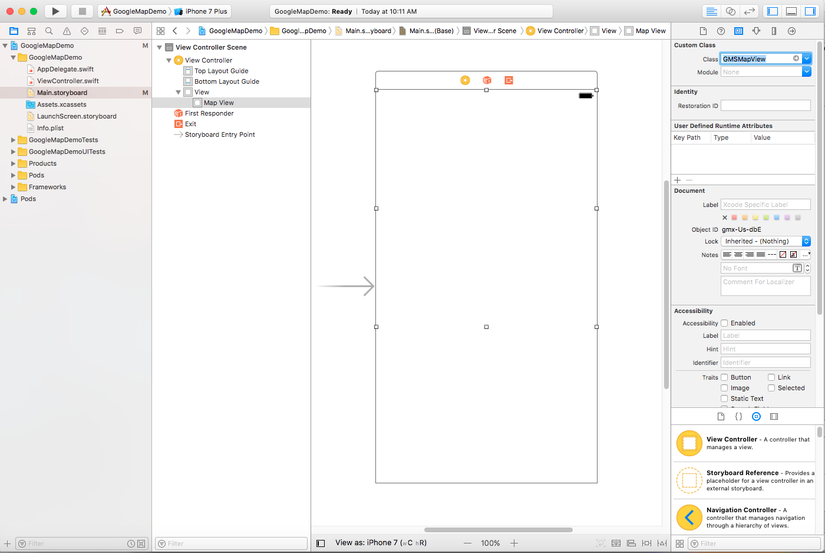
Cách 2: kéo thả trên storyboard
Kéo 1 UIView lên đặt class cho nó là GMSMapView sau đó tạo kết nối IBOutlet vào ViewController
 Đoạn code sử dụng như sau:
import UIKit
import GoogleMaps

class ViewController: UIViewController {

    @IBOutlet weak var mapView: GMSMapView!

    override func viewDidLoad() {
        super.viewDidLoad()
        // Do any additional setup after loading the view, typically from a nib.
        let camera = GMSCameraPosition.camera(withLatitude: -33.86, longitude: 151.20, zoom: 6.0)
        self.mapView.camera = camera
    }

    override func didReceiveMemoryWarning() {
        super.didReceiveMemoryWarning()
        // Dispose of any resources that can be recreated.
    }
}
5. Tạo marker trên map
Đoạn code tạo marker trên map với location fix sẵn:
// Creates a marker in the center of the map.
    let marker = GMSMarker()
    marker.position = CLLocationCoordinate2D(latitude: -33.86, longitude: 151.20)
    marker.title = "Sydney"
    marker.snippet = "Australia"
    marker.map = self.mapView
Full code trong ViewController:
import UIKit
import GoogleMaps

class ViewController: UIViewController {

    @IBOutlet weak var mapView: GMSMapView!

    override func viewDidLoad() {
        super.viewDidLoad()
        // Do any additional setup after loading the view, typically from a nib.
        let camera = GMSCameraPosition.camera(withLatitude: -33.86, longitude: 151.20, zoom: 6.0)
        self.mapView.camera = camera
        self.addMarker()
    }
    func addMarker() {
         let marker = GMSMarker()
         marker.position = CLLocationCoordinate2D(latitude: -33.86, longitude: 151.20)
         marker.title = "Sydney"
         marker.snippet = "Australia"
         marker.map = self.mapView
    }
    override func didReceiveMemoryWarning() {
        super.didReceiveMemoryWarning()
        // Dispose of any resources that can be recreated.
    }
}
Bài toán thường gặp khi làm việc với marker trên google map đó là khi ta tap vào 1 vị trí trên bản đồ sẽ lấy được location của vị trí đó và vẽ marker này tại ví trí đó. Để giải quyết được bài toán này Google Map SDK đã cung cấp sẵn cho chúng ta GMSMapViewDelegate để xử lý:
func mapView(_ mapView: GMSMapView, didTapAt coordinate: CLLocationCoordinate2D) {
        self.mapView.clear()
        self.addMarker(coordinate)
    }
Hàm addMarker:
func addMarker(coordinate: CLLocationCoordinate2D) {
         let marker = GMSMarker()
         marker.position = coordinate
         marker.map = self.mapView
    }
6. Current Location
Google map SDK cung cấp sẵn button Current Location, để hiển thị button này sử dụng code sau:
mapView.settings.myLocationButton = true
Để button hoạt động ta cần thêm dòng code sau:
mapView.isMyLocationEnabled = true
Ta có thể custom việc thực hiện bấm nút current location này thông qua delegate GMSMapViewDelegate
extention ViewController: GMSMapViewDelegate {
....
func didTapMyLocationButton(for mapView: GMSMapView) -> Bool {
        //Your custom code here: for example get current location and then send it to your own server
        return false
    }
...
}
Chú ý ở hàm didTapMyLocationButton return false để thực hiện chức năng mặc định của current location là show bản đồ vào vị trí hiện tại, nếu return true sẽ ko thực hiện chức năng mặc định này.
Tài liệu tham khảo:
https://developers.google.com/maps/documentation/ios-sdk/start
All rights reserved
