Làm ứng dụng nghe nhạc đơn giản với Rails và Amazon S3
Bài đăng này đã không được cập nhật trong 4 năm
Xin chào các bạn, trong bài viết hôm nay, mình sẽ giới thiệu với các bạn cách làm một trang web nghe nhạc, tải nhạc trực tuyến, lưu trữ nhạc trên dịch vụ s3 của amazon. Chúng ta cùng bắt đầu nhé.
I. S3 là gì?
Amazon S3 is "storage for the Internet". Đây là câu nói ngắn gọn nhất giải thích về dịch vụ s3. S3 cung cấp cho chúng ta dịch vụ lưu trữ các nội dung như ảnh, video, audio và các file dữ liệu với giá thành khá rẻ và tốc độ truy xuất nhanh.
Tuy nhiên S3 không hoạt động giống với việc lưu trữ trên máy tính của chúng ta lắm, thông thường trên máy tính chúng ta lưu các file vào thư mục, trên s3 có 1 số điểm khác biệt sau:
- Các thư mục trên s3 gọi là bucket, các file được gọi là object.
- Bucket ở top-level dùng để tạo url trỏ đến địa chỉ lưu trữ, vì thế chúng ta không thể tạo các bucket top-level trùng tên với người khác được.
- Thông thường để tránh trùng và dễ hiểu, top-level bucket thường đặt theo tên website hoặc dự án của chúng ta thay vì các danh từ chung như video, images... Các từ trên nên để ở các bucket level sau. Để sử dụng dịch vụ của amazon, các bạn có thể lên trang chủ amazon tạo tài khoản và sau đó lấy Access Key ID và Secret Access Key, 2 key này giúp chúng ta kết nối đến tài khoản amazon và sử dụng dịch vụ. Hiểu sơ qua như thế ổn rồi, chúng ta sẽ chi tiết cách thức sử dụng hơn trong các phần sau.
II.Tạo project và config S3
Trước hết chúng ta tạo project có tên mp3app:
rails new mp3app
Thêm gem 'aws-s3', :require => 'aws/s3' vào gem file và chạy bundle install.
Trong file application.rb, chúng ta thêm dòng config
AWS::S3::Base.establish_connection!(
    :access_key_id     => 'Put your Access Key ID here',
    :secret_access_key => 'Put your Secret Access Key here'
)
BUCKET='s3tutorialmusic'
File application sẽ được load sau khi chạy server, vì bucket chúng ta tạo ở top-level là cố định nên ta cũng gán 1 hằng BUCKET để tiện dùng sau này (ở đây tôi ví dụ tên bucket là s3tutorialmusic).
File application.rb của chúng ta cuối cùng như sau:
require File.expand_path('../boot', __FILE__)

require 'rails/all'

Bundler.require(:default, Rails.env) if defined?(Bundler)

module Mp3app
  class Application < Rails::Application
    config.encoding = "utf-8"
    config.filter_parameters += [:password]

    AWS::S3::Base.establish_connection!(
      :access_key_id     => 'Put your Access Key ID Here',
      :secret_access_key => 'Put your Secred Access Key here'
    )

    BUCKET = 's3tutorialmusic'

  end
end
Tiếp theo, ta cần tạo ra controller cho việc upload/xóa bài hát, hiển thị danh sách bài hát, chúng ta chạy lệnh sau
rails g controller Songs index upload delete
Câu lệnh trên sẽ sinh ra file songs_controller.rb với các action index, upload, delete.
III. Xây dụng tính năng upload, xóa và hiển thị danh sách bài hát
Tất cả các bài hát upload lên của chúng ta sẽ nằm trong bucket s3tutorialmusic, để lấy ra list bài hát chúng ta chỉ cần lấy tất cả object trong bucket này thôi. Action index sẽ được viết như sau:
def index
    @songs = AWS::S3::Bucket.find(BUCKET).objects
end
Ở file index.html, danh sách bài hát sẽ được in ra dạng list, hiển thị theo key của object trên s3, kèm theo đường link để xóa bài hát nếu muốn.
<ul>
<% @songs.each do |song| %>
   <li><%= song.key %> - <%= link_to "Delete",  "songs/delete/?song=" + song.key, :confirm => 'Are you sure you want to delete ' + song.key + '?' %></li>
<% end %>
</ul>
Tại action delete, kiểm tra nếu bài hát tồn tại trên s3 thì xóa bài hát, s3 có cung cấp cho chúng ta hàm delete để xóa object trên bucket.
if (params[:song])
    AWS::S3::S3Object.find(params[:song], BUCKET).delete
    redirect_to root_path
else
    render :text => "No song was found to delete!"
end
Để có thể upload bài hát lên s3, chúng ta cần tạo 1 form upload bài hát trỏ đến action upload của controller song như sau:
<h2>Upload a new MP3:</h2>
<%= form_tag upload_path, :method => "post", :multipart => true do %>
    <%= file_field_tag "mp3file" %>
    <%= submit_tag "Upload" %>
<% end %>
Khi submit form, params mp3_file gửi lên controller sẽ là đường dẫn đến file nhạc trong máy local của người dùng, params này cần xử lí trước khi lưu lại bằng hàm sanitize_filename
private
def sanitize_filename file_name
    just_filename = File.basename(file_name)
    just_filename.sub(/[^\w\.\-]/,'_')
end
Lí do chúng ta cần hàm này là vì khi lưu tên file vào s3, các trình duyệt chrome, safari hoặc firefox sẽ trả về tên file, riêng trình duyệt IE sẽ trả về cả đường dẫn trong thư mục (ví dụ như "C:\rails\mp3app\mysong.mp3"). Vì thế hàm sanitize_filename sẽ đảm bảo tên file không chứa đường dẫn đi kèm.
Và tất nhiên việc upload file có thể bị lỗi, action upload được viết như sau:
def upload
    begin
        AWS::S3::S3Object.store(sanitize_filename(params[:mp3file].original_filename), params[:mp3file].read, BUCKET, :access => :public_read)
        redirect_to root_path
    rescue
        render text: "Couldn't complete the upload"
    end
end
Khi xảy ra lỗi, người dùng sẽ nhận được dòng thông báo "Couldn't complete the upload".
Đây là toàn bộ file songs_controller.rb tại thời điểm này:
class SongsController < ApplicationController
  def index
    @songs = AWS::S3::Bucket.find(BUCKET).objects
  end

  def upload
    begin
      AWS::S3::S3Object.store(sanitize_filename(params[:mp3file].original_filename), params[:mp3file].read, BUCKET, :access => :public_read)
      redirect_to root_path
    rescue
      render :text => "Couldn't complete the upload"
    end
  end

  def delete
    if (params[:song])
      AWS::S3::S3Object.find(params[:song], BUCKET).delete
      redirect_to root_path
    else
      render :text => "No song was found to delete!"
    end
  end

  private

  def sanitize_filename(file_name)
    just_filename = File.basename(file_name)
    just_filename.sub(/[^\w\.\-]/,'_')
  end

end
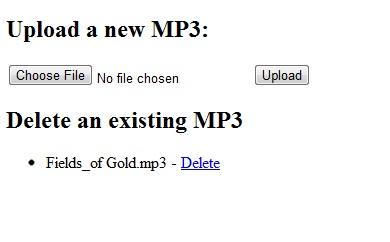
Đây là thành quả file index hiện tai (hehe)
IV. Download và stream file nhạc Để cho phép người dùng tải nhạc về thông qua giao thức HTTP, ta tạo thêm action download trong controller
def download_url_for(song_key)
    AWS::S3::S3Object.url_for(song_key, BUCKET, authenticated: false)
end
S3 cung cấp hàm url_for giúp người dùng tải nhạc qua HTTP với tham số như sau: song_key: tên bài hát đã upload. BUCKET: hằng số tên bucket. authenticated: false mặc định link tải sẽ expired trong 5 phút.
Ở view, chúng ta thêm nút download bên cạnh bài hát
<td><%= link_to "Download", download_url_for(song.key) %></td>
Để người dùng có thể nghe nhạc thì khó khăn hơn tải nhạc 1 chút. Chúng ta làm theo các step như sau:
- Tạo ra 1 section
audiođể chứa thẻ audio. - Sinh đường dẫn download file nhạc, dùng jquery tạo tag
<audio>với source là đường dẫn đó và append vào section audio bên trên.
<td><%= link_to "HTML5 Audio", download_url_for(song.key), :class => "html5" %></td>
File jquery để append audio tag, các bạn có thể viết thẳng vào file application.js:
$(document).ready(function() {
    var audioSection = $('section#audio');
    $('a.html5').click(function() {

        var audio = $('<audio>', {
             controls : 'controls'
        });

        var url = $(this).attr('href');
        $('<source>').attr('src', url).appendTo(audio);
        audioSection.html(audio);
        return false;
    });
});
Đến đây, tính năng download và stream nhạc của trang web đã cơ bản hoàn thành. File index có cấu trúc như sau:
<h2>Listen to a MP3 with HTML5 Audio</h2>
<section id="audio">
</section>
<h2>Upload a new MP3</h2>
<%= form_tag upload_path, :method => "post", :multipart => true do %>
    <%= file_field_tag "mp3file" %>
    <%= submit_tag "Upload" %>
<% end %>
<h2>Download and Delete Existing MP3's</h2>
<table>
<% @songs.each do |song| %>
    <tr>
        <td><%= song.key %></td>
        <td><%= link_to "HTML5 Audio", download_url_for(song.key), :class => "html5" %></td>
        <td><%= link_to "Download", download_url_for(song.key) %></td>
        <td><%= link_to "Torrent", torrent_url_for(song.key) %></td>
        <td><%= link_to "Delete",  "songs/delete/?song=" + song.key, :confirm => 'Are you sure you want to delete ' + song.key + '?' %></td>
    </tr>
<% end %>
</table>
Để web có vẻ mượt mà hơn, chúng ta sẽ thêm 1 chút css vào
#container {
  width: 75%;
  margin: 0 auto;
  background-color: #FFF;
  padding: 20px 40px;
  border: solid 1px black;
  margin-top: 20px;
}
body {
  background-color: #4B7399;
  font-family: Verdana, Helvetica, Arial;
  font-size: 14px;
}
.clear {
  clear: both;
  height: 0;
  overflow: hidden;
}

#sidebar {
    width: 30%;
    float: left;
}
#main {
    width: 70%;
    float: left;
}
a, a:visited {
    color: #00f;
    text-decoration: none;
}
a:hover {
    text-decoration: underline;
}
td {
    padding: 5px;
}
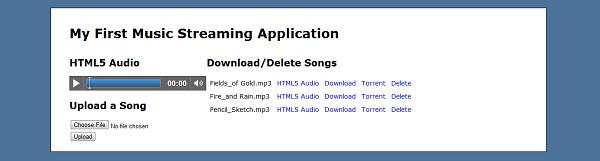
Và đây là thảnh quả cuối cùng sau khi chỉnh sửa.
V. Kết luận
Qua website demo trên, mong rằng các bạn có thể hiểu thêm cách sử dụng dịch vụ s3 với ứng dụng Rails và một vài thao tác cơ bản với các object của S3. Nếu có thời gian, các bạn có thể mở rộng ví dụ với các tính năng hấp dẫn hơn để học hỏi thêm nhiều kiến thức mới. Cảm ơn các bạn đã theo dõi bài viết.
Tham khảo: https://code.tutsplus.com/articles/create-a-simple-music-streaming-app-with-ruby-on-rails--net-18437
All rights reserved
