Kubernetes - Dashboard with Ingress
[Trà đá ký sự] Nay Hà Nội nó mưa, thời tiết se lạnh, trà đá càng ế.
Ngồi nghĩ về tương lai thấy nó mờ mịt như bầu trời lúc này.
Bán nước thế này baoh mới mua được Audi đời 2003 🙁
Thôi thì tiện đang rảnh, ngồi nghiên cứu về Role trong K8s, thì viết luôn 1 cái bài này.
Nó rất dễ rồi, nhưng cũng ok phết.
Ai rảnh qua ủng hộ cốc nước nhé  )
)
Kubernetes Dashboard hơi chuối.
Nay rảnh rỗi, ngồi hí hoáy tí cho nó vui.
1. Install Nginx Ingress
helm repo add ingress-nginx https://kubernetes.github.io/ingress-nginx

helm repo update

helm search repo nginx

helm pull ingress-nginx/ingress-nginx

tar -zxvf ingress-nginx-4.11.3.tgz

helm -n <namespaces> install <release name> -f <value file> <helm chart>

helm -n ingress-nginx install ingress-nginx -f ingress-nginx/values.yaml ingress-nginx
Chỉnh sửa file values.yaml:
vim values.yaml
Trong phần service, change type LoadBalancer → NodePort

Thêm port trong phần NodePort:
http: “30080”
https: “30443”
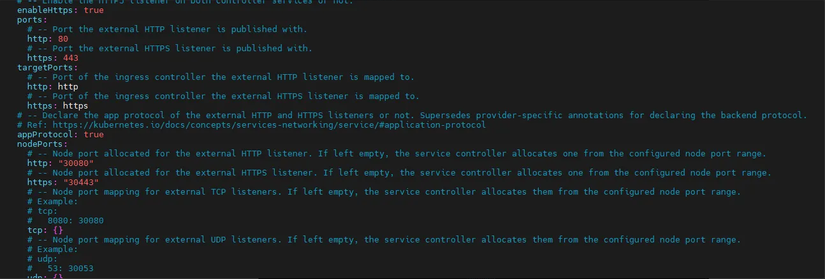

helm -n ingress-nginx install ingress-nginx -f ingress-nginx/values.yaml ingress-nginx
2. Install nginx
apt install nginx -y
3. Tạo 1 file config cho domain chúng ta muốn dùng :
vim /etc/nginx/conf.d/dashboard.conf

upstream k8s-cluster {

    server 192.168.100.10:30443;

    server 192.168.100.11:30443;

    server 192.168.100.12:30443;
}

server {

    listen 8000;

    server_name product.co;

 location / {
     proxy_pass <http://k8s-cluster>;

    proxy_redirect off;

    proxy_set_header Host $host;

    proxy_set_header X-Real-IP $remote_addr;

    proxy_set_header X-Forwarded-For $proxy_add_x_forwarded_for;

    proxy_set_header X-Forwarded-Proto $scheme;
    }
}
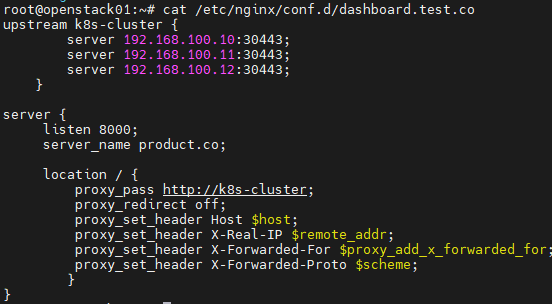
4. Install Kubernetes Dashboard:
helm repo add kubernetes-dashboard https://kubernetes.github.io/dashboard/

helm update repo

helm repo list

helm pull repo kubernetes-dashboard/kubernetes-dashboard

tar -zxvf kubernetes-dashboard-7.10.0.tgz

vim kubernetes-dashboard/values.yaml
Tìm và chỉnh sửa phần kong như sau :
NodePort → ClusterIP
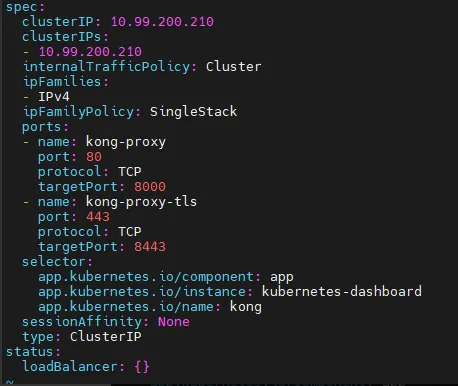
helm upgrade kubernetes-dashboard kubernetes-dashboard/kubernetes-dashboard -f values.yaml -n kubernetes-dashboard


5. Create service account dashboard-user, và tạo cluster role binding, secret.
apiVersion: v1

kind: ServiceAccount

metadata:

    name: dashboard-user

    namespace: kubernetes-dashboard

---

apiVersion: rbac.authorization.k8s.io/v1

kind: ClusterRoleBinding

metadata:

    name: dashboard-user
roleRef:
    apiGroup: rbac.authorization.k8s.io

    kind: ClusterRole

    name: cluster-admin
subjects:

    - kind: ServiceAccount

    name: dashboard-user

    namespace: kubernetes-dashboard

---

apiVersion: v1
kind: Secret
metadata:

    name: dashboard-user

    namespace: kubernetes-dashboard

 annotations:
    kubernetes.io/service-account.name: "dashboard-user"

 type: kubernetes.io/service-account-token
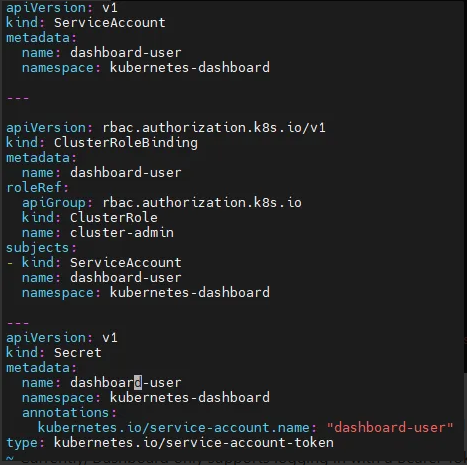
Mục đích của việc này :
- To protect your cluster data, Dashboard deploys with a minimal RBAC configuration by default.
- Currently, Dashboard only supports logging in with a Bearer Token.
Nguồn : https://kubernetes.io/docs/tasks/access-application-cluster/web-ui-dashboard/
https://github.com/kubernetes/dashboard/blob/master/docs/user/access-control/creating-sample-user.md
In most cases after provisioning the cluster using kops, kubeadm or any other popular tool, the ClusterRole cluster-admin already exists in the cluster. We can use it and create only a ClusterRoleBinding for our ServiceAccount. If it does not exist then you need to create this role first and grant required privileges manually.
→ ClusterRole cluster-admin đã có sẵn khi ta khỏi tạo k8s cluster, thế nên chúng ta chỉ việc tạo 1 ClusterRoleBinding cho service account ở trên.
Tiếp đến là tạo 1 secret để lưu trữ token để access vào UI Dashboard.


Get token để access nào :
kubectl -n kubernetes-dashboard get secret dashboard-user -o jsonpath="{.data.token}" | base64 --decode > key.txt

6. Tạo ingress-dashboard.yml để thực hiện việc access từ bên ngoài thông qua domain.
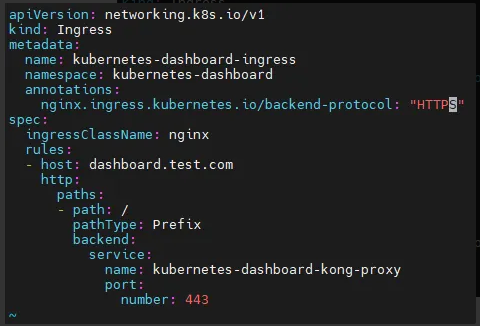
Apply nó thôi.
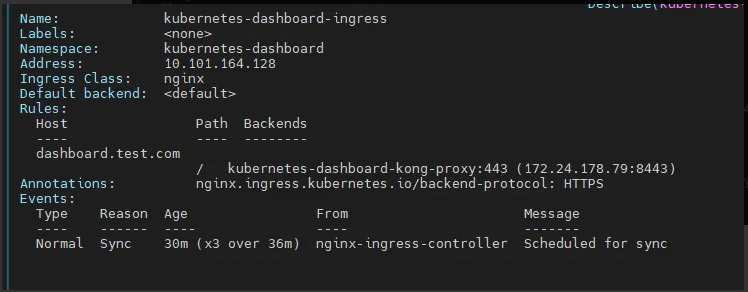
Sau khi apply, phần rule của ingress đi vào backend là thằng kong-proxy là ok.
7. Access và tận hưởng thành quả :
Add host trên máy cá nhân :

Mở browser và truy cập :
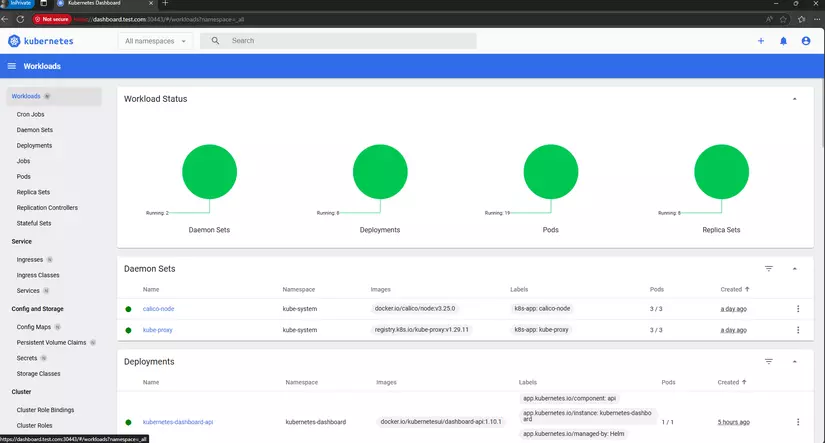
Nhập token và tận hưởng.
8. Troubleshot lỗi
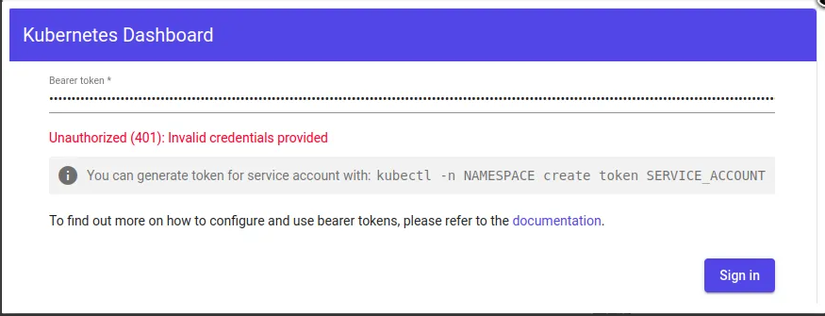
Tôi lượn 1 vòng gg thì thấy nhiều bài về cái lỗi này, nhưng với tôi thì là do trước đó tôi truy cập bằng
Có vẻ thằng này nó k cho xác thực qua http.
Thế nên tôi đã sửa lại ở các bước trên để làm sao có thể truy cập được qua https.
Chúc các bạn cuối tuần vui vẻ.
All rights reserved