Key-Value Observing P2
Bài đăng này đã không được cập nhật trong 4 năm
Ở phần trước chúng ta đã biết các steps cần thiết khi muốn sử dụng KVO. Việc quản lý, post các notification OS đã làm một cách tự động, chúng ta chỉ cần observe nó khi cần, chi tiết các bạn có thể xem Phần 1 tại đây.
Automatic and Manual Notifications
iOS gởi các thông báo khi các property có sự thay đổi cho các observer. Việc này có đôi khi lại gây ra hiện tượng spam notification liên tục khi observe nhiều property. iOS cho phép chúng ta có thể quản lý việc gởi đi các notification khi cần thiết. Chúng ta có thể tự động gởi các message đó một cách thủ công khi cần thiết.
Để quản lý việc gởi notification khi property change cần phải implement method
automaticallyNotifiesObserverForKey:
Kiểu trả về của method này là Bool với giá trị NO thì OS sẽ không gởi notification về property change. Nếu bạn không chắc chắn về giá trị này thì nên để để OS tự động handle nó.
Thử với project từ phần 1. Chúng ta sẽ observer properties "name" và "age" của object child, chúng ta sẽ không cho gởi đi message khi property name thay đổi.
Cùng check lại code dùng để log sự thay đổi của object child
- (void)viewWillAppear:(BOOL)animated {
    [self.child1 addObserver:self
            forKeyPath:@"age"
               options:NSKeyValueObservingOptionNew | NSKeyValueObservingOptionOld
               context:self.child1.someContext];
    [self.child1 addObserver:self
                  forKeyPath:@"name"
                     options:NSKeyValueObservingOptionNew | NSKeyValueObservingOptionOld
                     context:self.child1.someContext];

}

-(void)viewDidAppear:(BOOL)animated {
    [self.child1 setValue:@20 forKey:@"age"];
    [self.child1 setValue:@"Huu Duong" forKey:@"name"];
}

-(void)observeValueForKeyPath:(NSString *)keyPath
                     ofObject:(id)object
                       change:(NSDictionary *)change
                      context:(void *)context{

    if (object == self.child1) {
        if ([keyPath isEqualToString:@"age"]) {
            NSLog(@"The age of the child 1 was changed.");
            NSLog(@"%@", change);
        }
        else if ([keyPath isEqualToString:@"name"]) {
            if ([keyPath isEqualToString:@"name"]) {
                NSLog(@"The name of the child 1 was changed.");
                NSLog(@"%@", change);
            }
        }
    }
}
Bây giờ chúng ta sẽ implement automaticallyNotifiesObserverForKey: ở child object.
+(BOOL)automaticallyNotifiesObserversForKey:(NSString *)key{
    if ([key isEqualToString:@"name"]) {
        return NO;
    }
    else{
        return [super automaticallyNotifiesObserversForKey:key];
    }
}
Với code trên các thay đổi của property name sẽ được giữ lại, các thay đổi của property age vẫn nhận được như bình thường. Nhưng như vậy chúng ta sẽ ko nhận được notification một cách tự đông nữa, giờ phải động tay để quyết định khi nào thì cần gởi notification thủ công.
Chúng ta cần sử dụng 1 cặp khai báo willChangeValueForKey:, didChangeValueForKey:. Nếu bạn đã làm việc với update TableViewController thì có thể bạn còn nhớ [table tableViewWillUpdate ] và [table tableViewDidUpdate ]
Quay lại đoạn code thay đổi name của child object, ta thêm vào như sau:
    [self.child1 willChangeValueForKey:@"name"];
    self.child1.name = @"Michael";
    [self.child1 didChangeValueForKey:@"name"];
Khi chạy app bạn sẽ lại thấy notification chúng ta nhận được.
2016-11-24 21:45:22.995 KVOTest[804:23242] {
    kind = 1;
    new = 20;
    old = 30;
}
2016-11-24 21:45:22.996 KVOTest[804:23242] The name of the child 1 was changed.
2016-11-24 21:45:22.997 KVOTest[804:23242] {
    kind = 1;
    new = Michael;
    old = "Huu Duong";
}
Như vậy message property update chỉ được gởi đi khi didChangeValueForKey: được gọi.
Chúng ta có thể viết willChangeValueForKey:, didChangeValueForKey:
vào trong accessors của class Children để quản lý việc gởi đi các message.
Working With Arrays
Array không theo chuẩn Key-value codingcoding, vậy để observe được sự thay đổi khi insert, delete objects của array yêu cầu phải implement một số method để array thoả mãn KVC. Chúng ta thêm 1 array vào class Children.
@interface Children : NSObject
...
@property (nonatomic, strong) NSMutableArray *siblings;
...
@end
Update lại hàm dựng của children một chút
- (instancetype)init {
    self = [super init];
    if (self) {
        self.name = @"";
        self.age = 0;
        self.someContext = &_someContext;
        self.siblings = [[NSMutableArray alloc] init];
    }
    return self;
}
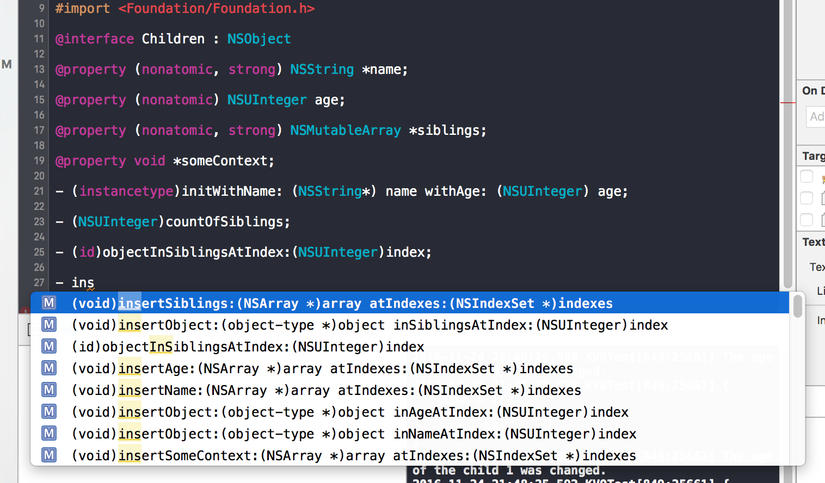
Quay trở lại file Children.h chúng ta cần khai báo các method cần thiết để array siblings thoả mãn siblings. Các method cần implement:
- countOfMyArray
- objectInMyArrayAtIndex:
- insertObject:inMyArrayAtIndex:
- removeObjectFromMyArrayAtIndex:
Xcode hỗ trợ sẵn code complete chỗ này nên bạn yên tâm mà gõ.

Tiếp theo chúng ta sẽ implement các method này ở children.m
-(NSUInteger)countOfSiblings{
    return self.siblings.count;
}

-(id)objectInSiblingsAtIndex:(NSUInteger)index{
    return [self.siblings objectAtIndex:index];
}

-(void)insertObject:(NSString *)object inSiblingsAtIndex:(NSUInteger)index{
    [self.siblings insertObject:object atIndex:index];
}

-(void)removeObjectFromSiblingsAtIndex:(NSUInteger)index{
    [self.siblings removeObjectAtIndex:index];
}
Xong phần chuẩn bị, bây giờ thì array của chúng ta đã đạt chuẩn KVC và giờ chỉ cần đăng ký observe nó nữa thôi. Vào file viewController.m để thêm phần observe arrayarray
[self.child1 addObserver:self
                  forKeyPath:@"siblings"
                     options:NSKeyValueObservingOptionNew | NSKeyValueObservingOptionOld
                     context:self.child1.someContext];

                     -(void)observeValueForKeyPath:(NSString *)keyPath
                     ofObject:(id)object
                       change:(NSDictionary *)change
                      context:(void *)context{

    if (object == self.child1) {

            if ([keyPath isEqualToString:@"siblings"]) {
                NSLog(@"%@", change);
            }

    }
}
Thay đổi array siblings của chúng ta.
-(void)viewDidAppear:(BOOL)animated {

    [self.child1 insertObject:@"Nguyen A" inSiblingsAtIndex:0];
    [self.child1 insertObject:@"Nguyen B" inSiblingsAtIndex:1];
    [self.child1 insertObject:@"Nguyen C" inSiblingsAtIndex:2];
    [self.child1 removeObjectFromSiblingsAtIndex:1];
}
Kết quả thu được:
2016-11-24 22:34:10.372 KVOTest[1201:45277] {
    indexes = "<_NSCachedIndexSet: 0x7fca9f41c0a0>[number of indexes: 1 (in 1 ranges), indexes: (0)]";
    kind = 2;
    new =     (
        "Nguyen A"
    );
}
2016-11-24 22:34:10.372 KVOTest[1201:45277] {
    indexes = "<_NSCachedIndexSet: 0x7fca9f436240>[number of indexes: 1 (in 1 ranges), indexes: (1)]";
    kind = 2;
    new =     (
        "Nguyen B"
    );
}
2016-11-24 22:34:10.373 KVOTest[1201:45277] {
    indexes = "<_NSCachedIndexSet: 0x7fca9f435390>[number of indexes: 1 (in 1 ranges), indexes: (2)]";
    kind = 2;
    new =     (
        "Nguyen C"
    );
}
2016-11-24 22:34:10.424 KVOTest[1201:45277] {
    indexes = "<_NSCachedIndexSet: 0x7fca9f436240>[number of indexes: 1 (in 1 ranges), indexes: (1)]";
    kind = 3;
    old =     (
        "Nguyen B"
    );
}
Tổng kết
Chúng ta đã đi qua khá nhiều thứ qua 2 bài KVC-KVO này. KVC và KVO đều là các kỹ thuật giúp chúng ta giải quyết các vấn đề mà delegate, notification hay các cách khác không xử lý được. Việc implement cũng không quá khó khăn, phần lớn các việc khó đã do iOS đảm nhiệm cho chúng ta. Hy vọng 2 bài viết trên sẽ giúp ích cho các bạn trong công việc. Các bạn có thể xem source code phần demo tại đây
All rights reserved