Kết nối AngularJS đến backend sử dụng REST và JSON
Bài đăng này đã không được cập nhật trong 4 năm
Trong bài viết này sẽ hướng dẫn bạn tạo một ứng dụng đơn giản sử dụng AngularJS kết nối đến backend sử dụng RESTFull
**Những gì bạn cần làm **
Bạn sẽ xây dựng một ứng dụng bằng Angular để truy cập đến backend sử dụng RESTFull, backend phải sử dụng RESTFull với CORS.
Người dùng sẽ truy vập vào ứng dụng bằng cách mở file index.html trên trình duyệt. Khi đó ứng dụng sẽ gửi request đến backend
http://api.openweathermap.org/data/2.5/weather?q=Hanoi,vn&units=metric
Khi đó sẽ nhận được kết quả trả về là 1 chuỗi JSON
{"coord":{"lon":105.86,"lat":21.03},"sys":{"message":0.1259,"country":"Vietnam","sunrise":1432246584,"sunset":1432294204},"weather":[{"id":500,"main":"Rain","description":"light rain","icon":"10d"}],"base":"stations","main":{"temp":26.839,"temp_min":26.839,"temp_max":26.839,"pressure":1007.27,"sea_level":1017.45,"grnd_level":1007.27,"humidity":97},"wind":{"speed":1.89,"deg":332.001},"clouds":{"all":92},"rain":{"3h":0.105},"dt":1432260676,"id":1561096,"name":"Hanoi","cod":200}
Angular JS sẽ tạo hiển thị main và wind lên màn hình.
**Những gì bạn cần **
- Khoảng 15 phút
- Một trình soạn thảo văn bản mà bạn hay sử dụng
- Một trình duyệt web hiện đại
- Một kết nối internet
Tạo một AngularJS Controller
Đầu tiên tạo 1 AngularJS Controller truy cập đến RESTFull
js/weather.js
'use strict';

var weatherApp = angular.module('weatherApp', []);
weatherApp.controller('WeatherCtrl', function ($scope, $http) {
$http.get("http://api.openweathermap.org/data/2.5/weather?q=Hanoi,vn&units=metric")
            .success(function (data) {
                if (data) {

                    $scope.current = data.main.temp;
                    $scope.temp_min = data.main.temp_min;
                    $scope.temp_max = data.main.temp_max;
                    $scope.wind_speed = data.wind.speed;
                    $scope.clouds = data.clouds ? data.clouds.all : undefined;

                    //Lay anh thoi tiet
                    var baseUrl = 'https://ssl.gstatic.com/onebox/weather/128/';
                    if ($scope.clouds < 20) {
                        $scope.img_url = baseUrl + 'sunny.png';
                    } else if ($scope.clouds < 90) {
                        $scope.img_url = baseUrl + 'partly_cloudy.png';
                    } else {
                        $scope.img_url = baseUrl + 'cloudy.png';
                    }
                }
            })
            .error(function (data, status) {
                console.log(data);
            });

});
Ở trong controller đang sử dụng 2 component của AngularJS là $scope và $http
- $scope: là 1 object có nhiệm vụ trao đổi dữ liệu giữa controller và view ứng dụng
- $http: là 1 service cho phép chúng ta giao tiếp với backend và thực hiện các HTTP Request, các request được gọi thông qua đều có 2 phương thức callback sẽ được gọi lại là success() và error()
Nếu thành công nó sẽ gán dữ liệu từ JSON vào biến $scope để chuyển sang view, view sẽ thực hiện bind dữ liệu vào DOM và thực hiện việc hiển thị cho người dùng
Tạo một Application Page
Tạo một file html để thực hiện load Angular Controller lên trình duyệt web của người dùng
index.html
<!doctype html>
<html ng-app="weatherApp">
    <head>
        <title>Weather Example AngularJS</title>
        <script src="https://ajax.googleapis.com/ajax/libs/angularjs/1.3.14/angular.min.js"></script>
        <script src="js/weather.js"></script>
    </head>

    <body>
        <div ng-controller="WeatherCtrl">
            <h2>Hanoi, Vietnam</h2>
            <div style="float:left"><img ng-src="{{img_url}}"></div>
            <h3>Current: {{ current | number: 1}} °C</h3>
            min: {{ temp_min | number: 1}} °C, max: {{ temp_max| number: 1}} °C.
            <h3>Wind: {{wind_speed}} km/h</h3>
        </div>
    </body>
</html>
Thẻ script đầu tiên là thư viện minified AngularJS, bạn có thể tải về và đặt nó ở trong project của bạn
Thư việc AngularJS cho phép nhiều tuỳ chỉnh các thuộc tính để có thể sử dụng với các thẻ HTML chuẩn trong index.html, có 2 thuộc tính
- ng-app: thuộc tính này thông báo rằng trang này là 1 ứng dụng AngularJS
- ng-controller: thuộc tính này thiết lập vùng làm việc của controller
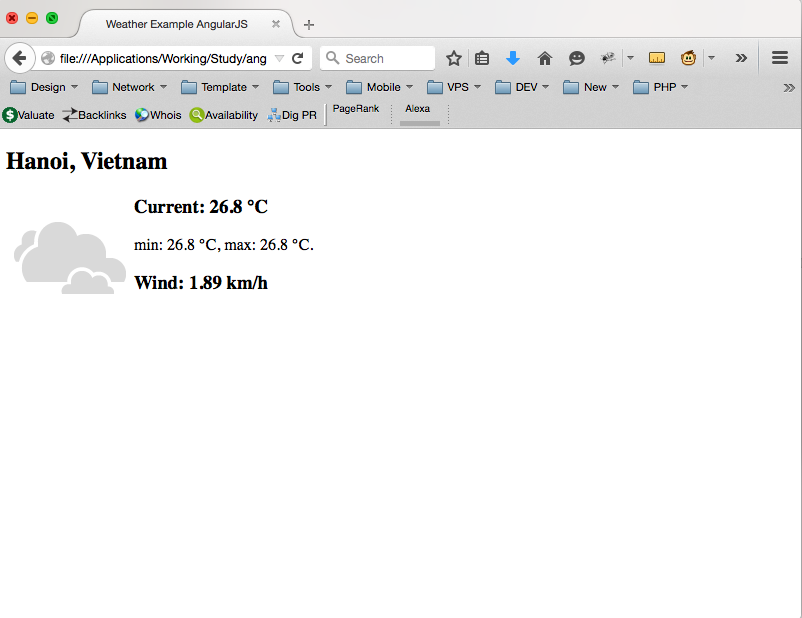
Khi mở application:

Dữ liệu JSON đọc từ backend đã được hiển thị trên màn hình.
Để thuận tiện cho việc build một khung chương trình angular Js bạn có thể sử dụng công cụ yoeman
https://github.com/yeoman/generator-angular
để tạo ứng dụng angularJS nhanh chóng và dễ dàng
Bạn có thể dùng server để chạy angular: tomcat, grunt, nginx ...
**Tổng kết **
Chúc mừng, bạn vừa tạo được 1 ứng dụng AngularJS kết nối tới backend, code được để ở đây: https://github.com/ngocitbk/angularjs_05_15
Reference
All rights reserved