Kết hợp Stacks, Tabs và Drawers của React Navigation 4.x trong React Native
Bài đăng này đã không được cập nhật trong 6 năm
Bonjour! Cùng đi tiếp với series về React Native, hôm nay chúng ta sẽ build 1 app kết hợp các loại navigator bao gồm: Stacks, Tabs và Drawers. App không có tính năng gì đặc biệt chủ yếu để các bạn hiểu cách sử dụng các loại navigator này với nhau thôi, nào let's go!
Goal - Mục tiêu
Mục tiêu là hoàn thành 1 app như video dưới:
Để tìm hiểu thêm về React Navigation các bạn tham khảo tại ĐÂY
Thông tin phiên bản
Ở bài hướng dẫn này, mình dùng:
- React Native bản 0.61
- React Navigation bản 4.x
Coding
init - config
Đầu tiên, tạo app React Native, cmd lệnh quen thuộc:
react-native init DemoCompexNavigation
Tiếp theo, cài react-navigation, cmd lệnh:
npm i react-navigation --save
Cài react-navigation-tabs để dùng Bottom Navigator:
npm i react-navigation-tabs --save
Cài react-navigation-stack để dùng Stack Navigator:
npm i react-navigation-stack --save
Cài react-navigation-drawerđể dùng Drawer Navigator:
npm i react-navigation-drawer --save
Cài thêm các package bổ sung:
npm i react-native-gesture-handler react-native-reanimated react-native-vector-icons --save
Sau khi cài xong, check dependencies trong package.json
  "dependencies": {
    "react": "16.9.0",
    "react-native": "0.61.3",
    "react-native-gesture-handler": "^1.5.0",
    "react-native-reanimated": "^1.4.0",
    "react-native-vector-icons": "^6.6.0",
    "react-navigation": "4.0.10",
    "react-navigation-drawer": "^2.3.3",
    "react-navigation-stack": "^1.10.3",
    "react-navigation-tabs": "^2.5.6"
  }
*Note: phiên bản có thể khác nhau tùy thuộc vào thời gian.
Cấu trúc navigation: với app trong bài này, hình dung cấu trúc navigation như sau
- BottomTab
	- Home Screen
	- List Screen
			- Item Screen
			- Drawer
Tạo thư mục components chứa các component Home, List, Item:
- Home.js
import React, { Component } from 'react';
import { View, Text } from 'react-native';

export default class Home extends Component {
  constructor(props) {
    super(props);
    this.state = {
    };
  }

  render() {
    return (
      <View>
        <Text> Home Screen </Text>
      </View>
    );
  }
}
- List.js
import React, { Component } from 'react';
import { View, Text, TouchableOpacity } from 'react-native';

export default class List extends Component {
  constructor(props) {
    super(props);
    this.state = {
    };
  }

  _navigate() {
      //code navigate to Item screen
  }

  render() {
    return (
      <View>
        <Text> List Screen </Text>
        <TouchableOpacity
        onPress={() => {
            this._navigate();
        }}>
            <Text>Navigate to Item screen</Text>
        </TouchableOpacity>
      </View>
    );
  }
}
- Item.js
import React, { Component } from 'react';
import { View, Text } from 'react-native';

export default class Item extends Component {
  constructor(props) {
    super(props);
    this.state = {
    };
  }

  render() {
    return (
      <View>
        <Text> Item Screen with Drawer </Text>
      </View>
    );
  }
}
Và index.js để dễ truy xuất components:
import Home from './Home';
import Item from './Item';
import List from './List';

export {
    Home,
    Item,
    List
}
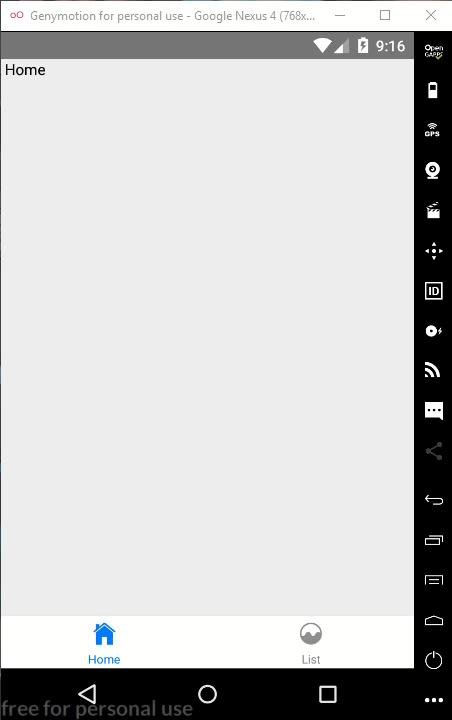
OK, Giờ là phần code navigation, nhìn phần cấu trúc ở trên mình sẽ cho App container là BottomTabNavigator (để bottom tab bao bọc toàn bộ), mở App.js và code như sau:
import React from 'react';
import { createAppContainer } from 'react-navigation';
import { createBottomTabNavigator } from 'react-navigation-tabs';
import { Home, List, Item } from './components';

const IndexNavigator = createBottomTabNavigator({
  'Home': Home,
  'List': List
}, {
  defaultNavigationOptions: ({ navigation }) => ({
    tabBarIcon: ({ focused, horizontal, tintColor }) => {
      const { routeName } = navigation.state;
      let iconName;
      if (routeName === "Home") {
        iconName = `ios-home`;
      } else if (routeName === "List") {
        iconName = `ios-analytics`;
      }
      return <Ionicons name={iconName} size={25} color={tintColor} />;
    }
  })
});

const App = createAppContainer(IndexNavigator);

export default App;
Kết quả run trên máy ảo:
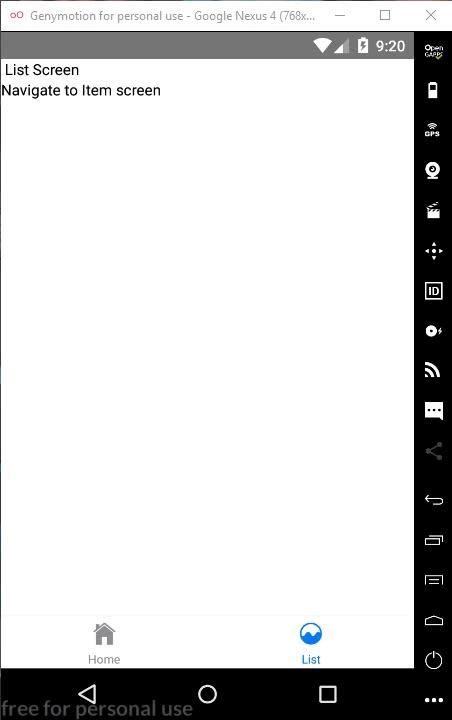
Tiếp theo, ở màn hình List Screen khi ấn vào dòng chữ Navigate to Item screen sẽ chuyển đến màn hình Item Screen và cũng ở màn hình này chúng ta có Drawer.
Trong hàm _navigate ở List.js, thêm đoạn code navigate đến Item Screen:
  _navigate() {
      //code navigate to Item screen
      // Dùng props navigation
      this.props.navigation.navigate('Item');
  }
Chỉ với hàm trên thì vẫn chưa navigate được vì nó không hiểu Item là thằng nào, vậy nên chúng ta phải dùng StackNavigator để liên kết 2 đứa nó (List và Item). Trong App.js chỉnh sửa:
import React from 'react';
import { createAppContainer } from 'react-navigation';
import { createBottomTabNavigator } from 'react-navigation-tabs';
import { createStackNavigator } from 'react-navigation-stack';
import { Home, List, Item } from './components';

const ListItemStack = createStackNavigator({
  'List': List,
  'Item': Item
});

const IndexNavigator = createBottomTabNavigator({
  'Home': Home,
  'List': ListItemStack
}, {
  defaultNavigationOptions: ({ navigation }) => ({
    tabBarIcon: ({ focused, horizontal, tintColor }) => {
      const { routeName } = navigation.state;
      let iconName;
      if (routeName === "Home") {
        iconName = `ios-home`;
      } else if (routeName === "List") {
        iconName = `ios-analytics`;
      }
      return <Ionicons name={iconName} size={25} color={tintColor} />;
    }
  })
});

const App = createAppContainer(IndexNavigator);

export default App;
Giờ chúng ta đã navigate đến Item Screen được như thế này:
Phần còn lại là Drawer, tạo liên kết giữa Item và Drawer bằng cách chỉnh sửa App.js như sau:
import React from 'react';
import { View, Text } from 'react-native';
import Ionicons from 'react-native-vector-icons/Ionicons'
import { createAppContainer } from 'react-navigation';
import { createBottomTabNavigator } from 'react-navigation-tabs';
import { createStackNavigator } from 'react-navigation-stack';
import { createDrawerNavigator } from 'react-navigation-drawer';
import { Home, List, Item } from './components';

const TestDrawerItem = (props) => (
  <View>
    <Text>
      Đây là component được hiển thị liên kết dưới dạng link trong Drawer
    </Text>
  </View>
);

const ItemDrawer = createDrawerNavigator({
  'Item': Item,
  'Link đến TestDrawerItem function component': TestDrawerItem
});

const ListItemStack = createStackNavigator({
  'List': List,
  'Item': ItemDrawer
});

const IndexNavigator = createBottomTabNavigator({
  'Home': Home,
  'List': ListItemStack
}, {
  defaultNavigationOptions: ({ navigation }) => ({
    tabBarIcon: ({ focused, horizontal, tintColor }) => {
      const { routeName } = navigation.state;
      let iconName;
      if (routeName === "Home") {
        iconName = `ios-home`;
      } else if (routeName === "List") {
        iconName = `ios-analytics`;
      }
      return <Ionicons name={iconName} size={25} color={tintColor} />;
    }
  })
});

const App = createAppContainer(IndexNavigator);

export default App;
Bạn cứ run xem có lỗi gì không chứ chưa có gì xuất hiện đâu  , tiếp theo là cách để hiện Drawer ra. Mình sẽ tạo button để mở Drawer(thường thì sẽ là hamburger menu trên header nhưng do mình lười nên chỉ cho đơn giản là button thôi), trong
 Item.js thêm:
import React, { Component } from 'react';
import { View, Text, Button } from 'react-native';

export default class Item extends Component {
  constructor(props) {
    super(props);
    this.state = {
    };
  }

  render() {
    return (
      <View>
        <Text> Item Screen with Drawer </Text>
        <Button
        title='Open Drawer'
        onPress={() => {
            this.props.navigation.openDrawer();
        }}/>
      </View>
    );
  }
}
Và giờ run lên hồi hộp xem kết quả nào
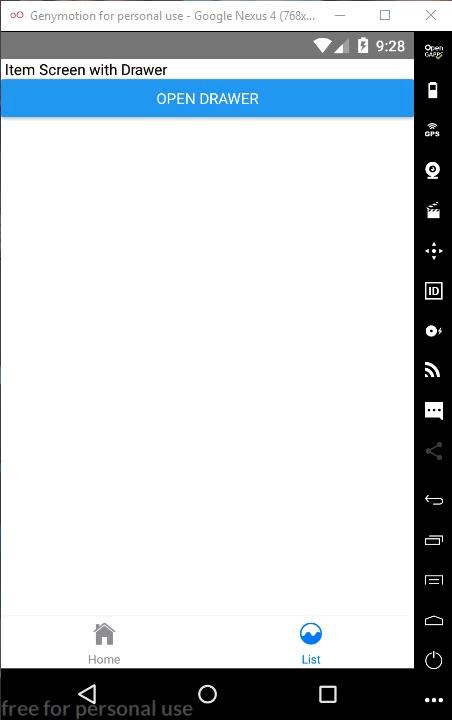
Trừ phần thẩm mĩ ra thì nó hoạt động đúng theo chúng ta mong muốn nhưng vẫn có gì đó chưa tiện lắm, để tắt Drawer đi thì hiện giờ chúng ta phải ấn nút Back của Android - Tại sao ấn ra ngoài vùng màn hình của Drawer nó lại không tắt? và 1 vấn đề nữa là bạn không thể vuốt màn hình từ bên trái sang để mở Drawer đúng không? Đừng lo mình sẽ chỉ cách fix luôn 2 lỗi này 
Các bạn làm theo từng bước nhé:
Bước 1: run cmd lệnh:
react-native link
Bước 2: vào MainActivity.java và thêm:
...
import com.facebook.react.ReactActivityDelegate; //<- Dòng này
import com.facebook.react.ReactRootView;//<- Dòng này
import com.swmansion.gesturehandler.react.RNGestureHandlerEnabledRootView;//<- Dòng này

public class MainActivity extends ReactActivity {
	...
    @Override
    protected ReactActivityDelegate createReactActivityDelegate() {
        return new ReactActivityDelegate(this, getMainComponentName()) {
            @Override
            protected ReactRootView createRootView() {
                return new RNGestureHandlerEnabledRootView(MainActivity.this);
      }
   };
  } //<- Hàm này
}
Save rồi run lại xem OK chưa nhé Vậy là hoàn thành bài hướng dẫn này rồi, chúc mừng các bạn đã tạo được Complex Navigation trong React Native.
Nếu có thắc mắc về bài viết, bình luận ngay bên dưới cho mình biết nhé
Theo dõi các bài viết hay khác tại: https://tuitucode.me
All rights reserved
