Kết hợp masonry layout và virtualized trong ReactJS
Bài đăng này đã không được cập nhật trong 5 năm
Giới thiệu
- Layout masonry là 1 bố cục dạng lưới dựa trên các cột, không giống như grid, nó không có chiều cao cố định. Tựu chung lại, masonry layout sẽ tối ưu hoá không gian sử dụng trong 1 trang web bằng cách giảm thiểu tất các khoảng trống giữa các element. Một ví dụ đơn giản và trực quan nhất là https://www.pinterest.com/ khoảng trống giữa các ảnh chỉ là phần phân chia giữa các ảnh mà thôi, không có không gian thừa
- virtualized là gì thì trong series bài viết của mình thì có khá nhiều bài viết liên quan, bạn có thể check lại nhé.
- Đã lâu lắm rồi, sau khi vào trang pinterest mình đã mong muốn có thể tạo được 1 layout như vậy, nếu bạn để ý, thì pinterest vừa sử dụng dạng layout masonry này, vừa sử dụng phương pháp virtualized, vừa sửa dụng phương pháp load more, cũng như những thuật toán tối ưu ảnh để tăng tốc độ load. Nhưng hôm nay mình chỉ tập trung vào 2 cái đầu là layout masonry và kết hợp nó với virtualized. Vì vậy ngày hôm nay mình sẽ sử dụng 1 thư viện gọi là masonic để hỗ trợ làm việc này tốt hơn.
Ví dụ
Để cho nhanh chóng, lần này ta lại sử dụng create-react-app để thao tác nhé:
create-react-app masonry_layout
Mình install thư viện masonic luôn nhé: npm i masonic
Ở trong file App.js mình tạo 1 danh sách các ảnh với 5000 ảnh:
const items = Array.from(Array(5000), () => {
    const randomPhoto = Math.floor(Math.random() * 5000) + 1
    const randomHeight = Math.floor(Math.random() * 5) + 2
    const randomWidth = Math.floor(Math.random() * 5) + 2
    const imgUrl = `https://picsum.photos/${randomWidth}00/${randomHeight}00?random=${randomPhoto}`

    return {
      id: i++,
      name: `Img-title-${i}`,
      src: imgUrl
    }
  })
Tiếp đó là component Masonry:
<Masonry
          items={items}
          // Adds 8px of space between the grid cells
          columnGutter={8}
          // Sets the minimum column width to 172px
          columnWidth={300}
          // Pre-renders 5 windows worth of content
          overscanBy={5}
          // This is the grid item component
          render={ImageCard}
        />
Đây là file App.js đầy đủ:
import React from "react";
import { Masonry } from "masonic";
import ImageCard from './ImageCard'
import './App.css'

let i = 0


const App = () => {
  const items = Array.from(Array(5000), () => {
    const randomPhoto = Math.floor(Math.random() * 5000) + 1
    const randomHeight = Math.floor(Math.random() * 5) + 2
    const randomWidth = Math.floor(Math.random() * 5) + 2
    const imgUrl = `https://picsum.photos/${randomWidth}00/${randomHeight}00?random=${randomPhoto}`

    return {
      id: i++,
      name: `Img-title-${i}`,
      src: imgUrl
    }
  })

  return (
    <main className={'container'}>
      <div className={'masonic'}>
        <Masonry
          items={items}
          columnGutter={8} // Set khoảng cách giữa các column
          columnWidth={300} // Set chiều rộng tối thiểu là 300px
          overscanBy={5} // Giá trị để render trước khi scroll tới
          render={ImageCard} // Grid item của component
        />
      </div>
    </main>
  );
};

export default App;
Sau nữa là components ImageCard dùng để render mỗi cell của layout masonry: file ImageCard.js
import React from 'react'

const ImageCard = ({ data: { id, name, src } }) => (
  <div className={'card'}>
    <img className={'img'} alt="kitty" src={src} />
    <span children={name} />
  </div>
);

export default ImageCard
Cuối cùng, mình có thêm 1 số css để layout dễ nhìn hơn ở file App.css:
.masonic {
  padding: 8px;
  width: 100%;
  max-width: 960px;
  margin: 163px auto 0;
  box-sizing: border-box;
}
.container {
  min-height: 100vh;
  width: 100%;
}
.card {
  display: flex;
  flex-direction: column;
  border-radius: 6px;
  justify-content: center;
  align-items: center;
  transition: transform 100ms ease-in-out;
  width: 100%;
  min-height: 100px;
  overflow: hidden;
}

.img {
  width: 100%;
  display: block;
  border-top-left-radius: 6px;
  border-top-right-radius: 6px;
  display: block;
}
Và đây là kết quả:
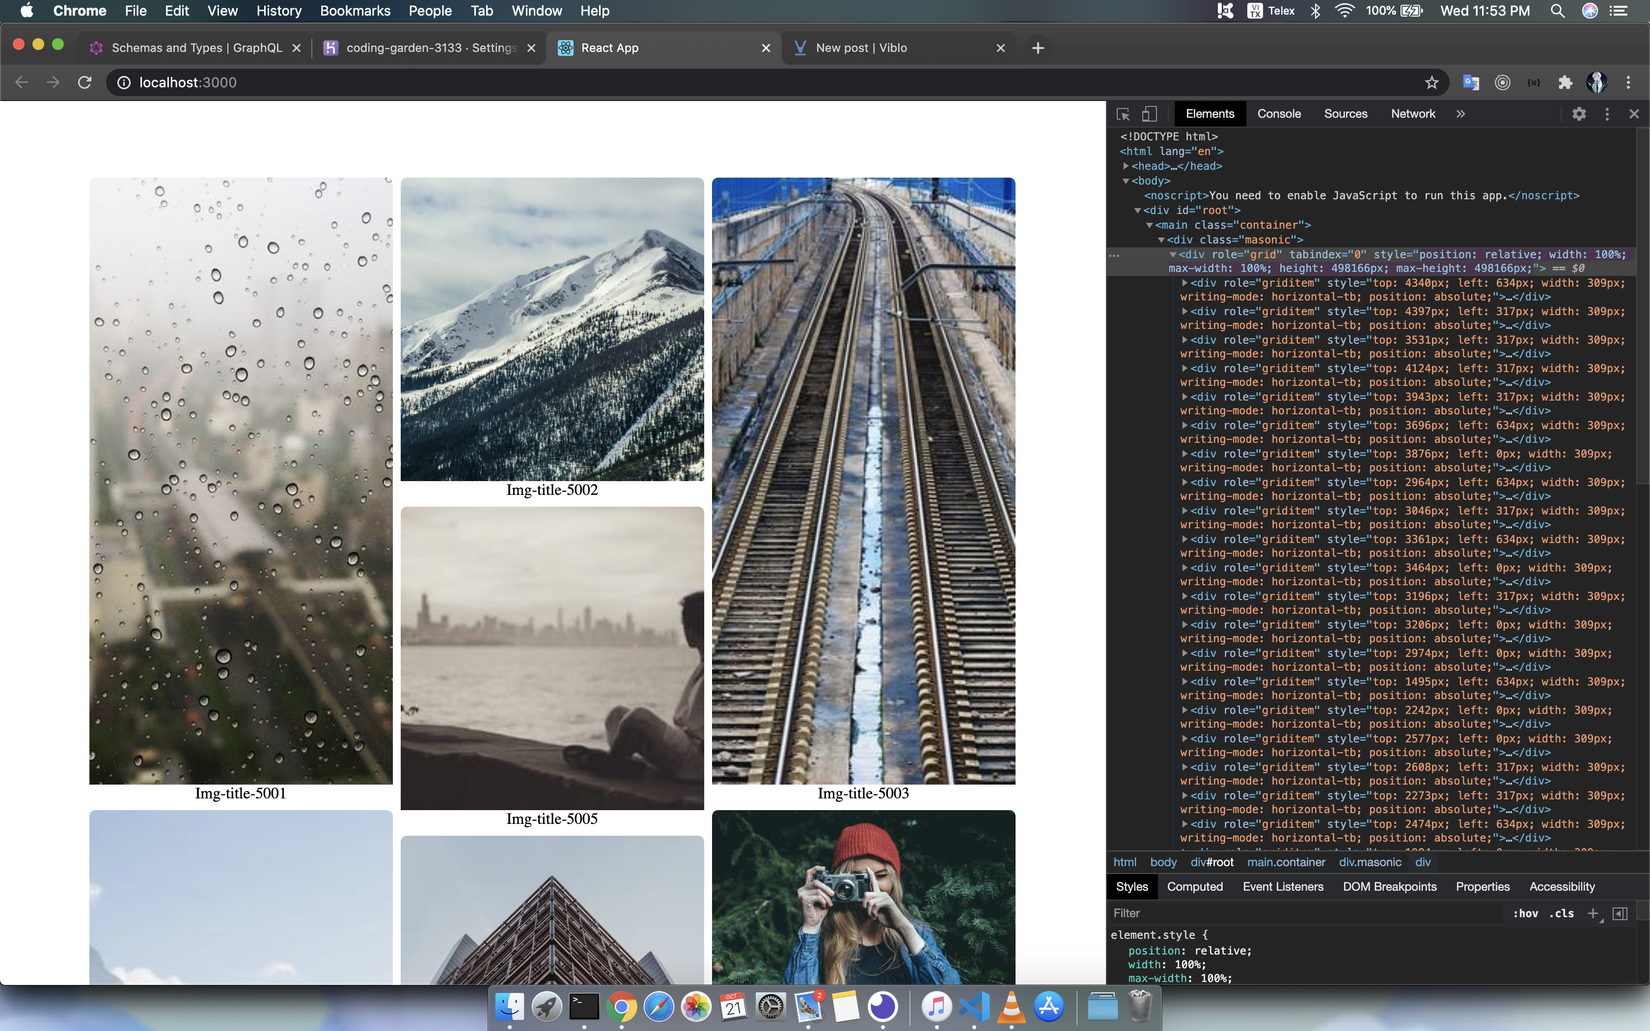
Nếu bạn inspect element lên thì bạn đã có layout masonry cùng với phương pháp virtualized rồi nhé 
Kết luận
Vậy là mình đã tạo cho mình 1 UI layout giống pinterest rồi, bạn hãy thử xem sao nhé, chúc các bạn thành công (yaoming)
All rights reserved
