Kết hợp Ajax, AngularJS và PHP để tạo Form
Bài đăng này đã không được cập nhật trong 4 năm
I. Giới thiệu
- Chào các bạn, bài trước mình có giới thiệu đến các bạn những khái niệm cơ bản về
AngularJS, một trong những sản phẩm tuyệt với của Google phát triển dựa trên nền tảngJavaScriptđể trình diễn những sáng tạo trên web 2.0. - Hôm nay mình lại có 1 bài viết niên quan đến
AngularJS, nhưng hôm nay nó sẽ được kết hợp vớiAjaxvàPhpđể thực hiện 1 tác vụ đơn giản, nhưng nó rất hay. - Còn chờ đợi gì nữa chúng ta bắt đầu tìm hiểu thôi, mời các bạn bước sang mục II để cùng tìm hiểu với tôi nhé (hoho)
- View source demo: Source demo
II. Tạo form kết hợp Ajax, AngularJS và PHP
1. Form mẫu của chúng ta
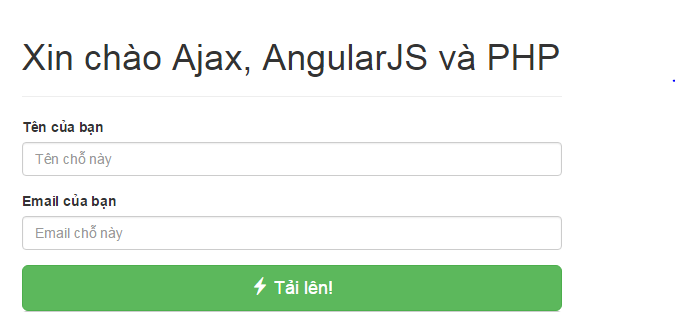
- Ở trên chúng ta tạo ra 1 form submit lên gồm 2 trường cần nhập dữ liệu vào là
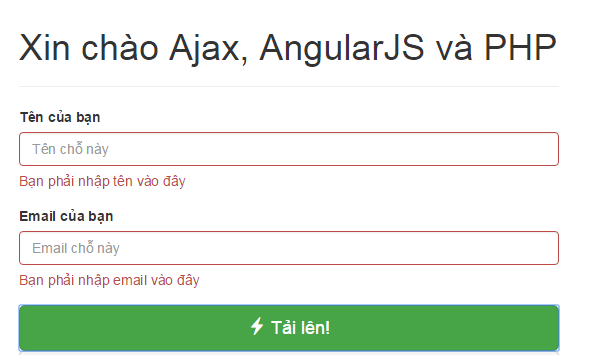
TênvàEmail, khi người dùng không nhập 1 trường đó mà thực hiện Submit thì lỗi được thông báo ra trên màn hình yêu cầu người nhập nội dung vào. - Và màn hình lỗi sẽ hiện ra thông báo sau
- Ở trên là 2 tác vụ chính của form mà chúng ta sẽ bàn tới bài viết này.
2. Cấu trúc file
- Chúng ta tạo 2 file sau:
- index.html
- submit.php
- file
index.htmllà file phía bên client, còn filesubmit.phplà file xử lý tác vụ bên phía server.
3. Các tác vụ xử lý form
3.1. Logic xử lý phía server
- Chúng ta thiết lập file
phpxử lý logic chính của chương trình, xử lý này được gửi dữ liệu lên qua phương thứcPOST.
<?php
// submit.php
$errors         = array();
$data 			= array();
	if (empty($_POST['name']))
		$errors['name'] = 'Bạn phải nhập tên vào đây';

	if (empty($_POST['email']))
		$errors['email'] = 'Bạn phải nhập email vào đây';
	if ( ! empty($errors)) {
		$data['success'] = false;
		$data['errors']  = $errors;
	} else {
		$data['success'] = true;
		$data['message'] = 'Success!';
	}
	echo json_encode($data);
- Đoạn code trên chúng ta kiểm tra dữ liệu có tồn tại không, nếu không tồn tại chúng ta không làm bất cứ điều gì. Thống báo nỗi đến người dùng thông qua biến mảng
$errors. - Để dữ liệu trả về dưới dạng
ajaxtôi đã đẩy dữ liệu vào hàmjson_encode, đây là phương thức xử lý củaphpđểjquery ajaxvàAngularJScó thể lấy đc dữ liệu ra.
3.2. Form hiển thị dữ liệu
- Chúng ta sẽ tạo ra file
htmlđể hiển thị dữ liệu ra màn hình.
<!-- index.html -->

<!doctype html>
<html>
<head>
	<title>vo van do</title>
	<meta charset="UTF-8">
	<!-- LOAD BOOTSTRAP CSS -->
	<link rel="stylesheet" href="//netdna.bootstrapcdn.com/bootstrap/3.0.2/css/bootstrap.min.css">
	<!-- LOAD JQUERY -->
	<script src="//ajax.googleapis.com/ajax/libs/jquery/2.0.3/jquery.min.js"></script>
	<!-- LOAD ANGULAR -->
	<script src="//ajax.googleapis.com/ajax/libs/angularjs/1.2.0/angular.min.js"></script>
	<script>
		var formApp = angular.module('formApp', []);
		function formController($scope, $http) {
			$scope.formData = {};
			$scope.processForm = function() {
				$http({
			        method  : 'POST',
			        url     : 'submit.php',
			        data    : $.param($scope.formData),
			        headers : { 'Content-Type': 'application/x-www-form-urlencoded' }
			    })
			        .success(function(data) {
			            console.log(data);

			            if (!data.success) {
			                $scope.errorName = data.errors.name;
			                $scope.errorEmail = data.errors.email;
			            } else {
			                $scope.message = data.message;
                            $scope.errorName = '';
			                $scope.errorEmail = '';
			            }
			        });
			};
		}
	</script>
        <style>
            .ng-valid.ng-dirty{
                border-color: green;
            }
            .ng-invalid.ng-dirty{
                border-color: red;
            }
        </style>
</head>
<body ng-app="formApp" ng-controller="formController">
<div class="container">
<div class="col-md-6 col-md-offset-3">
	<div class="page-header">
		<h1>Xin chào Ajax, AngularJS và PHP</h1>
	</div>
	<div id="messages" class="well" ng-show="message">{{ message }}</div>
	<form ng-submit="processForm()">
		<div id="name-group" class="form-group" ng-class="{ 'has-error' : errorName }">
			<label>Tên của bạn</label>
			<input type="text" name="name" class="form-control" placeholder="Tên chỗ này" ng-model="formData.name">
                        <span class="help-block" ng-show="errorName">{{ errorName }}</span>
		</div>
		<div id="superhero-group" class="form-group" ng-class="{ 'has-error' : errorEmail }">
			<label>Email của bạn</label>
			<input type="text" name="email" class="form-control" placeholder="Email chỗ này" ng-model="formData.email">
			<span class="help-block" ng-show="errorEmail">{{ errorEmail }}</span>
		</div>
		<button type="submit" class="btn btn-success btn-lg btn-block">
			<span class="glyphicon glyphicon-flash"></span> Tải lên!
		</button>
	</form>
	<pre>
		{{ formData }}
	</pre>
</div>
</div>
</body>
</html>
- Khi chạy file
index.htmltrên server ta sẽ được 1 màn hình hiển thị ra như thế này:
- Nếu bạn sử dụng
Jquery và Ajaxbạn sẽ phải viết như sau:
<!-- index.html -->
...
<script>
$(document).ready(function() {
$('form').submit(function(event) {
  $('#name-group').removeClass('has-error');
  $('#name-group .help-block').empty();
  $('#superhero-group').removeClass('has-error');
  $('#superhero-group .help-block').empty();
  $('#messages').removeClass('alert alert-success').empty();
  var formData = {
      'name'     : $('input[name=name]').val(),
      'email'    : $('input[name=email]').val()
  };
  $.ajax({
    type        : 'POST',
    url         : 'submit.php',
    data        : formData,
    dataType    : 'json',
    success     : function(data) {
      console.log(data);
      if ( ! data.success) {
        if (data.errors.name) {
          $('#name-group').addClass('has-error');
          $('#name-group .help-block').html(data.errors.name);
        }
        if (data.errors.email) {
          $('#email-group').addClass('has-error');
          $('#email-group .help-block').html(data.errors.email);
        }
      } else {
        $('#messages').addClass('alert alert-success').append('<p>' + data.message + '</p>');
      }
    }
  });
  event.preventDefault();
});
});
</script>

...
- Như vậy việc xử lý logic của chúng ta sẽ dài hơn và khó kiểm soát hơn
- Với cùng 1 tác vụ xử lý nhưng chúng ta có thể kết hợp
ajaxvàAngularJS:
<!-- index.html -->
...
<script>
		var formApp = angular.module('formApp', []);
		function formController($scope, $http) {
			$scope.formData = {};
			$scope.processForm = function() {
				$http({
			        method  : 'POST',
			        url     : 'submit.php',
			        data    : $.param($scope.formData),
			        headers : { 'Content-Type': 'application/x-www-form-urlencoded' }
			    })
			        .success(function(data) {
			            console.log(data);

			            if (!data.success) {
			                $scope.errorName = data.errors.name;
			                $scope.errorEmail = data.errors.email;
			            } else {
			                $scope.message = data.message;
                            $scope.errorName = '';
			                $scope.errorEmail = '';
			            }
			        });
			};
		}
	</script>
...
- Như vậy code của chúng ta sẽ gắn gọn hơn và dễ kiểm soát hơn.
Từ 2 đoạn mã code trên chúng ta đã thấy được lợi ích của việc kết hợp
ajaxvàAngularJScó lợi như thế nào trong việc xử lý tác vụ.
III. Kết luận
- Việc kết hợp giữa
ajaxvàAngularJSgiúp cho chúng ta có những đoạn mã lệnh ngắn ngọn và hiệu qủa nhất để xử lý các tác vụ yêu cầu. - Ngày nay nhiều nhà phát triển ứng dụng web trên thế giới có xu hướng sử dụng
AngularJSđể phát triển các web site của mình nhiều hơn. - Cộng đồng sử dụng
AngularJScũng ngày 1 đông đảo, chúng ta gặp phải bất cứ vấn đề gì khó khăn đều có câu trả lời trên các diễn đàn trong nước và quốc tế.
Tài liệu tham khảo
- Trang chủ AngularJS: https://angularjs.org/
- http://blog.pluralsight.com/angularjs-step-by-step-controllers
- http://www.w3schools.com/angular/angular_controllers.asp
Mã nguồn demo bạn có thể tham khảo ở đây: Tại đây
All rights reserved
